

StarWind Virtual SAN VAAI (vStorage API for Array Integration) Configuration and Performance Tuning Guide
- February 14, 2018
- 5 min read
INTRODUCTION
This document is intended for experienced StarWind users and VMware administrators, who want to decrease the workload by using vStorage API for Array Integration (VAAI). The guide describes how to check VAAI proper functioning and its productivity.
VAAI is a complex of technologies, designed to offload certain VM disk operations to the storage array. In case VAAI is enabled while working with the disk subsystem, the ESXi host sends the commands to the array to perform the specific operations, without having to process all the data.
The screenshot below shows that some of the mounted disks have the hardware acceleration support. To identify if VAAI is supported, the ESXi host sends VAAI SCSI commands to each datastore.

A full set of up-to-date technical documentation can always be found here.
For any technical inquiries please visit our online community, Frequently Asked Questions page, or use the support form to contact our technical support department.
Enabling VAAI support inside StarWind VSAN
By default, VAAI is turned on in the StarWind configuration file. To turn off the VAAI support, the StarWind configuration file needs to be modified by following the steps described below. NOTE: The StarWind service must be stopped before editing the configuration file.
1. Stop the StarWind service
2. Navigate to the StarWind root directory and locate the StarWind.cfg file.
The default location is “C:\Program Files\StarWind Software\StarWind\StarWind.cfg”.
3. Make the backup of StarWind.cfg file.
4. Open the file via text editor, find the VAAI strings <VaaiExCopyEnabled value=”yes”/>, <VaaiCawEnabled value=”yes”/>, <VaaiWriteSameEnabled value=”yes”/> below the <hardwareacceleration> section and change “yes” to “no”.
5. Save the changes and close the text editor.
6. Restart the host where StarWind VSAN is installed.
Checking the VAAI proper functioning
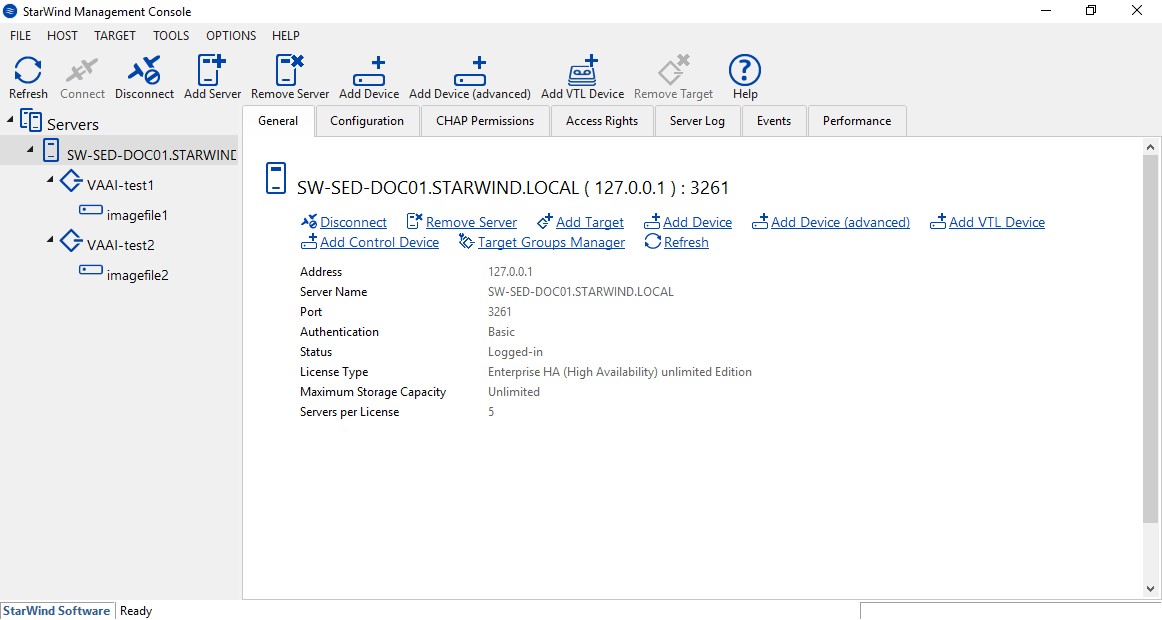
7. Create the device in StarWind Management Console
8. To discover the StarWind device on ESXi host, navigate to Configuration -> Storage Adapters and click on the iSCSI Software Adapter.
9. In Targets -> Dynamic Discovery section, add the ISCSI interface of the StarWind host by clicking on the Add button.
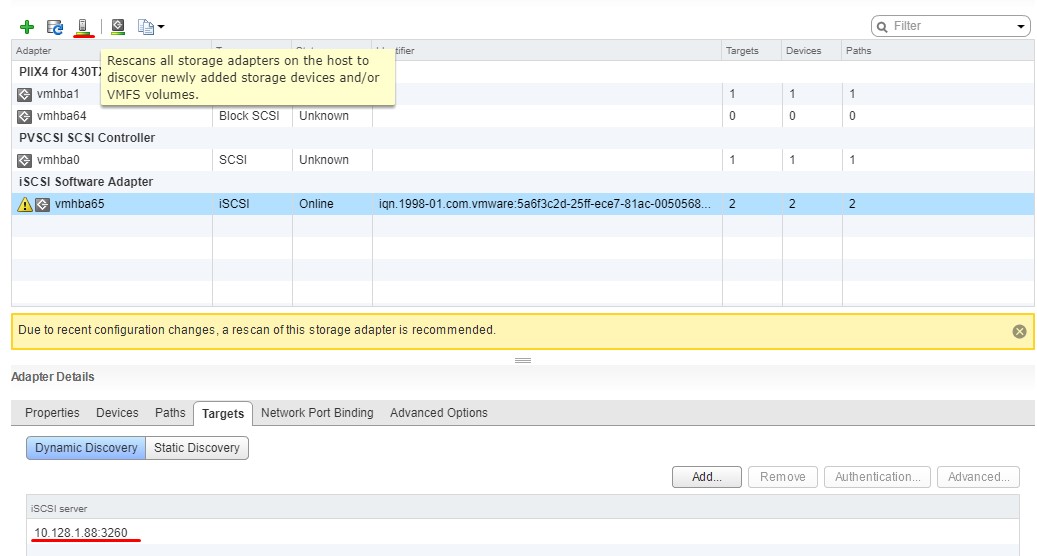
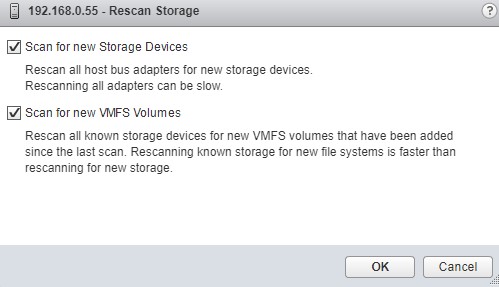
10. Click Rescan All. Once Rescan is done, all the available devices that can be discovered from the StarWind host will appear.
11. Create new Datastores based on the StarWind devices.
To check how VAAI works, enable its support in the StarWind configuration file and then in ESXi.
VAAI can be turned on in ESXi via Web-GUI or through CLI.
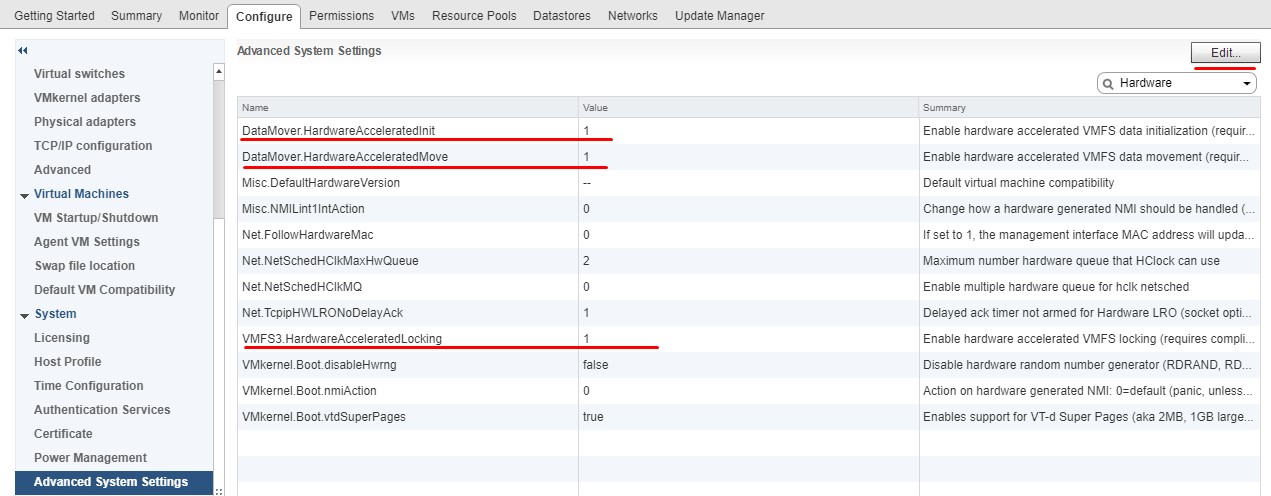
12. To turn on VAAI through Web-GUI, select the ESX-host, navigate to the Configure tab, select Advanced System Settings, and click Edit button.
13. Set HardwareAcceleratedMove and HardwareAcceleratedInit parameters value to
Also, set “VMFS3.HardwareAcceleratedLocking” value to 1.
14. To turn on VAAI through CLI, connect to the ESX server via SSH. The commands below show the current status of the parameters, allowing to check the parameters value additionally.
esxcfg-advcfg -g /DataMover/HardwareAcceleratedMove esxcfg-advcfg -g /DataMover/HardwareAcceleratedInit esxcfg-advcfg -g /VMFS6/HardwareAcceleratedLocking
When VAAI is turned on, the result should look as demonstrated in the screenshot below:

The same commands with -s key will change the value of the parameter.
For example, the command:
esxcfg-advcfg –s 1 /DataMover/HardwareAcceleratedMove is demonstrated in the picture below:

15. In the case below, the virtual machine migrated between two Datastores created on StarWind devices. VAAI has been enabled on the ESXI host and in the StarWind configuration file. The virtual machine migration took around 55 seconds and the workload on the NIC during the migration is shown in the picture below:
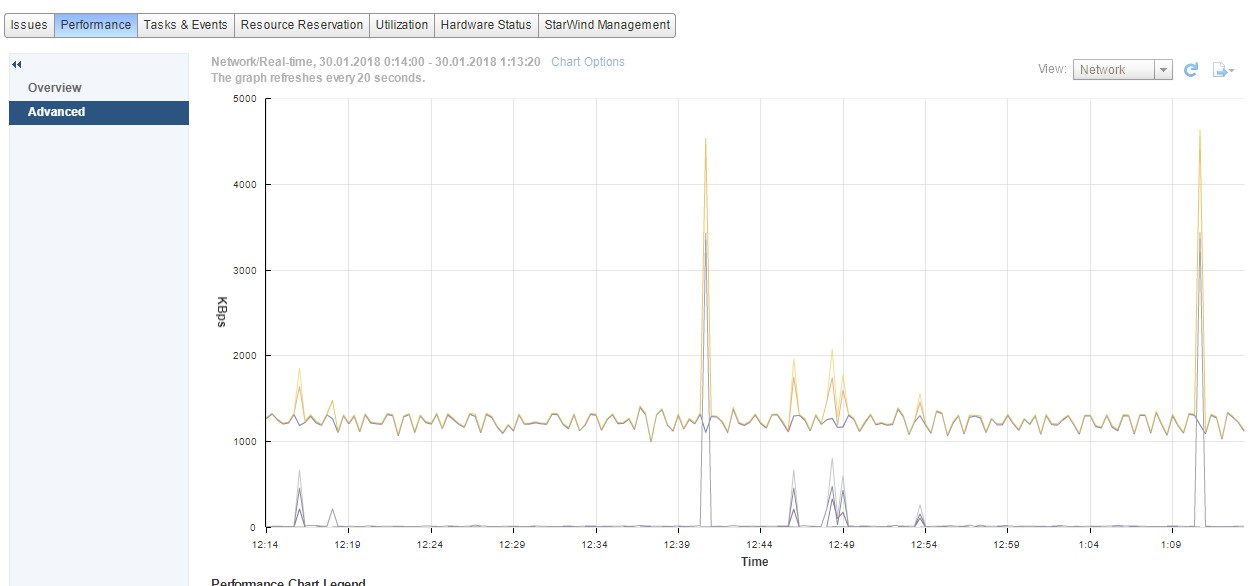
The maximum network usage was approximately 3 MBps.
16. Without VAAI, the virtual machine migration took around 1 minute 15 sec. The maximum network usage was approximately 20 MBps. Contrary to the case above, the network load is higher.

SUMMARY
VAAI support allows StarWind to offload multiple storage operations from the VMware hosts to the storage array itself. Thus, these operations are carried out much faster and with no impact on the system’s performance.
