


Introduction
With the release of Windows Server 2016, there’s a lot of new features that have been added to increase availability and security. One hot feature that will add a lot of benefits for small, medium and enterprise business environments is Storage Replica (SR). Be sure that’s going to help you in your Disaster Recovery Plan and protect your data against catastrophic losses.
A while ago, I wrote a step by step blog posts around Storage Replica based on Windows Server 2016 Technical Preview 4. Please make sure to check them before you continue reading this post.
There are a lot of enhancements and additional features that have been added to Storage Replica since Windows Server 2016 TP4.
In this article, I will cover all the SR features that will be shipped in Windows Server 2016 at GA including how to protect your data with Storage Replica on top of Nano Server.
Storage Replica in Windows Server 2016
The main purpose of SR is to protect your data and allow you to survive for disasters, in other term, it’s referred to Disaster preparedness’. According to Wikipedia, Disaster preparedness refers to measures taken to prepare for and reduce the effects of disasters. That is, to predict and, where possible, prevent disasters, mitigate their impact on vulnerable populations, and respond to and effectively cope with their consequences.
Storage Replica supports Synchronous and Asynchronous replication either in a short distance like between buildings on the same campus or in a long distance like different neighborhood in a city, or longer distance like different county in a state, or even longer distance like different countries.
Storage Replica will help you to set your Recovery Point Objective (RPO) to zero data loss with Synchronous replication, or Asynchronous replication if you can tolerate to lose some amount of data. Storage Replica is a block-based replication technology, and the replication is continuous all the time compared to other replication technology in the market today.
Storage Replica in Windows Server 2016 will support the following four scenarios:
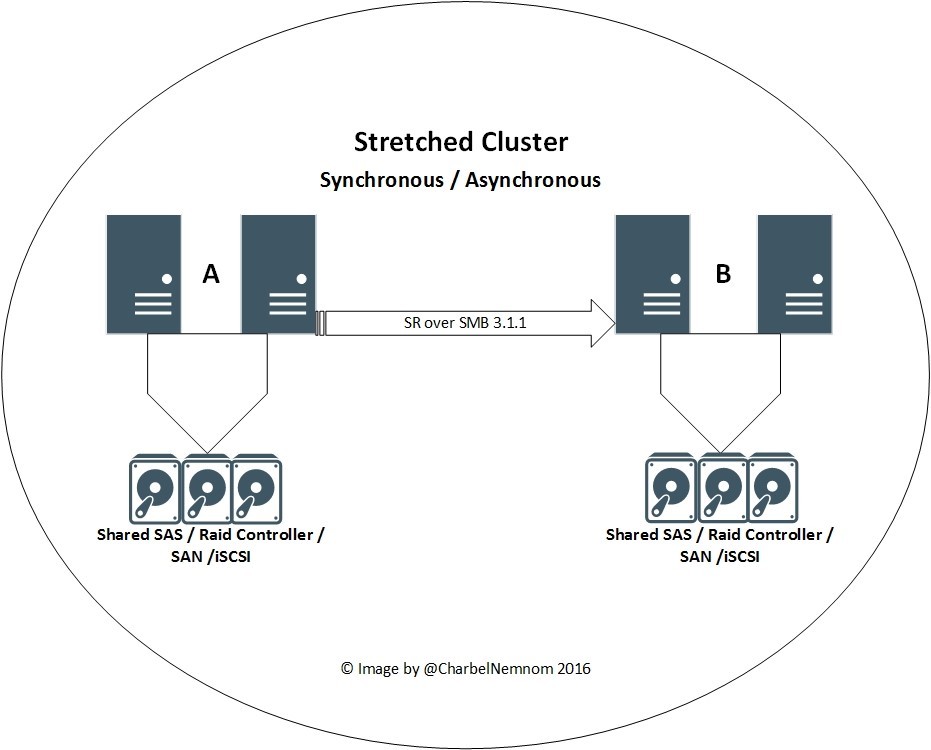
- Storage replication in a stretch cluster. Stretch cluster scenario is a single cluster as showing in the following diagram, the cluster could be stretched across two different geographical locations and using Asymmetric shared storage such as (SAN, iSCSI, Shared SAS with JBODs). As of this writing, stretch cluster with Storage Spaces Direct (S2D) is not supported yet, this is coming in future updates. The Synchronization could be Synchronously and An important point to mention is, even if you choose to replicate Synchronously, the initial synch will be Asynchronous until the replication is completed, thus will avoid performance impact on the primary site. The management of stretch cluster will be with PowerShell, with Failover Cluster Manager or with Azure Site Recovery (ASR). ASR will orchestrate everything for you. As of this writing, ASR is in preview mode, and how much will cost if you want to use ASR? It’s free! Yes, it’s totally free.
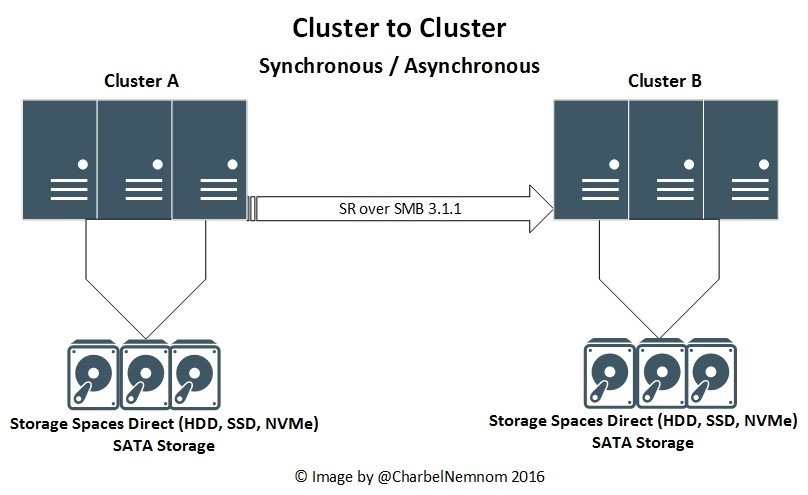
- Cluster-to-cluster storage replication. Cluster-to-cluster scenario is a two separate two nodes clusters as showing in the following diagram, the two clusters could be in two separate geographical locations, and each cluster in each location has its own Symmetric shared storage such as (SAN, iSCSI, Shared SAS with JBODs including Storage Spaces Direct). The Synchronization could be Synchronously and Asynchronously. The management of cluster to cluster will be with PowerShell, Failover Cluster Manager, System Center Virtual Machine Manager or with Azure Site Recovery (ASR). ASR will orchestrate everything for you. As of this writing, ASR is in preview mode, and it’s totally free.
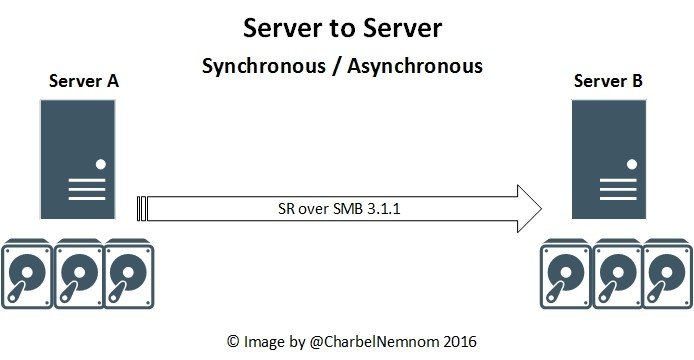
- Server-to-server storage replication. Server-to-server scenario is a two different servers as showing in the following diagram, they don’t need to be clustered, the two server could be in two different geographical locations or in the same location and can use any type of storage such as (Raid controllers, Storage Spaces, etc.). Server-to-server could be physical or virtual machine. The management of server to server will be with PowerShell only.
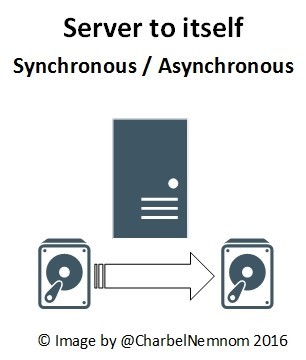
- Server-to-self to replicate between volumes. Server-to-self scenario is to replicate (copy) from one volume to another volume on the same server, they could be two different media type. The primary scenario is, if you have a large amount of data, you can do the initial Synch locally, and then take the drives out and ship them to the other location and continue the replication from there, this is called Seeded Sync. The second scenario is, if you want to seed data to a different volume that you don’t want to replicate, why do you want to do this? because Storage Replica is so much faster than Robocopy. How much faster? For more information, please check the following article written by Ned Pyle (Principal Program Manager for Storage Replica):
https://blogs.technet.microsoft.com/filecab/2015/07/09/storage-replica-versus-robocopy-fight/
The management of server to self will be with PowerShell only.
Note: As of this writing, Cluster to Server is not a supported scenario.
Storage Replica features in Windows Server 2016
In Windows Server 2016, Storage Replica will support the following features:
- RoCE V2, iWARP and InfiniBand RDMA networks are supported.
- Network Constraint (you can control which Networks are used for Replication Traffic even down to the volume).
- Integrated Storage Replica with Storage Spaces Direct Cluster Health service.
- Delegation (delegate access by adding users to the Storage Replica group without being an Administrators on the server).
- Thin provisioning storage is supported.
- Resize of Data Volumes (grow only) that are in a Replication.
- Resize of Log Volumes (grow and shrink) that are in a Replication.
- Change from Synchronous to Asynchronous Replication and vice versa without breaking the storage replication.
Infrastructure Overview
We have the following servers installed in our environment:
- Domain controller, DNS, DHCP.
- Storage Space Direct Nano Cluster A “NANOS2D-SR-A” and Cluster B “NANOS2D-SR-B“, each S2D cluster has the following configuration:
- 4 Nodes
- 4 X SSD = 960GB (Cache)
- 4 X HDD = 2TB (Capacity)
- Storage Net1 = 10.11.0.X/24
- Storage Net2 = 10.11.0.X/24
- StorageReplica Net = 10.13.0.X/24
- Management Net = 172.16.20.X/24
- Cluster and Live Migration using IPv6 network
- 4 Cluster Data Volumes @ 3TB each
- 4 Cluster Log Volumes @ 13GB each
Requirements
There are some requirements we need to be aware of before start using SR:
- You need to have two volumes available on each location, one for data and one for logs.
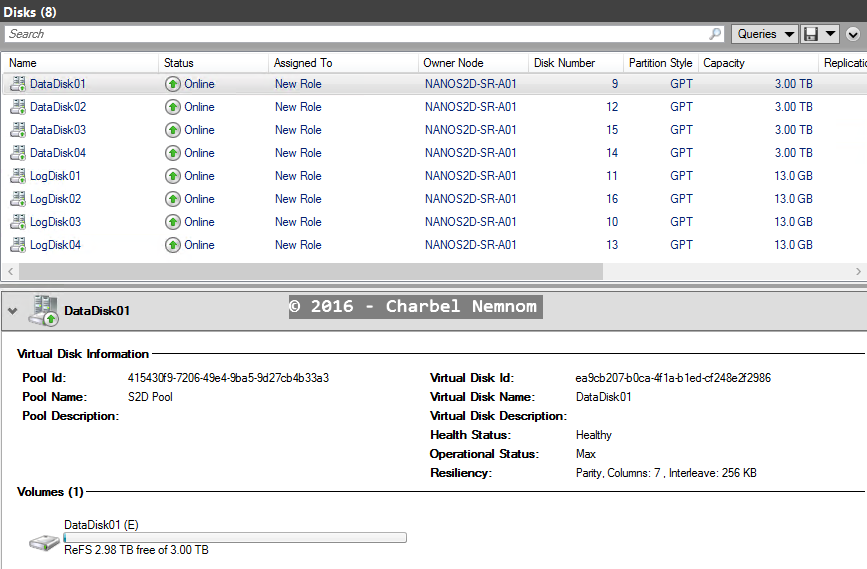
- Log and Data Volumes need to be configured as GPT and be the same (identical) size at the source and destination as shown in the following screenshot.
- The log volume must be at least 8GB. The log volumes should use flash-based storage, such as SSD or NVMe.
- Data volumes should not be higher than 10 TB.
- Windows Server 2016 Datacenter Edition as the source and as the target as well.

In this example, we will demonstrate Cluster-to-cluster storage replication scenario on top of Nano Servers.
Install Storage Replica on Nano Server
Before you start installing Storage Replica on Nano Server, you need to make sure that the Storage package (Microsoft-NanoServer-Storage-Package) is already added to the Nano server image.
To install Storage Replica feature including the management tools, open Windows PowerShell from a management machine and run the following command:
|
1 2 3 4 5 6 7 |
$Nodes = (“NANOS2D-SR-A01”, “NANOS2D-SR-A02”, “NANOS2D-SR-A03”, “NANOS2D-SR-A04”, “NANOS2D-SR-B01”, “NANOS2D-SR-B02”, "NANOS2D-SR-B03”, “NANOS2D-SR-B04”) foreach ($node in $nodes) { Install-windowsfeature -Name Storage-Replica, RSAT-Storage-Replica -ComputerName $node -IncludeManagementTools -Restart } |
In this example, we assume that the management machine is joined to the same domain as Nano Server, otherwise, you want to set Windows Remote Management on the management computer by running the following command:
|
1 |
Set-Item WSMan:\localhost\Client\TrustedHosts "<Nano Server>" |
Test Storage Replica on Nano Server
After we have installed SR feature on Nano server, you can start testing Storage Replica to determine if you meet all the Storage Replica requirements.
In order to do so, you need to do the following on each cluster:

Now that you have mounted all your storage with drive letters, you can evaluate the cluster with Test-SRTopology, and because Test-SRTopology cmdlet with Nano Server requires remote script invocation with CredSSP, thus Test-SRTopology requires to run locally on the source Nano server.
In order to enable CredSSP on Nano server and on the management machine, you need to run the following commands (through a remote PowerShell Session):
|
1 2 3 4 5 6 7 8 9 10 11 12 13 |
# On the Nano Servers $Nodes = (“NANOS2D-SR-A01”, “NANOS2D-SR-A02”, “NANOS2D-SR-A03”, “NANOS2D-SR-A04”, “NANOS2D-SR-B01”, “NANOS2D-SR-B02”, "NANOS2D-SR-B03”, “NANOS2D-SR-B04”) Invoke-Command -ComputerName $Nodes -ScriptBlock { Enable-WSManCredSSP -role server -Force } # On the management machine Enable-WSManCredSSP -role Client -DelegateComputer NANOS2D* -Force |
When CredSSP is set, you can now run Test-SRTopology locally on Nano Server through a remote PowerShell Session by running the following command:
|
1 2 3 4 5 6 7 8 9 |
$Cred = Get-Credential Invoke-Command -ComputerName NANOS2D-SR-A01 -ScriptBlock { MD C:\temp -Force Test-SRTopology -SourceComputerName NANOS2D-SR-A01 -SourceVolumeName E: -SourceLogVolumeName L: -DestinationComputerName NANOS2D-SR-B01 -DestinationVolumeName E: -DestinationLogVolumeName L: -DurationInMinutes 30 -ResultPath C:\temp } -Authentication Credssp -Credential $Cred |
The Storage Replica Test Report will look something like this:
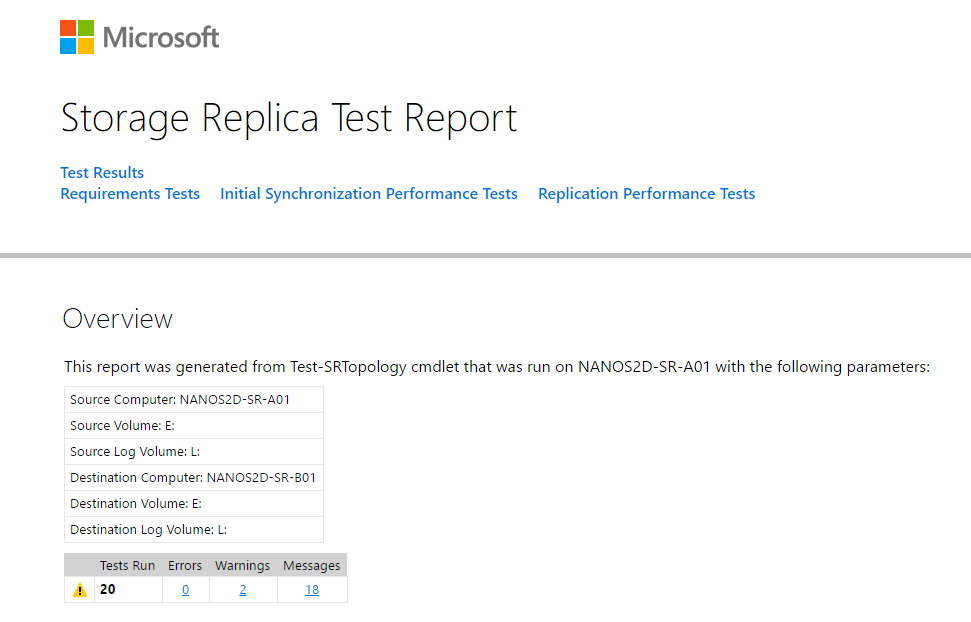
As you noticed, I have two warnings around Physical Memory Requirement. The Total physical memory available on NANOS2D-SR-A01 is 2GB. Though that meets the minimum physical memory requirement (2GB) to deploy Storage Replica, however, it is recommended that the system has at least 4GB of physical memory for optimal Storage Replica performance.
Configure Cluster to Cluster Replication
After we successfully ran Test-SRTopology, we can start setting up our replication configuration.
Before you create the replication, you need to do the following on Cluster A and on Cluster B:
|
1 2 3 4 5 6 7 8 9 |
# Add Data Volumes to Cluster Shared Volumes across nodes $ClusterA = "NANOS2D-SR-A" $ClusterB = "NANOS2D-SR-B" Get-ClusterResource -Cluster $ClusterA | ?{$_.ResourceType -eq "Physical Disk" -and $_.Name -like "DataDisk*"} | Add-ClusterSharedVolume Get-ClusterResource -Cluster $ClusterB | ?{$_.ResourceType -eq "Physical Disk" -and $_.Name -like "DataDisk*"} | Add-ClusterSharedVolume |
|
1 2 3 4 5 |
# Grant Access Cluster A to Cluster B $ClusterB = "NANOS2D-SR-B" Grant-SRAccess -ComputerName NANOS2D-SR-A01 -Cluster $ClusterB |
|
1 2 3 |
# Grant Access Cluster B to Cluster A $ClusterA = "NANOS2D-SR-A" Grant-SRAccess -ComputerName NANOS2D-SR-B01 -Cluster $ClusterA |
|
1 2 3 4 5 6 7 8 9 |
# Configure SR cluster-to-cluster $ClusterA = "NANOS2D-SR-A" $ClusterB = "NANOS2D-SR-B" New-SRPartnership -SourceComputerName $ClusterA -SourceRGName S2D-SR-RG01 -SourceVolumeName C:\ClusterStorage\DataDisk01 -SourceLogVolumeName L: -DestinationComputerName $ClusterB -DestinationRGName S2D-SR-RG02 -DestinationVolumeName C:\ClusterStorage\DataDisk01 -DestinationLogVolumeName L: -ReplicationMode Synchronous -Verbose New-SRPartnership -SourceComputerName $ClusterA -SourceRGName S2D-SR-RG03 -SourceVolumeName C:\ClusterStorage\DataDisk02 -SourceLogVolumeName M: -DestinationComputerName $ClusterB -DestinationRGName S2D-SR-RG04 -DestinationVolumeName C:\ClusterStorage\DataDisk02 -DestinationLogVolumeName M: -ReplicationMode Synchronous -Verbose New-SRPartnership -SourceComputerName $ClusterA -SourceRGName S2D-SR-RG05 -SourceVolumeName C:\ClusterStorage\DataDisk03 -SourceLogVolumeName N: -DestinationComputerName $ClusterB -DestinationRGName S2D-SR-RG06 -DestinationVolumeName C:\ClusterStorage\DataDisk03 -DestinationLogVolumeName N: -ReplicationMode Synchronous -Verbose |
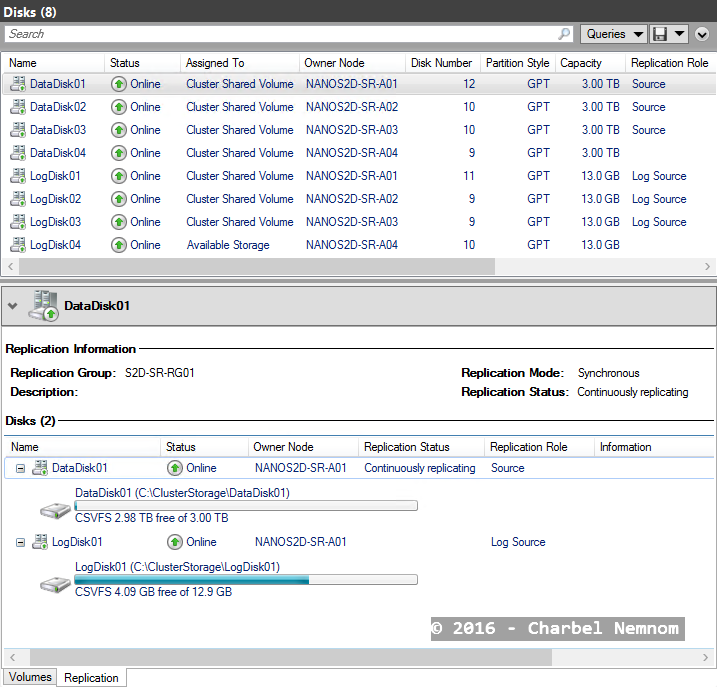
In this example, I am configuring the cluster replication for three CSV volumes.
The output in Failover Cluster Manager will look something like this:
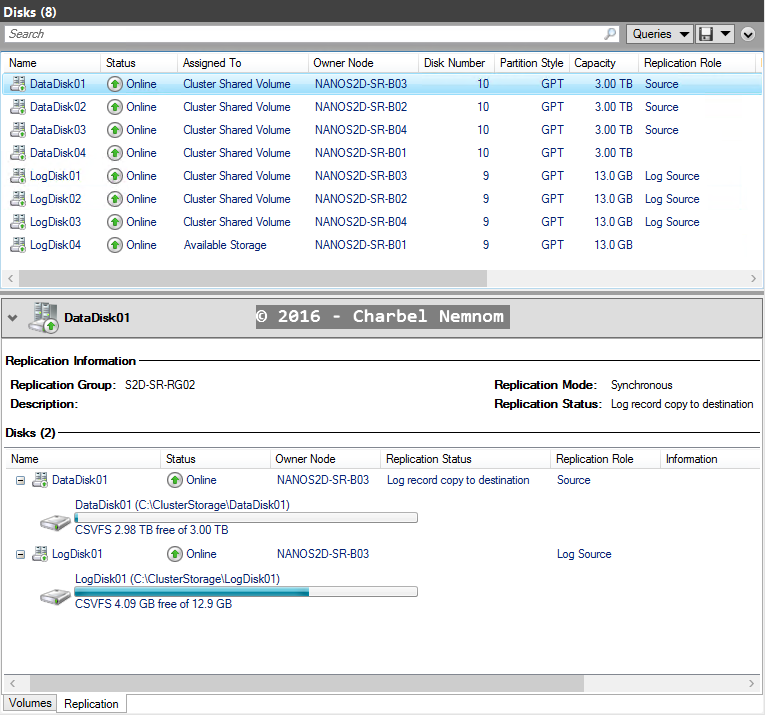
Cluster A:
Cluster B:
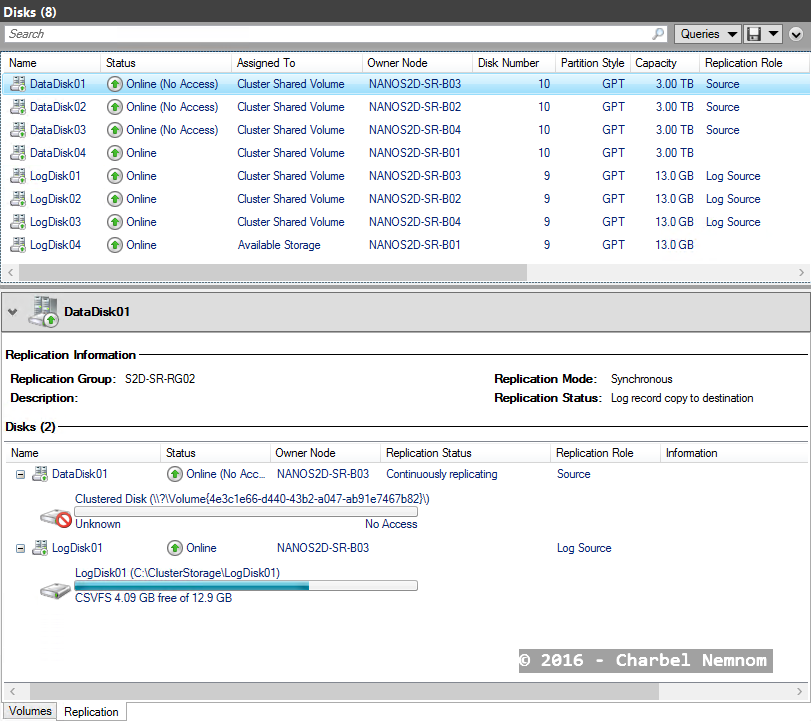
As you noticed, the log volume has been brought in as a Clustered Shared Volume automatically as part of creating this new partnership.
|
1 2 3 4 5 6 7 8 9 10 11 12 13 14 15 |
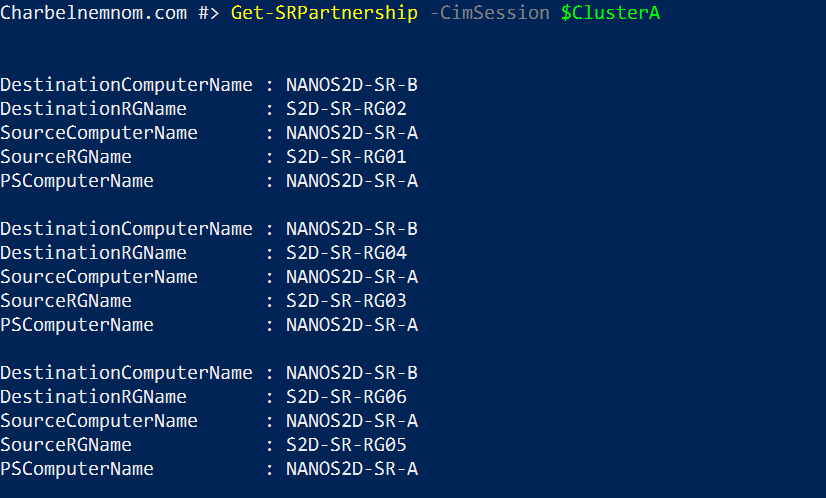
# Configure SR cluster-to-cluster $ClusterA = "NANOS2D-SR-A" Get-SRGroup -CimSession $ClusterA Get-SRPartnership -CimSession $ClusterA (Get-SRGroup -CimSession $ClusterA).replicas |
The output will look something like this:
This example assumes that you already have the VM images ready and copied to the CSV volumes.
|
1 2 3 4 5 6 7 8 9 10 11 12 13 14 15 16 17 18 19 20 21 22 23 24 25 26 27 |
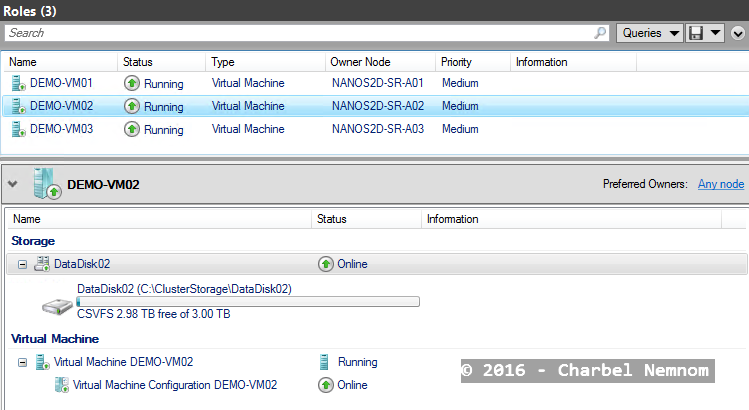
# Create four Clustered VMs on hyper-converged S2D cluster - Storage Replica $vSwitchName = "SETvSwitch" $ClusterA = "NANOS2D-SR-A" 1..3 | % { New-VM -ComputerName NANOS2D-SR-A0$_ -Name DEMO-VM0$_ -MemoryStartupBytes 512MB -VHDPath "C:\ClusterStorage\DataDisk0$_\DEMO-VM0$_\DEMO-VM0$_.vhdx" -SwitchName $vSwitchName -Path "C:\ClusterStorage\DataDisk0$_\" -Generation 2 #Rename network interface Get-VMNetworkAdapter -ComputerName NANOS2D-SR-A0$_ -VMName DEMO-VM0$_ | Rename-VMNetworkAdapter -NewName "vmNIC01" # Make the VM highly available Add-ClusterVirtualMachineRole -Cluster $ClusterA -VMName DEMO-VM0$_ # Start Clustered VM $ClusteredVM = Get-ClusterResource -Cluster $ClusterA | Where {$_.ResourceType -eq "Virtual Machine" -and $_.State -eq "Offline"} Start-ClusterResource -Cluster $ClusterA -Name $ClusteredVM } |
The output in Failover Cluster Manager will look something like this:
Validate Cluster to Cluster Replication
After we have successfully configured the cluster to cluster replication, you can start verifying the replication on the source and destination Nano S2D clusters.
|
1 2 3 |
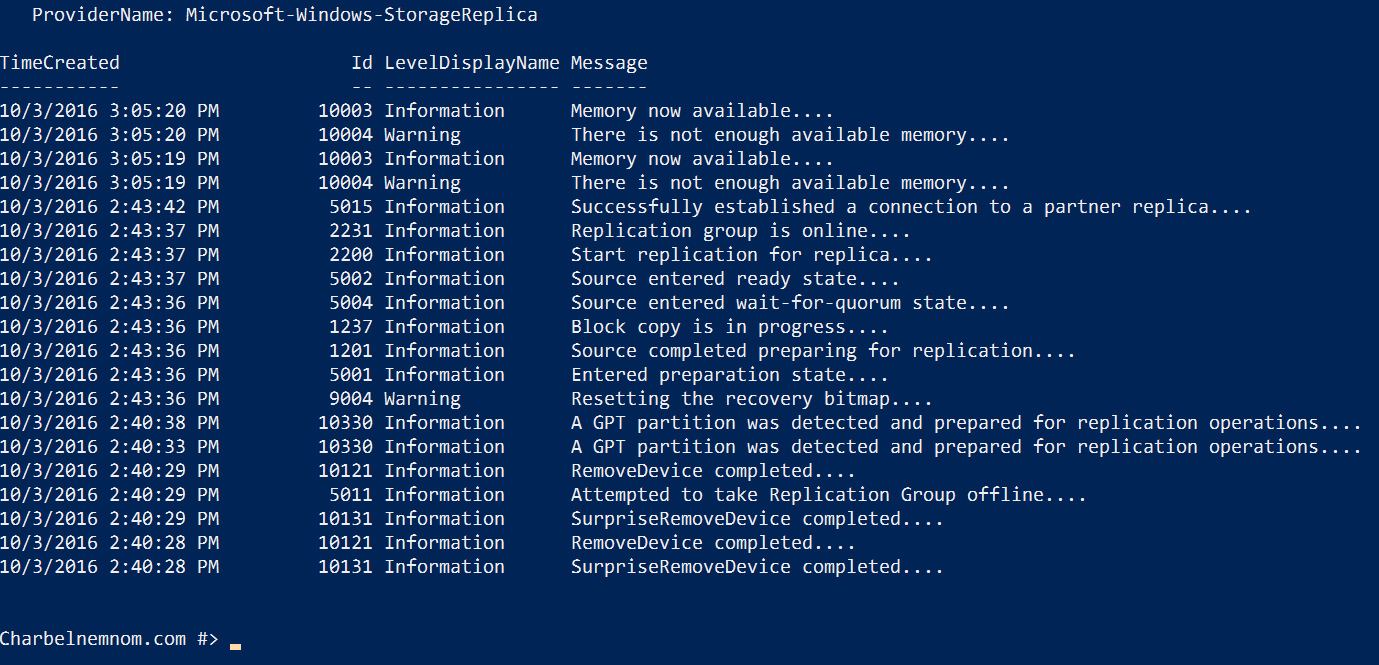
$ClusterA = "NANOS2D-SR-A" Get-WinEvent -ComputerName $ClusterA -ProviderName Microsoft-Windows-StorageReplica -max 20 |
The output will look something like this:
|
1 2 3 |
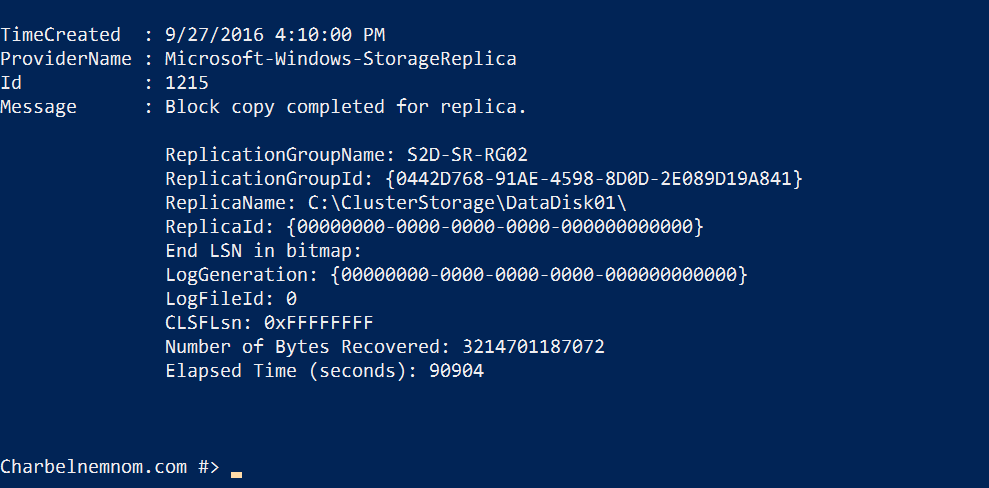
$ClusterB = "NANOS2D-SR-B" Get-WinEvent -ComputerName $ClusterB -ProviderName Microsoft-Windows-StorageReplica | Where-Object {$_.ID -eq "1215"} | fl |
The output will look something like this:
|
1 2 3 4 |
# Move the replication direction from Cluster B to Cluster A Set-SRPartnership -NewSourceComputerName $ClusterB -SourceRGName S2D-SR-RG02 -DestinationComputerName $ClusterA -DestinationRGName S2D-SR-RG01 -Confirm:$false Set-SRPartnership -NewSourceComputerName $ClusterB -SourceRGName S2D-SR-RG04 -DestinationComputerName $ClusterA -DestinationRGName S2D-SR-RG03 -Confirm:$false Set-SRPartnership -NewSourceComputerName $ClusterB -SourceRGName S2D-SR-RG06 -DestinationComputerName $ClusterA -DestinationRGName S2D-SR-RG05 -Confirm:$false |
The output in Failover Cluster Manager for Cluster B will look something like this:
|
1 2 3 4 |
# Move the replication direction from Cluster A to Cluster B Set-SRPartnership -NewSourceComputerName $ClusterA -SourceRGName S2D-SR-RG01 -DestinationComputerName $ClusterB -DestinationRGName S2D-SR-RG02 -Confirm:$false Set-SRPartnership -NewSourceComputerName $ClusterA -SourceRGName S2D-SR-RG03 -DestinationComputerName $ClusterB -DestinationRGName S2D-SR-RG04 -Confirm:$false Set-SRPartnership -NewSourceComputerName $ClusterA -SourceRGName S2D-SR-RG05 -DestinationComputerName $ClusterB -DestinationRGName S2D-SR-RG06 -Confirm:$false |
Conclusion
Congratulations! you have successfully configured Storage Replica using cluster-to-cluster Storage replication on top of Nano Server and accomplished the following tasks:
Until next time…
Thanks for reading!
