


The placement of the virtual machines in a Hyper-V cluster is an important step to ensure performance and high availability. To make a highly available application, usually, a cluster is deployed spread across two or more virtual machines. In case of a Hyper-V node is crashing, the application must keep working.
But the VM placement concerns also its storage and its network. Let’s think about a storage solution where you have several LUNs (or Storage Spaces) according to a service level. Maybe you have an LUN with HDD in RAID 6 and another in RAID 1 with SSD. You don’t want that the VM which requires intensive IO was placed on HDD LUN.
Thanks to Virtual Machine Manager we are able to deploy a VM in the right network and in the wanted storage. Moreover, the VM can be constrained to be hosted in a specific hypervisor. In this topic, we will see how to deploy this kind of solution. I assume that you have some knowledge about VMM.
N.B: the screenshot has been taken from Virtual Machine Manager TP5 Cumulative Update 3. But you can apply the same configuration in VMM 2012 R2.
Manage the VM storage placement
Microsoft has provided a feature called Storage Classification in Virtual Machine Manager. Thanks to the Storage Classification, we are able to group LUN or Storage Spaces in the logical group. For example, you can take several LUNs and group them in Bronze classification and other in Gold.
As shown in the above scheme, LUNs can be grouped in storage classification even if they are hosted on different storage system. To add LUN or Storage Spaces in Storage Classification, you need to connect to the underlying storage system from VMM. You can connect to a SAN by using SMI-S or you can also connect VMM to a Storage Spaces (Direct) cluster. In the below example, my VMM is connected to my hyperconverged cluster:
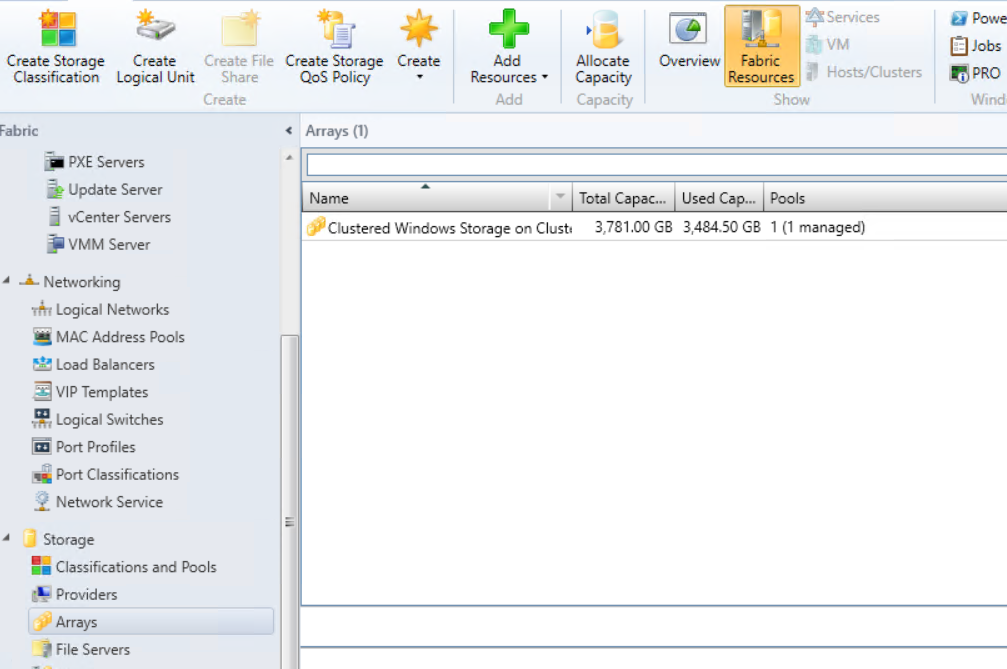
To connect VMM to your storage system, navigate to the Fabric and right click on Providers under Storage. Then select Add Storage Devices. Then follow the wizard.
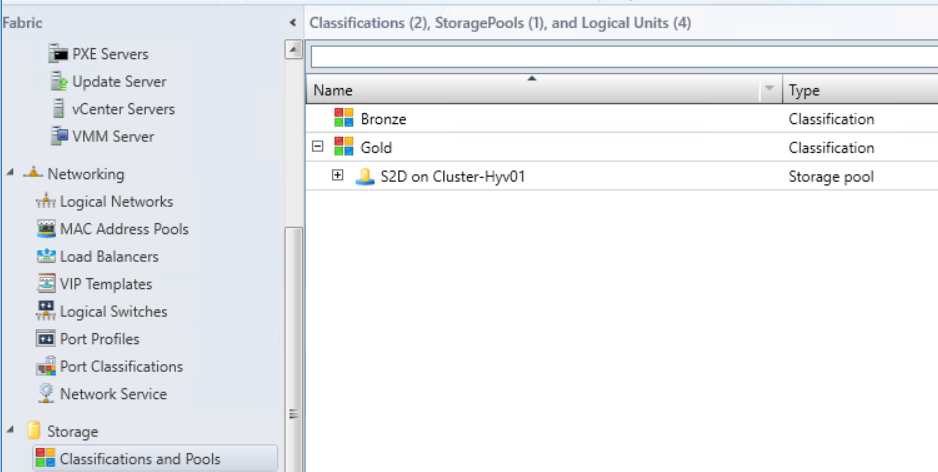
Once the storage system is added, you can create classification from Classifications and Pools menu. In the below example, I have created two classifications called bronze and gold. I have placed the Storage Pool in Gold classification:
Once you have finished sorting your LUNs or Storage Spaces inside storage classifications, you can now deploy the VM storage in a classification and not in a specific LUN anymore. With this method, you don’t need to think in which storage you have to place the VM storage. You need to think now which performance level requires the VM.
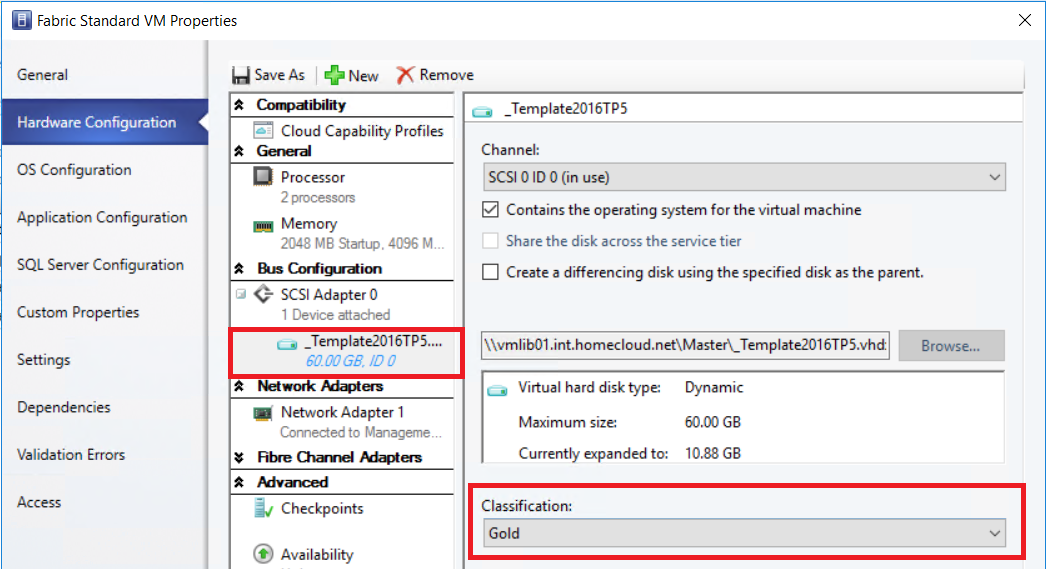
You can specify the storage classification in your VM template or when you deploy a VM. In the below example, I have configured my template to deploy the VM in a Storage Spaces located in Gold classification:
About the network placement
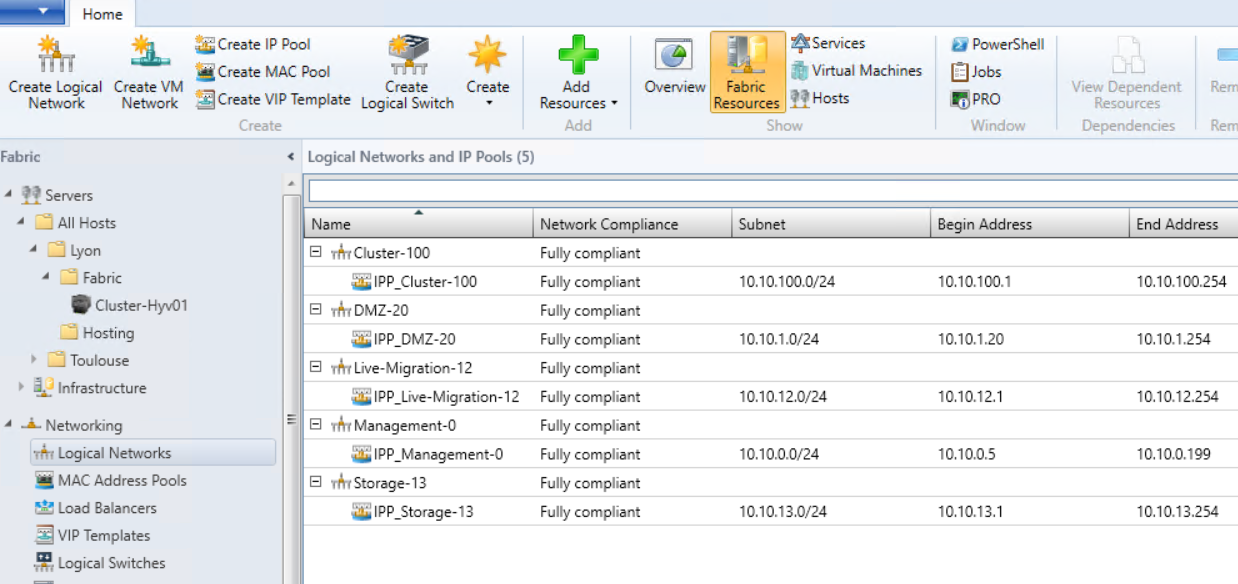
With a proper network configuration in VMM, you are able to “place” the VM on the right network. It is not really a network placement, but a virtual NICs auto configuration. You need to configure logical networks, logical switches, port profiles and so on. Below you can find an example of a configuration:
I have created the logical network and set the network sites. I have also configured some virtual port profiles to configure automatically the features of the VM vNIC:
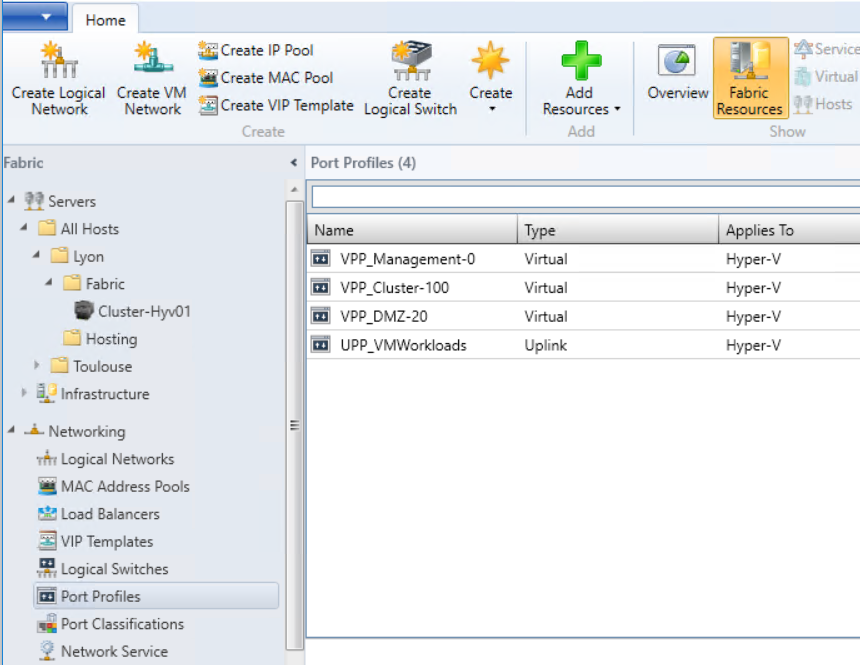
When I have created the logical switch profile, I have associated these virtual adapter port profiles to a port classification. Below you can find an example of this configuration:

By selecting the right VM network and the right port classification, the virtual network adapter is automatically configured with the related network settings (VLAN, vNIC features, QoS and so on). To make this configuration, you can edit a VM template and modify the vNIC configuration as below:

Manage the VM placement on Hyper-V nodes
In the previous section, we have seen how to place the VM storage regarding the underlying storage performance and how to auto configure the network. Now we will discuss the VM placement on Hyper-V nodes. There are mainly two solutions:
- The Availability Set: This feature prevents two VMs to be placed on the same hypervisor
- The Custom Placement Rules: This feature enables to enforce the VM to be placed on the wanted hypervisor
The Availability Set
The Availability Set is a property applied to several VMs. When multiple VMs have the same Availability Set, there are prevented to be placed on the same Hyper-V node in a cluster. When VMM runs a cluster optimization, it doesn’t suggest to move these VM in the same host. Manually you can move the VMs with the same Availability Set to the same Hyper-V node but VMM will raise a warning. The below VM is added to an Availability Set called Fabric-SCOM:
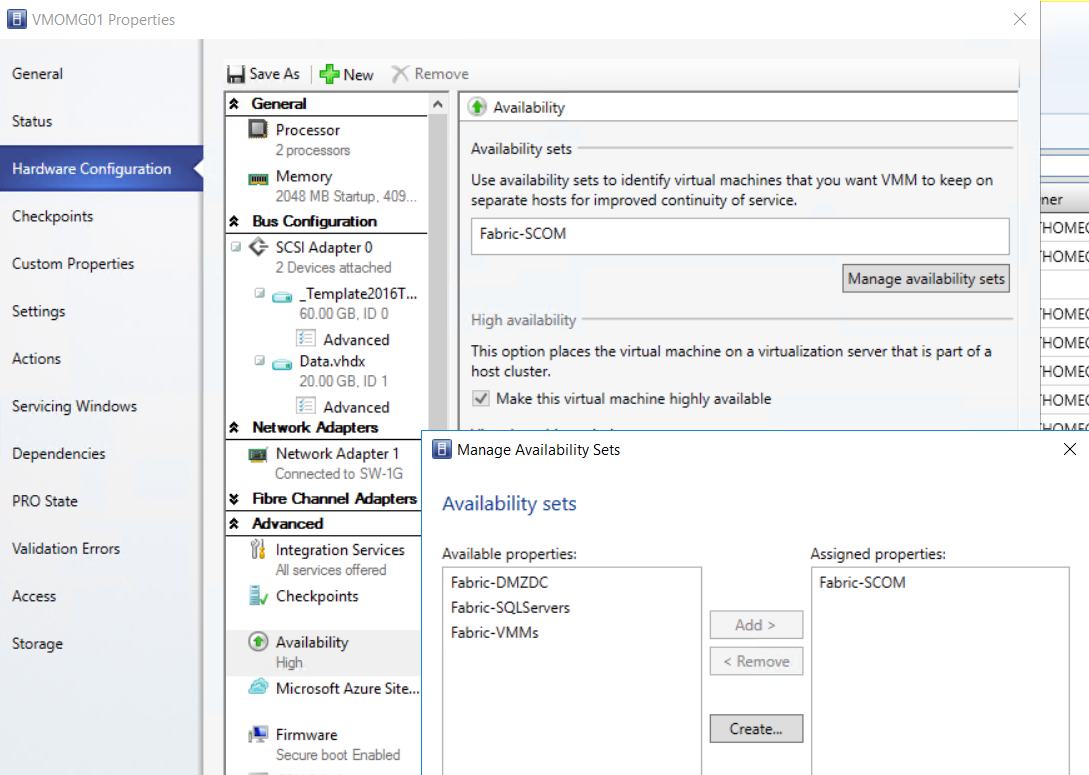
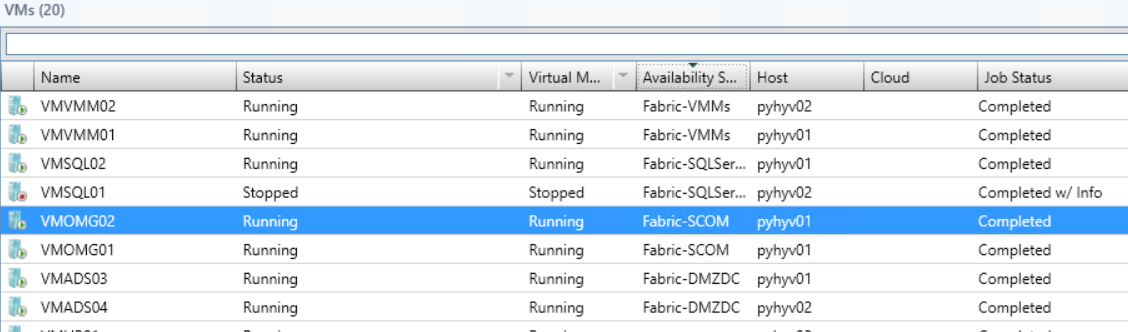
Below you can see VM configured with Availability Set. You can see that each time VMs are in the same availability set, they are not placed in the same Hyper-V node; excepted for VMOMG VM that I have moved manually:
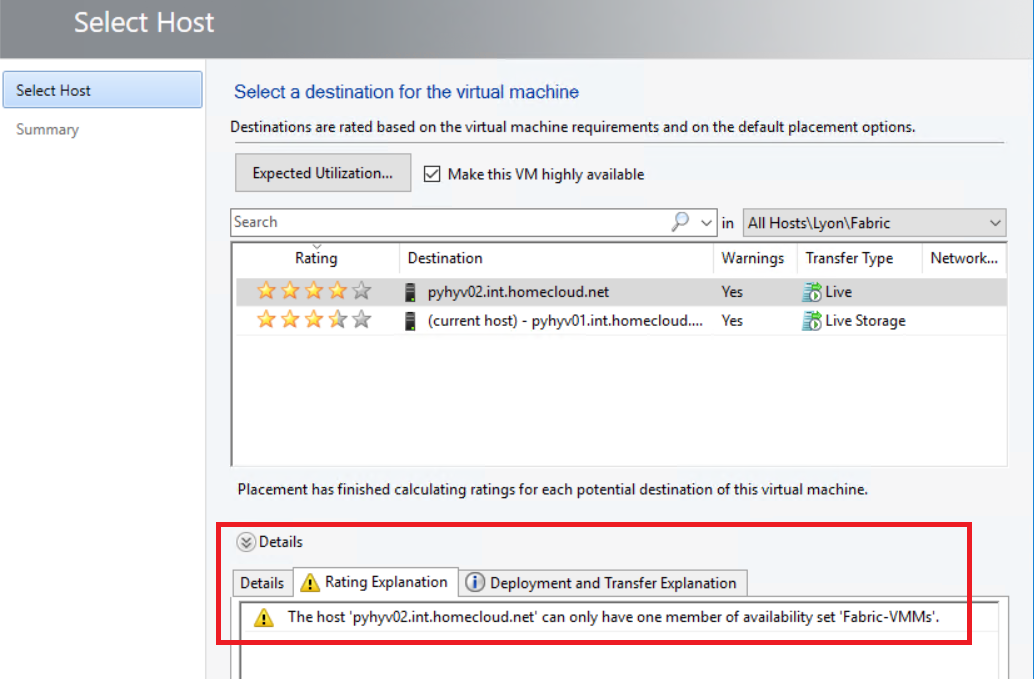
If I try to move VMs with the same availability set to the same node, I have a warning:
The Custom Placement Rules
The custom placement rules are based on custom properties applied to Hyper-V hosts and virtual machines. I have personally used this feature for a project where a stretched cluster has been deployed. To force VM to run in a specific room because the VM storage is also in this room, you have to use this feature. There are four rules for this kind of placement:
- Custom properties must match: this rule means the custom properties must be the same between the host and the VM. It can block the VM deployment
- Custom properties should match: this rule means the custom properties should be the same between the host and the VM. It doesn’t block the deployment but raises a warning.
- Custom properties must not match: this rule means the custom properties must not be the same between the host and the VM. It can prevent the VM deployment
- Custom properties should not match: this rule means the custom properties should not be the same between the host and the VM. It doesn’t prevent the deployment but raises a warning.
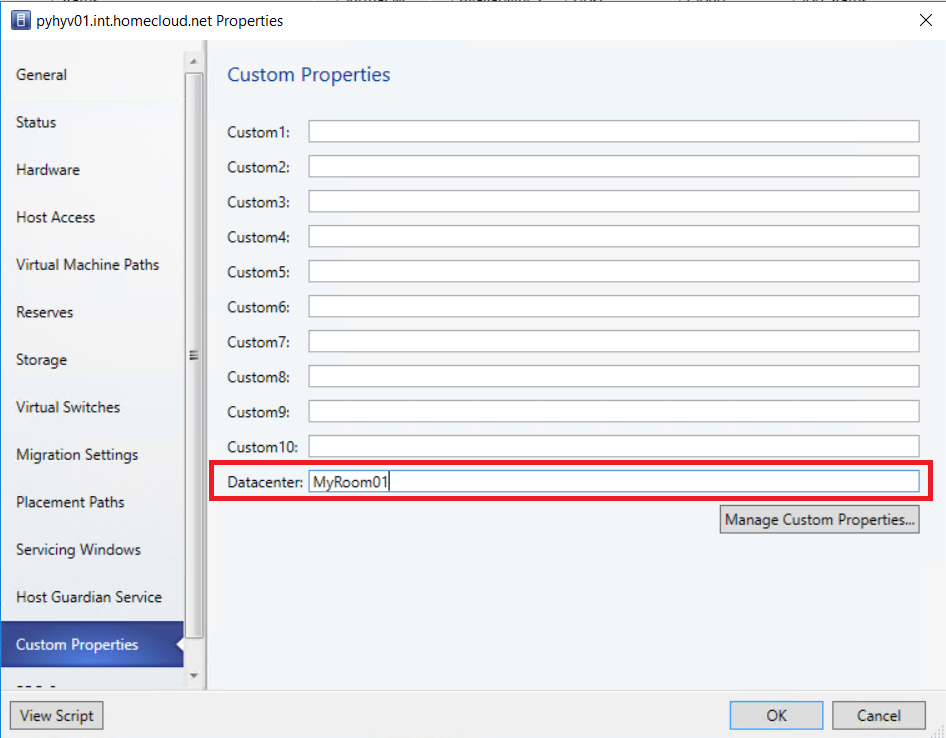
To deploy this kind of solution, you must create a custom property. Edit the Hyper-V host settings from VMM and navigate to Custom Properties. Then as below, create the custom property. I have called mine Datacenter.

Then I fill the custom property value. For example, I have set the custom property to MyRoom01 for the first Hyper-V node.
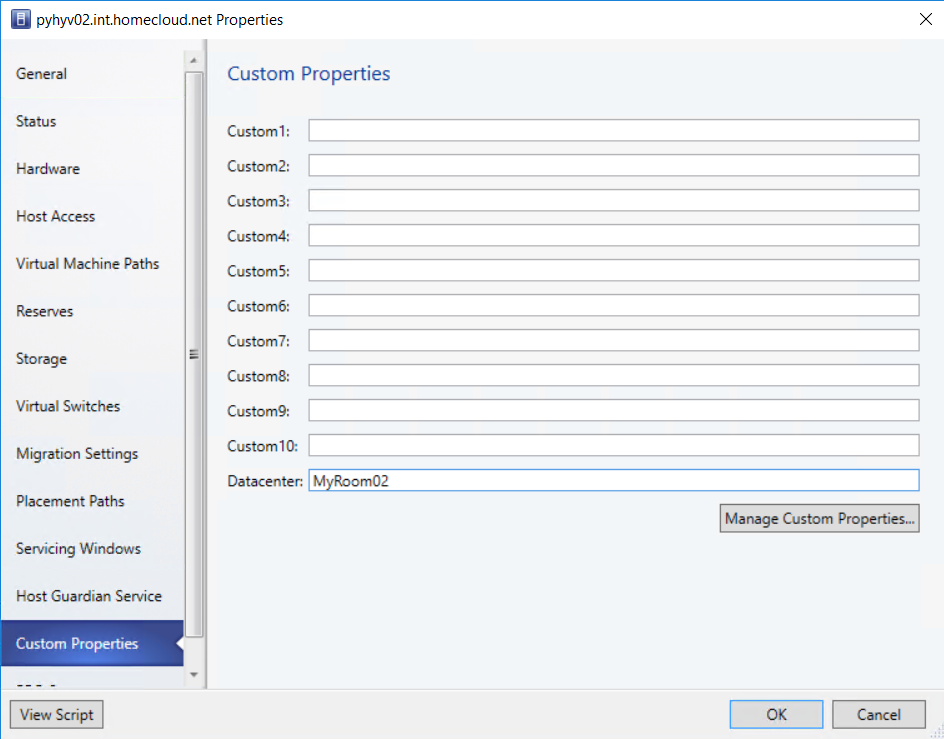
I do the same for the second Hyper-V host but this time the Datacenter property value is equal to MyRoom02.
Then I edit the custom properties of the VM and I fill the Datacenter property value. I set the same value that I have specified in the first Hyper-V host settings.

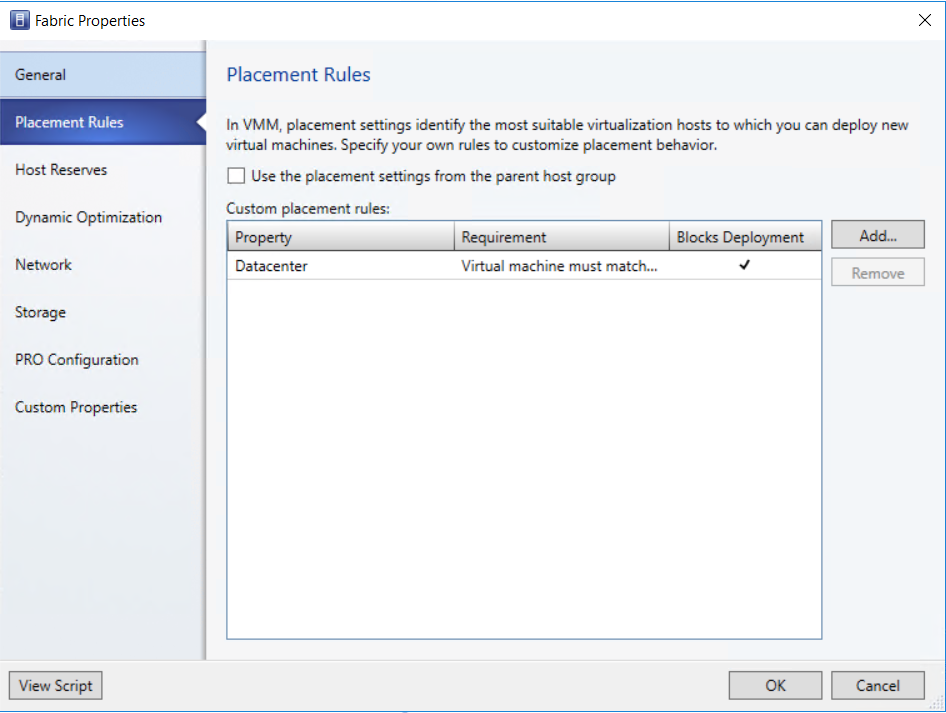
To finish, I edit the host group where are my Hyper-V hosts and I navigate to Placement Rules. Then I create a Custom placement rule based on Datacenter custom property. I choose also the rule that I want for my placement.

In the below example, I have chosen that the VM Datacenter property value must match with the value specified in Hyper-V host settings. So it can prevent the VM deployment.
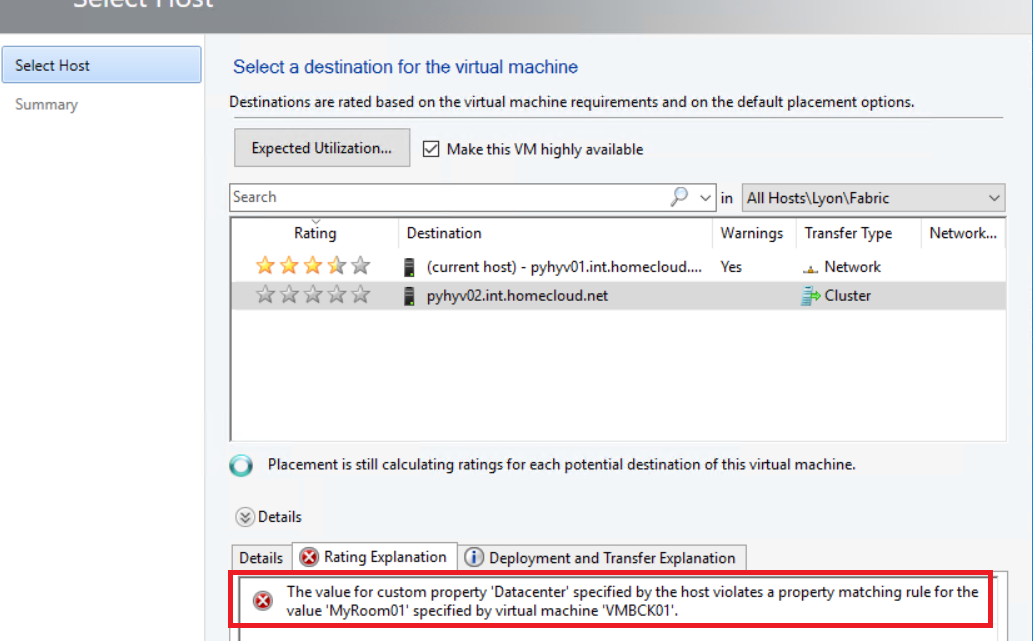
I try to move the VM to the second Hyper-V host. As you can see in the below screenshot, I can’t move the VM because the custom property doesn’t match between the VM and the host.
It is also possible to configure this custom property from the VM template to pre-configure the VM with the custom property.
Conclusion
VMM provides some features to manage the VM placement in storage, network and Hyper-V nodes. It is not really difficult to implement the placement constraint from VMM but it should be studied during the design step. I have seen some projects where these features were not appreciated during the design phase and it was a challenge to deploy the placement constraint after the start in production.
