

Sooner or later every single IT guy comes to the idea of having some lab. There are a million reasons why you would need a lab: learning new technologies, improving skills, trying crazy ideas you would never dare to try in the production network, you name it. Even though it is a work-related activity for most home labbers this is just another hobby for many of us. That’s why people spend so many hours of their personal time building the homelab, investing significant funds into new hardware, thoroughly planning its setup, looking for a help in online communities or sharing their experience to help others. There is a whole universe of home labbers and I am happy to be part of this community.
In this post, I would like to share my experience with 3 generations of home labs I have had so far and the thoughts about next generation.
Generation 1
The first idea of having my own home lab was triggered by a new project at work 4 years ago. At that time, I used to work for a small managed services provider and my task was to create a PoC of the DR scenario.
The project’s focus was mostly about failing over public IP subnets using BGP and I was planning to use GNS3 to simulate networking part of the disaster recovery, but to make it more interesting I decided to use nested vSphere as well for a full-blown test.
Coincidentally, I was looking for a new laptop as my daily commute on the train was about 2 hours and it was the perfect time to do something useful.
After some research, I ended up with latest and top specs MacBook Pro. With i7 CPU, 16GB of RAM and 1TB SSD drive I had plenty of capacity and performance resources at that time.
Here is a quick look at what I could squeeze into one laptop for my project.
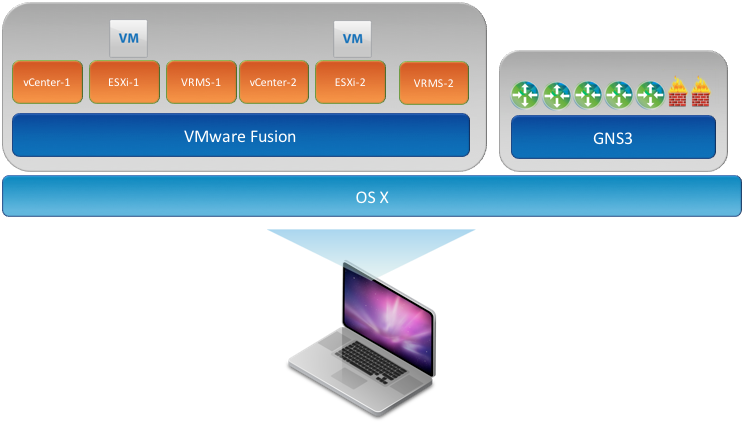
Please note that I was running vSphere 5.5. These days, I will not be able to squeeze the same setup running vSphere 6.x into the MacBook.
On top of that, it was a very mobile lab, so my 10 weekly hours of commute time were more productive.
However, this solution was not impeccable. There were few issues I had faced with:
- 16 GB of RAM looked like a lot of memory at first, but very quickly RAM has become the bottleneck and I had to juggle virtual machines to stay within 13-14 GB of available RAM. Unfortunately, there was no way to add more RAM to the MacBook.
- It was not possible to have the lab running 24×7. The laptop was getting hot and a bit noisy. So, I had to use few scripts to power on/power off different lab deployments in the correct order. And sometimes it could easily take 20 minutes before you could log in to vCenter.
- You don’t get much bang for the buck. For 3200 AUD I could have bought way bigger and juicier second-hand rack server, but I had no place in our house to put this kind of server.
With all that said, the Macbook served its goal quite well even though this wasn’t an ideal lab.
Generation 2
vSphere 6.0 release raised system requirements. vCSA server only would take half of available RAM on the Mac. So, I felt like it was time to man up and get some real gear.
I spent days exploring different options and trying to match my budget. There were very few options of the small form-factor server at that time. I know people used Apple Mac Mini. A bit later Intel NUC was introduced on the market and I know few people who built the 5-7 nodes vSAN cluster on them. There was also HP Microserver Gen8. However, none of them was my choice giving the 16GB limit per node, though I liked how compact and quiet these servers are. Going with NUC or Mac Mini would also mean having 1Gb Ethernet port only. Some people tried to use USB-ethernet adapter and invested the significant amount of efforts to make it work, but any new ESXi version could break its functionality.
That’s when I stumbled upon reviews of Avaton processors and few feedbacks of running ESXi on these CPUs. This was a new generation of Intel Atom processors. Very common perception of Atom processors is that they are not capable to run the serious workload. Their niche is low power routers/switches/mobile phones/etc. However, Avaton showed impressive performance results compared to its predecessors. According to multiple performance comparison charts, Avaton CPUs were on par with Intel i3 processors which was very promising.
Also, none of the reviews of ESXi running on Avaton had any complaints about performance. The last bit of info that convinced me to buy Avaton CPUs was that they supported up to 64 GB of memory. That means I could start with 32GB per server and still had head room for future expansion.
The main benefits of Avaton were:
- TDP under 20W
- It is fanless
- Small form factor
- Supports up to 64GB of RAM
- Officially supported by VMware (even in vSphere 6.5 U1)
- Has IPMI interface and 2 built-in gigabit NICs
For the shared storage, I chose Synology DS415+ which seemed to be the perfect balance of performance and price.
BOM

* Prices are in AUD, actual for July 2015
I wrote a couple of detailed posts on my blog about planning and building this setup. It was a bit challenging at first because the last time I had to assemble PC myself was about 15 years ago. I also recorded a short video about vSphere performance on these processors.
Overall, I was very happy with these servers. They gave me a feeling of having the real servers, especially when using server’s console through IPMI. And TP-Link switch had familiar Cisco-like CLI. Running 2 servers in HA cluster with shared storage allowed me to update servers without shutting down all virtual machines. That is still one of my favorite arguments against running everything on one large server.
This setup was perfect to prepare for VCAP5-DCA exam and to improve my vSphere skills.
As always, it was not perfect. The storage became the bottleneck very quickly. With 4 x 1TB 7.2K HDD in RAID5, you cannot get enough IOPS for 10-15 virtual machines. I made some attempts to improve the storage performance using Pernix FVP, but that was not successful enough.
Also, as my lab was growing I noticed that Avaton were a bit underpowered. This was especially noticeable when I was powering on the 2-site nested lab which could take up to 40 minutes.
However, the biggest disappointment was the RAM price. Even though the Avaton CPU supports up to 64GB of RAM you would need 4 x 16GB unbuffered DDR3 DIMMs. With 200 AUD price for each DIMM, it would cost you 1600 dollars to get to 128GB RAM. However, 8GB DIMMs were relatively cheap so you end up with 32GB of RAM in each server.
Over time I extended my home lab with few local disks – SSD and HDD – and got a taste of vSphere vSAN, but I couldn’t run it in the supported config with two servers only so I settled down with VSAN from StarWind for a while. I even wrote a very comprehensive 7-parts review of the Startwind product.
Generation 3
It took me a year to grow out of this lab. It was my first year since I started working for VMware as a PSO consultant and idea of having the lab with the full suite of VMware products looked very appealing. However, the specs of the Avaton lab was nowhere near what you need to run vSphere, vSAN, NSX, vROPs, vRA, vRLI products. And I wanted to run all of them at the same time because you never know what you will have to test next day after a customer asks you a tricky question.
So, after another couple of weeks of reading reviews and forums, I ordered my first Supermicro SYS-E200-8D. I even wrote a review comparing this model with Intel NUC.
The major benefits of this model for my 3rd generation of the home lab were:
- High performance 6 cores Xeon D-1528 processor
- Up to 128GB of RAM
- Low TDP – 35W
- Built-in 2 x 10GB and 2 x 1GB ports
- Compact form factor
- M2 slot
After few months of tests, I realized that it was not quite enough for my living room. The 2 x 35mm fans would rev up during high load and become very loud. Also, I was not happy with space for a single 2.5 disk in the small case.
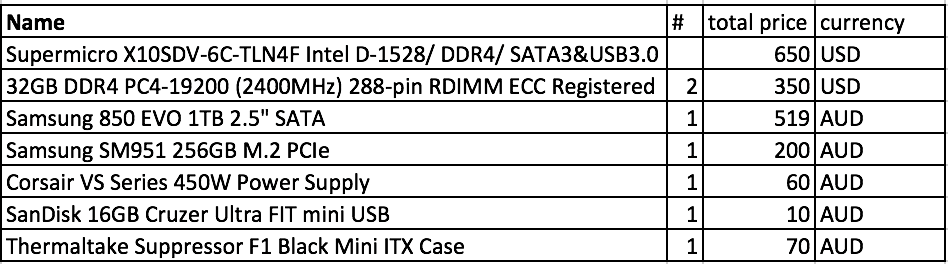
3 months later I ordered X10SDV-6C+-TLN4F mobo – it is the same one that is installed in SYS-E200-8D and placed it in a bigger case with bigger and quieter fans. Additional benefits of this custom build over E200 was that I could use PCIe slot and install more than one disk. It turned out to be the ideal home server. So, I moved mobo from E200 to a bigger case too. Now the servers were taking a bit more space, but they were consistently quiet all the time.
Here is the BOM of my custom build
Now, with 4 servers in total I built 2 vSAN ROBO clusters:

Each cluster runs its Witness appliance in the opposite cluster. Officially this scenario is not supported, but it provides enough redundancy for the homelab and let me play with Hybrid and AF vSAN. Now I also have enough capacity to use NSX.
All these improvements and additional capacity made me re-consider the way I was using home lab. Previously, I would use my vSphere to test whatever I wanted. After few months of active testing I usually had quite a mess – many virtual machines I couldn’t even remember why I deployed, inconsistent configuration of hosts, plenty of alerts and warnings in vCenter. When I had just a vSphere in the home lab it was quite easy to re-install everything from the scratch instead of fixing the lab issues. But now with vSAN, NSX, vROPs the re-installation of the home lab could easily take few days. So, I started treating my home lab as production environment.
The nested environments became the new sandbox. William Lam did a fantastic job creating nested ESXi appliance and then developing PowerCLI script that automates deployment of the nested vSphere and vSAN. NSX allowed to create limitless combination of network topologies for the nested labs. These factors led to new home lab concept – vSphere-as-a-Service (VaaS).
If you are a big fan of vRA you can have a look at the following blog post explaining how to build VMware Hands-On-Lab with vRA and NSX.
There is a still a discussion between those who prefer to consume VaaS in one powerful server or others like me who still choose to use multiple physical servers as you have High Availability and more flexibility during patching/upgrades, though it costs more than a single server solution.
The only drawback of the 3rd generation of my home lab is unexpected raise of the memory price. The DDR4 price almost doubled since last year and there is nothing you can do about it. That is the only factor which sometimes makes me think about second-hand rack-mounted server, e.g. Dell R710.
The home network grew as well. I realised how big it has become only after I made a high-level diagram of my network.
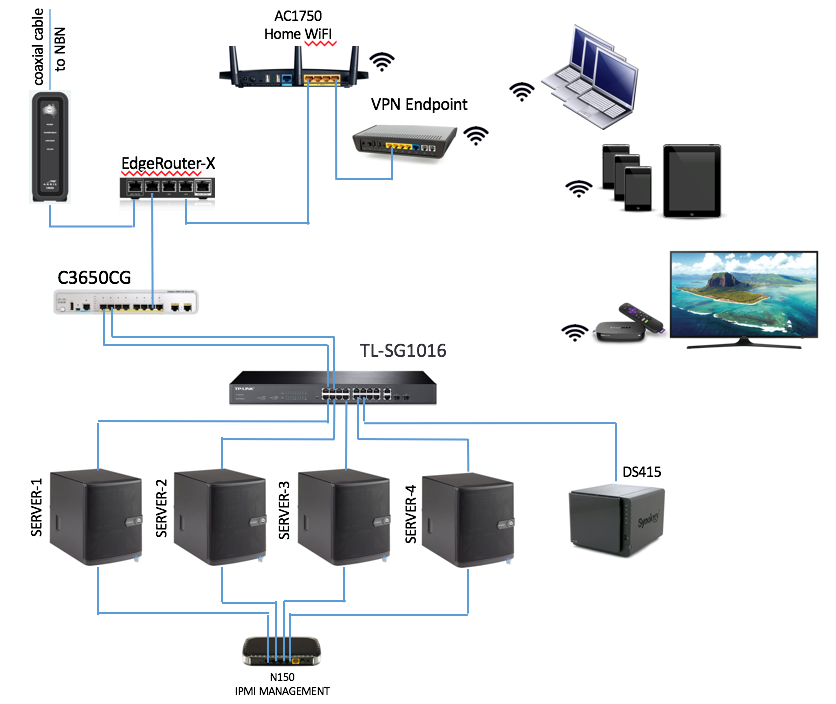
The biggest and most valuable addition to the network was a tiny EdgeRouterX which proved to be a reliable multifunctional device. It now plays the role of router, firewall, switch, OpenVPN server, OpenVPN client.
All-in-all, the home lab has been an interesting and useful hobby. I use it almost daily in my work and I can’t see myself without home lab in my current job. I already have plans to expand it further and definitely prefer to use my own private cloud rather than public ones.