

It is not new that VMware vCenter Server Appliance (VCSA) is a very popular option, especially for small businesses which can save money on an additional Windows Server license.
It is a prepackaged and preconfigured virtual appliance with PostgreSQL database, vCenter server 6.5 components and also (in case you deploy “all-in-one” VM) Platform services Controller that contain all of the necessary services for running vCenter Server such as vCenter Single Sign-On, License service, and VMware Certificate Authority.
The VCSA is running Photon OS which is a VMware own lightweight distribution, optimized for fast booting, security, and scalability. During a long time, VMware was using Suse Linux Enterprise Server (SLES) distribution, but the fact that VMware did not own the stack was a break to faster development.
What if I need to recover root password of the VCSA appliance?
The password for the root account of the vCenter Server Appliance expires after 365 days by default, so it is like a time bomb. When you don’t take care of it, you’ll probably need to reset one day. Here is how.
Here are the steps:
- Shut down the VCSA appliance
- Take a snapshot (or backup)
- Start the VCSA appliance and when the VM starts to boot (Photon OS splash screen), hit the letter “e” on your keyboard. You’ll access a GRUB boot menu.
- Navigate to the end of the line and add “rw init=/bin/bash” at the end of the line (as on the pic)
|
1 |
rw init=/bin/bash |
The view:
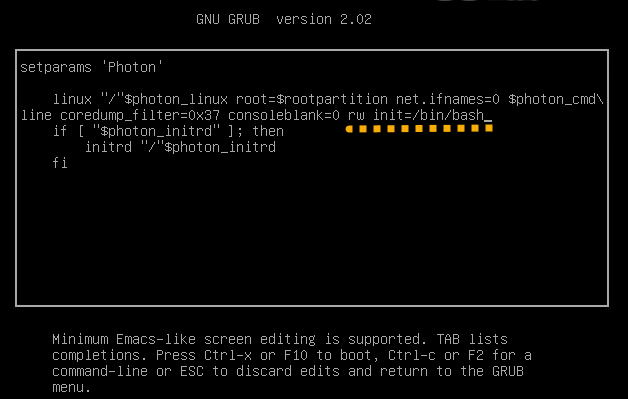
Then Press F10 to continue the boot process, which will present you with a prompt:
Type this:
|
1 |
passwd |
then enter a new root password. You’ll need to confirm.

Next step is to unmount the file system via this command
|
1 |
umount / |
After you just need to reboot the appliance and you’re done.
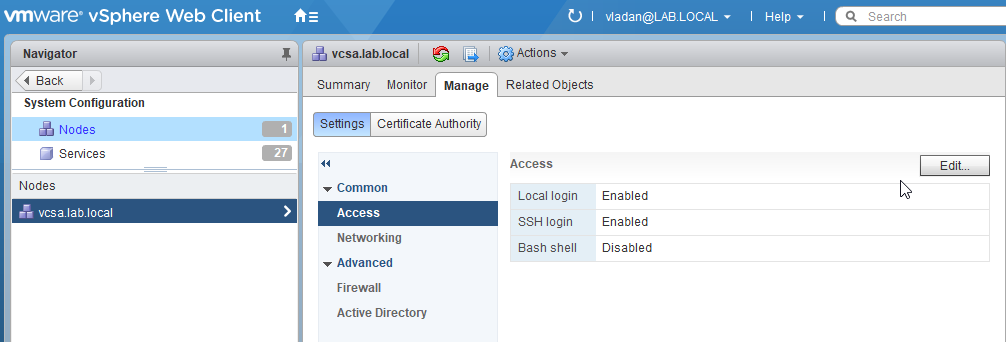
Enable SSH to access VCSA appliance
By default, the SSH access is disabled. It is possible to enable SSH so after you’ll be able to use SSH client such as Putty, to access the system.
Connect via vSphere Web Client to your VCSA, and to:
Administration > System Configuration > Nodes > vCenter > Manage > Settings > Access
After connection, you’ll connect first to the VCSA appliance shell. This is not enough, you’ll need to type “shell” to get access to the full features shell.
The details of the login screen via Putty client will look like this:

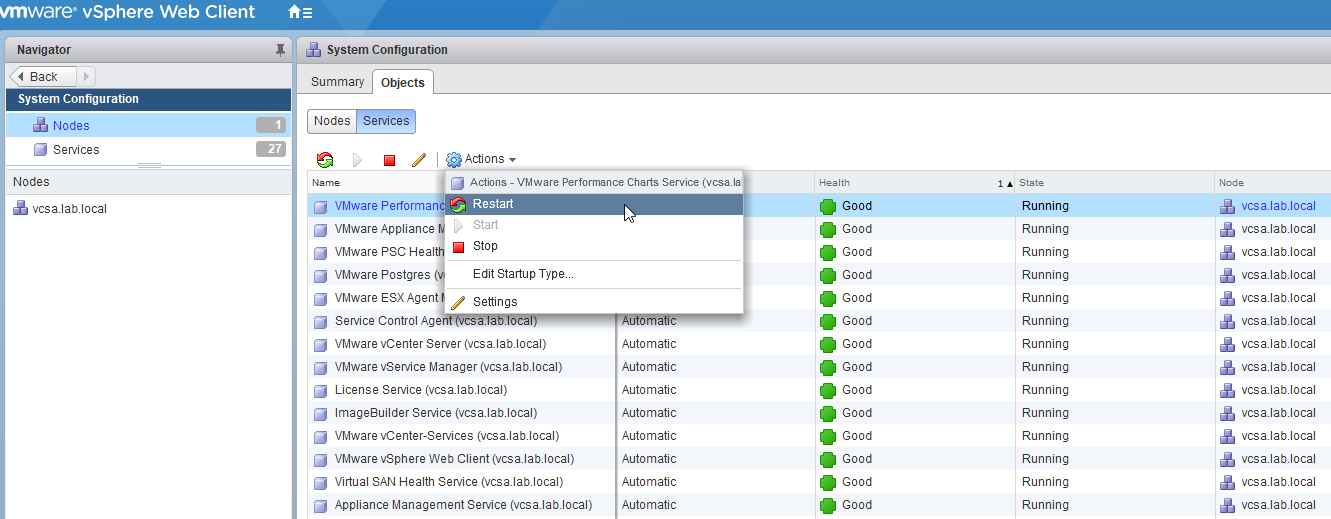
Check and restart VCSA services
To List all the Services in vCSA appliance
|
1 |
service-control --list-services |
To check a status of all services you can enter the following command:
|
1 |
service-control --status |

If you see a service which has stopped and you’ll need to restart it, then simply go and enter this command: (example of vpxd service)
|
1 |
service-control --start vpxd |
to stop is also simple
|
1 |
service-control --stop vpxd |
You can also do stop all services, and then start them all. They’ll stop and start by keeping their dependency. This allows to completely restart all vCenter services without restarting the whole appliance.
Type this:
|
1 |
service-control --stop --all |
and then this:
|
1 |
service-control --start –all |
The start of all services takes time because they have to initialize and also the dependencies one with another is assured automatically, so be patient. In my own testing, it took me about 5 min until all services have restarted completely.
If you have access to GUI, through vSphere web client, you can go to:
Administration > Deployment > System Configuration.
Click on Services to view the list of all services within the vCenter Server system.
click Nodes > Select the node > Click the Related Objects tab.
VCSA Session timeout – how to change or disable
The VCSA session timeout can be changed by modifying one value within one file, or completely disabled.
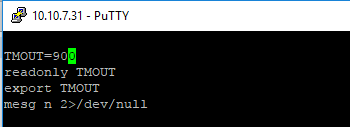
The timeout can be modified in /etc/profile.d/tmout.sh:
Open /etc/profile.d/tmout.sh with a VI editor by executing this command:
|
1 |
vi /etc/profile.d/tmout.sh |
change the line TMOUT=900 to the value you want
Save and close the file via this command
|
1 |
:wq! |
Log out and then log back in for the change to take effect.
To disable completely, remove the tmout.sh script completely
|
1 |
rm /etc/profile.d/tmout.sh |
like this:
![]()
Done, you’re completely unsecured….
Note, that I would only do this for lab environments.
Wrap up
I hope that you enjoyed our tips as it may come handy when building prove of concept (POC) environments or when you come to a VCSA appliance which the admin lost his/her password or the password simply expired after 365 days of utilization.
Also, the fact that the VCSA has a huge number of services (Windows based vCenter too) there might be some situations when you won’t get access to the UI to debug those services, and so the only way is to connect via console or via SSH.
