

StarWind Virtual SAN® Creating NVMe-oF
- January 09, 2019
- 7 min read
- Download as PDF
Introduction
NVMe over Fabrics is the protocol that is set to be the standard for shared NVMe storage which is much faster and efficient than usual SAS. Moving things forward, StarWind Software designed NVMe over Fabrics [1] which can be connected to the host on demand and provide really fast NVMe storage there.
This guide is intended for IT professionals and enthusiasts who would like to configure the StarWind NVMe over Fabrics. It provides detailed instructions on how to configure the hosts and get shared NVMe-oF storage connected on the CentOS host.
A full set of up-to-date technical documentation can always be found here, or by pressing the Help button in StarWind Management Console.
For any technical inquiries please visit our online community, Frequently Asked Questions page or use the support form to contact our technical support department.
Preconfiguring the Servers
Here is a network diagram of the configuration described in this guide.
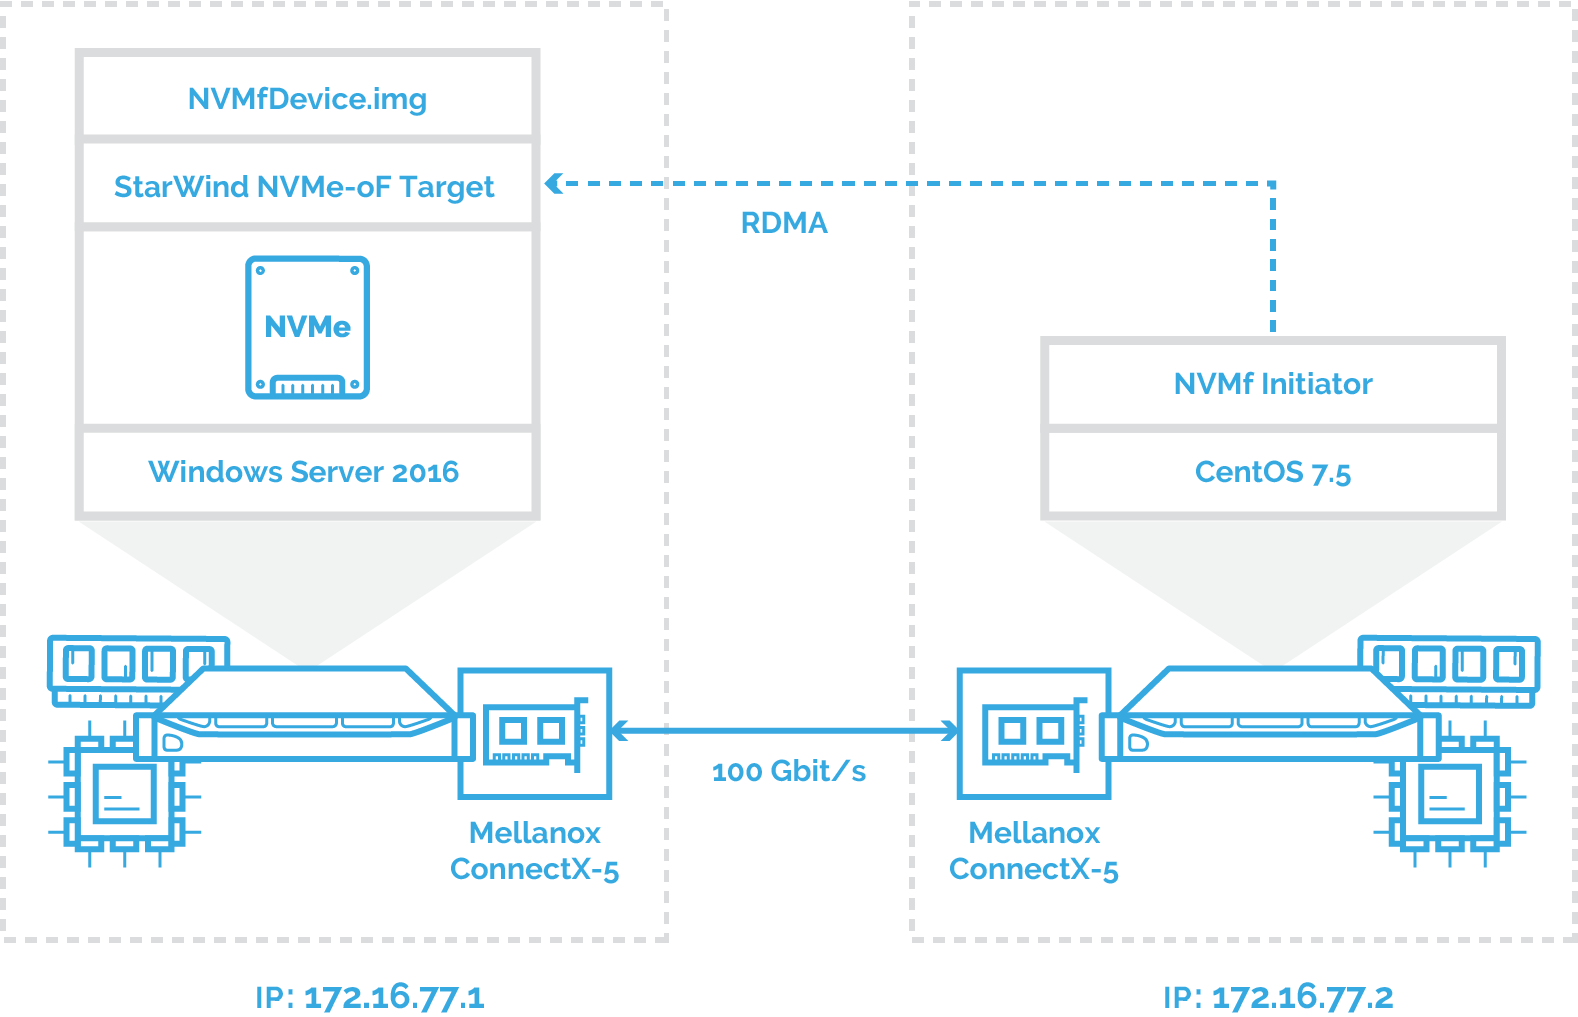
In this document, the host with Mellanox ConnectX-5 adapter and NVMe drive is running Windows Server 2016. The second host is running CentOS 7.5 and has Mellanox ConnectX-5 adapter installed accordingly. The NVMe-oF is created on Windows Server 2016 using StarWind NVMe over Fabrics service and discovered and connected on CentOS 7.5 via 172.16.77.x subnet.
Windows Server 2016 should have the latest Mellanox driver installed which is available here: http://www.mellanox.com/page/products_dyn?product_family=32&mtag=windows_sw_drivers
For proper RDMA functioning with Mellanox, the CentOS kernel version should be higher than 4.9. The guide on how to install or upgrade the kernel in CentOS 7 can be found at the following link: https://www.tecmint.com/install-upgrade-kernel-version-in-centos-7/
Please install important packages when connected to the CentOS host via terminal console (e.g. PuTTY) as it is specified in the Mellanox Red Hat Enterprise Linux (RHEL) 7.5 Driver User Manual (http://www.mellanox.com/pdf/prod_software/Red_Hat_Enterprise_Linux_(RHEL)_7.5_Driver_User_Manual.pdf):
# yum install libibverbs librdmacm libibcm libibmad libibumad libmlx4 libmlx5 opensm ibutils infiniband-diags srptools perftest mstflint rdmacm-utils ibverbs-utils librdmacm-utils –y
Also, install the libibverbs-utils package to get the ability to check that Infiniband is active:
# yum install libibverbs-utils
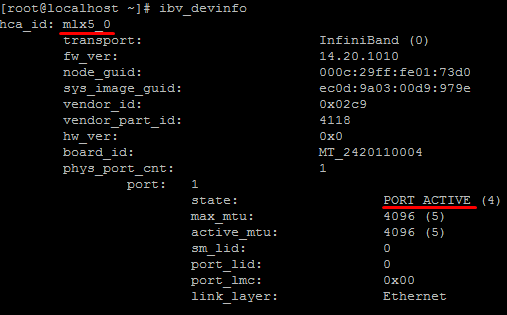
To check that Infiniband port state, run the following command. The port state must be Active.
# ibv_devinfo
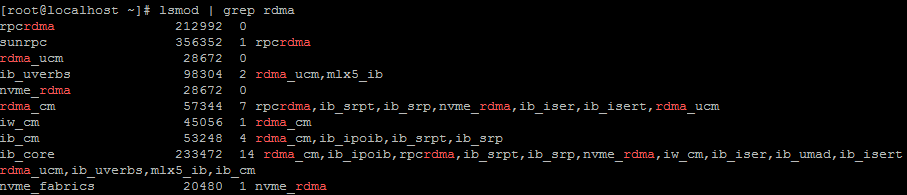
The Mellanox modules for ConnectX®-4/ConnectX®-4 Lx/ConnectX®-5/ConnectX®-5 Ex are: mlx5_core and mlx5_ib. To check that kernel modules mlx5_core, mlx5_ib and RDMA are loaded, run the following command:
# lsmod | grep mlx5
# lsmod | grep rdma

To check the bandwidth between Windows Server 2016 and CentOS 7.5 hosts, use a StarWind rPerf utility, which can be downloaded here: https://www.starwindsoftware.com/starwind-rperf
Creating NVMe-oF
1. Login to Windows host and install StarWind VSAN by following the guide here: https://www.starwindsoftware.com/resource-library/starwind-virtual-san-quick-start-guide-installation
2. Launch StarWind Management Console from the StarWind icon in the tray.
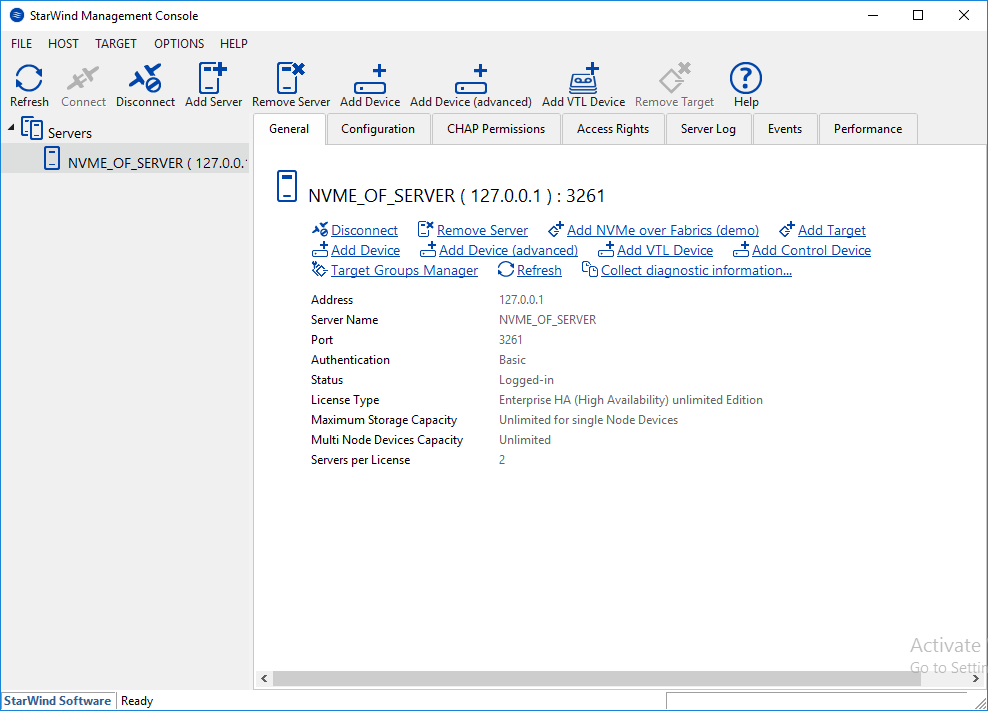
3. If StarWind Service and Management Console are installed on the same server, the Management Console will automatically add the local StarWind instance to the Console tree after the first launch. Then, the Management Console automatically connects to it using default credentials. To add a StarWind server to the console, use the Add Server button on the control panel.
4. StarWind Management Console will ask to specify the default storage pool on the server which it connects to for the first time. Configure the default storage pool to use one of the volumes that have been prepared previously. Press the Yes button to configure the storage pool. If the storage pool destination needs to be changed, click Choose path… and point the browser to the necessary disk.
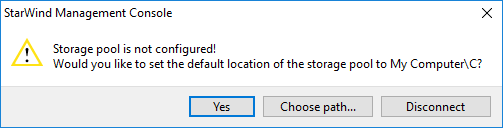
NOTE: Each of the arrays which will be used by StarWind Virtual SAN to store virtual disk images, should meet the following requirements:
- Be initialized as GPT,
- Have a single NTFS-formatted partition,
- Have a drive letter assigned.
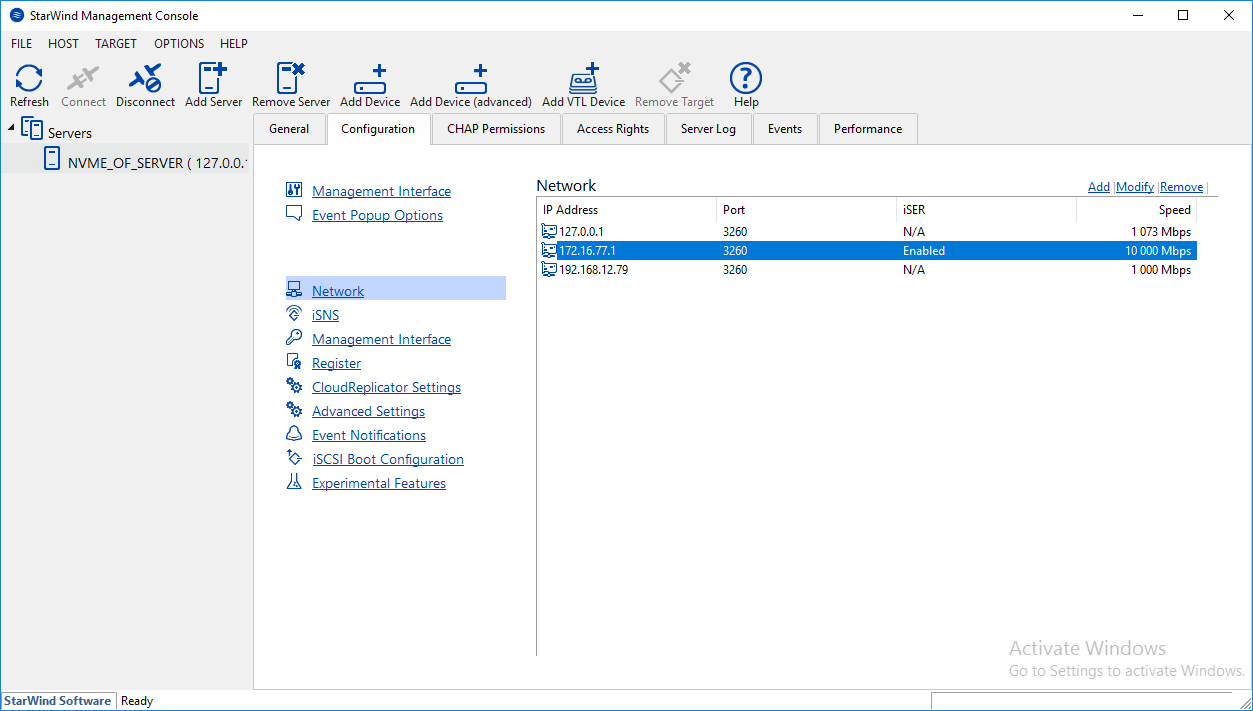
5. In StarWind Management Console, open the server Configuration tab and click the Network button. Check that ISER support is enabled.
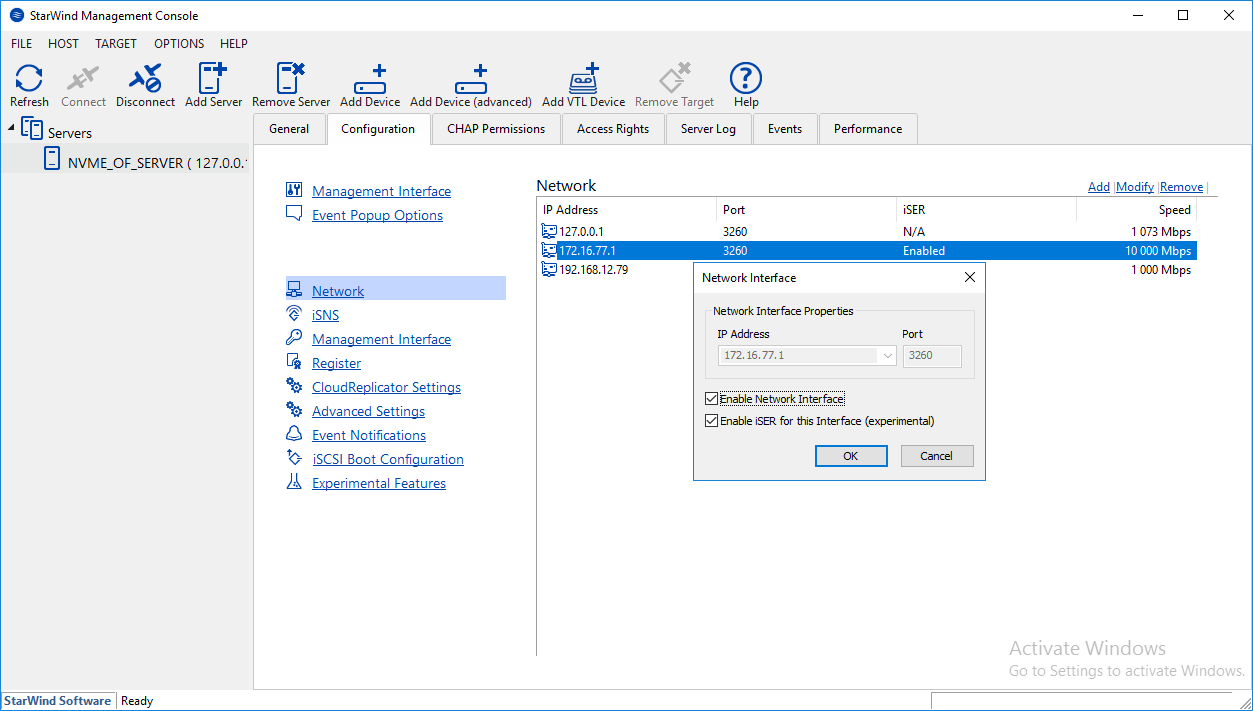
6. To enable iSER support, click on the network (here 172.16.77.1), press the Modify button and enable the checkbox Enable iSER for this Interface… in the appeared window. Click OK to confirm.
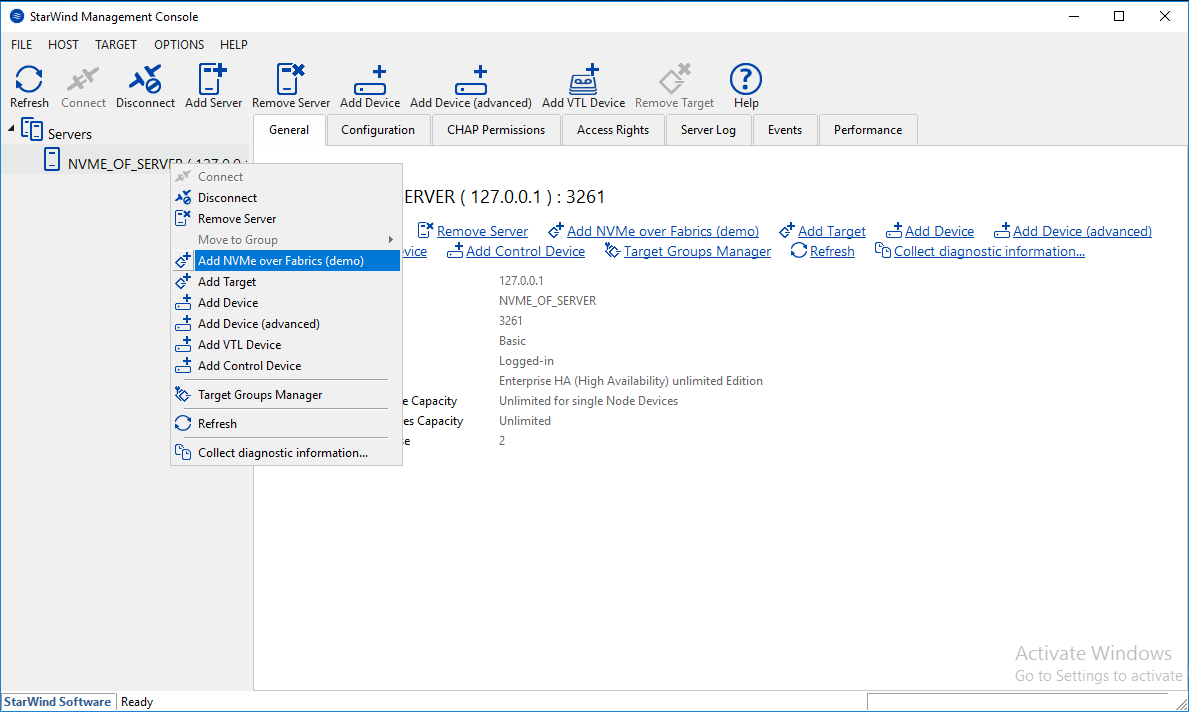
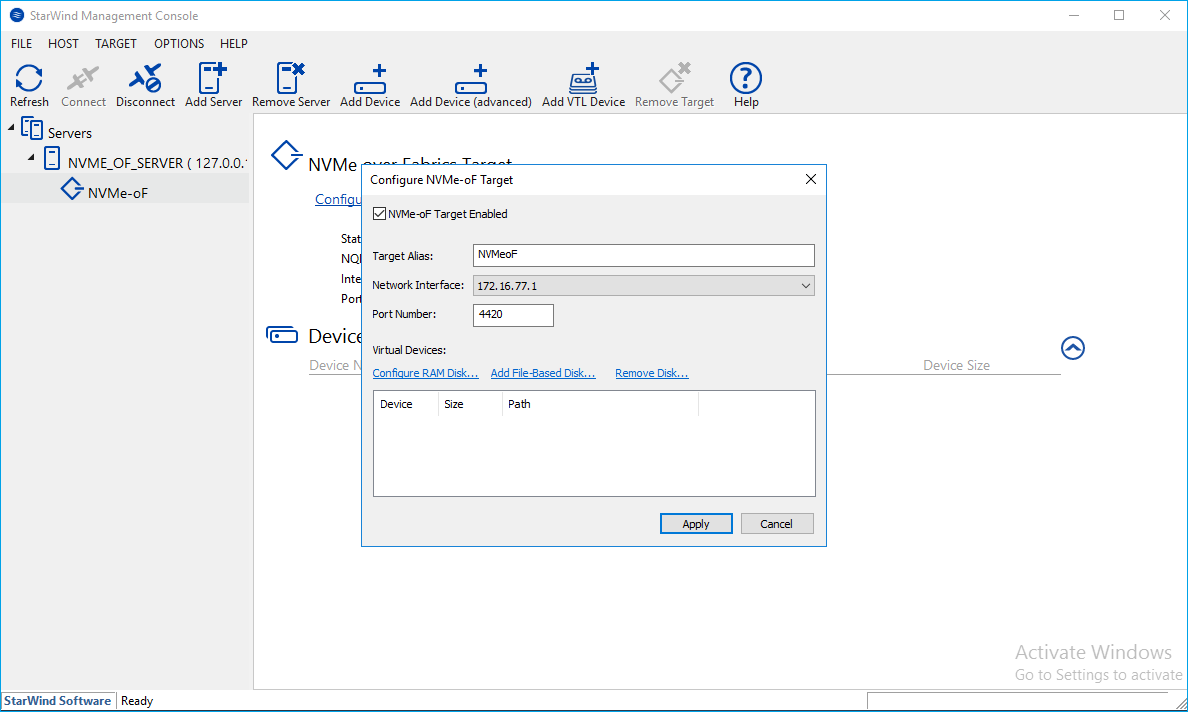
7. Right click on the server and choose Add NVMe-oF… option in the appeared list.
8. lick on the newly created target and press the Config… button. Enter Target Alias and port number (default is 4420) and click the Add File-Based Disk… button.
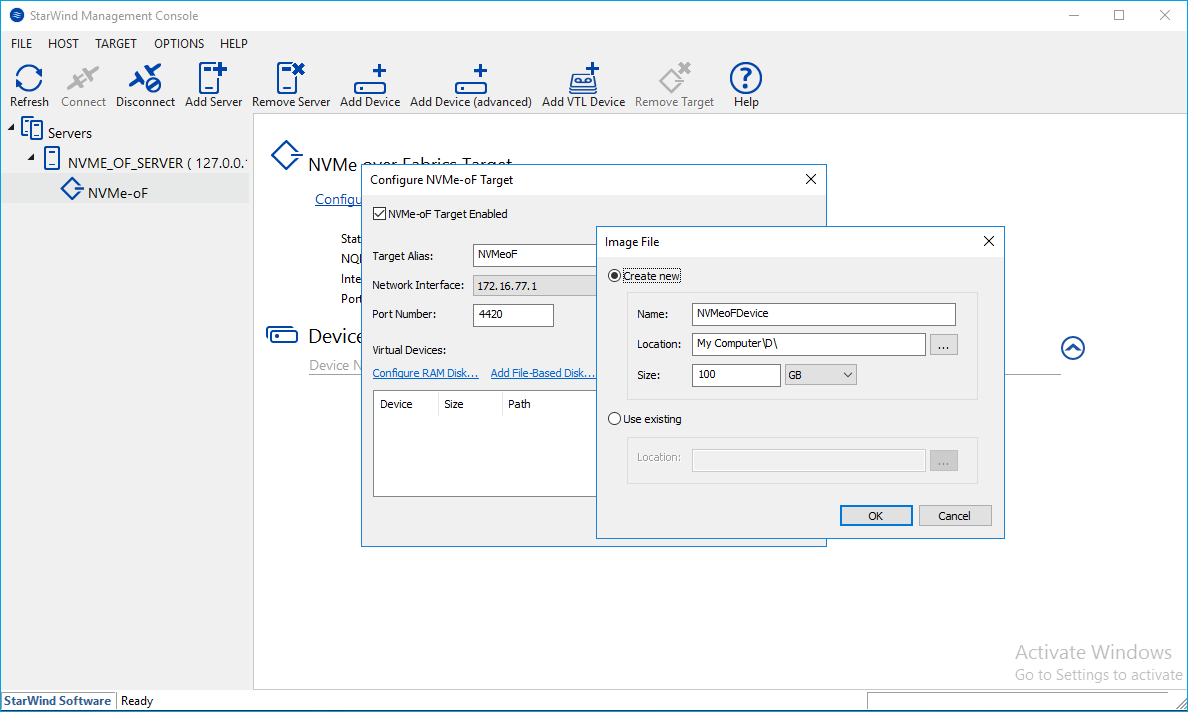
9. In the newly appeared window, specify virtual disk name, its location, and size. Click OK to save the settings.
10. Click Apply to confirm the NVMe-oF configuration.

Discovering and connecting NVMe-oF on CentOS host
1. The Linux kernel NVMe over Fabrics RDMA host support is provided by the nvme-rdma driver:
modprobe nvme-rdma
2. To make sure that nvme-rdma is loading during OS boot, edit nvme.conf using text editor and add nvme_rdma line there.
# vi /etc/modules-load.d/nvme.conf

3. The nvme-cli tool may be used to interface with the Linux kernel NVMe over Fabrics host. To install nvme-cli, run the following command:
# yum install nvme-cli

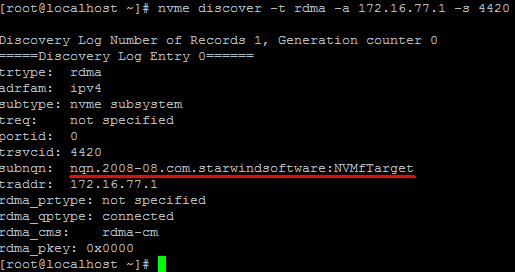
4. To discover the target, run nvme discover command by specifying the protocol, target host IP address, and port number:
# nvme discover -t rdma -a 172.16.77.1 -s 4420
5. To connect the target, run nvme connect command by specifying target name (can be copied from the previous command execution result), target host IP address, and port number:
# nvme connect -t rdma -n "nqn.2008-08.com.starwindsoftware:NVMfTarget" -a 172.16.77.1 -s 4420
6. To check the connected device, run nvme list command:

7. The device can be found in the list of devices, provided by the lsblk command:

