

Many of you have heard of Virtual Volumes (VVols) storage technology, which allows essential increasing of storage I/O performance within VMware vSphere environment by using logical volumes for certain virtual machines components and transferring of some storage operations to disk arrays.

Many of you have heard of Virtual Volumes (VVols) storage technology, which allows essential increasing of storage I/O performance within VMware vSphere environment by using logical volumes for certain virtual machines components and transferring of some storage operations to disk arrays.
Let’s see how VVols technology impacts virtual machines backup process. First, let’s consider main ways of backup in virtual environments:
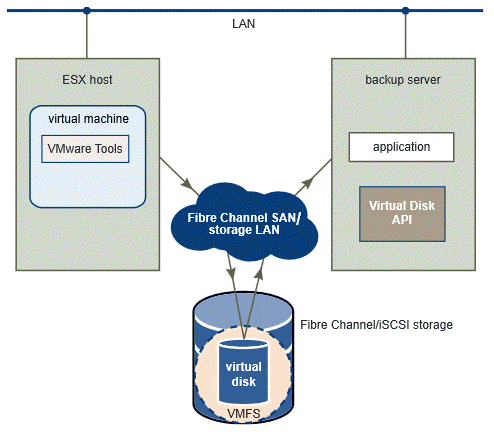
- Backup by mounting virtual disks (Hot Add backup) – in this case VMDK disk of one VM is mounted to another VM and backed up.
- Backup through Ethernet (the so-called NBD backup) – is a standard VM backup through Ethernet network, when VM snapshot is taken (commands are processed by ESXi host), virtual disk is transferred to the backup target, then snapshot is applied to the base disk (“sticks” to it), and the machine keeps working as before.
- Backup through SAN network (SAN-to-SAN backup) – in this case a VM snapshot is shot at dedicated server (Backup Server) through special Virtual Disk API mechanism without ESXi host and backup machine involvement to the target storage directly in SAN network without involvement of Ethernet environment.
The last one is the fastest and the most efficient way, but it requires special interfaces like vSphere APIs and Virtual Disk Development Kit, VDDK, which must be available at dedicated server.
Unfortunately, backup through SAN network is not supported for VVols at the moment, as this way has not been developed yet to work directly with SAN storages based on VVols. That’s why with VVols you have to use backup through Ethernet network. But don’t be upset – this is what is used by most companies to back up machines on VMFS volumes, for different reasons.
Technically, backup of VM on VVols is identical to standard backup in VMware vSphere, as snapshot creation goes through a single mechanism both for standard virtual storages and Virtual Volumes. This is achieved by supporting vSphere APIs for Data Protection (VADP).
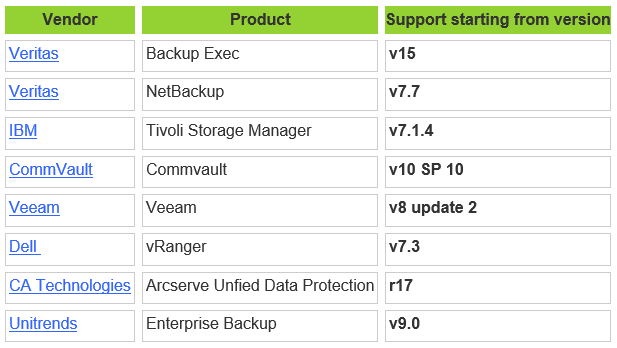
VADP has been supported by virtual machines backup solutions for quite a long time already, so feel free to use them to back up VM at VVols starting from the following versions:
For successful backup through VADP you must have access to vCenter, make its backup copy and create backup of virtual machine, which realizes VASA Provider (VP), if it is not realized in array physically, but is provided as a VM.
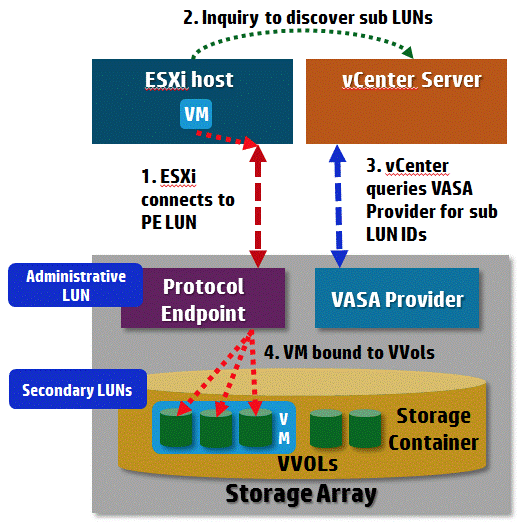
Keep in mind that VASA Provider (if it is VM) contains structure of VVols volumes, as well as virtual machine mappings for the devices, and if this component is lost, you will completely lose control over the storages. It must be said that vendors of solutions supporting VVols usually carry out fault tolerance and disaster recovery of their VP by themselves, but it is necessary to remember that this component is essential, so it will be a good thing to back up it.
There is an important thing about snapshots for VVols volumes. It is not recommended to make more than 2 or 3 snapshots in traditional VMFS storages, though the tree of up to 32 items is supported. Also, according to the best practices, they shouldn’t be stored for more than 24 to 72 hours.
Before making a backup copy of VM, a snapshot is made, which allows switching the base disk to Read Only mode and to record changes to snapshot delta disk. Next, VM basic disk is copied by the backup server, and, after the basic disk is copied, the snapshot is committed to the base disk bringing the machine storage back to its consolidated state.
This is how it works with VMFS file system, which is backed up by physical LUNs. You know, when there is intensive workload during the backup process (especially with big virtual disks), a lot of time can pass after the snapshot taking. This is why a lot of data can be accumulated on delta disks, and snapshot consolidation process sometimes takes practically hours.
It works a bit different with Virtual Volumes. In VVols environment, when snapshot is taken, the base disk remains in Read/Write mode (this procedure is undertaken by the array), so data writing context doesn’t switch anywhere, and changes are recorded to the base disk. Only information on base disk changes, that is which disk blocks have been changed since snapshot taking, is written to the snapshots, which are certain VVol volumes.
And, when snapshot is deleted after the backup completion, no consolidation with the base disk is needed, as storage system keeps working with it just discarding delta disks. So, it goes to show that snapshots with VVols are not as bad as before.
