

Last year I have written a topic on Starwind to create VMs from PowerShell. That enables to automate the creation process without using a GUI, either from Virtual Machine Manager or Hyper-V Manager. But a VM deployment is not finished when the VM is created but when the application is deployed. Before deploying the application, the OS must also be installed and specialized. This topic shows you the method I use to deploy and specialize a VM without a single click.
Specialize OS from unattended file
If you read this documentation (Implicit Answer File Search Order section), you can see that we can specialize the OS from unattended file. This unattended.xml file will be placed in C:\Windows\Panther\Unattend. To prepare the unattended file, I use ADK (Assessment Deployment Kit). When you install the ADK, select Deployment Tools. Then you can open Windows System Image Manager.
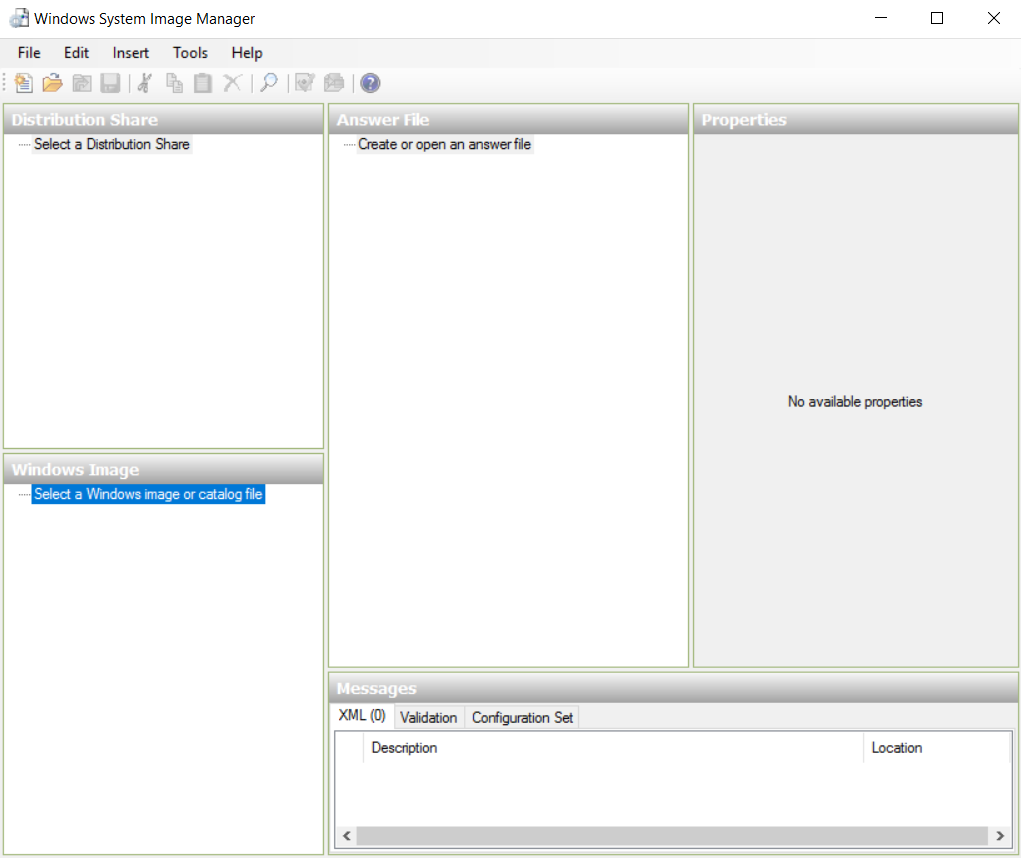
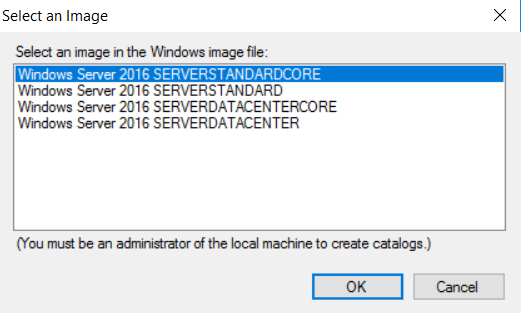
Then select File > Select Windows Image and choose the install.wim of your Windows Server. For this example, I have chosen an install.wim from Windows Server 2016 ISO. Select the image you want and click on OK.
Once the image is loaded, you can create an answer file. Click on File > New Answer file. Below you can find the answer file I use:

|
1 2 3 4 5 6 7 8 9 10 11 12 13 14 15 16 17 18 19 20 21 22 23 24 25 26 27 28 29 30 31 32 33 34 35 36 37 38 39 40 41 42 43 44 45 46 47 48 49 50 51 52 53 54 55 56 57 58 59 60 61 62 63 64 65 66 67 68 69 70 71 72 73 74 75 76 77 78 79 80 81 82 83 84 85 86 87 88 89 90 91 |
<?xml version="1.0" encoding="utf-8"?> <unattend xmlns="urn:schemas-microsoft-com:unattend"> <settings pass="specialize"> <component name="Microsoft-Windows-Shell-Setup" processorArchitecture="amd64" publicKeyToken="31bf3856ad364e35" language="neutral" versionScope="nonSxS" xmlns:wcm="http://schemas.microsoft.com/WMIConfig/2002/State" xmlns:xsi="http://www.w3.org/2001/XMLSchema-instance"> <ProductKey>C3RCX-M6NRP-6CXC9-TW2F2-4RHYD</ProductKey> <TimeZone>Romance Standard Time</TimeZone> </component> </settings> <settings pass="oobeSystem"> <component name="Microsoft-Windows-Shell-Setup" processorArchitecture="amd64" publicKeyToken="31bf3856ad364e35" language="neutral" versionScope="nonSxS" xmlns:wcm="http://schemas.microsoft.com/WMIConfig/2002/State" xmlns:xsi="http://www.w3.org/2001/XMLSchema-instance"> <UserAccounts> <AdministratorPassword> <Value>MyPassword</Value> <PlainText>false</PlainText> </AdministratorPassword> </UserAccounts> <AutoLogon> <Password> <Value>MyPassword</Value> <PlainText>false</PlainText> </Password> <Enabled>true</Enabled> <LogonCount>1</LogonCount> <Username>administrator</Username> </AutoLogon> <FirstLogonCommands> <SynchronousCommand wcm:action="add"> <CommandLine>powershell.exe -file C:\Windows\Panther\Unattend\ConfigureOS.ps1</CommandLine> <Order>1</Order> <Description>Specialize OS</Description> </SynchronousCommand> </FirstLogonCommands> </component> <component name="Microsoft-Windows-International-Core" processorArchitecture="amd64" publicKeyToken="31bf3856ad364e35" language="neutral" versionScope="nonSxS" xmlns:wcm="http://schemas.microsoft.com/WMIConfig/2002/State" xmlns:xsi="http://www.w3.org/2001/XMLSchema-instance"> <InputLocale>fr-FR</InputLocale> <SystemLocale>en-US</SystemLocale> <UILanguage>en-US</UILanguage> <UserLocale>en-US</UserLocale> </component> </settings> <settings pass="generalize"> <component name="Microsoft-Windows-PnpSysprep" processorArchitecture="amd64" publicKeyToken="31bf3856ad364e35" language="neutral" versionScope="nonSxS" xmlns:wcm="http://schemas.microsoft.com/WMIConfig/2002/State" xmlns:xsi="http://www.w3.org/2001/XMLSchema-instance"> <PersistAllDeviceInstalls>true</PersistAllDeviceInstalls> </component> </settings> </unattend> |
This unattended.xml file set the following element:
- The timezone
- The product key (AVMA Key)
- An autologon which can run once time (to run a script automatically). The following script will be run the first time: C:\Windows\Panther\Unattend\ConfigureOS.ps1
- The system language:
- Keyboard layout: French
- UI and system language: en-US
- The PnP devices are not uninstalled during generalize pass. Because VMs have always the same hardware, I set this setting to save time during specialization
I save this with the following name: unattend.xml
PowerShell script for specific settings
I have written the bellow script which is run on the first logon on the server. Because the unattended file set the autologon once a time, this script is automatically run at the deployment.
This script takes settings from a XML file which I configure for each VM. This script set the following:
- Rename network adapters (requires device naming enabled on vNIC)
- Set IP Addresses with the configuration specified in XML file
- The machine join the domain
- xml and configuration xml are removed because sensitive information are stored in these files.
- The VM is rebooted
|
1 2 3 4 5 6 7 8 9 10 11 12 13 14 15 16 17 18 19 20 21 22 23 24 25 26 27 28 29 30 31 32 33 34 35 36 37 38 39 40 41 42 43 44 45 46 47 48 49 50 51 52 53 54 55 56 57 58 59 60 61 62 63 64 65 66 67 68 69 70 71 72 73 74 75 76 77 78 79 80 81 82 83 84 85 86 87 88 89 90 91 92 93 94 95 96 97 98 99 100 101 102 103 104 105 106 107 108 109 110 111 112 113 |
[xml]$XML = Get-Content C:\Windows\Panther\Unattend\ConfigureOS.xml ## STEP 1: RENAME NET ADAPTER ## Foreach ($NetAdapter in Get-NetAdapter){ Write-Host "Renaming network adapters ..." -ForegroundColor Green -BackgroundColor Black $NetAdapterDisplayValue = (get-netAdapterAdvancedProperty | ?{($_.DisplayName -eq "Hyper-V Network Adapter Name") -and ($_.Name -eq $NetAdapter.Name)}).DisplayValue Rename-NetAdapter -Name $NetAdapter.Name -NewName $NetAdapterDisplayValue } ## STEP 2: SET IP ADDRESSES ## Foreach ($NetAdapter in $XML.Configuration.NetAdapters.NetAdapter){ Write-Host "Set IP Address on $($NetAdapter.Name)" -ForegroundColor Green -BackgroundColor Black if ($NetAdapter.Gw -notlike $Null){ New-NetIPAddress -InterfaceAlias $($NetAdapter.Name) ` -IPAddress $($NetAdapter.IP) ` -PrefixLength $($NetAdapter.Netmask) ` -DefaultGateway $($NetAdapter.GW) ` -Type Unicast | Out-Null } Else { New-NetIPAddress -InterfaceAlias $($NetAdapter.Name) ` -IPAddress $($NetAdapter.IP) ` -PrefixLength $($NetAdapter.Netmask) ` -Type Unicast | Out-Null } if ($NetAdapter.DNS -notlike $Null){ Set-DnsClientServerAddress -InterfaceAlias $($NetAdapter.Name) ` -ServerAddresses $($NetAdapter.DNS) | Out-Null } if (!($NetAdapter.RegisterDNS)){ Set-DNSClient -InterfaceAlias $($NetAdapter.Name) -RegisterThisConnectionsAddress $False } } ## STEP 3: JOIN DOMAIN ## Write-Host "Joining $($Xml.Configuration.Domain.Name) domain..." -ForegroundColor Green -BackgroundColor Black $Account = $XML.Configuration.Domain.Account $Password = ConvertTo-SecureString $XML.Configuration.Domain.Password -AsPlainText -Force $credential = New-Object -typename System.Management.Automation.PSCredential -argumentlist $Account, $Password Sleep 5 Add-Computer -DomainName $XML.Configuration.Domain.Name ` -OUPath $XML.Configuration.Domain.OUPath ` -NewName $XML.Configuration.ComputerName ` -Credential $Credential ## STEP 4: Remove Unattend file and XML file ## Write-Host "Removing sensitive files ..." -ForegroundColor Green -BackgroundColor Black Remove-Item C:\Windows\Panther\Unattend\Unattend.xml -Confirm:$False Remove-Item C:\Windows\Panther\Unattend\ConfigureOS.xml -Confirm:$False ## STEP 5: REBOOT ## Write-Host "Rebooting." -ForegroundColor Green -BackgroundColor Black Sleep 5 Restart-Computer -Force |
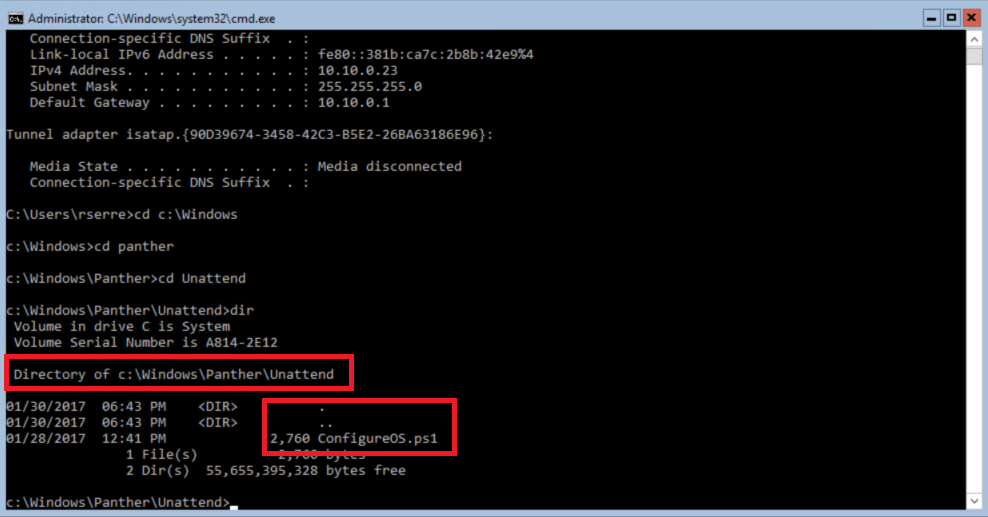
I copy the above PowerShell script in the VHDX master here: c:\Windows\Panther\Unattend\ConfigureOS.ps1. Below you can find the XML file
|
1 2 3 4 5 6 7 8 9 10 11 12 13 14 15 16 17 18 19 20 21 22 23 24 25 26 27 |
<?xml version="1.0" encoding="UTF-8"?> <Configuration> <ComputerName>VMTST01</ComputerName> <NetAdapters> <NetAdapter Name="Management-0" IP="10.10.0.23" Netmask="24" GW="10.10.0.1" DNS="10.10.0.20,10.10.0.21" RegisterDNS="1" /> </NetAdapters> <Domain> <Name>HomeCloud.net</Name> <OUPath>OU=Computers,OU=Servers,DC=HomeCloud,DC=net</OUPath> < !-- Account which can add the computer to the domain --> <Account>sa-ads-join</Account> <Password>password</Password> </Domain> </Configuration> |
As you can see, this file contains a sensitive information. This is why I leave the field password empty and I fill this information when I need it. The above XML file is copied in the VHDX master here: c:\windows\panther\Unattend\ConfigureOS.xml
Prepare the VHDX master
To prepare a VHDX Master, I have deployed a Windows Server 2016 Standard Core VM. Then I have applied the updates. To finish I have run the following command:
|
1 |
C:\windows\system32\sysprep\sysprep.exe /generalize /oobe /shutdown /mode:VM |
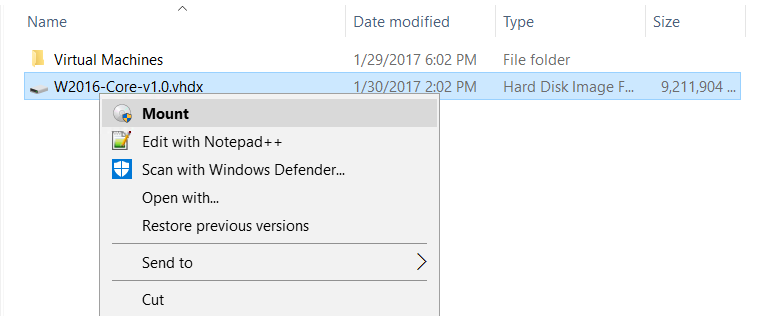
Then I have copied the VHDX in a repository. Next, mount the VHDX:
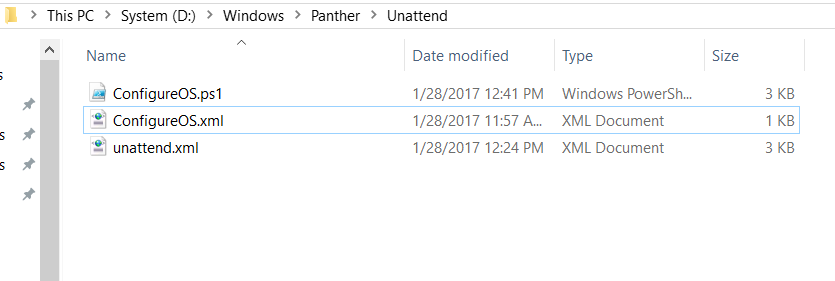
To finish, copy the unattend.xml, the ConfigureOS.ps1 and ConfigureOS.xml into the windows\panther\Unattend
Now unmount the VHDX and create a VM. You can copy the VHDX and attach it to the VM.

Test the OS deployment
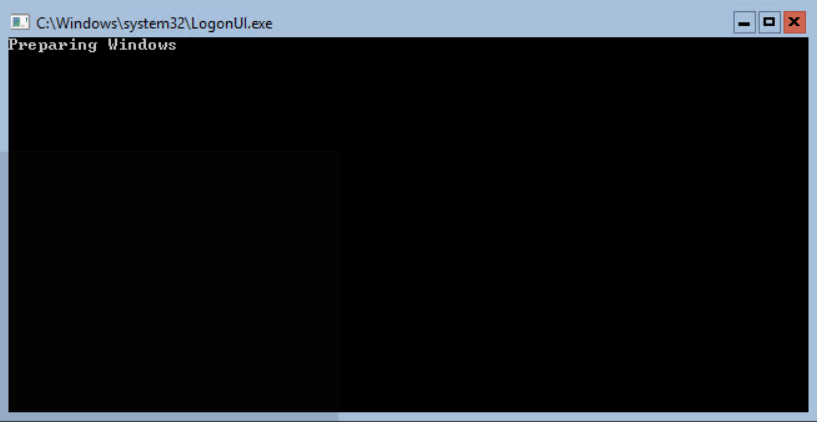
Now the VHDX is attached to the VM, you can run the VM. Below you can find the screenshot of the VM configuration. First the VM apply the unattend.xml file:

Then Windows boot and the account Administrator is logged automatically
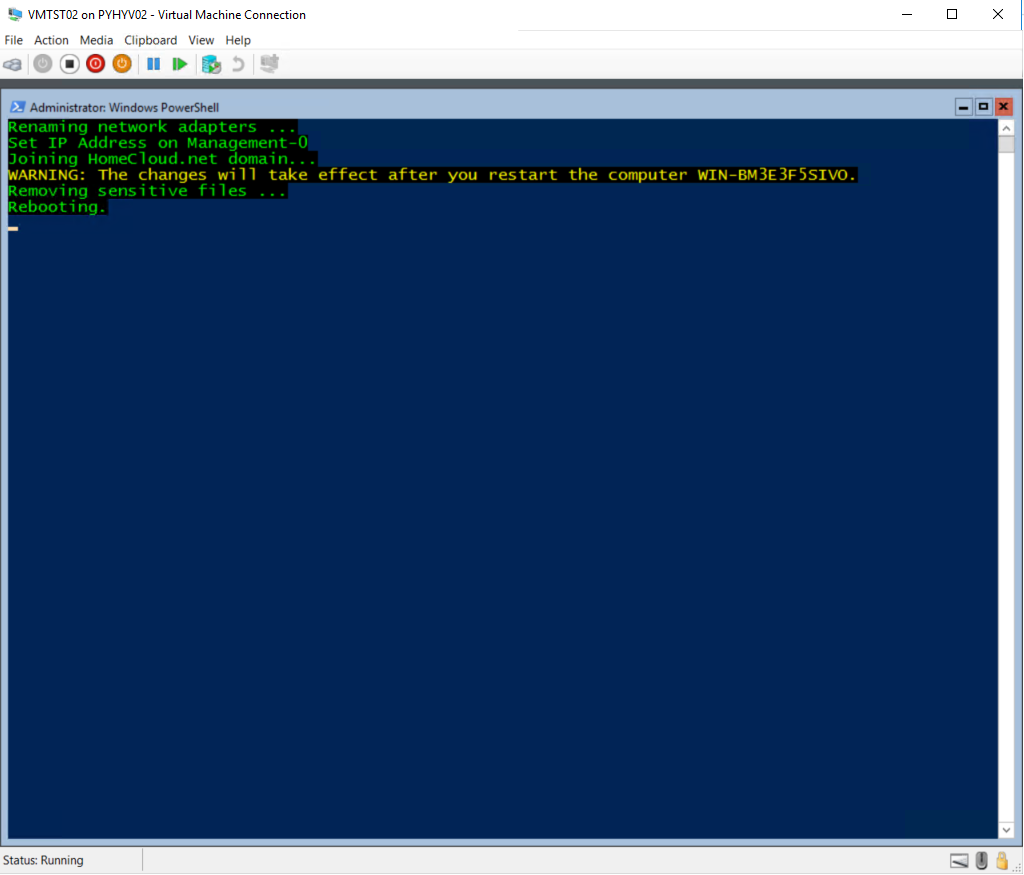
Then the Powershell script is automatically executed
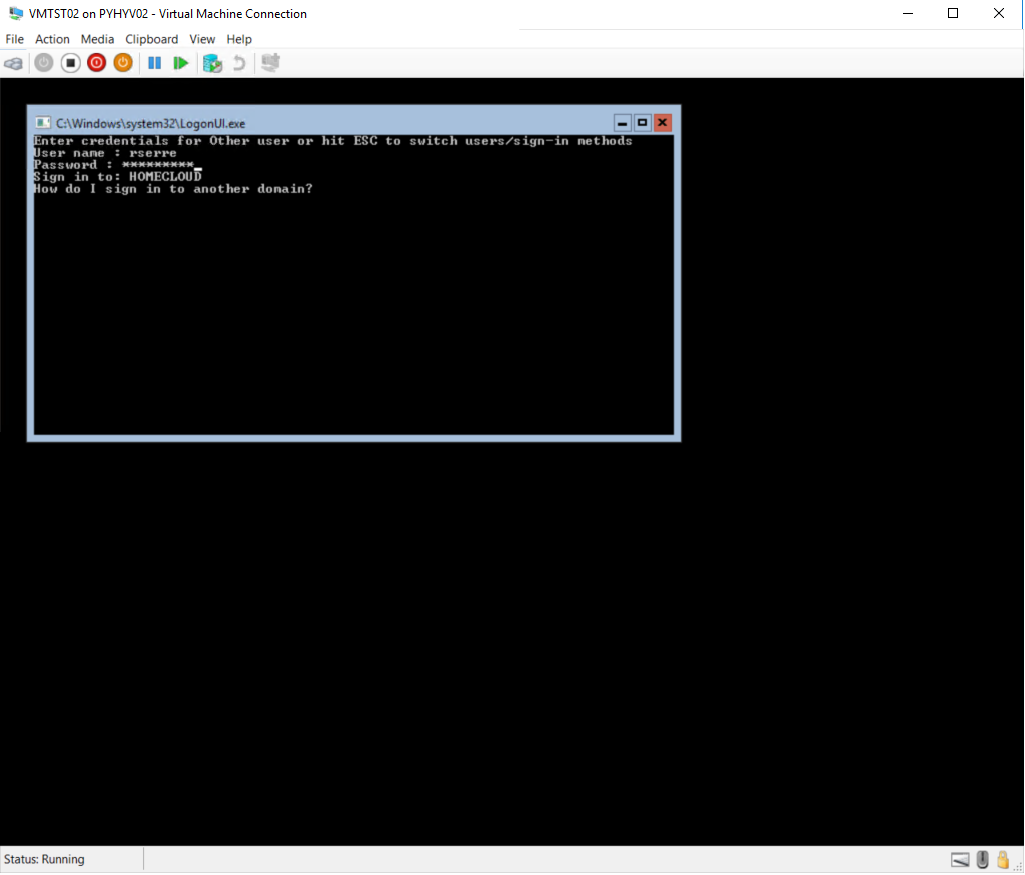
At next logon, I’m able to connect with Active Directory account
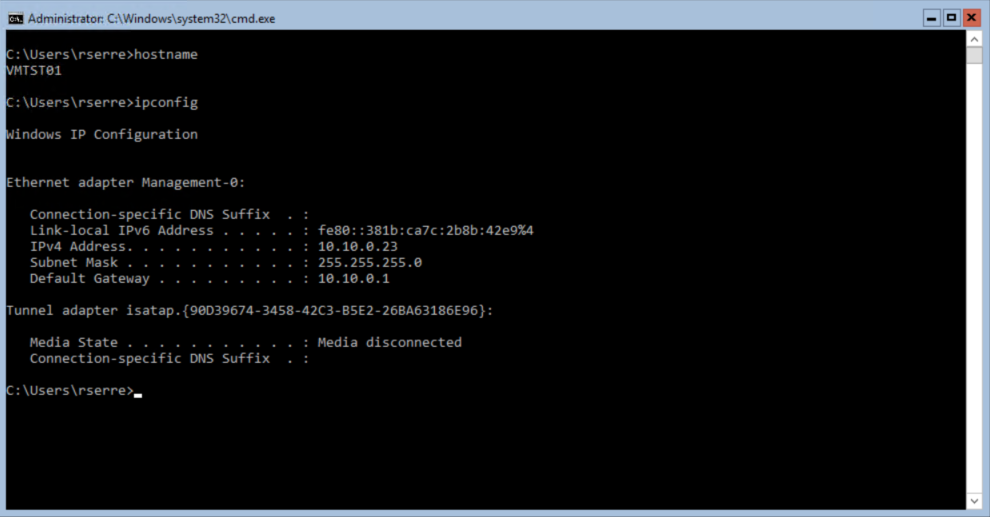
The IP address, network adapter name and computer name are well set:
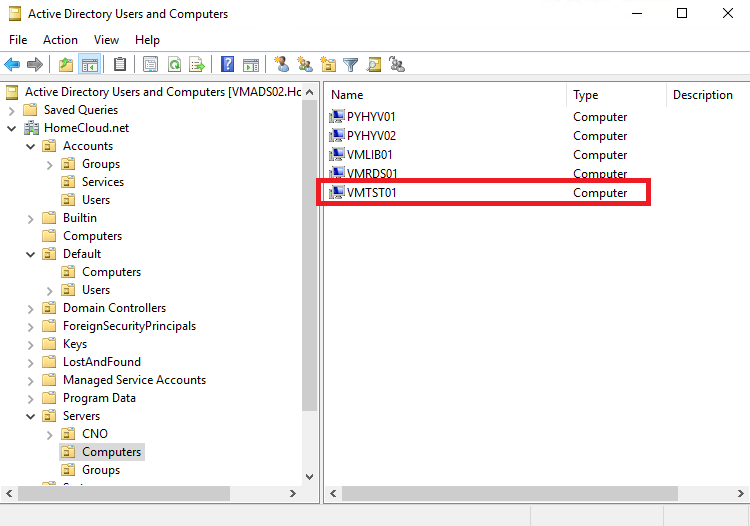
The computer is placed in the right Active Directory OU:
And to finish, the sensitive files are deleted:
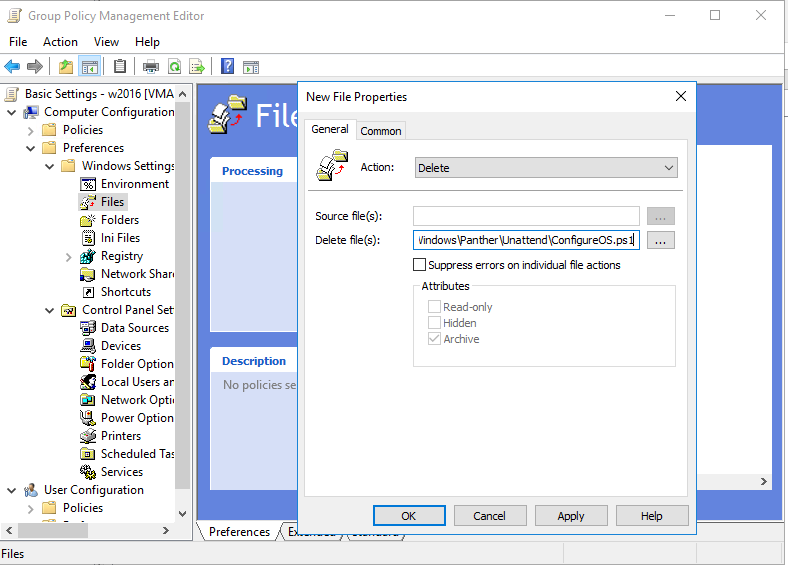
If I want delete the ConfigureOS.ps1 script after deployment, I can create a GPO to make this. Just create a Files GPP as below:
Conclusion
Thanks to unattended file, you can customize OS and run specific PowerShell scripts. With this feature, you can specialize your OS from the deployment. Thanks to this method, you just have to deploy your application after the VM deployment. Virtual Machine Manager uses the same mechanism to specialize the OS after the VM creation. The automatic OS configuration is really appreciable to get a consistent environment. So why not use it?
- Why moving from Windows Server 2012 R2 to 2016 for Hyper-V
- Storage Replica: “Shared Nothing” Hyper-V Guest VM Cluster
