

On October 1st, Microsoft Exchange Team released the new Exchange Server 2016. Microsoft had been testing and improving on millions of mailboxes in their Office365 environment before it released the product on-premises. In this article, I will describe a step-by-step guide for the installation of Microsoft Exchange Server 2016. The installation considers:
- Single server deployment of Exchange Server 2016 with the Mailbox role on the new Windows Server 2016
- Windows Server 2016 forest functional level
- Exchange Server 2016 with the latest Cumulative Update 4
Because Windows PowerShell is a powerful tool that every sysadmin should already know, I will use PowerShell to perform the installation. But If you prefer the graphical interface, you can use that.
Step 1: Requirements
Before installing Exchange Server 2016, you must review the following requirements:
| Forest Functional Level for Exchange 2016 |
|
| Minimum Operation System |
|
| Minimum Memory Requirement (RAM) |
|
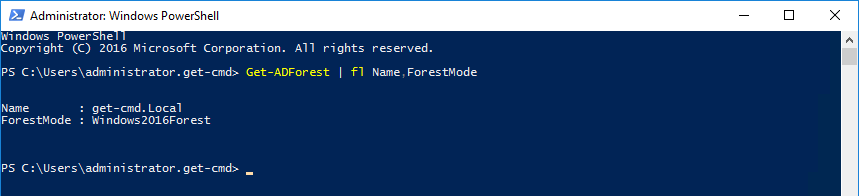
To check your Active Directory Forest Functional Level, you can run the “Get-ADForest” cmdlet:
Important:
- Note that Microsoft doesn’t support the installation of Exchange 2016 on a computer that’s running Windows Server Core or Nano Server. The Windows Server Desktop Experience feature needs to be installed.
- Client Access Role is removed in Exchange Server 2016, which simplifies the Exchange architecture.
If you need further information about what you need to have in your environment before installing Exchange 2016, please visit the following link: https://technet.microsoft.com/en-US/library/aa996719(v=exchg.160).aspx
Step 2: Installing Pre-Requisites
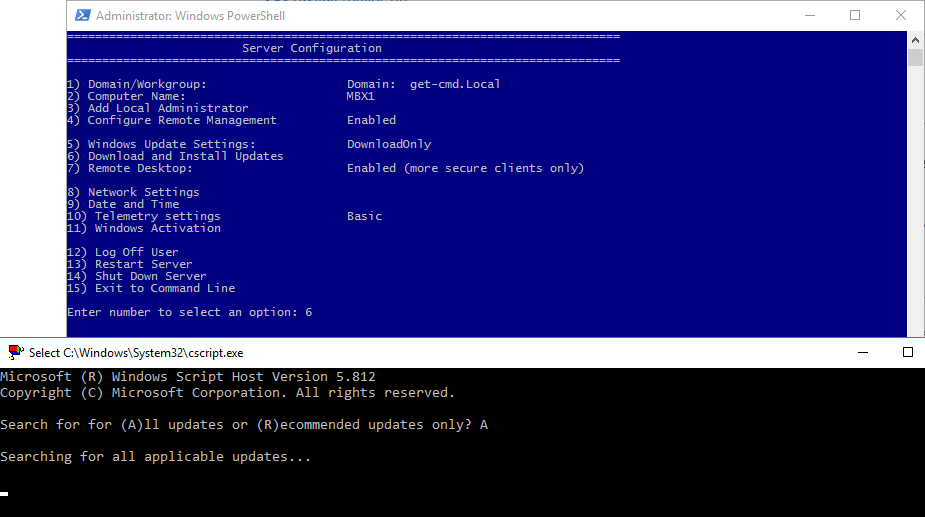
Open Windows PowerShell as Administrator, and run the sconfig utility to install the latest Windows Updates. Exchange Server 2016 requires the update described in Microsoft Knowledge Base article KB3206632. Without this update, Exchange Server 2016 will not work reliably on Windows Server 2016. Choose number 6 to download and install Updates:
Next, run the following command to install the Remote Tools Administration Pack:
|
1 |
PS > Install-WindowsFeature RSAT-ADDS |

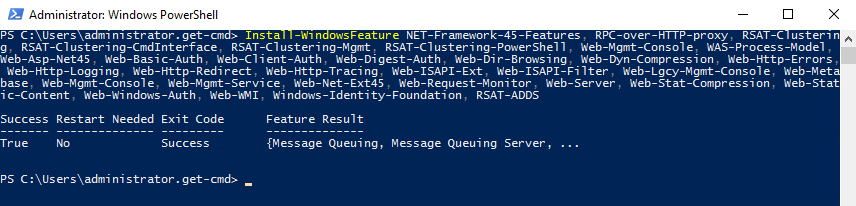
Now, we will install the required roles. The prerequisites for Exchange Server 2016 varies if you run Windows Server 2012 or 2016. So be careful, and use the following for Windows Server 2016:
|
1 |
PS > Install-WindowsFeature NET-Framework-45-Features, RPC-over-HTTP-proxy, RSAT-Clustering, RSAT-Clustering-CmdInterface, RSAT-Clustering-Mgmt, RSAT-Clustering-PowerShell, Web-Mgmt-Console, WAS-Process-Model, Web-Asp-Net45, Web-Basic-Auth, Web-Client-Auth, Web-Digest-Auth, Web-Dir-Browsing, Web-Dyn-Compression, Web-Http-Errors, Web-Http-Logging, Web-Http-Redirect, Web-Http-Tracing, Web-ISAPI-Ext, Web-ISAPI-Filter, Web-Lgcy-Mgmt-Console, Web-Metabase, Web-Mgmt-Console, Web-Mgmt-Service, Web-Net-Ext45, Web-Request-Monitor, Web-Server, Web-Stat-Compression, Web-Static-Content, Web-Windows-Auth, Web-WMI, Windows-Identity-Foundation, RSAT-ADDS |
Windows indicates that no reboot is required, but I advise you to restart the server.
.Net Framework 4.5 and higher is required, so to check the .Net version on Windows Server 2016:
|
1 |
PS > (Get-ItemProperty -Path 'HKLM:\SOFTWARE\Microsoft\NET Framework Setup\NDP\v4\Full' ).Release |
If it’s above “394747”, then it means you have the necessary .NET Framework 4.6.2 or later installed.

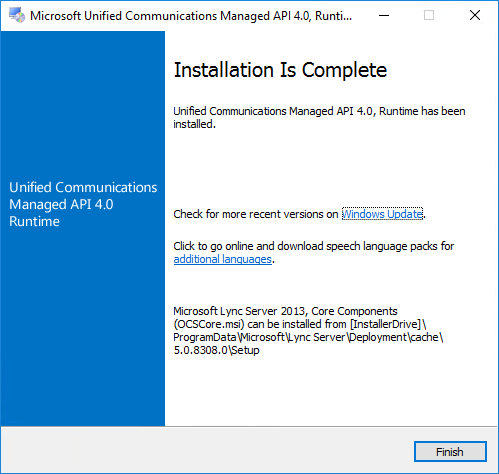
To finish with pre-requisites, you must download and install Unified Communications Managed API 4.0 Runtime: http://www.microsoft.com/en-us/download/details.aspx?id=34992
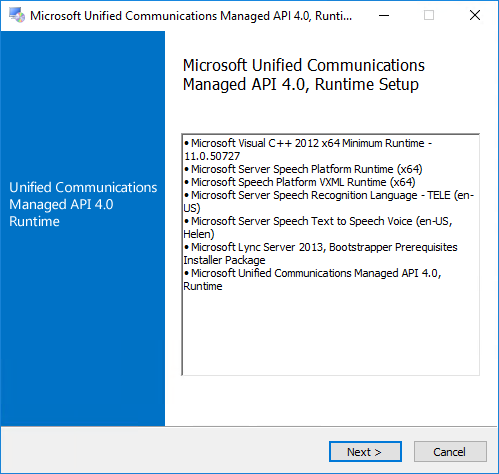
Click Next and Finish to install Microsoft UCMA component:
Step 3: Preparing Schema and Active Directory
After you’ve prepared a Windows Server with the Exchange Server 2016 pre-requisites, you can proceed with the schema update. To apply only the schema update:
First, mount the Exchange Server 2016 installation media, open a PowerShell console and navigate to the setup files. Then, type the following command:
|
1 2 |
cd d: .\setup /PrepareSchema /IAcceptExchangeServerLicenseTerms |
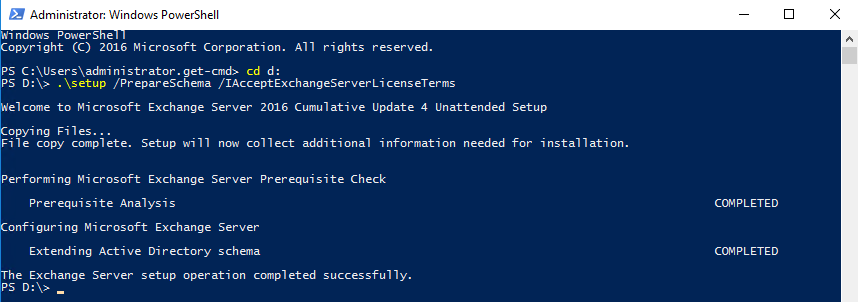
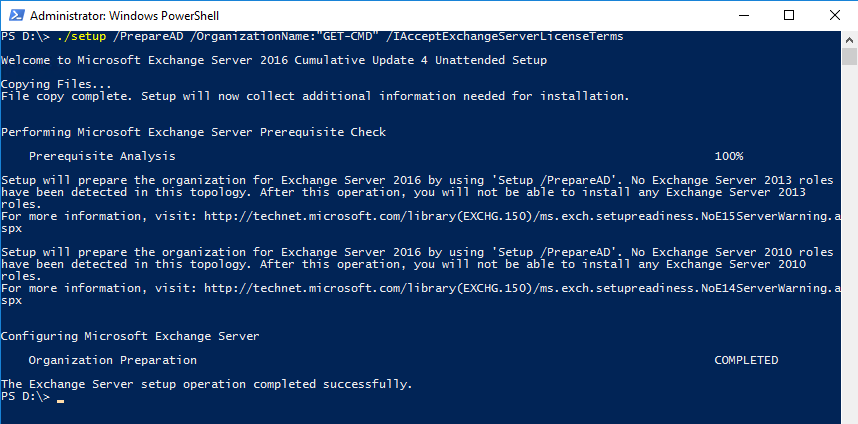
Extending schema status must be “Completed”. After applying the schema update we can prepare our Active Directory with the PrepareAD parameter:
|
1 |
.\setup /PrepareAD /OrganizationName:"GET-CMD" /IAcceptExchangeServerLicenseTerms |
The final step to get Active Directory ready for Exchange is to prepare each of the Active Directory domains where Exchange will be installed.
|
1 |
.\setup /Preparedomain /IAcceptExchangeServerLicenseTerms |
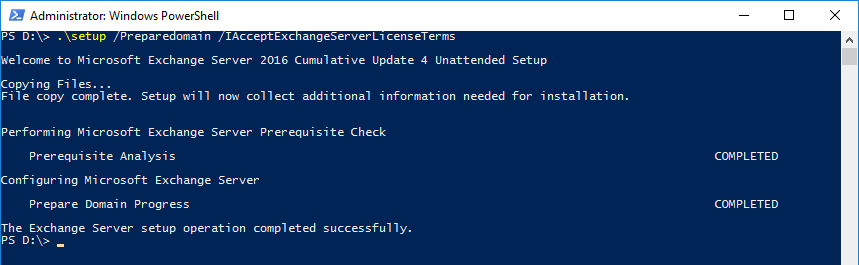
If you have more than one domain, you can replace the PrepareDomain parameter with PrepareAllDomains parameter.
 |
StarWind HyperConverged Appliance is a turnkey, entirely software-defined hyperconverged platform purpose-built for intensive virtualization workloads. Bringing the desired performance and reducing downtime, the solution can be deployed by organizations with limited budgets and IT team resources. Also, it requires only one onsite node to deliver HA for your applications that makes the solution even more cost-efficient. |
| Find out more about ➡ StarWind HyperConverged Appliance |
Step 4: Installing the Mailbox Server Role
The Mailbox server role contains all of the components required to run an Exchange Server 2016 server. If you need an Edge Server, you can still install it in Exchange 2016 but that is not a mandatory role. At this point, it’s up to you. To install the Mailbox Role, there are two ways you can do this:
- Using the graphical interface. Run the exe, choose Next, Accept the agreement, select the Mailbox Role, specify the path for the Exchange Server installation and choose Install.
- Or you can try to install Exchange with Windows PowerShell.
Below are the available parameters to customize your installation:
|
1 2 3 4 5 6 7 8 9 10 11 12 13 14 15 16 17 18 19 20 21 22 23 24 25 26 27 |
Setup.exe [/Mode:<setup mode>] [/IAcceptExchangeServerLicenseTerms] [/Role:<server role to install>] [/InstallWindowsComponents] [/OrganizationName:<name for the new Exchange organization>] [/TargetDir:<target directory>] [/SourceDir:<source directory>] [/UpdatesDir:<directory from which to install updates>] [/DomainController:<FQDN of domain controller>] [/DisableAMFiltering] [/AnswerFile:<filename>] [/DoNotStartTransport] [/EnableErrorReporting] [/CustomerFeedbackEnabled:<True | False>] [/AddUmLanguagePack:<UM language pack name>] [/RemoveUmLanguagePack:<UM language pack name>] [/NewProvisionedServer:<server>] [/RemoveProvisionedServer:<server>] [/MdbName:<mailbox database name>] [/DbFilePath:<Edb file path>] [/LogFolderPath:<log folder path>] [/ActiveDirectorySplitPermissions:<True | False>] [/TenantOrganizationConfig:<path>] |
In my opinion, it’s never a good idea to install the Exchange Database and the log folder on the root partition.
|
1 2 3 |
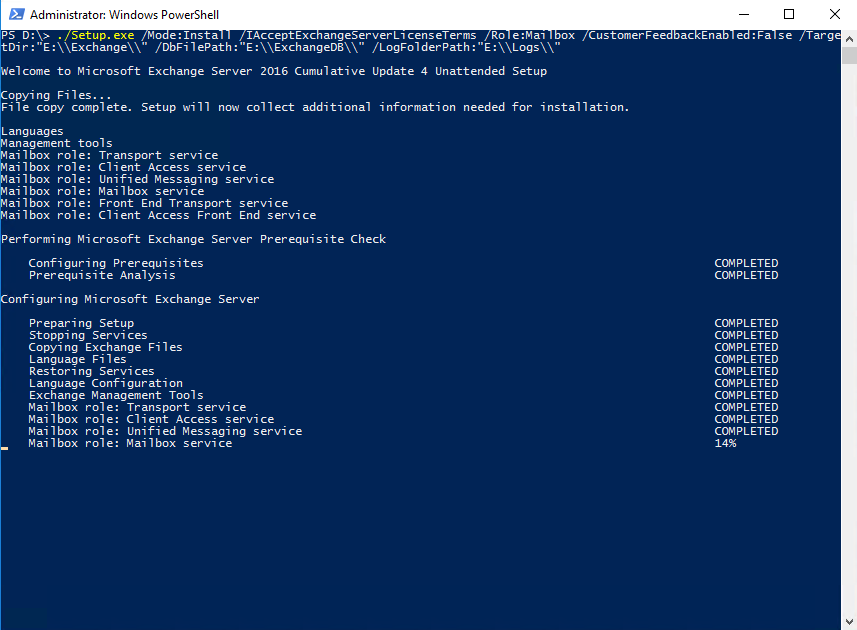
PS D:\> ./Setup.exe /Mode:Install /IAcceptExchangeServerLicenseTerms /Role:Mailbox /CustomerFeedbackEnabled:False /Targe tDir:"E:\\Exchange\\" /DbFilePath:"E:\\ExchangeDB\\" /LogFolderPath:"E:\\Logs\\" |
The setup process will collect some information needed for installation, check the prerequisites and configure your Exchange Server. Just wait …
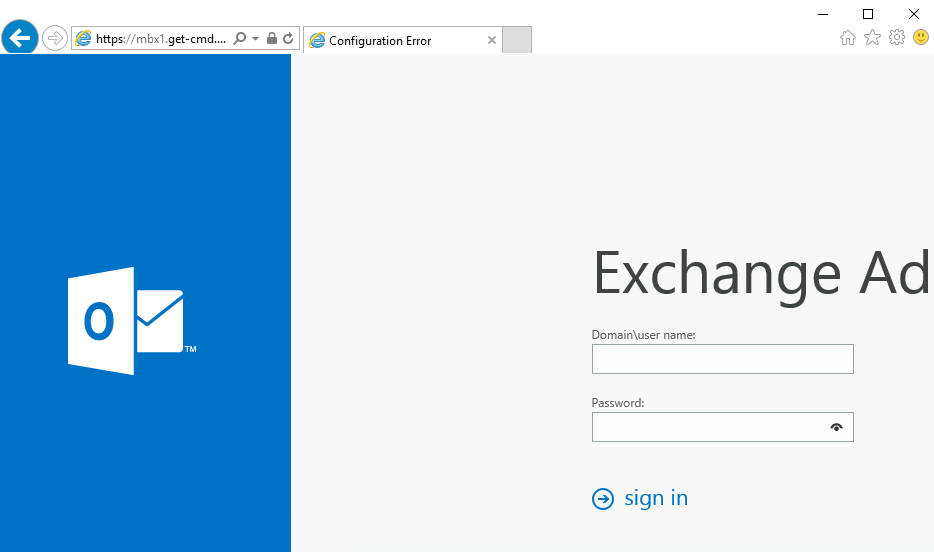
When it’s done, open Internet Explorer and go to https://<FQDN of Mailbox Server>/owa to validate your Exchange installation.
You have successfully installed your Exchange Server 2016 on Windows Server 2016. The idea of this article was to illustrate how PowerShell can allow us to simplify and automate our daily tasks.
Thanks for checking out this guide!
