


Introduction
In Part I of this series, we created the tenant virtual network and connecting two VMs to it using System Center Virtual Machine Manager, and then we validated they can route between each other.
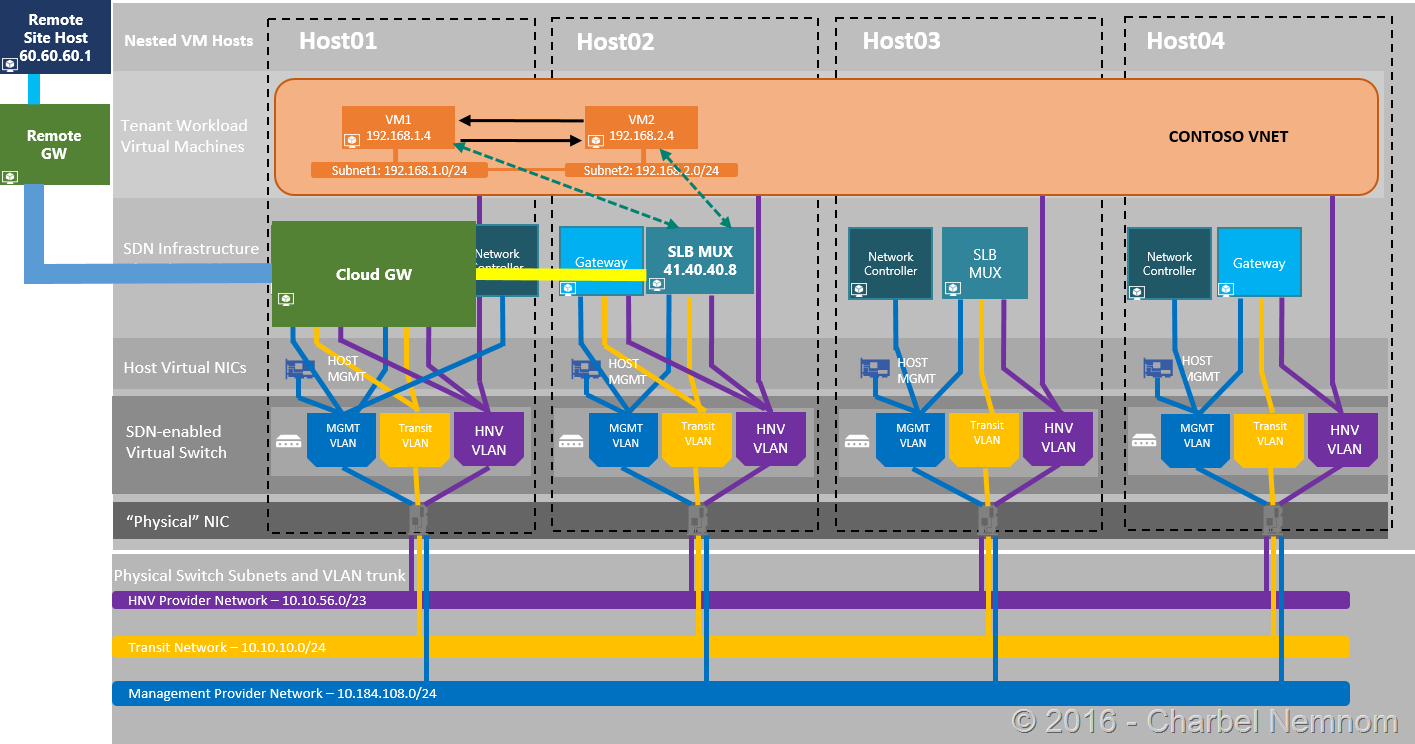
In this blog post Part II, we will be creating a public Virtual IP Address (VIP) on the Software Load Balancer (SLB) MUX using SCVMM and PowerShell through which you can access a website on your virtual network. We will also create Site-to-site (S2S) VPN to a Remote site.
Please make sure to check Part I so you can have an overview of the infrastructure and the VMM Logical Network that we are using throughout this series.
Create a Load-Balanced VIP
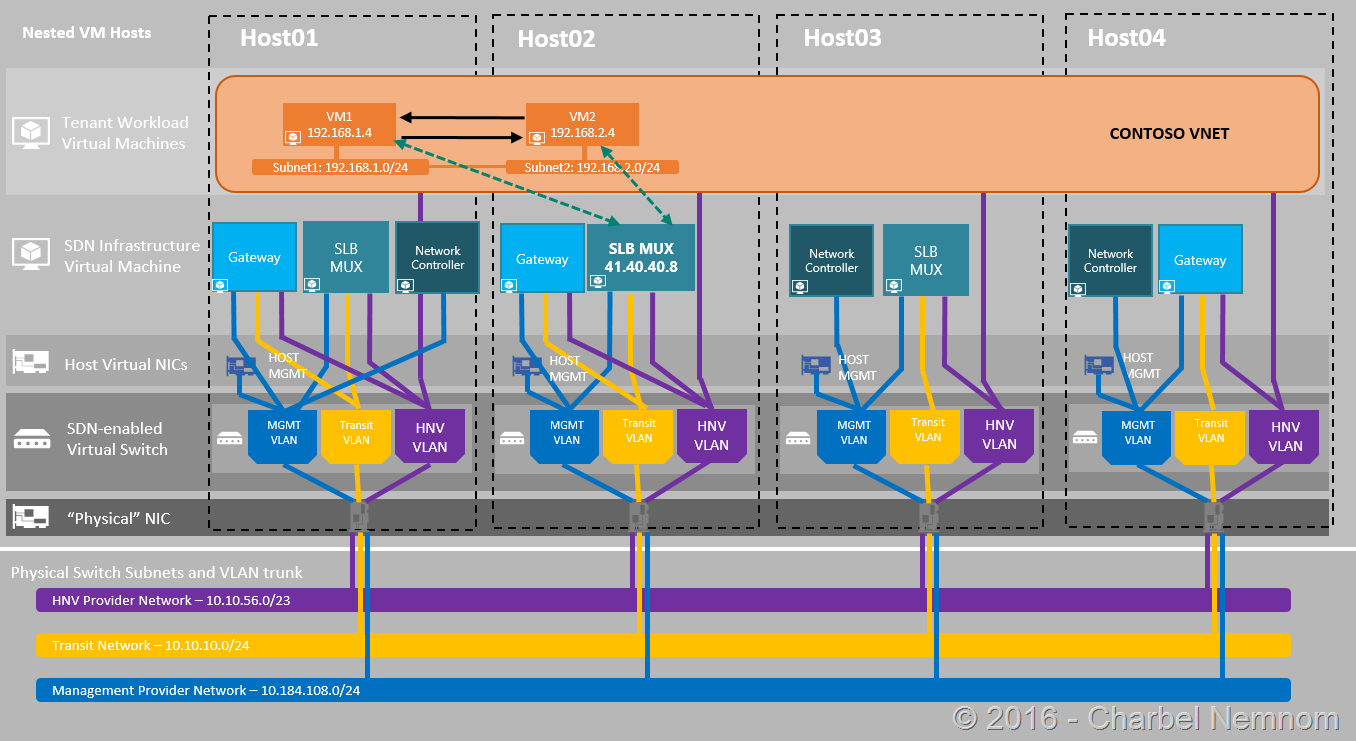
The diagram below gives you a high-level view of the topology that we will be using to create the public Load-Balanced VIP.
In the following steps, we will be creating a public VIP on the Software Load Balancer (SLB) using SCVMM console and PowerShell:
Create VIP Template using VMM Console
- Open System Center Virtual Machine Manager (SCVMM) Console and navigate to “Fabric” in the bottom-left hand side. Right-click on “VIP Templates” in the menu under “Networking” and select “Create VIP Template”.
- Input the Template name and optionally a description for the VIP Template. Specify the “Virtual IP port” (public facing) value of 80 and “Backend port” (on tenant VMs) value of 80. Click “Next”.

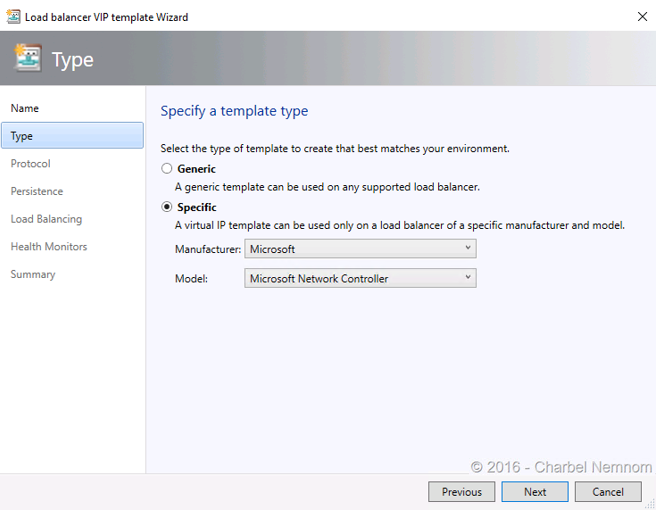
- Select “Specific” template and navigate to: Manufacturer: “Microsoft” and Model: “Microsoft Network Controller”. Click “Next”.
- Select “Custom” protocol and type in value of TCP as protocol name. Click “Next”.
- Leave the “Enable Persistence” checkbox un-checked. Click “Next”.
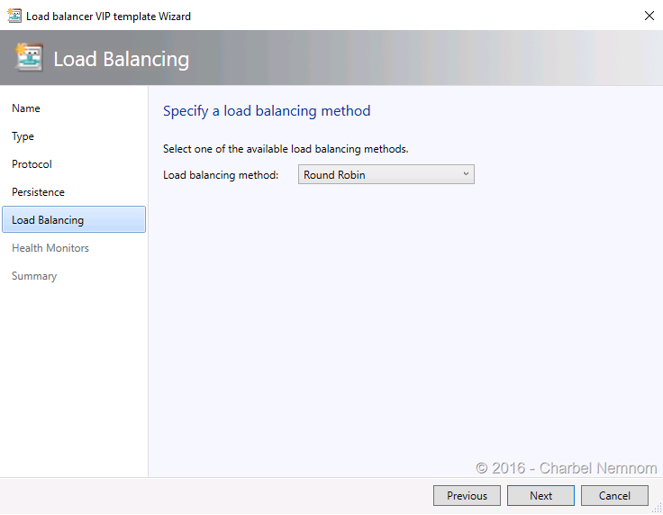
- Select a Load Balancing Click the drop-down to choose a load balancing method and select “Round Robin”. Click “Next”.
- Skip specify a Health Monitors. Click “Next”.
- In the Summary page. Click “Finish” to create the VIP Template. Check in “jobs” pane to see if the task creation is finished.
Create Tenant VIP using PowerShell
- Open the “Windows Powershell ISE” as Administrator.
- Copy the following script into your ISE window and run it on your VMM server.
1234567891011121314151617181920212223242526272829303132333435363738394041424344454647484950515253545556575859606162636465666768697071727374757677787980818283848586878889909192939495969798Import-Module VirtualMachineManagerfunction CreateTenantVIP{param([Parameter(Mandatory=$false)]# Name of the Network Controller Network Service# This value should be the name you gave the Network Controller Service# When you on-boarded the Network Controller into VMM$NCServiceName = "NCSERVICE",[Parameter(Mandatory=$true)]# Name of the VM instances to which you want to assign the VIP$VipMemberVMNames,[Parameter(Mandatory=$false)]# VIP address you want to assign from the Public VIP pool.# Pick any VIP that falls within your SLB VIP IP Pool range.$VipAddress = "41.40.40.8",[Parameter(Mandatory=$false)]# Name of the VIP VM Network$VipNetworkName = "PUBVIP",[Parameter(Mandatory=$true)]# The name of the VIP template you created via the VMM Console.$VipTemplateName,[Parameter(Mandatory=$true)]# Arbitrary but good to match the VIP you are using.$VipName)$lb = Get-SCLoadBalancer | where { $_.Service.Name -eq $NCServiceName};$VipNetwork = Get-SCVMNetwork -Name $VipNetworkName;$VipMemberNics = @();foreach ($VMName in $VipMemberVMNames){$VM = Get-SCVirtualMachine -Name $VMName;$VipMemberNics += $vm.VirtualNetworkAdapters[0];}$existingVip = Get-SCLoadBalancerVIP -Name $VipNameif ($existingVip -ne $null){foreach ($mem in $existingVip.VIPMembers){$mem | Remove-SCLoadBalancerVIPMember;}}$vipt = Get-SCLoadBalancerVIPTemplate -Name $VipTemplateName;$vip = New-SCLoadBalancerVIP -Name $Vipname -LoadBalancer $lb -IPAddress $VipAddress -LoadBalancerVIPTemplate $vipt -FrontEndVMNetwork $VipNetwork -BackEndVirtualNetworkAdapters $VipMemberNics;Write-Output "Created VIP " $vip;$vip = Get-SCLoadBalancerVIP -Name $VipName;Write-Output "VIP with members " $vip;}
CreateTenantVIP -VipMemberVMNames @(“VM1”,”VM2″) -VipTemplateName “VIPTemplate” -VipName “VIP”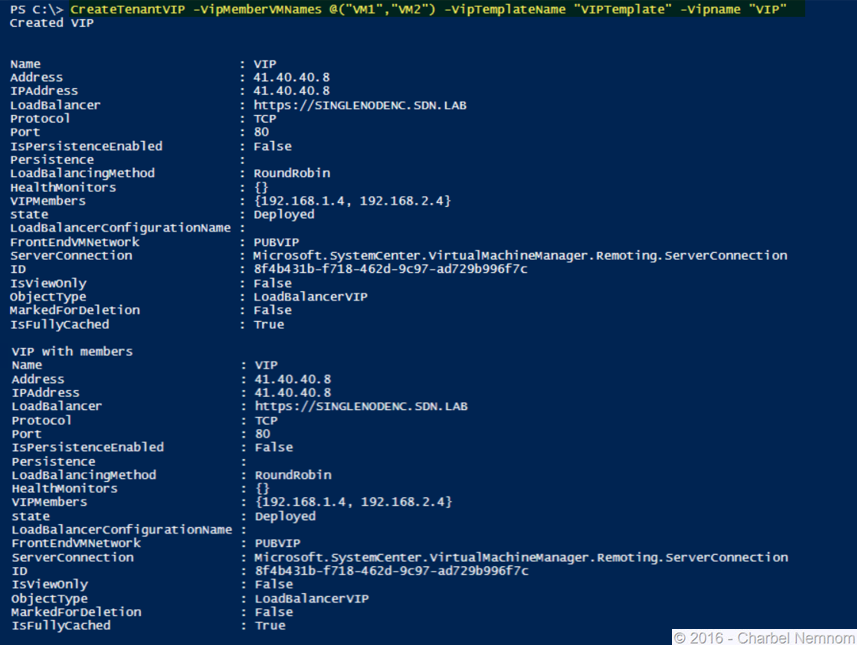
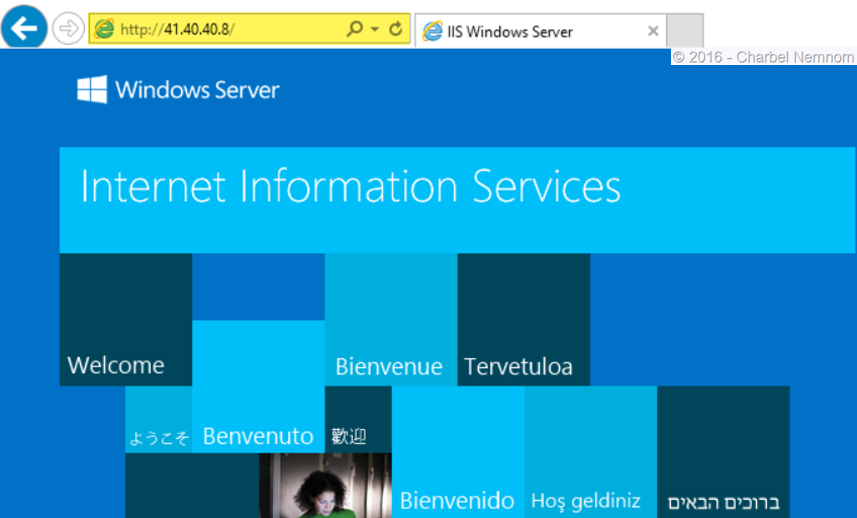
- In the final step, we will validate the load balanced VIP that we created in the previous step by opening “Internet Explorer”. Enter the IP address, “40.40.8” into the address bar. You should now see the default Windows Server IIS welcome page as shown in the following screenshot.
Create S2S VPN to a Remote Site
In the following steps, we will be creating a Site-to-site VPN connection between the SDN and a remote site. The diagram below gives you a high-level view of the topology that we will be using in this example.
- Open System Center Virtual Machine Manager Console, select “Client VMs and Services” in the bottom-left hand side of the VMM console. Click on “VM Networks”.
- Right Click the VM Network that we created in Part I, (“CONTOSO”), select “Properties” from the popup menu after your right click.
- Select “Connectivity” from the left navigation tabs. Check “Connect to another network through a VPN tunnel”. Leave “Enable Border Gateway Protocol (BGP)” unchecked. Check “Connect directly to an additional logical network”. Select the “Direct routing” radio button, and make sure the Gateway Service is selected. In my case, the Network Controller service is called “NCService”. Don’t click “OK” for now.

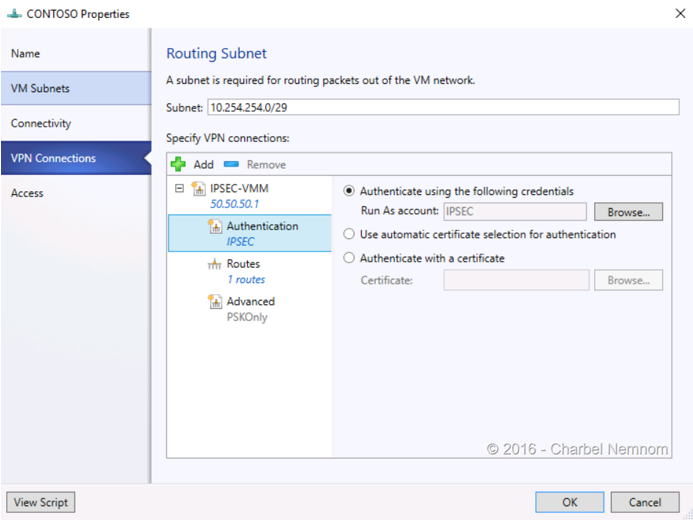
- Select “VPN Connections” from the left navigation tabs. In the subnet text field; enter 10.254.254.0/29 (You can choose a different subnet). Click on “Add” and choose “Add IPsec tunnel”. In the “Name” text input, Give the IPSEC tunnel a name (i.e. “IPSEC-VMM”). In the “Remote endpoint” field, input “50.50.50.1”—this is the IP of the remote site server that was pre-created for this example. Do not check “Limit bandwidth available for this VPN connection”. Click on “Authentication”. Select the first radio button option, “Authenticate using the following credentials”. For “Run As account:”, click on “Browse”. Select a “Run As” account with Administrative privilege, and then click “OK”. Click on “Routes”. Click on the “Add” button to add a subnet. In the Subnet text field, input “60.60.60.0/24” which is configured in the remote site server.
 Click “OK”. This may take a few seconds to complete.
 - Make sure the running jobs have finished successfully before you move to the next step.
- Log in now to the remote site. The gateway server has already the RRAS role installed and configured. In order to establish Site-to-site VPN connection, open the shortcut “RRAS Management Console”, click on “Network interfaces”. Right click on “Remote Router” and click “Properties” -> “Security”. In the “Key” text field, input the pre-shared key for authentication, and then click OK.
- Right click on “Remote Router” and click “Connect”. After a short delay around 5-6 seconds, you will see the Remote Router Connection State change from “Disconnected” to “Connected”. Now the S2S VPN is connected.
- In the final step, we will validate the S2S Tenant VPN connection. Switch back to VMM. Click on “VM and Services” in the bottom-left hand side of the VMM console. Click on “All hosts”. In the right VMs window, locate the first VM created – “VM1”. Right click on the VM and select “Connect or View”, choose “Connect via Console”. The Virtual Machine viewer window will now appear. Click on the “Ctrl-Alt-Del” (button in upper left-hand corner) then use “.\Administrator” as the username and enter the password to log in.Launch Internet Explorer, input in the address bar and press Enter. You should now be able to see a web page which is hosted on the web server in the remote site. In this example, the IP address of the remote site web server is 60.60.60.1.
Summary
In Part II, we created a public Virtual IP Address (VIP) on the Software Load Balancer (SLB) using SCVMM and PowerShell in which we could able to access a website hosted on the virtual network. The Software Load Balancer will manage to load-balance the traffic to VM1 and VM2 which enables multiple servers to host the same workload, providing high availability and scalability. We also created a Site-to-site (S2S) VPN between the cloud tenant VM Network and the remote site.
In Part III, we will be restricting access to the Web server VMs we have already deployed, as well as limiting what the Web server is able to access to only what it needs. This reduces the attack surface of the Web server as well as limits its ability to attack other services if it were to be compromised.
Until then… see you in Part III.
Thanks for reading!
