

vSphere vMotion is a cool feature provided by VMware that allows the migration of VMs to different hosts and datastores simultaneously with no downtime.
vMotion doesn’t require shared storages to migrate VMs and this capability can be used to perform cross-cluster migrations where the target cluster doesn’t have access to source cluster’s storage. The migration process is completely transparent to users and processed VMs will continue to run with no service disruption.
Requirements for vMotion without shared storage
To perform a successful migration across clusters with no shared storage, the infrastructure must be configured accordingly in order to ensure all involved components can communicate. If the new cluster/infrastructure resides in a different location, an L2 connectivity is required for the VM Network and the VMotion Network in order to allow the communication between the different host members of the processed clusters.

Scenario: hot migrate VMs from vSphere 5.5 to 6.7 using vMotion
The example will show the required steps needed for a successful migration from a 5.5 cluster to a 6.7 cluster.
Prerequisites
Once the new 6.7 vCSA has been installed in the new infrastructure, all ESXi host members of the source cluster to migrate must be supported by the target vCenter. Make sure the ESXi version installed in the source cluster is included in the supported matrix:
- If the ESXi hosts in the source infrastructure to migrating are installed with an old version (for example version 5.5), you need to check the VMware Product Interoperability Matrices to check if they are supported in version 6.7. In this example, you need to upgrade the hosts 5.5 to at least version 6.0 to ensure they are supported by the target vCenter 6.7.
- The supported hardware (HCL) is another aspect that must be considered during the upgrade/migration analysis. The hardware in use must be verified in the compatibility matrix to ensure it is actually supported by the vSphere version installed in the target infrastructure.
Upgrade the source infrastructure
In the chosen scenario, the source vSphere cluster is version 5.5 U3. Both vCenter Server and ESXi hosts must be upgraded accordingly in order to fall in the supported matrix for version 6.7. Therefore based on the compatibility matrix, the source cluster must be upgraded to at least version 6.0 U3 (version available for download at VMware website). The direct upgrade from 5.5 U3 to 6.0 U3 is fully supported through the migration tool and can be safely used.

Learn from this video about:
- vSphere environment traits and requirements
- vSphere compute resource architecture and provisioning
- Storage. Choose and tune
- Networking tips and tricks
You could migrate also to version 6.5 but you need to identify first what vSphere versions support the hardware in use at the old infrastructure. If the HCL reports that the servers model in use is supported by vSphere version 6.0 and earlier, this is the highest version you can install to upgrade the source cluster limiting the compatibility range.
The steps required to prepare the source cluster will be then the following:
- Upgrade the old 5.5 U3 vCenter to version 6.0 U3 (direct upgrade).
- Upgrade of the 5.5 U3 ESXi hosts to version 6.0 U3.
Migration of VMs to the target cluster
Once the source ESXi hosts have been upgraded, they can be moved (connected) to the target vCSA 6.7.
Add source ESXi hosts to the target cluster
From the source cluster, right-click the first host containing the VMs to migrate and select Connection > Disconnect.

Wait until the selected host is marked as disconnected.

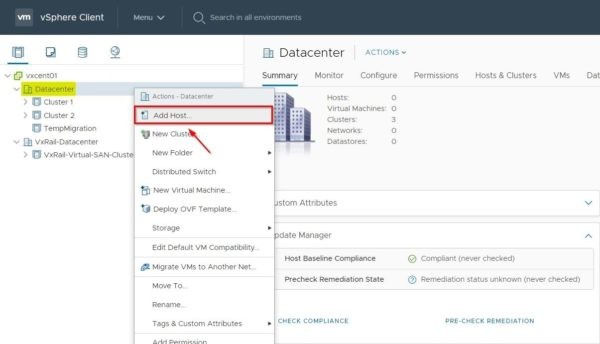
In the target Datacenter create a temporary cluster (TempMigration in the example) to add source hosts. Right-click the new cluster and select Add Hosts.

Specify the host to connect to the temporary cluster with the correct credentials then click Next.

Click OK to accept the ESXi’s certificate.

At this stage add the source host to the 6.7 cluster, a message warns you about powered on VMs. Powered on VMs is something we actually want to avoid service disruption. Click Next.

Clicking Finish, the system will try putting the host in Maintenance Mode (this is a feature introduced in vSphere 6.7). The only way to have the host in maintenance mode is to power off hosted VMs or migrate them off of the host. To keep the services up and running, this is not the desired behavior.
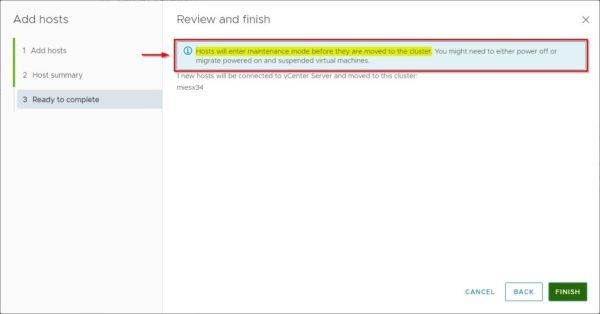
To add the host without powering VMs off we need a different approach. Click Cancel to exit the wizard.
Now right click the target Datacenter object instead and select Add Host.
Specify the Host name or IP address then click Next.

Enter the User name and Password and click Next.

Click Yes to accept the host’s certificate.

Click Next to continue.

Assign an existing or the Evaluation license then click Next.

No need to enable Lockdown mode then select Disable option. Click Next.

Nothing to do here. Click Next.

Click Finish to complete the procedure.

The source host has been added to the target Datacenter successfully.

Now move the host in the temporary cluster.

This time the host has moved into the cluster keeping VMs powered on.

Enable VMware EVC feature
To successfully migrate VMs between clusters with different CPUs generation, the VMware EVC feature must be enabled to safely move powered on VMs with no issues. Keep in mind all involved hosts should have the same processor “family” (Intel or AMD). Right-click the temporary cluster and select Settings.

Select the VMware EVC section and click Edit on the right pane.

Select Enable EVC for Intel@ Hosts option (if you have Intel processors in use) to enable EVC. Perhaps the target hardware won’t be compatible with the default baseline. Click the VMware EVC Mode drop-down menu and choose the appropriated processor generation (Haswell in the example).

When the chosen baseline is compatible, you will see the Validation succeeded message under Compatibility. Click OK.

Migrate the VMs to the target cluster
Right click the VM to migrate and select Migrate option.

Since we need to migrate the VM in a new infrastructure/cluster, select Change both compute resource and storage and click Next.

Select the target computer and click Next.

Specify the target storage to use and click Next.

Specify the correct Destination Network and click Next.

Select the desired vMotion priority and click Next.

Click Finish to proceed with the VM migration.

The selected VM is being relocated to the target destination.

If you receive a similar error, make sure source and target hosts can communicate through the same vMotion Network.

To verify if the target host and source host are connected in the same vMotion Network, SSH the target host and use the vmkping command to check if you can reach the source host. Run the following command:
|
1 |
# vmkping -I <vMotion_VMKernel_interface> <source_vMotion_IP_Address> |

Depending on the size of the virtual machine to migrate, after some minutes the VM is migrated successfully to the new infrastructure with no service disruption.

If you receive a similar error while configuring the migration, make sure the processed VM doesn’t have any attached ISO or Content Library.

Using vSphere vMotion feature the migration of VMs to different clusters can be easily done with no services interruption and with no need to work during off-work hours or during the weekend.
