

Introduction
In this article series, we transform a highly available RD Gateway deployment into one protected with MFA. In phase I, we address how we will change and prepare the existing deployment for NPS Extension for Azure MFA (Multi-Factor Authentication) by introducing a high available central NPS for the RD Connection Authorization Policies.

Figure 1: Secure any form of access with MFA (Photo by FLY:D on Unsplash)
MFA has not been a “mere option” for many years now. No, it has been a hard requirement for a while. I know managers of IT service companies that told customers they would fire them if they did not allow MFA to be enabled where possible, and this included their RD Gateway solution.
In phase II (what you are reading now), we will focus on installing and configuring the NPS Extension for Azure MFA. The aim here is to introduce NPS Extension for Azure MFA, with minimal interruption to services. We also look at the tools and log you will need to troubleshoot issues should they occur.
Phase II – Installing and configuring NPS Extension for Azure MFA
In phase II, we introduce MFA, finally. For your reference, below is an overview of the solution after installing and configuring the NPS Extension for Azure MFA on both NPS servers.

Figure 2: An RDP session over an RD Gateway & a central server running NPS Extension for Azure MFA installed
- A load balancer gets a request from a remote desktop user.
- A load balancer routes the request to RDGW01 or RDGW02.
- The RD Gateway server receives an authentication request to connect to an RDP session. The RD Gateway acts as a RADIUS client and converts the request into a RADIUS Access-Request message to send to the RADIUS/NPS server with the NPS extension installed.
- NPS sends the credentials to a domain controller for verification and authentication.
- If authentication succeeds, NPS the NPS extension triggers a request for secondary authentication with Azure MFA.
- Azure MFA communicates with Azure AD, verifies the user’s details.
- When MFA is enabled, it pushes an MFA challenge
- Azure MFA sends the result back to the NPS extension.
- If the MFA challenge is successful, the NPS server sends a RADIUS Access-Accept message for the RD CAP policy to the Remote Desktop Gateway server.
- When the RAP checks out, the user accesses the computer via an RDP session.
Prerequisites
To leverage Azure MFA, you need Azure AD with the correct licenses installed to provide MFA capability. In addition, the AD user accounts for which you want to leverage MFA must be synchronized to Azure AD using AD Connect.
AD Connect
For the NPS Extension for Azure MFA to work with your on-prem users, you will need to sync these to your Azure Active Directory with, at the very least, their password hash.
To do so, you leverage the AD Connect sync service, which you install on a virtual machine (server) on-premises and configure to sync. That will ensure that identity information in Azure AD is consistent with your on-premises identities
AD Connect is pretty powerful, and the details can seem intimidating. Luckily getting it set up and working is not very hard at all. I refer you to Azure AD Connect sync: Understand and customize synchronization | Microsoft Docs to learn more about AD Connect
For lab purposes and many production purposes, the express installation option handles everything for you. See Azure AD Connect: Getting Started using express settings | Microsoft Docs, and you will have your users and password hash synced in no time.

Figure 3: A quick peek at the exports and imports with the Synchronization Service Manager
For the lab, I filtered to sync only a single OU with a few users.

Figure 4: The on-premises users synced to Azure AD
When we have our on-premises users synced to Azure Active Directory, we can configure the to require MFA. I prefer to use conditional access to achieve this when possible.
Conditional Access
In Azure, I prefer to use conditional access policies to enable MFA. Since this has become available, I stay away from using per-user MFA. There are other ways to enable MFA for a user. I leave it up to the reader to determine what works best in their environments and use cases. The details of what you can do with conditional access would lead us too far and do not matter for this use case as an Azure conditional access policy, except for enforcing MFA, does not apply to the NPS Extension for Azure MFA.
I create a conditional access policy “MFAPolicyForRDGATEWAY” for the lab, added a test user “Billy The Kid” to it, and enabled MFA for that user under “Access Controls.”

Figure 5: My RD Gateway lab conditional access policy.
I must also mention that conditional access comes at an extra cost for Azure Active Directory Premium or Microsoft 365 Business Premium licenses that provide Conditional Access features.
Note that the consumption-based licenses for Azure AD MFA, such as “per user” or “per authentication” licenses, are not compatible with the NPS extension. However, you can use a trial subscription for your lab and testing and enable a trial P1/P2 license for a month free of charge. See Features and licenses for Azure AD Multi-Factor Authentication for more information.
Registering a user for MFA can be done via a direct link https://aka.ms/mfasetup, and when given to users with a proper explanation, the onboarding process should go smooth.
We are now ready to install NPS Extension for Azure MFA, and when finished, we have set up protection for our high available RD Gateway deployment with MFA.
Installing and configuring the NPS Extension for Azure MFA
Before you start the installation and configuration of the NPS Extension for Azure MFA, please grab the Azure tenant ID as you will need to enter it. You also need an Azure admin account with sufficient rights. I used my global admin account.

Figure 6: Grab your tenant ID in the portal
You can find your tenant ID in the portal or grab it with PowerShell as follows.
|
1 2 |
Connect-AzAccount Get-AzContext |
Select the correct tenant if you have more than one listed.
We are now ready to install the NPS Extension for Azure MFA. Don’t forget you’ll need to do this on both NPS servers.
Minimize interruptions
Before you begin, set the priority of the NPS servers in “Remote RADIUS Server Groups” (under “RADIUS Clients and Servers”) on your RD Gateway serves to manipulate the request flow. Via the load balancer, ensure all traffic goes to one RD Gateway server. Configure that server to send requests to the NPS server that you are not configuring. Via the “hosts” file, you can point your test client to the RD Gateways server that is not in use and configured to send requests to the NPS server you are configuring. Remember that once MFA is enabled, it can and will hinder your existing users if they have not been synced to Azure AD or have not yet registered their phones for MFA in Azure with the authenticator app.
Installing the NPS Extension for Azure MFA
- Download the NPS extension.
- Copy the NpsExtnForAzureMfaInstaller.exe to the NPS server.
- Run the executable (you will have to do this on both NPS servers)
- In the NPS Extension for Azure MFA dialog box, review the software license terms, check I agree to the license terms and conditions, and click “Install.”

- On the NPS Extension for Azure MFA dialog box, click Close.

This part goes very fast
Once you have installed the extension, create the following registry key under HKLM\ Software\ Microsoft\ AzureMFA. Do not make any typos here in both the name and value, including leading or trailing spaces, or forget about case sensitivity.
Name: REQUIRE_USER_MATCH
Type: String
Value: FALSE
IMPORTANT! As you will learn later, this ensures that users who have not had MFA enabled can still authenticate when you configure the NPS Extension for Azure MFA, so it kicks in. Additionally, it makes it easier for testing and for transitioning your users in small batches as not to overwhelm support should things not go smoothly.
Setting up the certificates for the NPS extension
To make the NPS extension work with Azure MFA, you need to set up a certificate to secure communications with Azure tenant ID. Under “C:\Program Files\Microsoft\AzureMfa\Config,” you will find a PowerShell script, AzureMfaNpsExtnConfigSetup.ps1, that will do the work for you.
Note that the self-signed certificate is valid for two years. You will need to rerun the script before it expires to avoid service interruption. You should already be monitoring your NPS server certificates to renew them in time.
You can also use another trusted certificate (from an internal certificate authority, for example). However, that process seems to be a road less traveled, and information on how to do this is not readily on the Microsoft site. If you want to optimize NPS high availability via a load balancer/NPS Proxies, you will need to use a custom certificate with the required host/DNS names in the Subject Alternative Names (SAN). It is a pretty involved process I have left for a separate article.
You will need your Azure Tenant ID and a tenant administrator account. Note that this cannot be an Azure guest account.
When prompted to allow the Nuget provider to interact with the Nuget-based repositories and install the Nuget provider, click “Yes.”
You must also allow installing modules for the “PSGalery.” None of these prompts will surprise you if you have work with PowerShell-driven configurations before. After those prompts, just let the script run.

Figure 7: The AzureMfaNpsExtnConfigSetup.ps1 script in action. Let it do the work for you.
When prompted to sign on as a tenant administrator, do so. Watch out for the browser prompt.

Figure 8: I don’t like browser prompts much on servers, so I edit the script!
Now, I don’t like browser prompts on servers. On servers, Internet Explorer is just a security mess. So if you need a browser, replace it with Edge Chromium (Windows Server 2022 has it preinstalled) and set it as your default browser. I even tend to disable Internet Explorer with DISM. To avoid a browser prompt altogether, adapt the script a little. Change the original:
|
1 |
Connect-MsolService -Verbose -ErrorAction Stop |
To:
|
1 2 |
$Cred = Get-Credential Connect-MsolService -Credential $Cred -Verbose -ErrorAction Stop |
That way, you don’t need a browser at all.
Next, the script will then ask for your tenant ID, paste it in and hit “Enter” to continue.

Figure 9: You did it. MFA should be working now!
What the script does for you is the following:
- Creates a self-signed certificate
- Stores the cert in the local machine personal store
- Associates the public key of the certificate to its service principal on Azure AD
- Grants read access to the certificate’s private key to the network user

Figure 10: NETWORK SERVICE has read access to the private key
- Restarted the Network Policy Server service
You can check your handy work by verifying the configuration with PowerShell (the AppPrincipalID here is fake).
|
1 |
Get-MsolServicePrincipalCredential -AppprincipalID 981f26a1-7f43-403b-a875-f8b09b8cd720 -ReturnKeyValues 1 |

Figure 11: check your handy work
Now, if you have forgotten your AppPrincipalID because you closed your PowerShell console, it is a fixed value for this application. Google for “Azure MFA extension AppPrincipalID,” and you will find it. You can also find it by connecting to the MsolService with Connect-MsolService and retrieving the correct MsolServicePrincipal.
|
1 |
Get-MsolServicePrincipal | where-object DisplayName -eq 'Azure Multi-Factor Auth Client' |
Or you can look in the Azure portal under Enterprise applications. To do so, select “All Applications” in the “Application type” and filter on Azure Multi-Factor Auth Client.
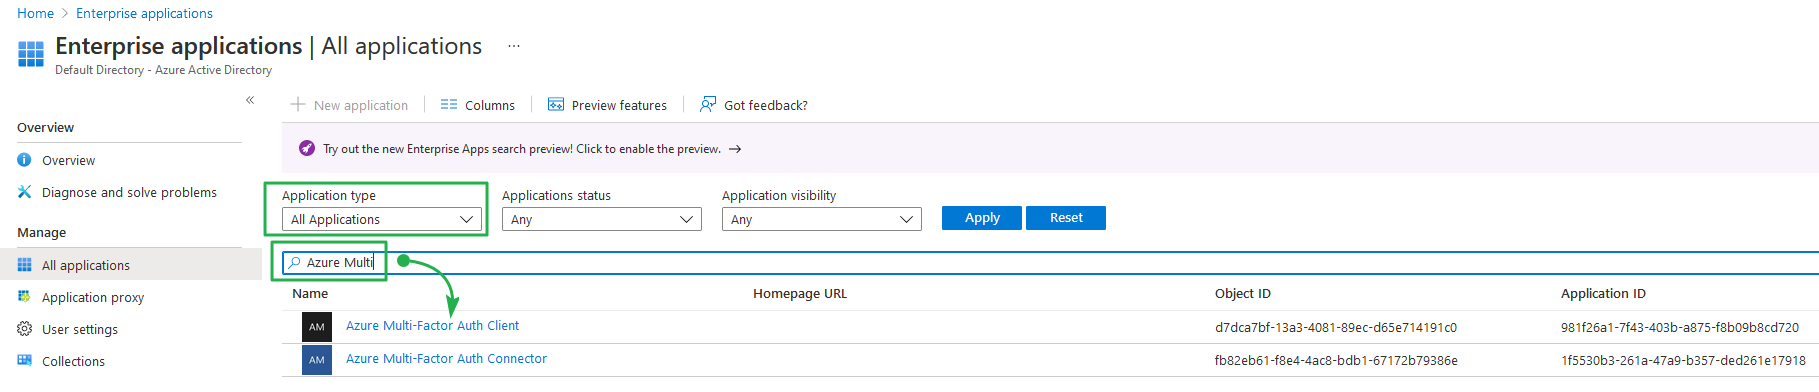
Figure 12: Finding the AppPrincipalID for the Azure Multi-Factor Auth Client
When you have done everything correctly, you are ready to test your work. You can play with the priority of the NPS servers in “Remote RADIUS Server Groups” (under “RADIUS Clients and Servers”) on your RD Gateway serves to manipulate the request flow. In a pickle, you can also disable MFA. See the section on troubleshooting for more information.
MFA should now be operational. If it doesn’t work, trace back your steps and verify you have done everything correctly. Troubleshooting can be tedious, which is why we split moving to MFA into separate phases. In my experience, the Central CAP configuration is the tricky one. Hence, we tested and verified that in Phase I before introducing MFA.
Testing RG Gateway access with MFA
Users with MFA enabled
Authentication is subject to MFA validation, and as such, when the user approves the challenge, the user can connect to the RD Gateway and connect to the computer.
Users without MFA enabled
By default, this will fail. But we can adjust default behavior. We do so by creating a registry key under HKLM\Software\Microsoft\AzureMFA on the NPS servers with NPS Extension for Azure MFA installed. CREATE THIS KEY ASAP AND SET IT TO FALSE ON BOTH NPS SERVERS
Name: REQUIRE_USER_MATCH
Type: String
Value: TRUE or FALSE
When the REQUIRE_USER_MATCH is TRUE, all authentication is subject to MFA. For users who did not enroll for MFA, authentication will fail, and the user cannot access the resource. That is pretty much default behavior.

Figure 13: Setting REQUIRE_USER_MATCH to FALSE is the most flexible option
When the “REQUIRE_USER_MATCH” value is FALSE, there are two options. First, if the user did not enroll for MFA, authentication continues, passes the MFA check, and gets access to the resource. Secondly, the authentication must pass the MFA check before accessing the resource if the user enrolled for MFA.
The latter allows for transitioning an existing user base to MFA gradually in smaller batches. Your helpdesk will thank you. Don’t forget that your users need to register for MFA via https://aka.ms/mfasetup. So, provide the users with proper guidance on how to do this. Both phone calls and push notifications are supported. They will need the Microsoft Authenticator app that is available for Android and IOS.

Figure 14: Setting up push notifications with the Authenticator app on a smartphone
I prefer the latter, and they can use the MSFT Authenticator app for this on their smartphone. This, combined with some proper onboarding you can assist anyone who has problems with registering for MFA. All this without causing a help desk overload and angry users calling managers and IT staff.
An SMS text does not work because Remote Desktop Gateway does not provide a way to enter a verification code.
WARNING: any user who was not synced to Azure Active Directory by AD Connect can no longer login via the RD Gateway! So if you have users who must log in and must be exempt from MFA, set REQUIRE_USER_MATCH to false but ensure their account has synced to Azure AD!
Naturally, the proof of the pudding is in the eating, so repeat the test you did when you moved to a central store. This time you should get a push notification on your phone, which you have to approve, and for that, I need to authenticate the approval on my phone with a fingerprint or drawing pattern.


If you configured everything correctly, you would see your session on the RD Gateway servers.

Figure 15: Congratulations! A load-balanced, MFA-protected RDP session over RD Gateway!
If the first NPS server is working fine, rinse and repeat to bring the second NPS server into play. If you have issues, take a look at the troubleshooting section below.
Troubleshooting
When things don’t work, retrace your steps and check every setting and policy. For example, look for mismatching shared secrets, password mistakes, etc. Remember you have the installation and configurations of both the RD Gateway servers and the NPS servers to check. That makes for many places and permutations for mistakes to trip you up in a load-balanced design.
When testing MFA, you need the second-factor device, in this case, a smartphone. You can also use an emulator, but those are serious resource hogs and sometimes picky in what you can run on the host (no hypervisor allows on the same system in some cases).
Capture Network traffic
The tools of the trade include Wireshark to see what is happening on the test client, the RD Gateway, and NPS servers. To filter out RADIUS traffic, enter “radius” into the filter and hit the arrow on the right to apply it.
The trick is to run Wireshark on both NPS servers and both RD Gateway servers. That way, you can follow the authentication flow. To figure out on what node something might be going wrong. One such example is a case where some users failed to match the RD CAP. This lead to their access being denied. But this only happened only for a user without MFA enabled. I found out it only happened on one NPS node. After checking everything in the NPS settings was OK, the clue that it was only happening to a user without MFA enabled. They made a typo adding the value to the registry. There was a trailing space in the name. That particular incident taught us that NPS Extension for Azure MFA checks this registry only after failing an MFA challenge with an AD Connect synced user that does not have MFA enabled.

Figure 16: RADIUS traffic on an NPS server captured by WireShark
Note that you can decrypt RADIUS traffic in Wireshark by providing the shared secret. In the Wireshark GUI:
- Go to Edit > Preferences.
- Click the “+” next to Protocols to expand the tree.
- Scroll down and select RADIUS.
- Type in the RADIUS shared secret and click Apply.
You won’t see many secrets revealed in this case, but it is handy to know.
Log files are your friend
There are some helpful event logs to check, but with 2 RD Gateway servers and 2 NPS servers you need in a highly available, load-balanced setup, you need to correlate these.
The RD Gateway role logs that you can finder under Application and Services Logs > Microsoft > Windows > Terminal Services Gateway.

Figure 17: With the TerminalServices-Gateway Operational log, you should be very familiar with already
The NPS Service role has a log you find under Custom Views > Server Roles > Network Policy and Access Services.

Figure 18: The Network Policy and Access Services event log
On the NPS servers, the NPS Extension for Azure MFA has its logs at Application and Services Logs > Microsoft > AzureMfa.

Figure 19: The AuthWOpthCh event log, one of three logs for the NPS Extension for Azure MFA
In the log above, the NPS extension for Azure MFA is not handling an accounting request. In this case, that is an artifact because we send the accounting information from the RD Gateway servers towards the NPS servers. If we do not do that, this type of entry will disappear.
Remember when I wrote that I unchecked forwarding accounting requests? That is what avoids the logging of many confusing events making it harder to find the relevant ones. It avoids the error above
NPS Extension for Azure MFA: NPS Extension for Azure MFA only performs Secondary Auth for Radius requests in AccessAccept State. Request received for User DATAWISETECH\billythekid with response state AccountingResponse, ignoring request.
and the error below (lots of them)
NPS Extension for Azure MFA: Exception in Authentication Ext for User ErrorCode:: REQUEST_FORMAT_ERROR Msg:: Request cannot be processed without userName attribute Enter ERROR_CODE @ https://go.microsoft.com/fwlink/?linkid=846827 for detailed troubleshooting steps.

Figure 20: These events are just spam, don’t forward the accounting requests to avoid these
There is one event you will always see is:
“NPS Extension for Azure MFA: Radius request is missing NAS Identifier and Nas IpAddress attribute. Populating at least one of these fields is recommended. This is not an error.”
You can safely ignore this.
I listed some other useful ones to recognize below.
“NPS Extension for Azure MFA: CID: 4daddc2b-2db7-4880-8857-b2cf800774a8 : Access Accepted for user pippa@workinghardinit.work with Azure MFA response: No Default Authentication Method Is Configured and message: No default authentication method is set for the user. session 310a4029-1d64-4669-b19f-e4a3f66d6ff2”
This one is for an AD Connect synchronized user that does not have MFA enable in Azure. What happens depends on whether REQUIRE_USER_MATCH contains TRUE or FALSE, which the NPS Extension for Azure MFA only checks in this situation.
“NPS Extension for Azure MFA: CID: 1517c31a-1221-400b-b956-bc512de81c08 : Request Discard for user Administrator1@datawisetech.corp with Azure MFA response: BecAccessDenied and message: MSODS Bec call returned access denied, BecAccessDenied, SAS. Shared. Exceptions. BecWebServiceException: The BEC web service failed to successfully respond to a call after 0 retries —> System. ServiceModel. FaultException`1 [Microsoft.Online. Administration. WebService. AccessDeniedException]: Access is denied for the specified domain.”
Above is the entry you see when a user that has not been synced to Azure by AD Connect is trying to log in over the gateway. It will fail, and due to the log time-out setting of 60 seconds, it will take a while to do so.
Now, on to the accounting or IAS logs.
IAS/NPS accounting logs
Looking at the IAS logs is also a helpful tool on your belt. With some trial versions of handy tools out there. In a pinch, these can be very helpful to see what’s going on. One such example is IAS Log Viewer | DeepSoftware.

RADIUS test tools
One such tool is NTRADPing, which is nice, but it is showing its age. You have to keep in mind that we locked down the settings in the policies pretty good and the tool needs adjusting the policies and adding the NTRADPing client IP to the RADIUS clients. So, not always ideal, but in certain conditions, it can be of help.
Disabling the NPS extension for Azure MFA
Another gem is temporarily disabling the NPS Extension for Azure MFA to get more helpful log entries. The NPS Extension for Azure MFA DLLs are in the authentication workflow and return relatively non-useful generic error messages. Like the one below.

Figure 21: But why did you discard it? Why?!
To get better error messages, we need to disable MFA, but we don’t want to uninstall NPS Extension for Azure MFA to do so. So the trick lies in renaming the HKLM\SYSTEN\CurrentControSet\Services\AuthSrv\Parameters values.

Figure 22: Rename the values to disable the NPS Extension for Azure MFA
I always take a backup just in case I need it. For testing without NPS Extension for Azure MFA in the mix, I rename the value names under the key to “BLOCKEDAuthorizationDLLs” and “BLOCKEDExtensionDLLs.” You have to stop and start the NPS Server and then test without MFA in the mix.
That helps identify the real cause of an error. So instead of the above generic error, you get one that gives you a real clue about the issue.

Figure 23: That is some actionable information!
When your testing is over, you reenable NPS Extension for Azure MFA by setting the value names back to their original ones.
Troubleshooting is an art
Finally, here’s a link to Troubleshooting Azure AD MFA NPS extension – Azure Active Directory | Microsoft Docs. There is also a handy script Azure MFA NPS extension health check script – Code Samples | Microsoft Docs that can help troubleshoot and grab logs to send to Microsoft support.
Putting in the time and doing the work will help you become better at troubles shooting this. Have a lab. Learning this in production is a stressful endeavor.
If you want to learn how to troubleshoot this like a boss, watch Basic NPS and MFA extension troubleshooting – YouTube. Nate Harris is a Microsoft expert in the field, sharing his troubleshooting skills.
Conclusion
Despite RDP getting a bad rap due to people opening up port 3389 directly to the internet, hence earning it the nickname “Ransomware Distribution Protocol,” it remains a powerful tool used for excellent and valid reasons. Just think about the popularity of Azure Virtual Desktop, where this experience exists in a cloud deployment. The caveat is that on-premises, you need to implement it correctly via an RD Gateway and add MFA to the mix. You can also set this up in a cloud environment if so desired. In Azure, for example, if and when Bastion does not meet your requirements.
I always deploy these solutions in high available designs due to the mission-critical nature of the services they provide. In this article, you have seen how to transform an existing highly available RD Gateway deployment based on two RD Gateways servers behind a (Kemp) load balancer into a more secure, Azure MFA-protected solution.
We first moved the existing connection authorization policies into remote ones on separate NPS servers. That is needed to get the NPS extension for Azure MAF to work. The process involves some tedious work where you have to pay attention to detail. The latter is especially true for the blocking of device redirection to work. However, as your deployment is highly available, you can do so with minimal disruption to the service.
Secondly, we installed the NPS Extension for Azure MFA on the NPS servers and configured it for our Azure tenant. The result is that an RD Gateway user’s authentication is now protected by MFA when accessing computers remotely via RDP their RDP client.
As you have seen, you need Azure AD with the proper licensing that supports MFA, and you must synchronize your user accounts to Azure via Azure AD Connect.
We also demonstrated how to exempt certain users from MFA if that is a requirement. The latter can be important when users without MFA enabled must still access remote computers via RD Gateway.
Finally, we went over some troubleshooting tools and tips to help you figure out why things might not work as expected.
I have addressed some of the biggest problems people I have seen people run into while implementing the NPS Extension for Azure MFA. With this information, you should be able to get it to work.
