


Step-by-Step
In Part I of this article, we discussed how to handle multiple SSL sites sharing the same IP address and port bound to multiple SSL certificates in regards to SNI decryption and re-encryption with Kemp LoadMaster. We discussed briefly how to achieve this creatively. With Kemp LoadMaster, you will need to leverage sub-virtual services (SubVSs) in combination with content rules to handle this scenario. We also use SSL decryption and re-encryption in order to support the clients and servers with different TLS versions. Re-encryption is handled at the virtual service (VS) level, not at the SubVS level. Meaning you can only enter one SNI name for re-encryption with a shared VIP. So, in the case of two or more SSL sites sharing the same IP address, you would have only one that works.
In this part, we will walk through an examplary setup to help you understand the exact end-to-end configuration better. In this example, we have only two sites sharing an IP address with different SSL certificates. But this scales rather well to dozens and even hundreds of sites.
1. Set up the lab web farm
We have a demo setup with 2 web servers running two websites with SNI required on the same IP address and port (443). Each website has its own certificate.
We host both flash.datawisetech.corp and thunder.datawisetech.corp on 192.168.2.180 (DEMO-VM-01) and on 192.1689.2.181 (DEMO-VM-02). Each site has Require Server Name Indication enabled to make this possible.

Verify your web site’s work before you continue with the load balancer. Note that you’ll need to use an FQDN name to test as you enforce this in the configuration. A host file on a test client VM is your friend here.
The thunder.datawise.corp sites have juvenile bears and the flash.datawisetech.corp sites have bears catching salmon. Both web servers host both sites and we will place them behind a Kemp LoadMaster. Pick whatever images that make you smile.

Different images with a common characteristic along with the host and node name in the tab title allow us to visually verify the node and the web site.
2. Create the virtual services for each SNI FQDN
First of all, you need to have your Kemp LoadMaster set up. I will not go into that here. You can always download a trial version or a free edition to test within the lab.
Set up the Virtual Services (VSs) for each of your web sites. For this, you will need to have the required number of virtual IP addresses. You do not need to NAT them via a firewall to the outside world. These are just the intermediary VIP the Kemp LoadMaster will leverage to as the IP addresses for the SubVSs real server of the parent VS. It is those intermediate VIPs that will be configured for flash.datawisetech.corp and thunder.datawisetech.corp to point to the actual real servers.
For our example sites flash.datawisetech.corp and thunder.datawisetech.corp is this means setting up the virtual services in the normal way with SSL Acceleration. For this, you need to add the SSL certificate for the web site. You also have to have re-encryption enabled but without require SNI hostname enabled. However, you should pass the Re-encryption SNI Hostname for the respective site here. That way, the respective VSs will send the SNI host name to the real servers.
You must also set up heath checking as you normally would and make sure everything shows up healthy when the sites are up and running.


Do this first for both sites and make sure this all behaves as expected. Test this by stopping a website on one the reals servers etc. Do your normal due diligence here before going on. This will help keep any confusion when something doesn’t work to a minimum.
Note that you’ll need to use an FQDN name to test as you enforce this in the configuration. A host file on a test client VM pointing to the respective intermediate VIPs is your friend here.
3. Create the content rules
Create two content rules. One for each FQDN of each site you are hosting on the same IP address with their own SSL certificate. The regular expression is for the exact match of the FQDN, and the rule will allow for the correct client request to be sent to the correct SubVS.
For flash.datawisetech.corp this is
| Rule Name: | SNIFLASH |
| Rule Type: | Content Matching |
| Match Type: | Regular Expression |
| Header Field: | Host |
| Match String: | /flash\.datawisetech\.corp/ |
| Negation: | ☐ |
| Ignore Case: | ☒ |
| Include Host in URL: | ☐ |
| Include Query in URL: | ☐ |
| Fail On Match: | ☐ |
| Perform If Flag Set: | Unset |
| Set Flag If Matched: | None |

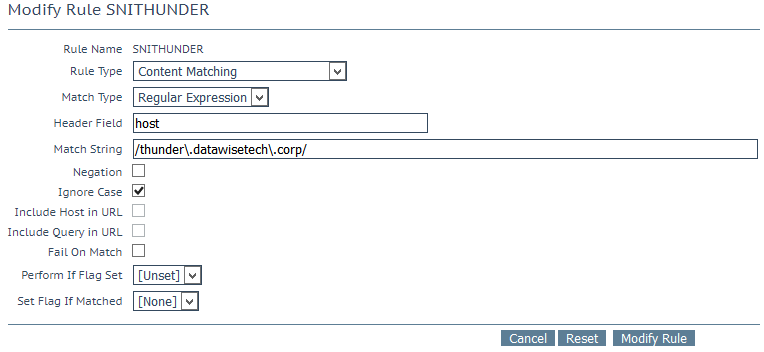
For thunder.datawisetech.corp this is
| Rule Name: | SNITHUNDER |
| Rule Type: | Content Matching |
| Match Type: | Regular Expression |
| Header Field: | Host |
| Match String: | /thunder\. datawisetech\.corp/ |
| Negation: | ☐ |
| Ignore Case: | ☒ |
| Include Host in URL: | ☐ |
| Include Query in URL: | ☐ |
| Fail On Match: | ☐ |
| Perform If Flag Set: | Unset |
| Set Flag If Matched: | None |
If you need a hand checking and validating your regular expressions this site will serve you well https://regex101.com/.
4. Create the root virtual service for the VIP that you NAT to the public IP.
Create the root virtual service for the VIP that you NAT to the public IP. It acts as the entry point for both SubVSs. Client requests are passed on correctly, too, because we assign the SNIFLASH content rule (for flash.datawisetech.corp) and SNITHUNDER content rule (for thunder.datawisetech.corp) to their respective SUBVSs. You need to add the SubVSs before you can enable content switching in order to assign the content rules you created above to the SubVSs.

In more detail

We do require SNI here, but it will also work without it. Add all the certificates you need to the parent VS. But do not fill out the re-encryption SNI host name. If you do (you can only fill out one), it will break one of the other websites sharing the VIP.
The SubVSs for flash.datawisetech.corp and thunder.datawisetech.corp looks like below. We only need one IP address per SubVS under real servers as this is an intermediate VIP for the web site that points to the real servers. These are the VSs we have set up in heading 2. Note that we have assigned content rule SNIFLash to the Flash SubVS and SNIThunder to the Thunder SubVS.

The two individual SubVSs look like below.


As mentioned above, you do not need to do a health check here as you have to do these on the respective VSs. But you can do them for good measure and to be very explicit. Do test the LoadMaster failover times in this case as they might be less good than without this extra health check. Your mileage may vary.
In an overview, this is how the setup looks – the details of each setting you have seen above.

5. Test it all out
Test it all out. You should now have both sites available over the same public IP / root VIP. When that is the case, start testing failover behavior. Be a chaos monkey and validate your load balancer can detect health properly and failover to a healthy real server works. Yes, really, you would be surprised how many people make assumptions when they implement something. Failover real servers, stop a website, shut down an IIS server/ You should now have both sites available over. To verify which TLS version and if the one you need to work to work play around on the SSL acceleration settings with the different versions. Where applicable, you can disable the caching in your browser to help with testing and leverage tools, such as WireShark and Fiddler to verify what TLS version is negotiated etc.
Tip
Once you have it all up and running, you can experiment a bit with different TLS settings on the LoadMaster. For testing, it is a good idea to allow only TLS1.0/1.1 in order to establish that the connection of the legacy client works. In reality, you should always allow for TLS 1.2/1.3 also. The reason for this is that you want to allow clients and services to leverage TLS 1.2/1.3 when they can. Doing so causes the least issues, some clients no longer support TLS1.1/1.2 and you don’t want to block those.
When you connect over TLS1.1, Firefox will display a warning. Most browsers will do so in 2020 and in March 2020; they will even block it. But for 3rd party clients (apps & services) that still require as well as older browsers, it will be available if you so desire. Mind you that ancient browsers don’t support SNI. SNI doesn’t work with old SSL. But you really don’t even want that to work.


A client that only supports TLS1.1 is marked as unsafe. Supporting SNI with the shared VIP and multiple certificates is dealt with via our Kemp Loadmaster construct. Remember that they are allowed to connect even as the real servers only support TLS 1.2 or higher. Again, thanks to the Kemp Loadmaster construct.
With a client that supports TLS1.2 or higher, it looks normal.

A client that supports TLS1.2 is marked as safe. Supporting SNI with the shared VIP and multiple certificates is dealt with via our Kemp Loadmaster construct.
You just want to enable TLS 1.0/1.1 when needed while providing optimal security by enforcing TLS 1.2/1.3 on the backend when possible.
As mentioned earlier, you can also only expose TLS 1.2/1.3 to the client side while allowing TLS1.0/TLS1.1/TLS1.2/TLS1.3 server side.
Remarks
When you still have to support clients that do not support SNI, you can disable it on the parent VIP Virtual Service. Internally, the SNI name will be passed along by the intermediate Virtual Services and work with the real web servers that require SNI. You can verify this via a WireShark trace on the real servers. In the image below, this also demonstrates that even when the client connects over TLS 1.1 to the parent VIP, the connection to the intermediate Virtual Services and real servers is made over TLS 1.2.

Conclusion
I have shown you how to Re-Encrypt Multiple SNIs on the same IP with Kemp LoadMaster on a practical scenario. A scenario that is drawn from real life as I have personally helped more than one deployment get ready for 2020 TLS 1.0/1.1 depreciation or better, termination of support.
While TLS version support issues have been around for a while, 2020 makes this a priority for many. You now have a way of handling some of the less obvious scenarios. In the end, this means you can keep everything as secure as possible while still supporting TLS1.0/1.1 for those scenarios out of your control. I really hope this helps some people out there.
