

Since a few weeks, Microsoft allows to use Active Directory to deliver Kerberos and NTLM tokens for Azure Files. When I say Active Directory, I mean your On-Premises Active Directory. Obviously, you need a Site-to-Site VPN between your On-Premises infrastructure and Azure. You need also Azure Active Directory to manage Azure Files SMB permissions so Azure AD Connect is a requirement.
The advantage of using Active Directory authentication over SMB for Azure file shares is that you can set NTFS permissions with your own groups or users. That enables you to migrate your On-Premises file servers to Azure files and get access to your company data from everywhere. In addition, Azure File Sync is supported with this kind of configuration to add some cache servers in the branch office for example. One other use case of that configuration is the profile repository for Windows Virtual Desktop and FSLogix.
In this topic, I’ll show you how to implement this configuration by integrating the storage account in your Active Directory.
Requirements
To follow this topic, you need the following:
- An Active Directory synchronized with Azure Active Directory through Azure AD Connect. In this topic I use my On-Premises Active Directory that is reachable through a Site-to-Site VPN.
Create the storage account
First, you need to create a storage account. To create it, navigate to the marketplace and look for Storage account. Then specify the following settings:

Add the Storage Account to Active Directory
Download AZFilesHybrid module from this URL. Then extract it for example in c:\temp\azfileshybrid. Then install Azure PowerShell modules by running the following cmdlet:
|
1 2 3 4 5 6 7 8 9 10 11 12 13 14 15 16 17 18 19 20 21 22 23 24 25 26 27 28 29 30 31 32 33 34 35 36 37 38 39 |
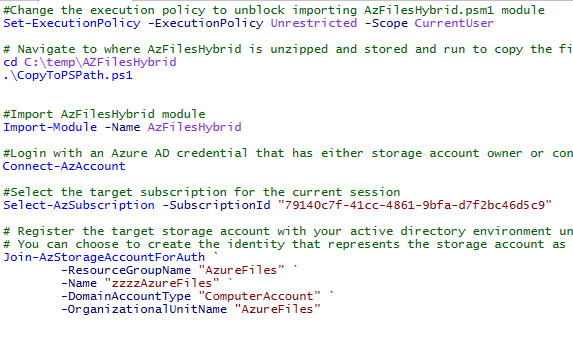
Install-Module AZ Then run the following script to join the storage account to Active Directory: #Change the execution policy to unblock importing AzFilesHybrid.psm1 module Set-ExecutionPolicy -ExecutionPolicy Unrestricted -Scope CurrentUser # Navigate to where AzFilesHybrid is unzipped and stored and run to copy the files into your path .\CopyToPSPath.ps1 #Import AzFilesHybrid module cd C:\temp\AZFilesHybrid Import-Module -Name AzFilesHybrid #Login with an Azure AD credential that has either storage account owner or contributer RBAC assignment Connect-AzAccount #Select the target subscription for the current session Select-AzSubscription -SubscriptionId "<your-subscription-id-here>" # Register the target storage account with your active directory environment under the target OU (for example: "OU=ComputersOU,DC=prod,DC=corp,DC=contoso,DC=com") # You can choose to create the identity that represents the storage account as either a Service Logon Account or Computer Account, depends on the AD permission you have and preference. Join-AzStorageAccountForAuth ` -ResourceGroupName "<resource-group-name-here>" ` -Name "<storage-account-name-here>" ` -DomainAccountType "ComputerAccount" ` -OrganizationalUnitName "<ou-name-here>" |
The following screenshot shows my configuration:
Once the script is finished, you can check if your storage account is added to the Active Directory.

Now you need to run the following script to enable the feature on the storage account:
|
1 2 3 4 5 6 7 8 9 10 11 12 13 14 15 16 17 18 19 20 21 |
# Set the feature flag on the target storage account and provide the required AD domain information Set-AzStorageAccount ` -ResourceGroupName "<your-resource-group-name-here>" ` -Name "<your-storage-account-name-here>" ` -EnableActiveDirectoryDomainServicesForFile $true ` -ActiveDirectoryDomainName "<your-domain-name-here>" ` -ActiveDirectoryNetBiosDomainName "<your-netbios-domain-name-here>" ` -ActiveDirectoryForestName "<your-forest-name-here>" ` -ActiveDirectoryDomainGuid "<your-guid-here>" ` -ActiveDirectoryDomainsid "<your-domain-sid-here>" ` -ActiveDirectoryAzureStorageSid "<your-storage-account-sid>" |
To get Active Directory information you can run the following command:
|
1 |
Get-ADDomain |

To get the Storage Account SID, run the following cmdlet:
|
1 |
Get-ADComputer -Identity "<StorageAccountName>" |

The following screenshot shows my configuration:

Finally run the following script to validate your configuration:
|
1 2 3 4 5 6 7 8 9 10 11 12 13 14 15 |
# Get the target storage account $storageaccount = Get-AzStorageAccount ` -ResourceGroupName "<your-resource-group-name-here>" ` -Name "<your-storage-account-name-here>" # List the directory service of the selected service account $storageAccount.AzureFilesIdentityBasedAuth.DirectoryServiceOptions # List the directory domain information if the storage account has enabled AD authentication for file shares $storageAccount.AzureFilesIdentityBasedAuth.ActiveDirectoryProperties |
The following screenshot shows the result of the above script:

If you go in the storage account configuration tab from the Azure Portal, you should see that the storage account is integrated in Active Directory.

Create a share and assign permissions
First create a file share. I called mine mydata.

Then navigate in the file share and navigate to Access Control (IAM). Then select add role assignment.
 - img")
Three roles exist:
- Storage File Data SMB Share Contributor: permissions to read, write and modify
- Storage File Data SMB Share Elevated Constributor: permissions to read, write, modify and manage NTFS permissions
- Storage File Data SMB Share Reader: permission to read.

Select the appropriate role and assign these SMB permissions to a group or a user (I prefer a group 😊). This is why you need an Active Directory synchronized with Azure Active Directory.

Now from the Windows Explorer, map a network drive by specifying the following SMB path:
\\<StorageAccount>.file.core.windows.net\<ShareName>.
P.S: You can use a private endpoint if you don’t want your storage account accessible from anywhere.

Now you can set NTFS permissions from the Windows Explorer.

As you can see, you can add groups or users from your On-Premises Active Directory. Just don’t forget to set SMB permissions from Azure Portal.

Now you can create your file trees.

And this file trees is accessible and visible from the Azure Portal.

