

In the previous blog post, I’ve walked you thru the process of creating the Windows Server 2016 Failover Cluster (WSFC) that is not joined to an Active Directory Domain. It is very important that you get the underlying WSFC properly configured and stabilized before you even attempt to create the SQL Server 2016 Always On Basic Availability Group. The availability and reliability of your SQL Server 2016 Always On Basic Availability Group depends so much on the WSFC.
If you have previously configured Always On Availability Groups, you will notice that most of the steps provided are similar to configuring it with Active Directory. But because there is no centralized directory service for managing accounts, you will need to rely on certificates for authenticating communication between replicas. You need to use T-SQL to accomplish those tasks.
Implementing SQL Server 2016 Always On Basic Availability Groups without Active Directory
Here’s a high-level overview of the steps for your reference. Be very careful with going thru all of the steps – there are a lot of moving parts. The scripts utilize SQLCMD mode on SQL Server Management Studio (SSMS) to make sure that you are indeed running them on the correct SQL Server instance. Refer to this Microsoft documentation on how to enable SQLCMD mode in SSMS.
I’ve excluded Step #1 since it is assumed that you already performed the installation using a default SQL Server instance. Also, since this is for an SQL Server 2016 Always On Basic Availability Group, you can only use two SQL Server instances as replicas. Regardless of how many WSFC nodes you have, you are still limited to two replicas.
Because the steps involve a lot of working with T-SQL, I’ve also decided not to do a video walkthrough like I did with Part 1. That way you can copy the T-SQL scripts and use them for your deployment.
- Install SQL Server 2016 using the built-in service account
- Enable the SQL Server Always On Availability Groups feature
- Create a database master key on the primary replica
- Create the certificate that will be used to encrypt the Availability Group endpoint
- Create the Availability Group endpoint for the primary replica using the certificate for authentication
- Export the certificate to a file
- Copy the certificate file to the secondary replica
- Create a login on the primary replica for use by the secondary replica
- Create a user for the login
- Associate the certificate created in Step #4 with the user
- Grant the CONNECT permission on the login
- Create the Availability Group
- Create an Availability Group listener name
Step #2: Enable the SQL Server Always On Availability Groups Feature
NOTE: This step needs to be performed on all of the Always On Availability Group replicas.
To enable the SQL Server 2016 Always On Availability Groups feature
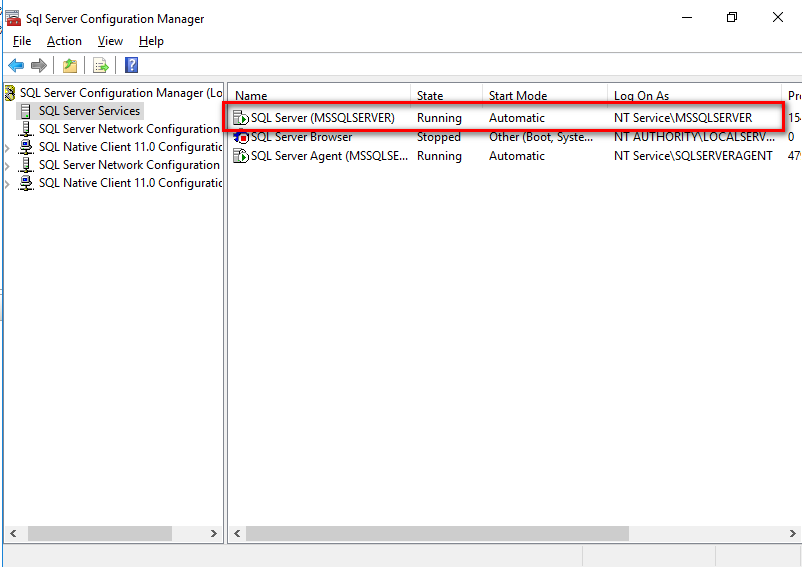
- Open SQL Server Configuration Manager. Double-click the SQL Server (MSSQLSERVER) service to open the Properties dialog box. Note the use of the built-in service account – NT Service\MSSQLSERVER.
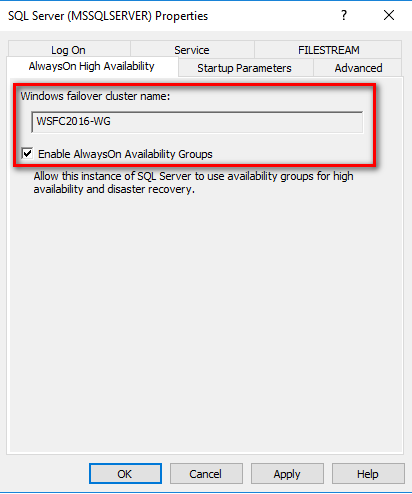
- In the Properties dialog box, select the AlwaysOn High Availability Check the Enable AlwaysOn Availability Groups check box. This will prompt you to restart the SQL Server service. Click OK.
- Restart the SQL Server service.
Step #3: Create a database master key on the primary replica
Each SQL Server instance that will function as a primary replica requires a database master key. The database master key is a symmetric key that is used to protect the private keys of certificates and asymmetric keys that are present in the database. The certificates referred to in this configuration will be used by the SQL Server logins that will connect to the Availability Group endpoint.
Using WSFC2016-NODE1 as the primary replica, create the database master key.
|
1 2 3 4 5 6 7 8 9 10 11 |
--Run this on the primary replica/WSFC2016-NODE1. Just to be sure, enable SQLCMD mode in SSMS, using the sa login :CONNECT WSFC2016-NODE1 -U sa -P y0ur$ecUr3PAssw0rd USE master GO CREATE MASTER KEY ENCRYPTION BY PASSWORD = 'y0ur$ecUr3PAssw0rd'; GO |
Step #4: Create the certificate that will be used to encrypt the Availability Group endpoint
Next, create the certificate that will be used to secure the Availability Group endpoint on the primary replica. This will also be used to secure the inbound traffic on the secondary replicas. Note that the primary replica will be sending transaction log records on the secondary replicas on a regular basis. Hence, the primary replica has to be authenticated on the secondary replicas.
|
1 2 3 4 5 6 7 8 9 10 11 12 13 |
--Run this on the primary replica/WSFC2016-NODE1. Just to be sure, enable SQLCMD mode in SSMS, using the sa login :CONNECT WSFC2016-NODE1 -U sa -P y0ur$ecUr3PAssw0rd USE master GO CREATE CERTIFICATE WSFC2016_NODE1_cert WITH SUBJECT = 'WSFC2016-NODE1 certificate for Availability Group' GO |
Step #5: Create the Availability Group endpoint on the primary replica using the certificate for authentication
Next, create the endpoint that the Availability Group will use on the primary replica. The endpoint type is DATABASE_MIRRORING. The default port number is used – 5022. Be sure to open up your firewall for both inbound and outbound traffic for this port. Also, the certificate created in Step #4 – WSFC2016_NODE1_cert – is used to authenticate the endpoint.
|
1 2 3 4 5 6 7 8 9 10 11 12 13 14 15 16 17 18 19 20 21 22 23 24 25 26 27 28 29 30 31 32 33 |
--Run this on the primary replica/WSFC2016-NODE1. Just to be sure, enable SQLCMD mode in SSMS, using the sa login :CONNECT WSFC2016-NODE1 -U sa -P y0ur$ecUr3PAssw0rd USE master GO CREATE ENDPOINT Endpoint_AvailabilityGroup STATE = STARTED AS TCP ( LISTENER_PORT = 5022, LISTENER_IP = ALL ) FOR DATABASE_MIRRORING ( AUTHENTICATION = CERTIFICATE WSFC2016_NODE1_cert, ENCRYPTION = REQUIRED ALGORITHM AES, ROLE = ALL ); GO |
Step #6: Export the certificate to a file
After creating the certificate and assigning it to authenticate the endpoint, you can proceed to export it to the file system. The example below stores the certificate file to the C:\SQLAG folder. Be sure to create the folder and grant the built-in service account NT Service\MSSQLSERVER the Modify permissions prior to running the script.
|
1 2 3 4 5 6 7 8 9 10 11 12 13 |
--Run this on the primary replica/WSFC2016-NODE1. Just to be sure, enable SQLCMD mode in SSMS, using the sa login :CONNECT WSFC2016-NODE1 -U sa -P y0ur$ecUr3PAssw0rd USE master GO BACKUP CERTIFICATE WSFC2016_NODE1_cert TO FILE = 'C:\SQLAG\WSFC2016_NODE1_cert.cer'; GO |
Step #7: Copy the certificate file to the secondary replica
You need to copy the certificate file to the secondary replica, WSFC2016-NODE2. As mentioned in Step #4, this certificate will also be used for authenticating and securing the endpoint on the secondary replicas as the primary replica connects to them to send transaction log records.
Repeat steps #3 to #7 on the secondary replica
Since the secondary replica will also function as a primary replica in the event of either an automatic or manual failover (plus the fact that the secondary replica needs to send an acknowledgement to the primary replica after hardening the transaction log records on disk), you need to repeat steps #3 to #7 on all of them.
A complete script for the secondary replica WSFC2016-NODE2 is shown below.
|
1 2 3 4 5 6 7 8 9 10 11 12 13 14 15 16 17 18 19 20 21 22 23 24 25 26 27 28 29 30 31 32 33 34 35 36 37 38 39 40 41 42 43 44 45 46 47 48 49 50 51 52 53 54 55 56 57 58 59 60 61 62 63 64 65 66 67 68 69 |
--Run this on the secondary replica/WSFC2016-NODE2. Just to be sure, enable SQLCMD mode in SSMS, using the sa login --Repeat the same process for steps #3 to #7 on the secondary replicas :CONNECT WSFC2016-NODE2 -U sa -P y0ur$ecUr3PAssw0rd USE master GO --STEP #3: CREATE MASTER KEY ENCRYPTION BY PASSWORD = 'y0ur$ecUr3PAssw0rd'; GO --STEP #4: CREATE CERTIFICATE WSFC2016_NODE2_cert WITH SUBJECT = 'WSFC2016-NODE2 certificate for Availability Group' GO --STEP #5: CREATE ENDPOINT Endpoint_AvailabilityGroup STATE = STARTED AS TCP ( LISTENER_PORT = 5022, LISTENER_IP = ALL ) FOR DATABASE_MIRRORING ( AUTHENTICATION = CERTIFICATE WSFC2016_NODE2_cert, ENCRYPTION = REQUIRED ALGORITHM AES, ROLE = ALL ); GO --STEP #6: BACKUP CERTIFICATE WSFC2016_NODE2_cert TO FILE = 'C:\SQLAG\WSFC2016_NODE2_cert.cer'; GO --STEP #7: Copy the certificate to the other replicas |
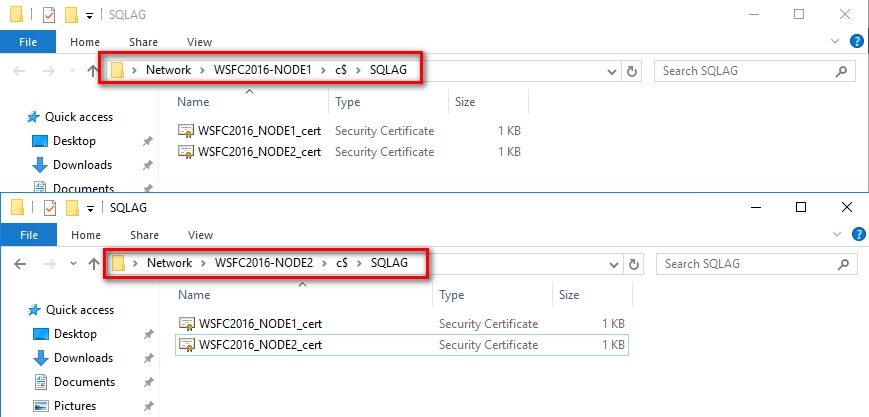
Once completed, you should have two (2) certificate files on all of your SQL Server instances.
Step #8: Create a login on the primary replica for use by the secondary replica
The login created on the primary replica is used by the secondary replica to connect to the Availability Group via the endpoint. You can think of the secondary replica as a client application that requires credentials to connect to the SQL Server instance – the primary replica.
|
1 2 3 4 5 6 7 8 9 10 11 12 13 |
--Run this on the primary replica/WSFC2016-NODE1. Just to be sure, enable SQLCMD mode in SSMS, using the sa login :CONNECT WSFC2016-NODE1 -U sa -P y0ur$ecUr3PAssw0rd USE master GO CREATE LOGIN login_AvailabilityGroup WITH PASSWORD = 'y0ur$ecUr3PAssw0rd'; GO |
Step #9: Create a user for the login
Create a user to associate with the login that was created.
|
1 2 3 4 5 6 7 8 9 10 11 12 13 |
--Run this on the primary replica/WSFC2016-NODE1. Just to be sure, enable SQLCMD mode in SSMS, using the sa login :CONNECT WSFC2016-NODE1 -U sa -P y0ur$ecUr3PAssw0rd USE master GO CREATE USER login_AvailabilityGroup FOR LOGIN login_AvailabilityGroup GO |
Step #10: Associate the certificate created in Step #4 with the user
The secondary replica will use the database user created in Step #9 to connect to the primary replica. You need to associate the certificate you created from the secondary replica with this user. The script below creates a certificate based on the one generated by the secondary replica and assigns it to the user.
|
1 2 3 4 5 6 7 8 9 10 11 12 13 14 15 16 17 |
--Run this on the primary replica/WSFC2016-NODE1. Just to be sure, enable SQLCMD mode in SSMS, using the sa login :CONNECT WSFC2016-NODE1 -U sa -P y0ur$ecUr3PAssw0rd USE master GO --Associate certificate from WSFC2016-NODE2 with user CREATE CERTIFICATE WSFC2016_NODE2_cert AUTHORIZATION login_AvailabilityGroup FROM FILE = 'C:\SQLAG\WSFC2016_NODE2_cert.cer' GO |
Step #11: Grant the CONNECT permission on the login
You, then, need to grant CONNECT permissions on the login to successfully establish the communication between Availability Group replicas.
|
1 2 3 4 5 6 7 8 9 10 11 12 13 |
--Run this on the primary replica/WSFC2016-NODE1. Just to be sure, enable SQLCMD mode in SSMS, using the sa login :CONNECT WSFC2016-NODE1 -U sa -P y0ur$ecUr3PAssw0rd USE master GO GRANT CONNECT ON ENDPOINT::Endpoint_AvailabilityGroup TO [login_AvailabilityGroup]; GO |
Repeat steps #8 to #11 on the secondary replica
Again, since the secondary replica will function as a primary replica in the event of either an automatic or manual failover, you need to repeat steps #8 to #11 on all of them.
A complete script for the secondary replica WSFC2016-NODE2 is shown below.
|
1 2 3 4 5 6 7 8 9 10 11 12 13 14 15 16 17 18 19 20 21 22 23 24 25 26 27 28 29 30 31 32 33 34 35 36 37 38 39 40 41 42 43 44 45 46 47 48 49 50 51 |
--Run this on the secondary replica/WSFC2016-NODE2. Just to be sure, enable SQLCMD mode in SSMS, using the sa login --Repeat the same process for steps #8 to #11 on the secondary replica :CONNECT WSFC2016-NODE2 -U sa -P y0ur$ecUr3PAssw0rd USE master GO --STEP #8: CREATE LOGIN login_AvailabilityGroup WITH PASSWORD = 'y0ur$ecUr3PAssw0rd'; GO --STEP # 9: CREATE USER login_AvailabilityGroup FOR LOGIN login_AvailabilityGroup GO --STEP # 10: --Associate certificate from WSFC2016-NODE1 with user CREATE CERTIFICATE WSFC2016_NODE1_cert AUTHORIZATION login_AvailabilityGroup FROM FILE = 'C:\SQLAG\WSFC2016_NODE1_cert.cer' GO --STEP # 11: GRANT CONNECT ON ENDPOINT::Endpoint_AvailabilityGroup TO [login_AvailabilityGroup]; GO |
Step #12: Create the Availability Group using T-SQL
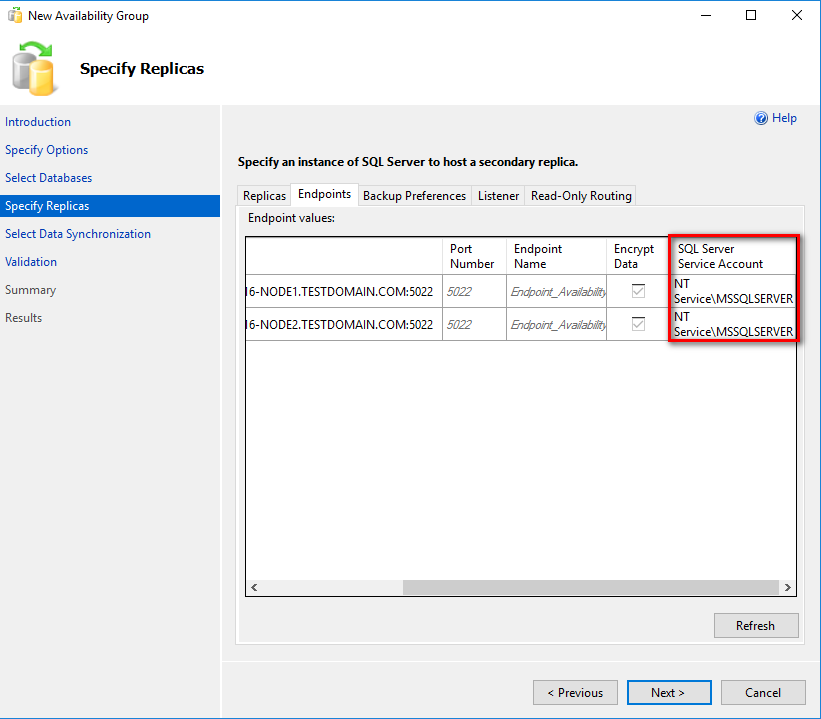
It’s tempting to use the New Availability Group Wizard to create the Basic Availability Group. However, if you do so, you won’t be able to modify the parameter for the login used to connect to the replicas. By default, the wizard will use the SQL Server service account credentials to connect to the replicas. But since the service accounts are all local user accounts (and that they are built-in accounts that Windows manages), you won’t be able to know what the password is. You can work around this limitation by creating a local user account on all of the failover cluster nodes with the same name and password. You can then use the local user account as the SQL Server service account credential.
For this example, the login created in Step #8 will be used.
Use the T-SQL script below to create the Basic Availability Group on the SQL Server instance that you want to configure as the primary replica. It is assumed that you already have a database named Northwind in your SQL Server instance configured in FULL recovery model with at least one full database backup.
|
1 2 3 4 5 6 7 8 9 10 11 12 13 14 15 16 17 18 19 20 21 22 23 24 25 26 27 28 29 30 31 32 33 34 35 36 37 38 39 40 41 42 43 44 45 46 47 48 49 50 51 52 53 54 55 56 57 58 59 60 61 62 63 64 65 66 67 68 69 70 71 72 73 74 75 |
--Run this on the primary replica/WSFC2016-NODE1. Just to be sure, enable SQLCMD mode in SSMS, using the sa login :CONNECT WSFC2016-NODE1 -U sa -P y0ur$ecUr3PAssw0rd USE [master] GO CREATE AVAILABILITY GROUP [Workgroup_AG] WITH ( BASIC, AUTOMATED_BACKUP_PREFERENCE = PRIMARY, DB_FAILOVER = ON, DTC_SUPPORT = NONE ) FOR DATABASE [Northwind] REPLICA ON N'WSFC2016-NODE1' WITH ( ENDPOINT_URL = N'TCP://WSFC2016-NODE1.TESTDOMAIN.COM:5022', FAILOVER_MODE = AUTOMATIC, AVAILABILITY_MODE = SYNCHRONOUS_COMMIT, SEEDING_MODE = AUTOMATIC, SECONDARY_ROLE ( ALLOW_CONNECTIONS = NO ) ), N'WSFC2016-NODE2' WITH ( ENDPOINT_URL = N'TCP://WSFC2016-NODE2.TESTDOMAIN.COM:5022', FAILOVER_MODE = AUTOMATIC, AVAILABILITY_MODE = SYNCHRONOUS_COMMIT, SEEDING_MODE = AUTOMATIC, SECONDARY_ROLE ( ALLOW_CONNECTIONS = NO ) ); GO |
The following parameters and their corresponding values are used to create the Basic Availability Group:
- Workgroup_AG: the name of the Availability Group
- BASIC: This is the keyword that tells SQL Server to create a Basic Availability Group.
- AUTOMATED_BACKUP_PREFERENCE = PRIMARY: specifies preference on the primary replica when performing automated database backups
- DB_FAILOVER = ON: specifies database-level health detection action; this will automatically failover the Availability Group if one of the databases on the primary replica is offline
- DTC_SUPPORT = NONE: no DTC support
- FAILOVER_MODE = AUTOMATIC: specifies automatic failover of the Availability Group
- AVAILABILITY_MODE = SYNCHRONOUS_COMMIT: specifies synchronous mode Availability Group replication
- SEEDING_MODE = AUTOMATIC: a new parameter in SQL Server 2016 that introduces direct seeding. This allows creation of a database inside an Availability Group without performing the usual backup-copy-restore process
- SECONDARY_ROLE (ALLOW_CONNECTIONS = NO): specifies secondary replica databases to only be on standby and not used for read-only workloads
After creating the Basic Availability Group on the primary replica, proceed to join the secondary replica – WSFC2016-NODE2.
|
1 2 3 4 5 6 7 8 9 10 11 12 13 |
--Run this on the secondary replica/WSFC2016-NODE2. Just to be sure, enable SQLCMD mode in SSMS, using the sa login --Join secondary replica to the Availability Group :Connect WSFC2016-NODE2 -U sa -P y0ur$ecUr3PAssw0rd USE master GO ALTER AVAILABILITY GROUP [Workgroup_AG] JOIN; GO |
Because the direct seeding option is used to initialize the database in the secondary replica, you need to grant it the CREATE ANY DATABASE permission.
|
1 2 3 4 5 6 7 8 9 10 11 12 13 |
--Run this on the secondary replica/WSFC2016-NODE2. Just to be sure, enable SQLCMD mode in SSMS, using the sa login --Join secondary replica to the Availability Group :Connect WSFC2016-NODE2 -U sa -P y0ur$ecUr3PAssw0rd USE master GO ALTER AVAILABILITY GROUP [Workgroup_AG] GRANT CREATE ANY DATABASE; GO |
Once the Basic Availability Group has been created, you can view the dashboard for the state and configuration information.

Step #13: Create an Availability Group listener name
Once the Basic Availability Group has been created and validated, proceed to create the listener name. Unlike when creating the Basic Availability Group, you can create the listener name using SSMS.
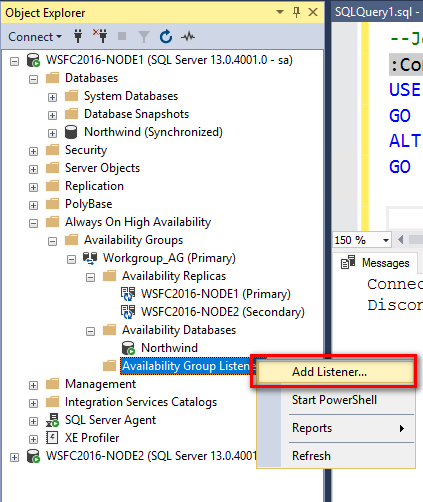
- From within Object Explorer, expand the AlwaysOn High Availability node and the Availability Groups node
- Right-click the Availability Group Listeners node and select the Add Listener This opens the New Availability Group Listener dialog box
- In the new Availability Group Listener dialog box, specify the listener name and the port number. In the example below, port 1433 is used for simplicity.

In the Network Mode: drop-down list, select Static IP and click the Add button.
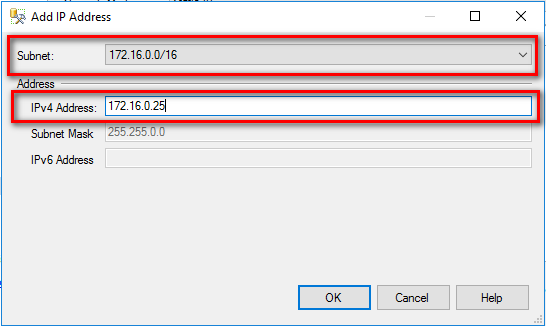
- In the Add IP Address dialog box, select the appropriate subnet and provide a virtual IP address for the corresponding listener name. Click OK.
- Click OK to create the listener name.
Alternatively, you can use the T-SQL script below to create the Availability Group listener name.
|
1 2 3 4 5 6 7 8 9 10 11 12 13 14 15 16 17 18 19 20 21 22 23 24 25 |
--Run this on the primary replica/WSFC2016-NODE1. Just to be sure, enable SQLCMD mode in SSMS, using the sa login :CONNECT WSFC2016-NODE1 -U sa -P y0ur$ecUr3PAssw0rd USE [master] GO ALTER AVAILABILITY GROUP [Workgroup_AG] ADD LISTENER N'Workgroup_AG_LN' ( WITH IP ( (N'172.16.0.25', N'255.255.0.0') ) , PORT=1433); GO |
Unlike the WSFC virtual server name, the Availability Group listener name will not get created in the DNS. You have to manually create the DNS entry if you want to use it for your client application connectivity. Refer to the previous blog post on how to add the Availability Group listener name as an A record in the DNS.
Summary
If you’ve managed to complete all of the tasks in these series of blog posts, congratulations! Implementing SQL Server 2016 Always On Basic Availability Groups without Active Directory is not an easy feat as there are a lot of moving parts. However, it does give you a very deep understanding of what makes it work – from the external dependencies like networking and DNS to the different processes that make up SQL Server Always On Availability Groups. In fact, this forms the foundational knowledge for deploying SQL Server 2017 Always On Availability Groups on Linux clusters.
