

Creating automation and orchestration requires taking multiple data center components which all speak different languages and chaining them together through one consistent workflow. Now there are a lot of programming and scripting languages that we can use as our orchestration engine such as Java, JavaScript, Perl, etc. – but one of the most common choices within the last 5 years has been PowerShell.
Why chose PowerShell?
Since PowerShell was introduced in 2006 we have seen adoption within the market going nowhere but up. There are many reasons for this, however, a couple of the biggest factors, in my opinion, have been the wide range of support PowerShell provides for other Microsoft products, along with third-party vendors also contributing by publishing their own sets of PowerShell modules and snap-ins. This makes it incredibly easy to say add a new Active Directory user and at the same time create them an Exchange mailbox and go out and do whatever else your “new user” policy entails. That said not all products within the data center provide a plug into PowerShell – instead, we are seeing a wider range of software vendors offer access to their applications and functions through basic web requests via a REST API. So, in the end, we are left with PowerShell as our automation flavor of choice, but how do we then talk to the REST API interfaces?
Making PowerShell and REST work together
The building blocks of writing PowerShell scripts are built around cmdlets – and we have a couple of cmdlets that can be used to interact with a REST endpoint: Invoke-WebRequest and Invoke-RestMethod. While we can use Invoke-WebRequest to interact with an API there seems to be a lot of legwork involved in getting all of the parameters properly assigned in order to send our requests and at times it can be quite cumbersome trying to parse responses. In my opinion, this cmdlet is mainly built to interact with simple web pages or forms – and at times is required to discover form fields and to build body variables to pass back to a REST API. All that said most REST API instances provide us with documentation as to what exactly needs to be included in our requests, which is why for the rest of this article we will focus on Invoke-RestMethod
You can have a look at the complete documentation for Invoke-RestMethod here – however, in most cases, we really only need to focus on four parameters to use the cmdlet successfully.
- URI – This is the only required parameter of the cmdlet. This will represent the HTTP or HTTPS resource in which we would like to send the request to – more specifically, the URL of the REST endpoint.
- Headers – A lot of REST providers will at one point require us to define the headers of our request. Within the headers quite often contain things such as session ids or credentials that define we are in fact authenticated and permitted to make the given request.
- ContentType – Here we specify the Content Type of the request as well as the response body. The most common content types we see are application/XML and application/JSON. We are just simply telling both PowerShell and the REST endpoint what format to expect within the body.
- Body – This is the meat and potatoes of our request. Within the body, we can see a number of things depending on the API we are talking to – usually, we see descriptors or information in regard to the function being performed. For example, a request to an API resource which creates a VM we would most likely see the body defining things such as VM Name, # of CPUs, Memory, etc.
So now that we have a basic understanding of the Invoke-RestMethod cmdlet let’s look at some examples of actually using it. There are literally thousands and thousands of public APIs that we could look at consuming, but given a lot of the readership of this blog is vExperts and Ravello offers vExperts 1000 free CPU hours a month of their cloud overlay product I thought that it might be a good example to use. If you want to have a look at their API documentation you can do so here. So, with all that let’s get started…
Time to start invoking!
The first step in any API process is usually authentication and Ravello is no different. As we can see from the documentation we can authenticate to our account by sending a POST request to the login resource. Now, as I mentioned before that normal authentication is handled within our request headers and again, Ravello requires us to do this. From the documentation we can see that they require us to send an Authentication value within the header, containing the authentication type (Basic) as well as a base64 encoded string of our username and password. So, with that let’s take a look at how we can achieve a login to Ravello using Invoke-RestMethod below…
|
1 2 3 4 5 6 7 8 9 10 11 12 |
$username = Read-Host “Enter Ravello username: “ $password = Read-Host “Enter Ravello password: “ $userpass = $username + “:” + $password $bytes= [System.Text.Encoding]::UTF8.GetBytes($userpass) $encodedlogin=[Convert]::ToBase64String($bytes) $authheader = "Basic " + $encodedlogin $headers = New-Object "System.Collections.Generic.Dictionary[[String],[String]]" $headers.Add("Authorization",$authheader) $headers.Add("Accept","application/json") $headers.Add("Content-Type","application/json") $uri = "https://cloud.ravellosystems.com/api/v1/login" $response = Invoke-RestMethod -Uri $uri -Headers $headers -Method Post -ContentType "application/json" |
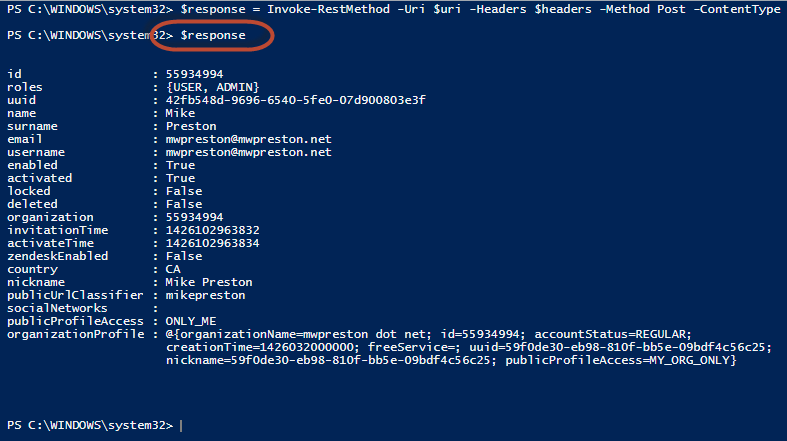
To break down the code above we can see that we are simply prompting for a username and password from the user, then taking that information and encoding it with Base64. From there we create a new header object for our request and add our Authorization key, along with a couple content type directives. We then simply send our request to the login resource of the Ravello API. After running the above script we can then take a look at the user response that Ravello sends back – as shown we can see that Ravello has indeed authenticated us and sent back an array of information in the response body about our user account.
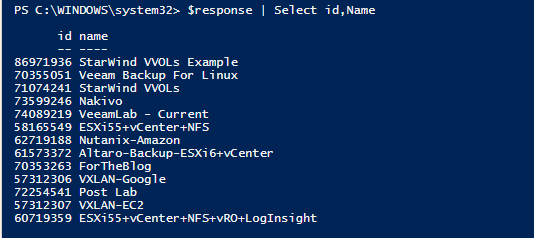
So now that we have authenticated let’s go ahead and send a get request to the applications resource to see what applications we have available to us to run. Again we do this with the Invoke-RestMethod as shown below. Keep in mind that the headers we have created above will be sent with every subsequent request in order to maintain our authentication.
|
1 2 |
$uri = "https://cloud.ravellosystems.com/api/v1/applications" $response = Invoke-RestMethod -Uri $uri -Method Get -Headers $headers |
After running the above script we should be returned a list of applications within our $response variable (shown below).
Now, to start an application within Ravello we need to get the actual application id associated with it. Since the application I am trying to start is called “StarWind VVols Example” I can achieve this with the following command…
|
1 |
$appid = ($response | where { $_.name -eq "StarWind VVOLs Example" }).id |
Now that we have our application id we can go ahead and start it, however, Ravello does support an auto shutdown feature which will power our labs down in case we forget to. Thankfully configuring this setting via the API also gives us a chance to showcase how we pass a body within our request as well. The following code shows just that…
|
1 2 3 4 5 6 |
$uri = "https://cloud.ravellosystems.com/api/v1/applications/" + $appid + "/setExpiration" $body = @{ expirationFromNowSeconds=14400 } $jsonbody = $body | ConvertTo-Json $response = Invoke-RestMethod -Uri $uri -Headers $headers -Method Post -Body $jsonbody |
The above code is pretty similar to all of the other requests we have sent with the exception of creating the $body JSON syntax and sending it along. Determining what goes into the body can sometimes be a challenge, however since the Ravello API is very well documented we are quickly able to figure out that we need to include the “expirationFromNowSeconds”. Once this request has gone through we are finally able to start our application with the following two lines of code…
|
1 2 |
$uri = "https://cloud.ravellosystems.com/api/v1/applications/" + $appid + "/start" $response = Invoke-RestMethod -Uri $uri -Method Post -Headers $headers |
If all goes well you should see your lab fire up and start booting VMs within Ravello – initiated by nothing but PowerShell – and in my case, I’m ready to start testing out VVol integration with VSAN from StarWind. Hopefully, you are beginning to see some of the benefits of integrating REST endpoints into your current PowerShell automation. Using Invoke-RestMethod we are able to essentially automate any part of our infrastructure that provides us with REST capabilities. Now, this was just one example using Ravello, obviously, the URI resource and syntax may change a little depending on what API you are connecting to, however, the context of how you do it is essentially independent. For more information on using the Invoke-RestMethod cmdlet, I’d suggest checking out the official documentation here.
Thanks for reading!
