

In my previous blog post, I covered SharePoint 2016 installation process, my next logical step after that was to configure SharePoint app catalog so that I can add K2 for SharePoint app and as I covered this process earlier on my personal blog, I expected this to be a small task. Indeed, I had created it following steps from my old blog post in just minutes, but, alas, I run into loads of warnings while running K2 for SharePoint AppDeployment.exe. I sorted most of them but after seeing extra warnings telling me that additional configuration is required just because I’m using HTTP instead of HTTPS I decided that it is better to re-create my app catalog using HTTPS.
From my support experience, I see that way too often it becomes easier just to configure HTTPS rather than doing extra hops allowing a use of insecure HTTP (even in development and test environments). I realized that when I wrote my old blog post about the provisioning of app catalog I just created it with HTTP URL and not covered all related details, so it seems now is high time to do it. I deleted my initially created HTTP app catalog and decided to start from the very beginning by reviewing SharePoint app model and creating app catalog from scratch with HTTPS URL.
Before I begin, just a brief note on how to delete existing App Catalog, for those who like me want to do some rework/remove previously created app catalog. Once created App Catalog looks pretty much like any other SharePoint site, yet one of the differences is that if you go into Site Settings for this site you won’t be able to find Delete this site option under Site Actions section, instead you must delete it from Central Administration > Application Management > Delete Site Collection. Once there select Change Site Collection and from the dropdown select the URL of the app catalog (make sure you look under right web app). After it populates the data, click delete. Now that we touched on this detail which enables you to start from scratch I can start with explanations and installation steps. 🙂
SharePoint app model currently includes two types or styles of apps: one for on-prem apps (SharePoint-hosted) and another for cloud apps (provider-hosted), and until June 2014 there used to be a third type – Auto-hosted apps which is no longer supported/available.
SharePoint-Hosted Apps are installed on SharePoint website (which is called Host Web in this context) and their app resources hosted on an App Web. Normally Host Web and App Web are websites hosted in the same Site Collection. When an app is being provisioned, SharePoint will deploy an app web into a unique domain where all resources associated with a SharePoint-hosted app will be deployed and from where they will be requested.
In this model, all app resources deployed into app web (there are no server side components in SharePoint-hosted apps, all components are hosted within SharePoint) and SharePoint creates a unique domain name for each app when it is being provisioned.
Provider-Hosted Apps are like SharePoint-hosted apps with that difference that they include server side components, so in this model, some of the app components live outside of SharePoint farm (in the cloud or on a dedicated server). When the provider-hosted app is provisioned it sets up a trust between external components living on the remote host and SharePoint farm. This provides an ability to put your app components on any platform and hardware, host them on Azure or some other remote web platforms. You can also use SharePoint components, resources and services on the remote site (thanks to trust). In this model, developers encouraged to use OAuth to communicate across SharePoint components inside the host web and app web, with the ability to by-pass OAuth in on-premise implementations by means of setting up high-trust app which uses server-to-server authentication protocol.
Auto-hosted Apps were essentially provider hosted apps hosted in Windows Azure which were available as a preview after SharePoint 2013 release but they are no longer supported (support ended in June 2014). Good list of what was wrong with this model can be found here.
To configure your SharePoint 2016 environment for Apps (SharePoint-Hosted apps) you must create an App Domain, configure an app URL and in addition to this a new DNS zone with an alias (CNAME) will be required too (as you can see there are at least 3 big distinctive steps).
Each SharePoint-Hosted app is going to have URL which looks approximately like this:
![]()
First part in this URL – “app” is a configurable app prefix, next goes unique auto generated app ID (1234567abcdefg) which will be different even for the same app per each site collection where you deploy it. Next goes an app domain part (yourappdomain.com) and after it goes site collection path or the host web (sites/your site) and final part of that URL is an app name.
Here is an example for K2 app URL deployed in my test environment (after it was configured 🙂 ):
![]()
Step 1. Creating DNS zone with the alias (CNAME). In my case for app domain I created new DNS forward lookup zone named “apps.conundrum.com” which contains wildcard CNAME entry pointing to my SharePoint 2016 server A-record in conundrum.com zone:

Wildcard DNS entry is required just because we can’t determine random app ID before app has provisioned. Without wildcard DNS entry, new DNS entry for every app will be required and you should go to DNS console and create it manually each and every time. If you need more detailed, step by step instructions for this you can find them in my old blog post.
Step 2. Creating web app, root level site collection and provision required service applications. Next thing we need is Service Applications required for our apps infrastructure. We need to provision Subscription Settings Service which establishes subdomains for apps and generates app IDs and App Management Service which handles app permissions and licensing information.
But before doing this, we start with the part which was not covered in my old blog post on provisioning app catalog is the creation of Web App for apps using SSL. This part is often poorly covered/omitted in other blogs and this has been something I stuck with for some time trying to make sense of how this should be configured.
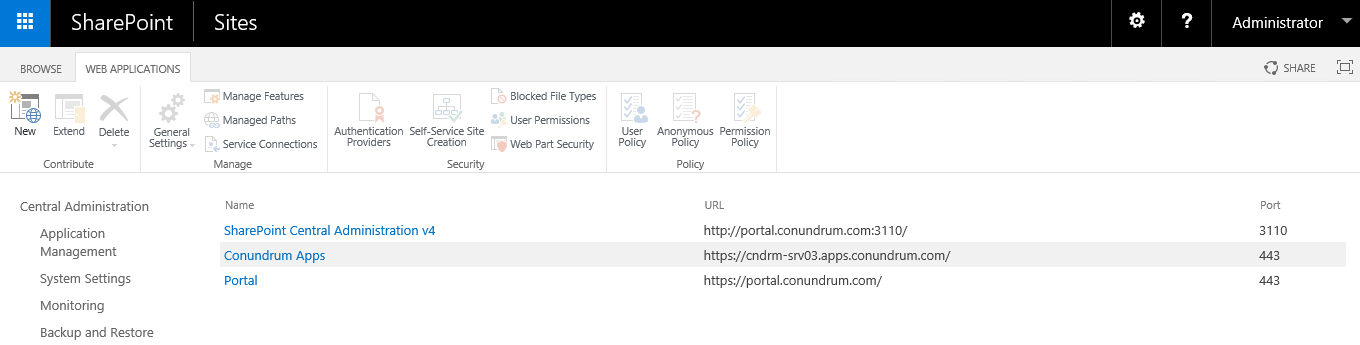
In my case, I had an existing Web App https://portal.conundrum.com on default port 443. We can see IT both in SharePoint and IIS UIs:
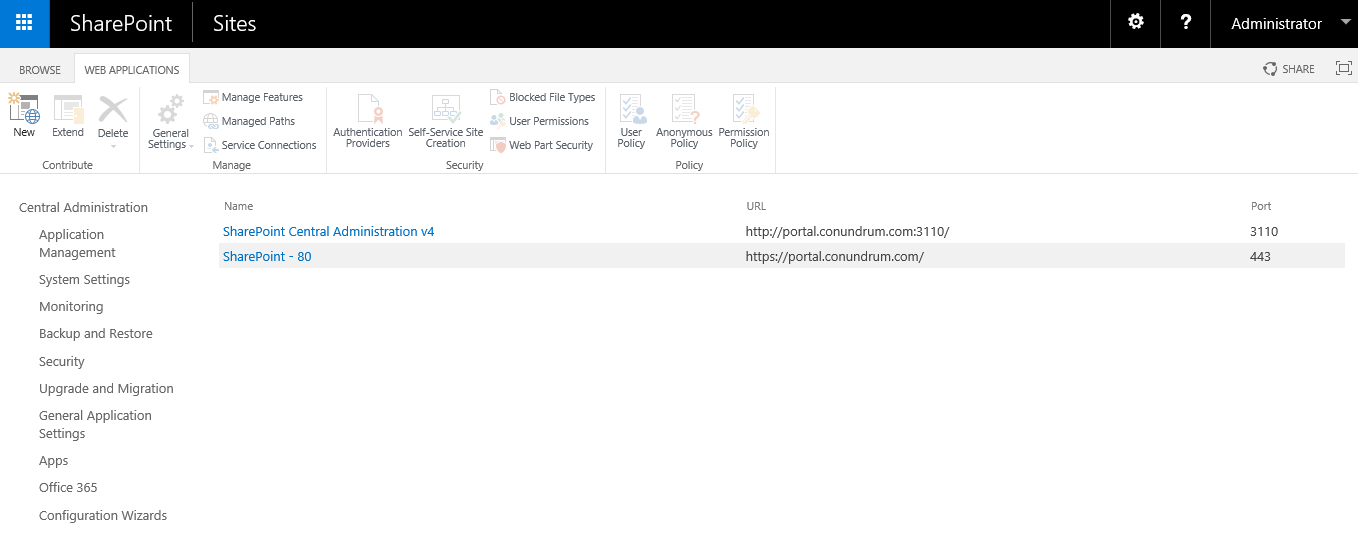
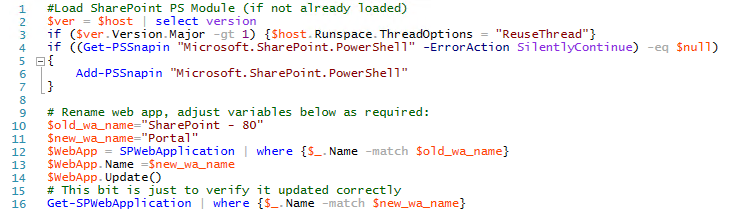
While doing initial installation, I opt out for HTTP URL, yet, like I said earlier while trying to deploy K2 for SharePoint app I realized that switching to HTTPS will save me some extra configuration steps which are required for less secure HTTP setup. Hence, I switched to HTTPS URL adjusting my IIS bindings as shown in the screenshot above. Yet as you can see my Web App still had an old name which mentions HTTP port 80, and there is no GUI to adjust that – but you can do this via PS script (grab it here):
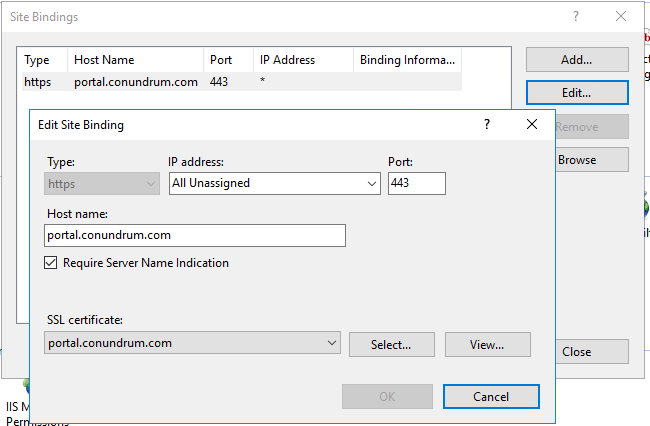
Now we have our initial Web App on HTTPS with SSL certificate and Require Server Name Identification option enabled, like that:
To make things clear: we going to preserve this existing web app and create a new one for app catalog for two reasons: to demonstrate full process starting from new web app and to demonstrate how to configure for coexistence of two SharePoint web apps (i.e. IIS sites) on the same IP address using SNI feature. But remember your app catalog is web app scoped so you create one app catalog per web app and it can be used for all site collections within the web app. That means that you can skip some of the steps below and configure app catalog for your existing web app. My suggestion is to go through the full process described below and only after this create another app catalog for your existing web app.
What we need to do next is create a new Web Application from Central Administration for our App Domain, and this one will need wildcard certificate, so we first just navigate to Central Administration > Manage Web Applications and click New:

We then filling in related form giving our Web Application descriptive name (Conundrum Apps in my case) specifying port 443, enabling Use SSL option and leaving Host Header empty (remember – apps have random IDs, therefore we need wildcard DNS entry, wildcard certificate and this is why we can’t use host header).
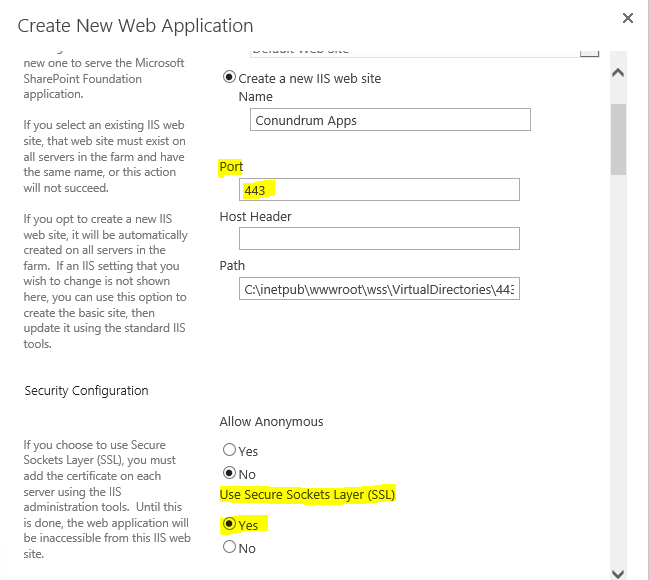
We also select Create new application pool specifying URL and just for convenience changing database name to something more descriptive/naming convention compliant so that we can easily make sense of which database related to what while looking at them from back-end/SQL server side:
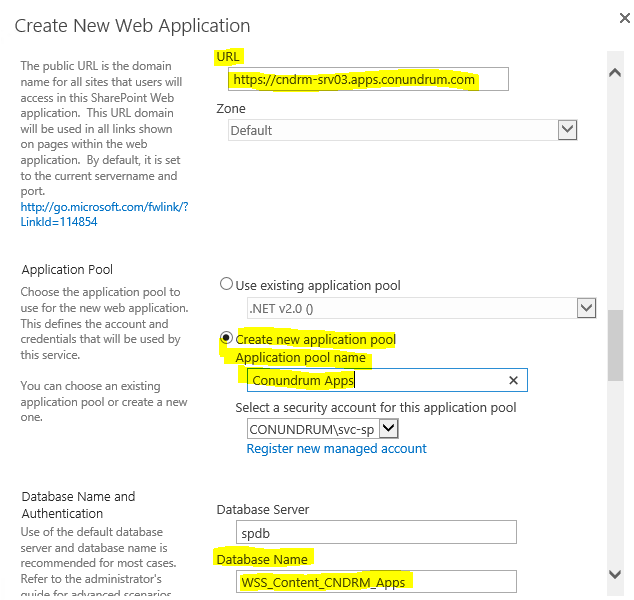
Note that for URL I just used my SharePoint server name + my DNS app domain where wildcard CNAME entry exists. After a bit of waiting we will be able to see our newly created Web App in SP UI:
As usual, the same operation can be performed with Power Shell (grab script here):

Once we have done with Web App we should now take care about certificates. For test/development environments you can get away with self-signed SSL certificate. Some time ago I did a blog post along with YouTube video entitled “How to create self-signed certificate for K2 NLB cluster add it to trusted root CA on client machines via GPO” where you can find details on how to create certificate as well as how to add it to trusted root CA on client machines via GPO. For our purposes here we just need to create wildcard SSL certificate which amounts to one line of Power Shell (grab script here):
Next step is configuring bindings for our newly created Web App in IIS as well as adding this certificate to Trusted Root Certification Authorities on your SharePoint server (refer to blog post/video I mentioned above for more details).
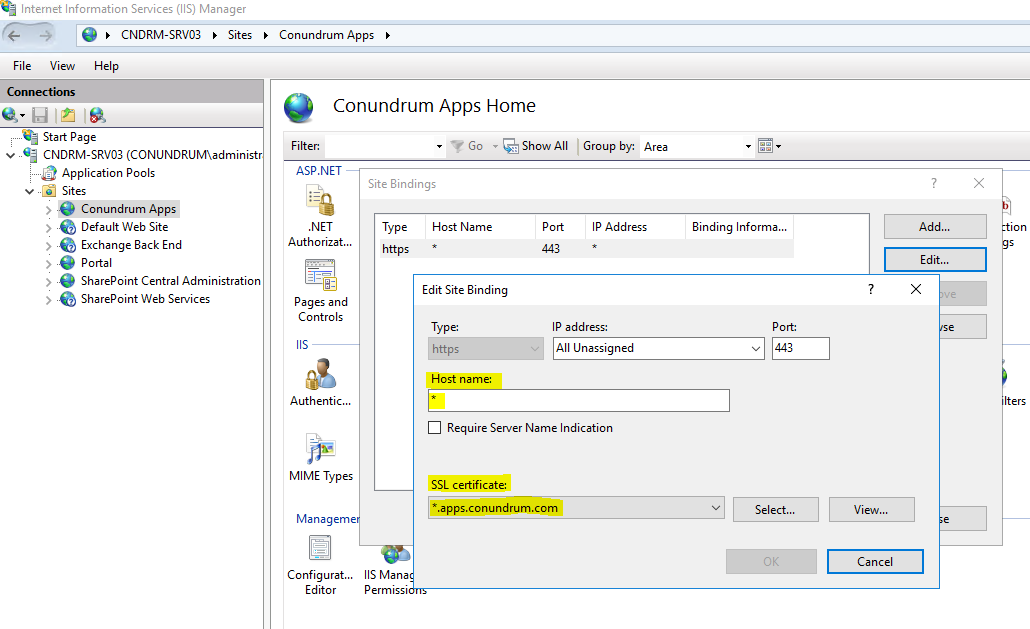
As you can see from the screenshot above we just select our wild card certificate as well as type in the wild card (*) in Host name field.
Now when we have our Web App set up properly we need to create our root site collection to put our app catalog on. For that, we just go ahead and create a new empty site collection using PowerShell. In my case I do it using “all-mighty” account with all possible rights everywhere, but normally you will be probably doing such operations using some dedicated account (e.g. sp_install) with more granular permissions, i.e. you going to make sure that it has user mapping as well as db_securityadmin rights on our web app content DB:
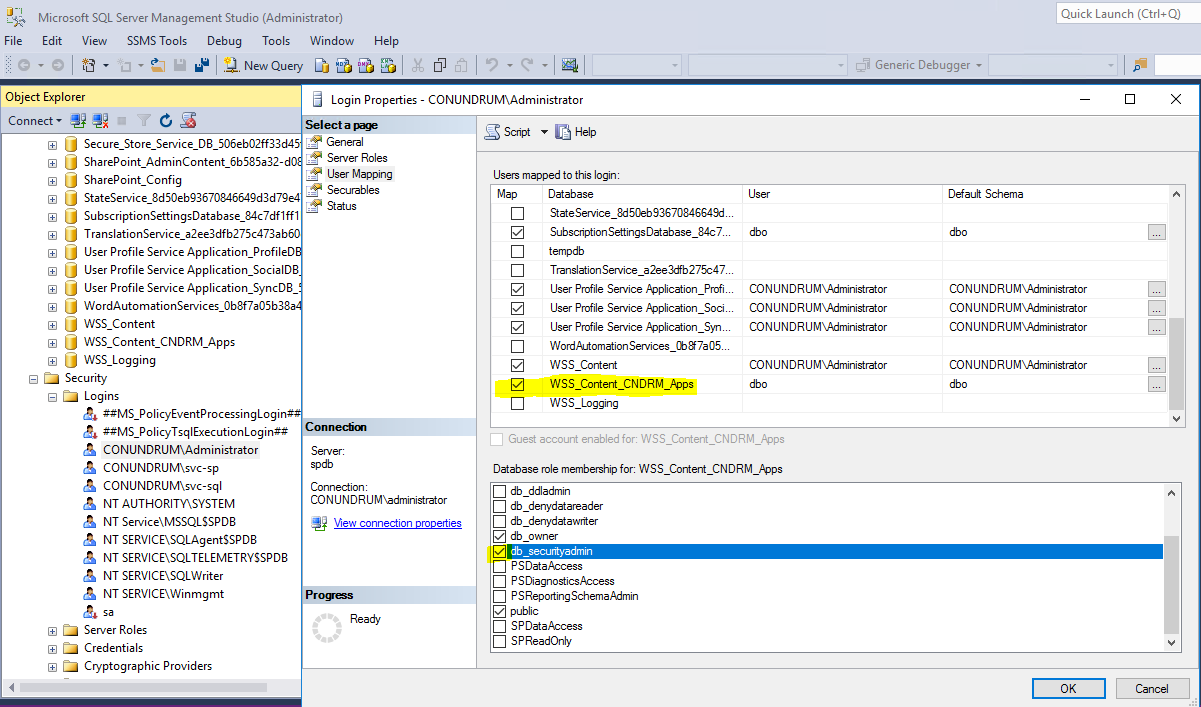
In case you are trying to grant database level db_securityadmin right and getting this error:
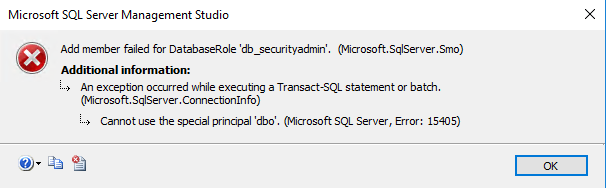
This error message simply means that user you are trying to grant this right is an actual owner of the database and as such, this user can only have db_owner, and cannot be assigned any further database roles, nor does he need them (SSMS error messages tend to be quite cryptic at times). Users who are the DB owners already have permissions to do anything they want to within this database. So make sure user account you are using either is a db_owner or has a db_securityadmin right. Now we just creating empty host named site collection (apps have to be hosted on the host named site collection (HNSC)) on a root level of our web application (grab script here):
If this script completed with no errors you can navigate to Site Collection List for the web application we created for our apps and see that root level site collection is in place (yes, it is that backslash highlighted in yellow, which tells us about it 🙂 ):
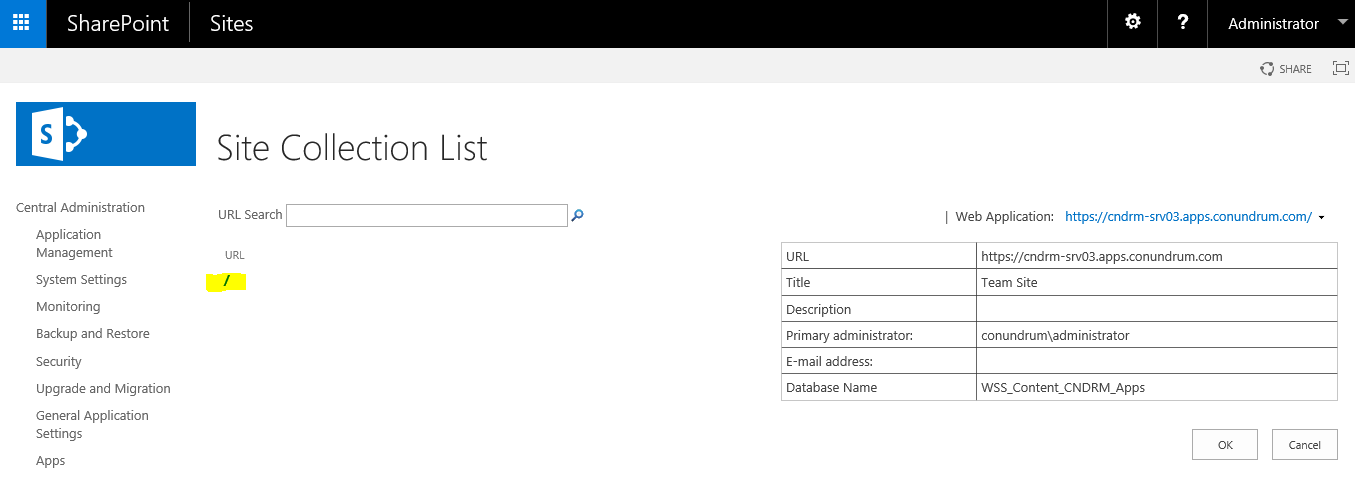
And you can now access this root level site collection via your web app URL:
Now, for our new web app and related root site collection to be hosted on the same box as our other SharePoint web app/site collection(s) we must run multiple SSL sites on the same IP. Such configuration was not possible without extra IPs or custom ports prior to Windows Server 2012/IIS 8 where support for SNI (Server Name Indication) extension to TLS protocol was added, allowing the use of hostname to identify the network endpoint. SNI also requires browser side support, but all modern browsers have it. Thanks to this we just add Require SNI + host name to our primary web app, while leaving SNI/host name unspecified for our application catalog web app (which receives all requests which not explicitly indicate configured host header, portal.conundrum.com in my case).
After somewhat lengthy preceding part covered mainly DNS/IIS stuff we moving to configuration related Service Applications in SharePoint. Remember in the very beginning we mentioned Subscription Settings Service which establishes subdomains for apps and generates app IDs and App Management Service which handles app permissions and licensing information? Time to finally configure them.
To create these service applications, you should use PowerShell as there is no GUI way to create them – you just can’t find them in Service Applications > New drop down menu:

In SharePoint 2013 before running PowerShell scripts you had to start related services on the server, in SharePoint 2016 instead of clicking Start for respective service you should click on Enable Auto Provision link instead (Subscription Settings Service listed as Microsoft SharePoint Foundation Subscription Settings Service, not sure why MSFT keeps this lengthy prefix 🙂 ). In my case Enable Auto Provisioning action was not displayed and Manage Service Application action was presented instead for App Management Service (probably because I haven’t start from scratch and deleted app catalog and related service apps earlier in this environment).
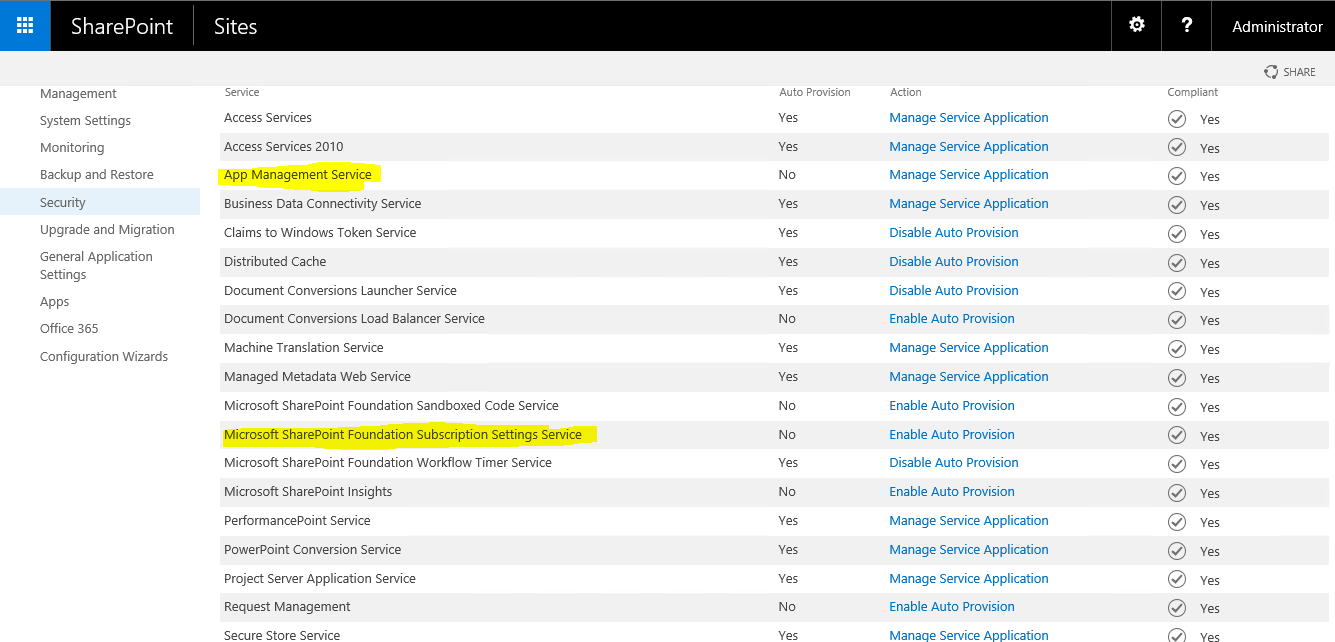
Anyhow after clicking Enable Auto Provision for these two services you may run PS script to provision required service applications and verify that those created successfully either by locating them in CA GUI (Manage Service Applications) or using PS script:

Now we are ready to configure app URLs. As everything in SP it can be done both via GUI (Central Administration > Apps > Configure App URLs) or PowerShell (grab the script here):
![]()
In any case, we just specifying app domain we created earlier in DNS (i.e. parent domain under which all our applications will be hosted) and app prefix (static part of our apps URLs, which will be prepended to the subdomain of the app URLs/app GUID).
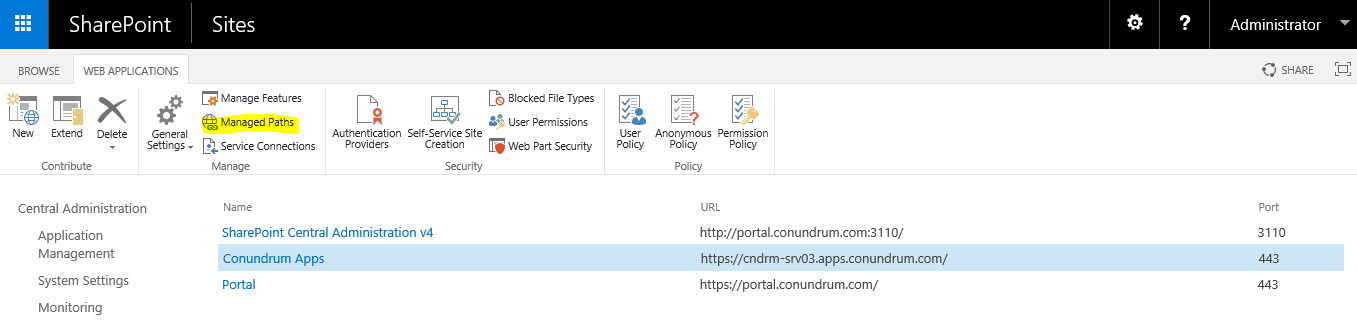
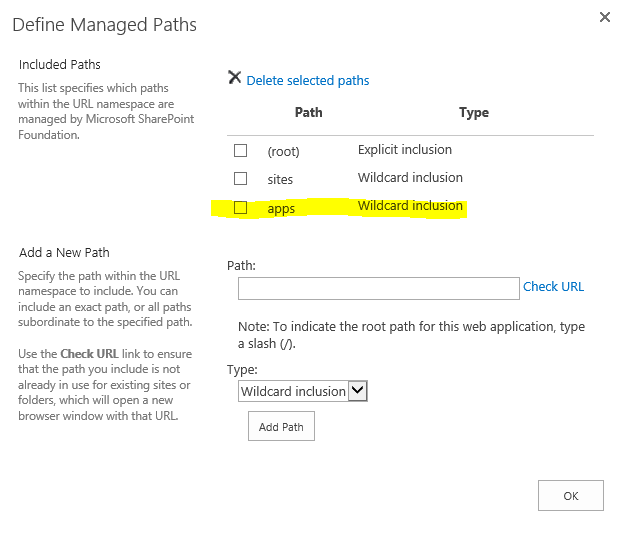
Step 3. Creating App Catalog. We are now all set to create an App Catalog. This involves creation managed path & app catalog site. The process is quite simple and similar to the creation of any other site in SharePoint (Team Site etc.) with the only difference that you do it from another place. First, we create managed path, by means of navigating to Central Administation > Application Management > Manage web applications, selecting our web app for app catalog (in my case – Conundrum Apps):
In Managed Paths we just adding wildcard inclusion path named Apps:
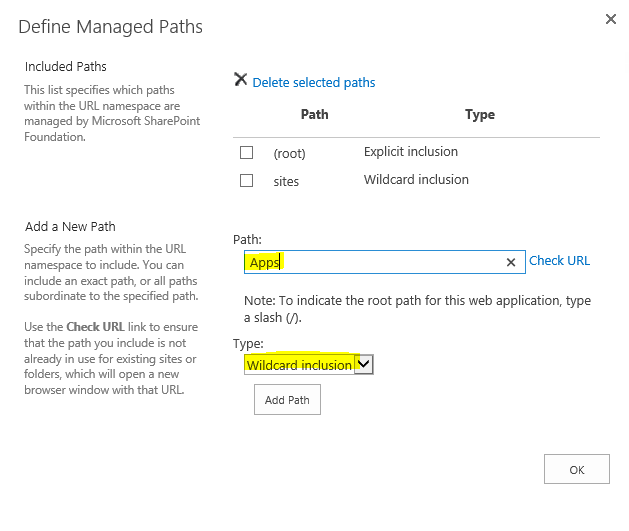
After clicking Add Path Button we will see new path listed under Included Path section:
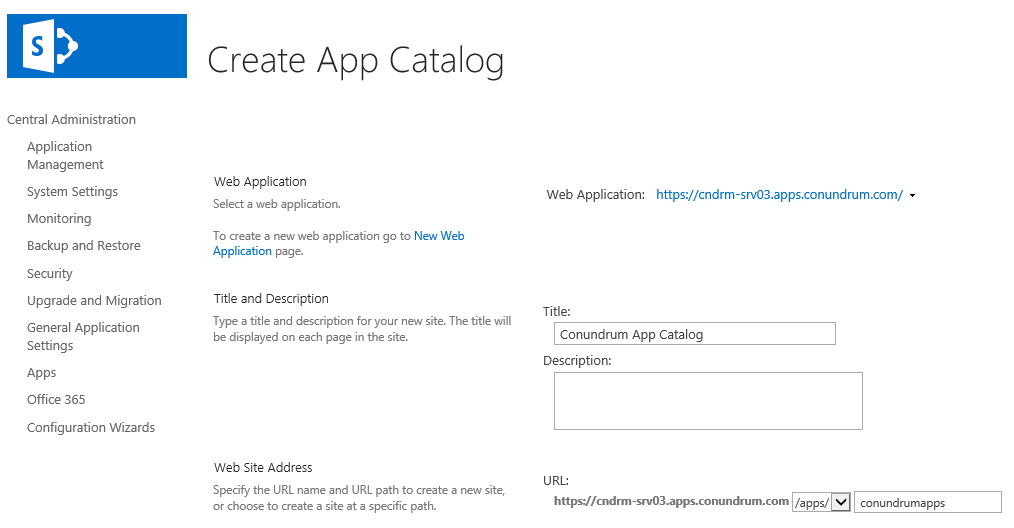
And once we have done with that we can create an app catalog site, this time we have to navigate to Central Administration > Apps > Manage App Catalog. In that dialog, we have an option to Create a new app catalog site which brings us to Create App Catalog page which is similar to the one you have seen while creating other SP sites. We make sure that proper Web Application is selected, filling in Title field and select our managed path (this is not a requirement, but makes things neat and increases naming consistency 🙂 ) and fill in the rest of the path like that:
Now we just assign site collection administrator and adding Everyone into End Users and hit OK. After well familiar “Working on it” we have confirmation that our app catalog site has been created:
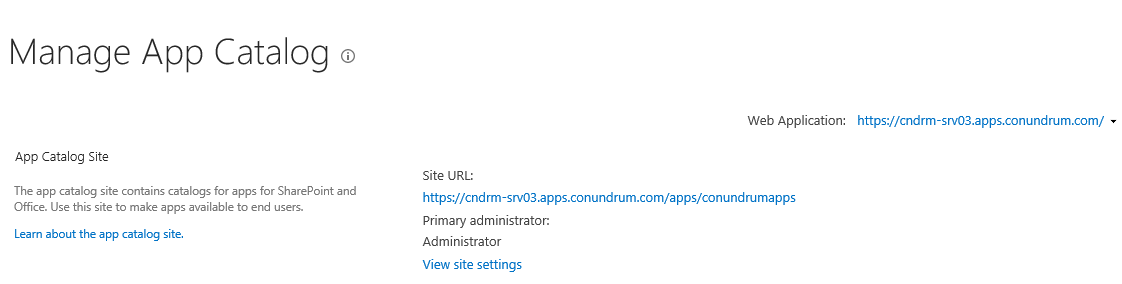
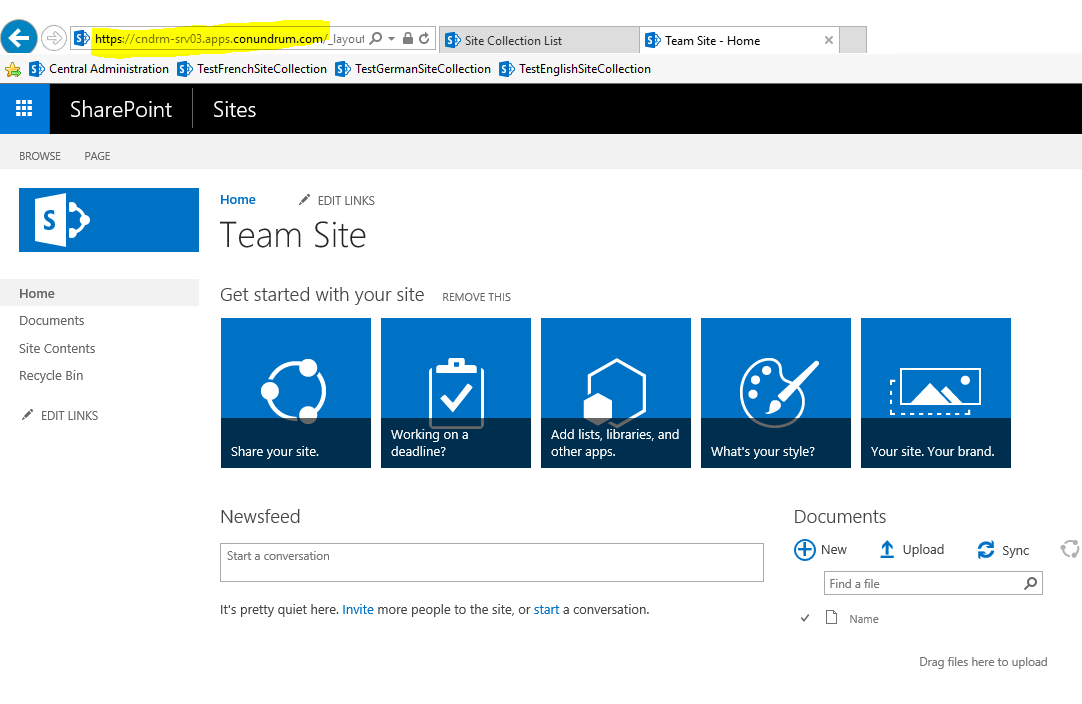
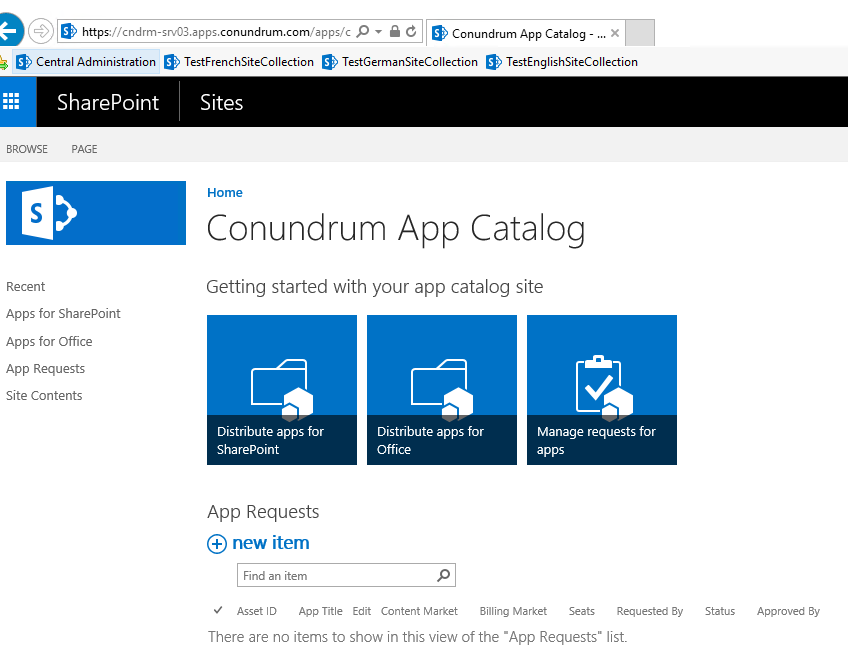
Now we finally can click on site URL and access our app catalog:
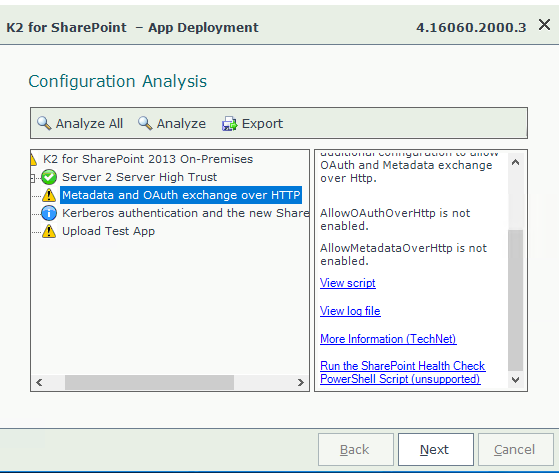
With our app catalog in place, we are now ready to add an App to an SP Site. In my case, my first app to add is K2 as this what I wanted to do initially, and lo and behold after all these steps K2 for SharePoint App Deployment Configuration Analyses completes with flying colors (all green 🙂 ):

Like I said in the very beginning, having HTTPS configured tend to save you a couple of extra configuration steps. I hope you find that detailed app catalog provisioning walkthrough useful and hope that now I can finally look carefully at some of the new features in SharePoint 2016 and write a blog post about them.
