

Despite I have mentioned in my previous article that setting up an integration between K2 blackpearl and SharePoint online is rather “a piece of cake” level of complexity compared to manual AAD integration set up the process, I’ve decided to write this article and describe this process from start to finish. Why? Because it is one thing to say that entire process boils down to adding K2 for SharePoint App to your SharePoint Online site through app catalog, and another thing to set this up completely from the ground up.
Let’s try to do that together. From the K2 side, you will need K2 server with HTTPS bindings and this too has been covered in my blog post which I mentioned above. Rest of the actions are covered in the K2 documentation, but even using these two useful resources you may still wondering how do you go about getting your SharePoint Online instance and this will be our first step in this article.
What you need is to get a SharePoint Online subscription which is a quite straightforward process, which you can initiate after selecting appropriate subscription plan. But the key thing to know here is that in order to use the K2 app you need an app catalog and if you select any of SharePoint Online plans you won’t be able to create it. Just because you can create app catalog from SharePoint Online Admin Center which you can access from Office 365 Admin Center. And Office 365 Admin Center is only available in Office 365 Business and Enterprise plans:
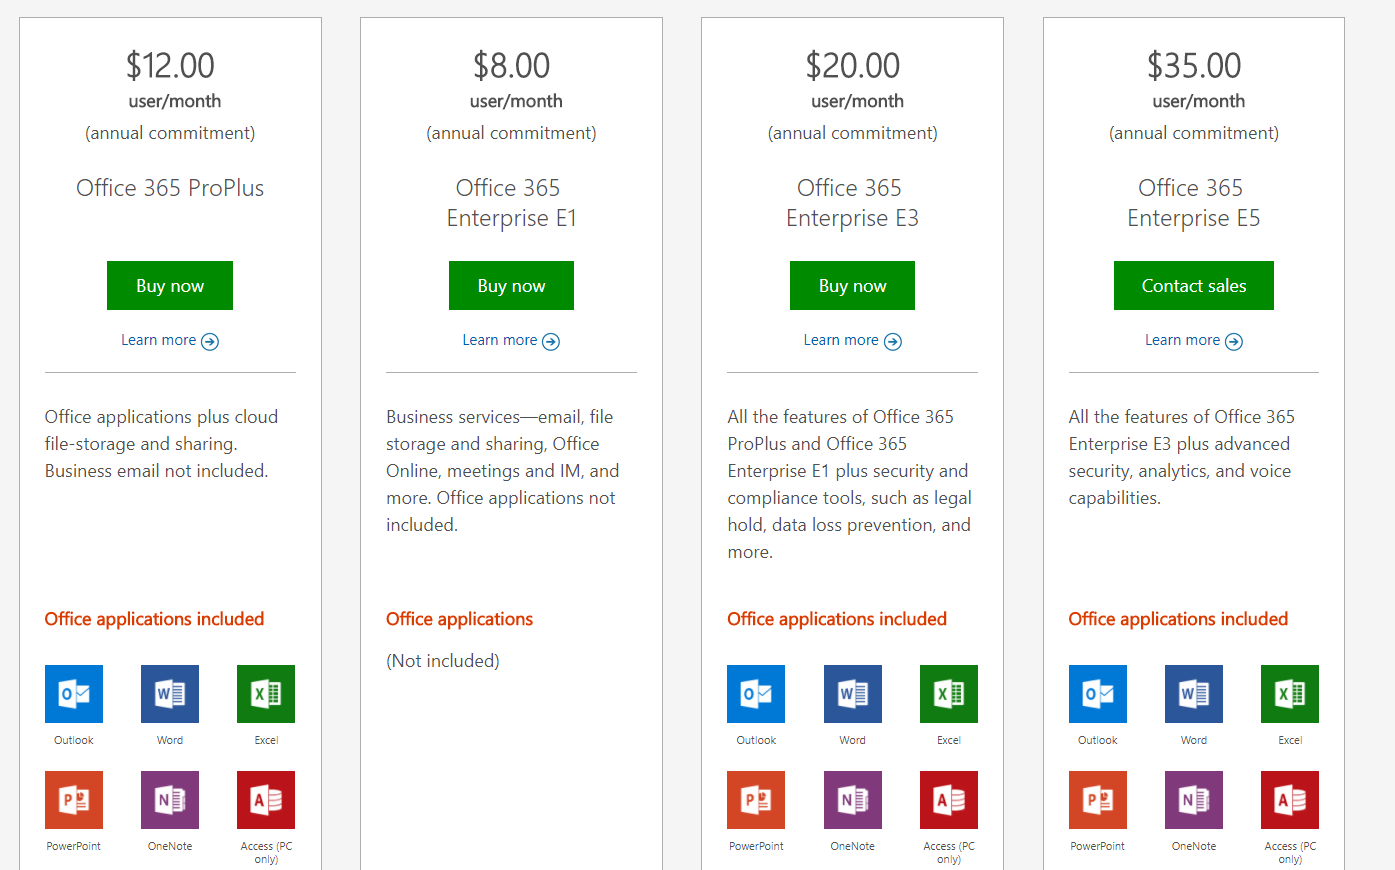
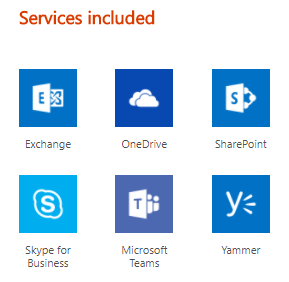
Essentially if you are looking for the cheapest option to simply test K2 and SharePoint Online integration you should subscribe for Office 365 Enterprise E1 plan which will cost you 8 USD per user, and for basic tests we can have one user only (though after playing a bit with single account I opted out to have dedicated “K2 Service Account” user for my lab and test environments). This subscription also allows you to use Exchange Online and other Microsoft technologies shown below:
Once we have required Office 365 subscription, we can navigate to Office 365 Admin Portal and from there invoke SharePoint Online Admin Center:
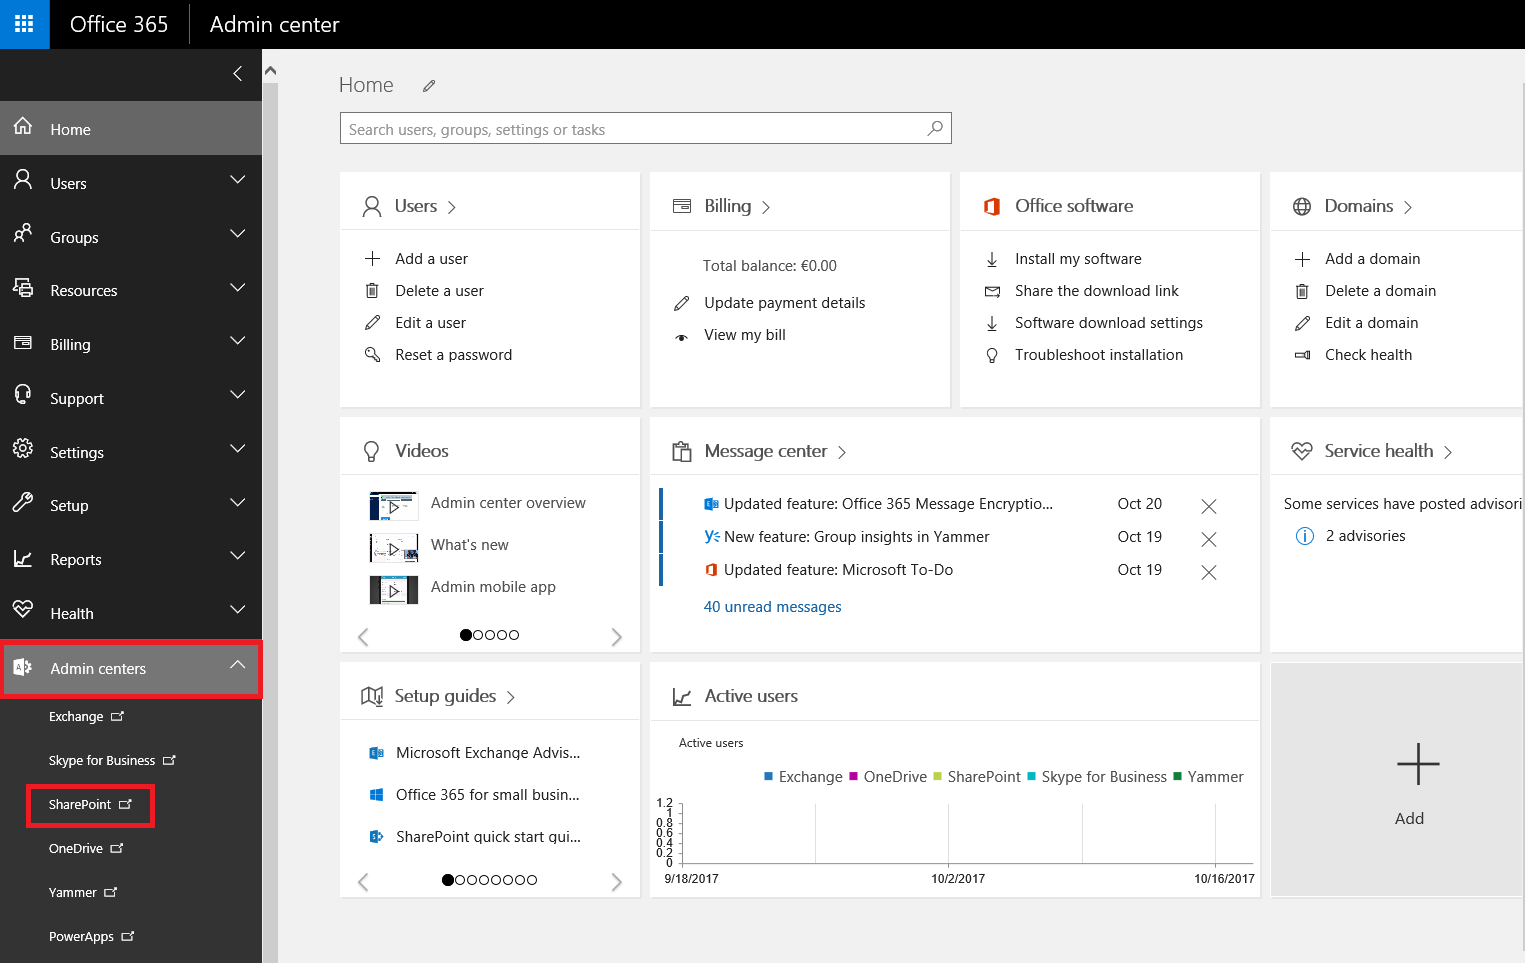
In SharePoint Online Admin Center click on Apps and then on App Catalog:

If you don’t have app catalog already, you will get a prompt to create it:
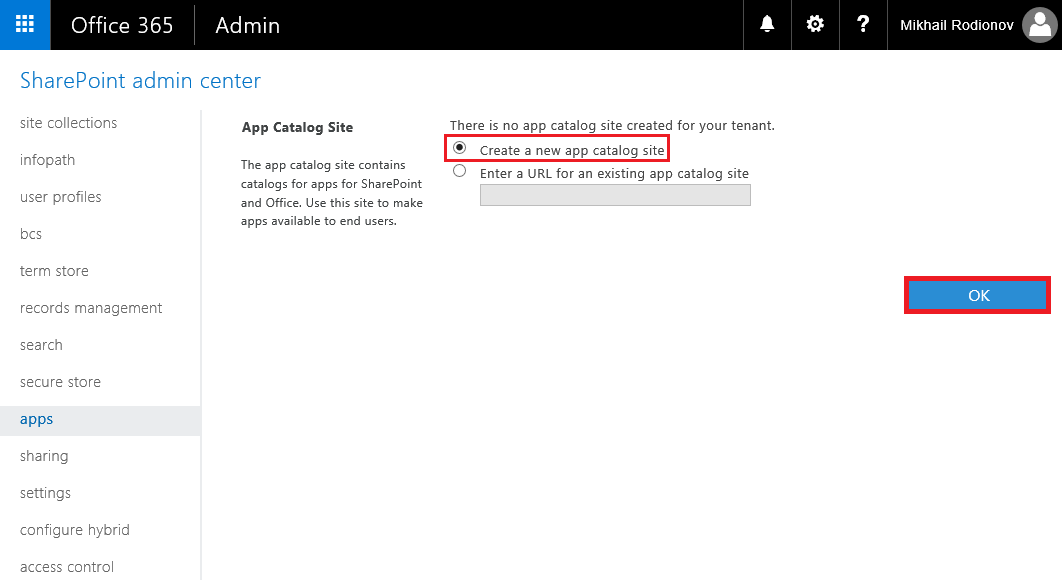
After clicking OK you will be presented with “Create App Catalog Site Collection” page where you need to specify Title and Administrator for your app catalog and if necessary adjust its other properties:

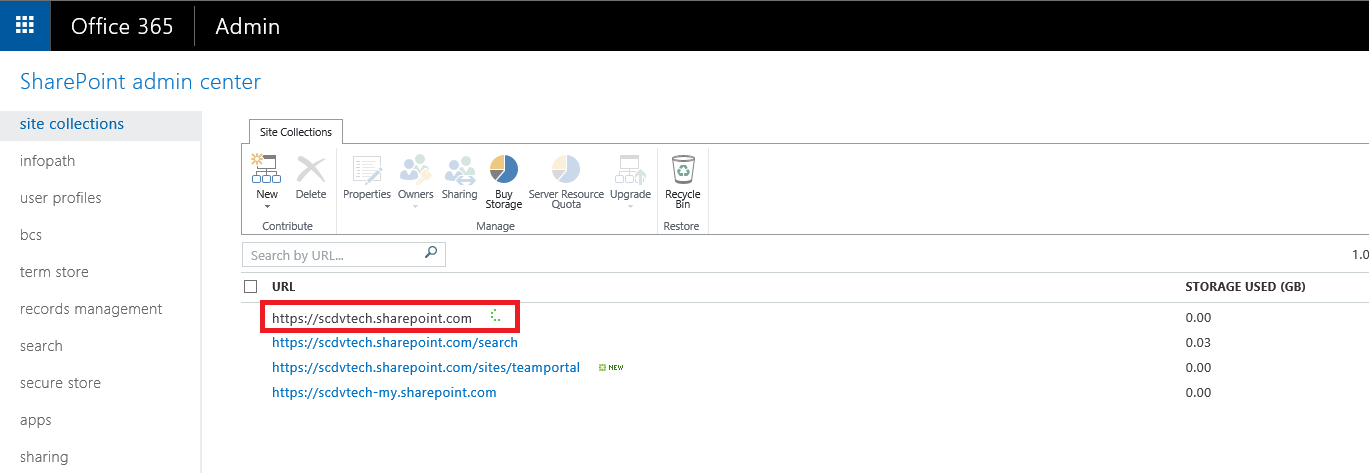
After clicking OK on that page, you will be redirected back to Site Collections page of Admin Center where you should see your App Catalog site collection listed (it will be accompanied with green spinning circle while it is being created):
In case you are running into a situation when your app catalog does not get created it probably means that you deleted your earlier created App Catalog site collection and need to delete it from SharePoint online recycle bin before trying to create it again. This is one of the cases where SharePoint online GUI does not allow you to do this operation and you need to use PowerShell for SharePoint Online. For more details on how to do this check out my other article “Managing SharePoint Online with PowerShell”.
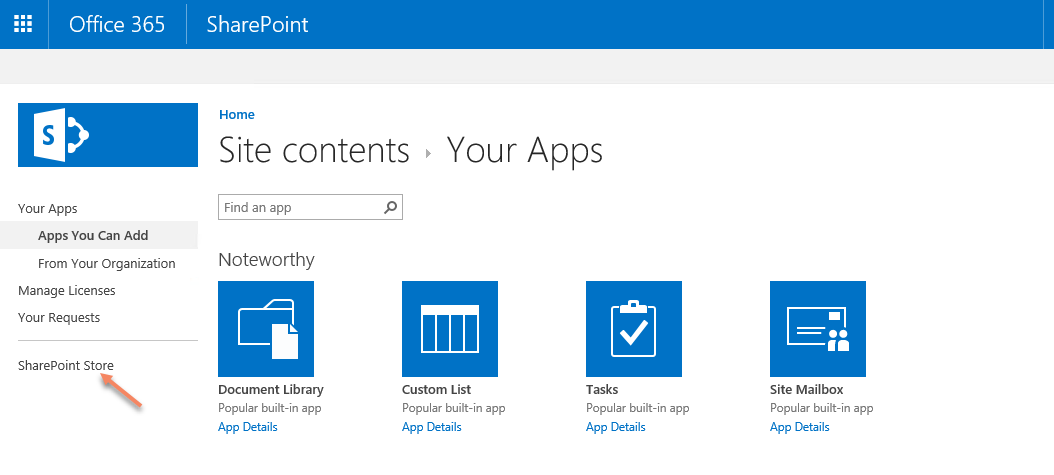
Once we have app catalog created we are ready to add our K2 app to it. If you are using the current version of K2 software (i.e. K2 4.7 or K2 Five) you can easily add K2 App to your app catalog from the store. Just navigate to Site Settings > Add an App and next click on SharePoint Store link on the left:
In SharePoint Store type in “K2” into the search box and you will see K2 Five for SharePoint app icon in search results:

Click on K2 Five for SharePoint app tile to open app page where you need to click on “ADD IT” button to add this app to your app catalog:

But before clicking on ADD IT button you may want to click on permissions link to see what actions will be allowed for K2 App once it will be added to your SharePoint Online site:
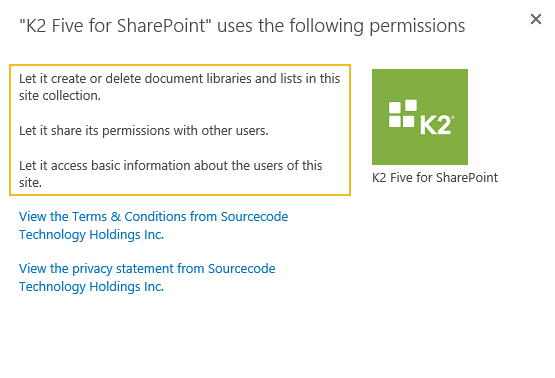
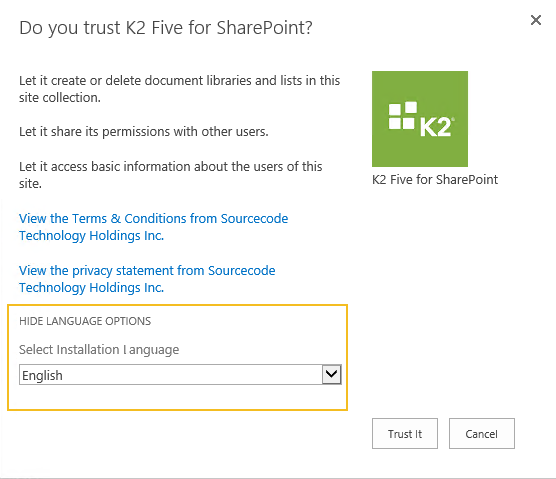
As you can see by adding this app we are granting it the following permissions (though later on, you will see the more specific set of permissions which you’ll have to confirm while going through app Registration Wizard):
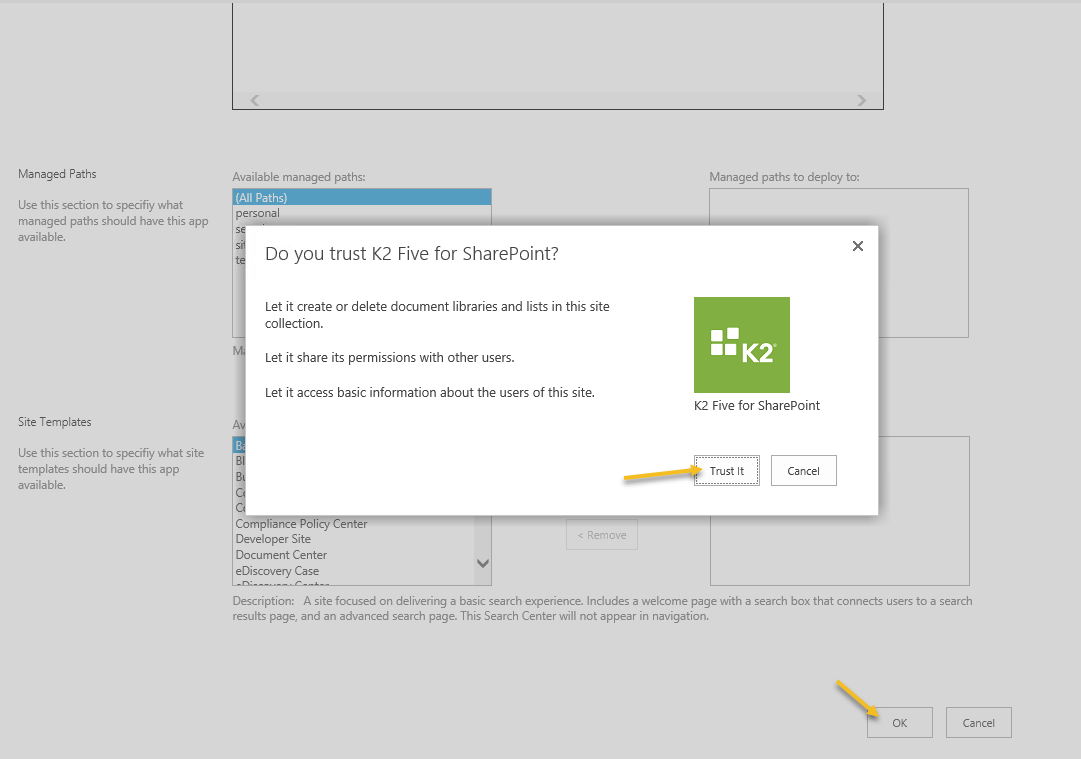
- Let it create or delete document libraries and lists in this site collection
- Let it share its permissions with other users
- Let it access basic information about the users of this site
Once you clicked on “ADD IT” button you will be presented with “Do you trust K2 Five for SharePoint?” dialog where you have to click “Trust It” button to add K2 Five for SharePoint app to your app catalog.
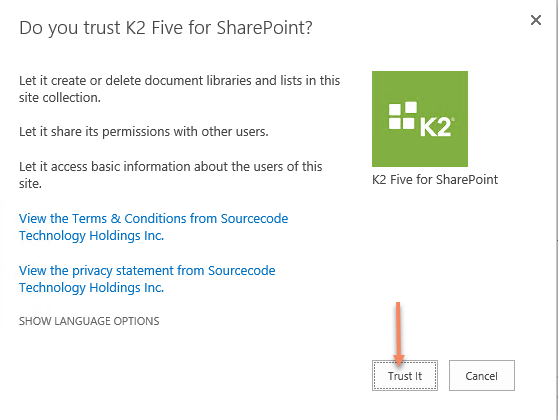
Note that there we also SHOW LANGUAGE OPTIONS link. But at this point in time, all we have there is Installation Language and there is nothing to select except for English… That’s not too much choice, but probably we will see more options later 😊
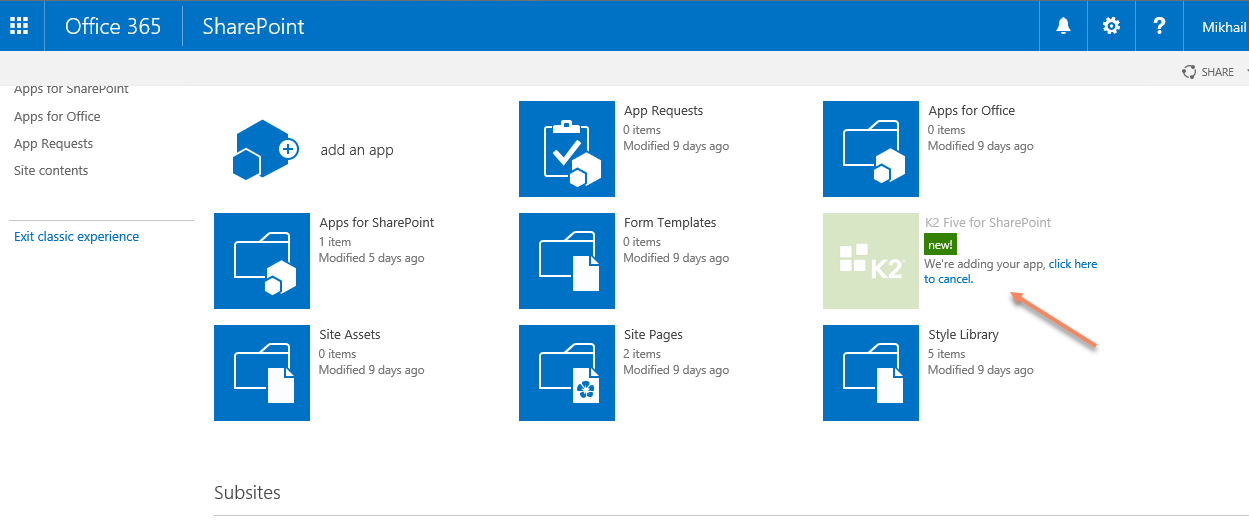
As soon as you click on “Trust It” button you will be redirected back to your App Catalog and will have to wait a little bit while app is being added to your site (you need to wait till “We’re adding your app, click here to cancel” text disappears and icon become bright instead of faded out):
This essentially concludes K2 for SharePoint app deployment part and we are ready to move on to App Registration and Activation steps. But before that I want to mention two important points:
- Currently, K2 for SharePoint app from SharePoint store supports two most current versions of K2 – K2 Five and K2 4.7, which is stated in app description:

- In case you are using the older version of K2 or access to SharePoint store is blocked in your organization you may manually add K2 for SharePoint online app as described in the related section of K2 Five Installation and Configuration Guide. You can find the app itself in the following location on your K2 Server: “%ProgramFiles%\K2\Setup\SharePoint Online”.
And yet another thing to clarify before we move on to K2 App Registration and Activation per se is this: Does exposing your K2 site to the Internet necessary? No. You can run app registration and activation from any machine within your corporate network that can connect to the SmartForms runtime site and everything will work for any user within the corporate network where your K2 server is deployed. There is no need to expose K2 site to the Internet except for the scenarios when you want your users to access K2 over the Internet/outside of corporate network, and use of event-driven workflows functionality which requires your event receiver site to be exposed to the internet even when all your users work with K2 within corporate network – just because it requires SharePoint Online to talk back to K2 server (more about this below).
K2 Installation and Configuration Guide lists the following prerequisites for K2 App Registration:
- The URL for the remote event receiver must be publicly accessible. This only required if you going to use the event-driven workflows (those which start when an item is added and so on). And even if you need this functionality you always can expose the event receiver site to the Internet later, after running registration wizard, when you really need to use this functionality (and it should not be necessary to rerun the registration wizard to get it working).
- SharePoint Online requires SSL to be enabled on your system. I have mentioned this prerequisite in the very beginning of this blog post.
- Custom Scripting capabilities are off by default for personal sites and self-service created sites and you may encounter errors when the registration wizard uploads pages to SharePoint. See KB001711 – SharePoint Online Root Site Collection Document Library ASPX upload issue and the Microsoft article: Turn scripting capabilities on and off for more information.
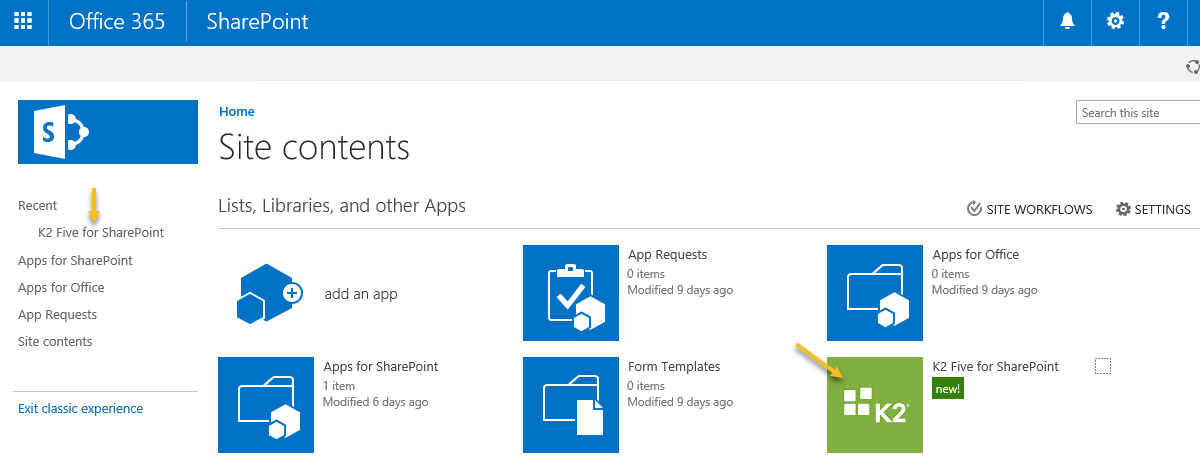
With prerequisites and requirements clarified let’s run K2 for SharePoint App registration wizard. Note that we do everything on the app catalog level: registration, deployment, activation and you only switch to your site collections, later on, to actually use deployed and activated K2 for SharePoint App. To run K2 for SharePoint App registration wizard, just click on K2 Five for SharePoint app tile on App Catalog Site contents page or on its link on the left under Recent items:
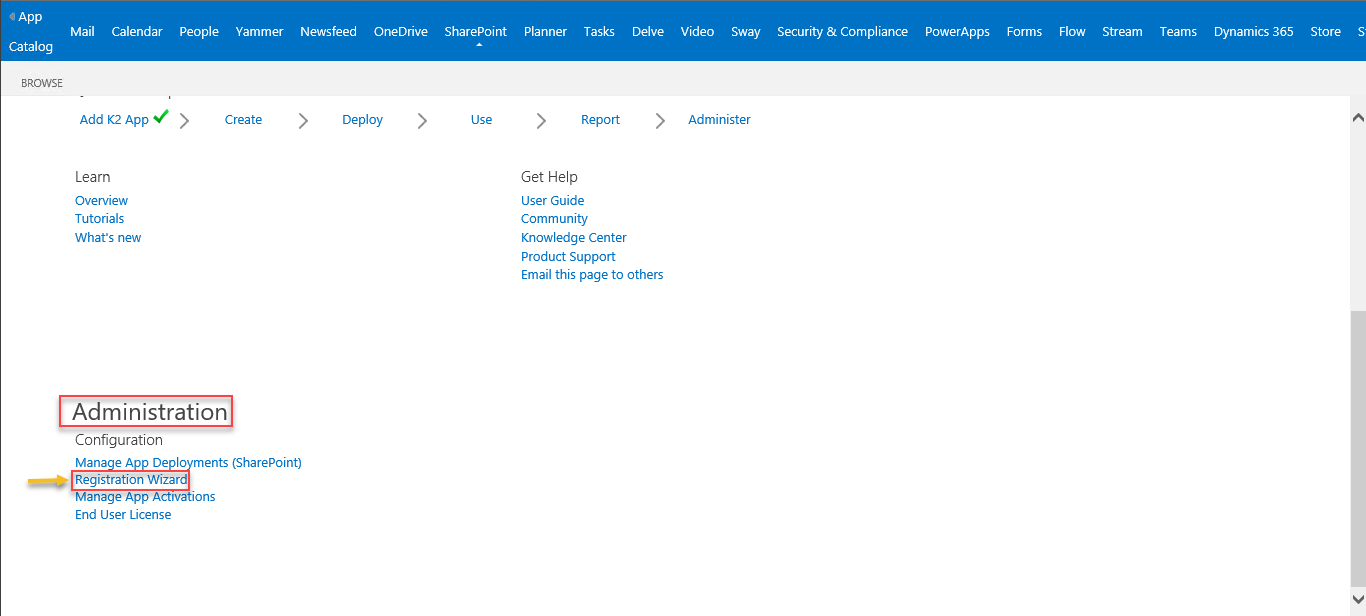
It will open K2 Five for SharePoint app settings page:
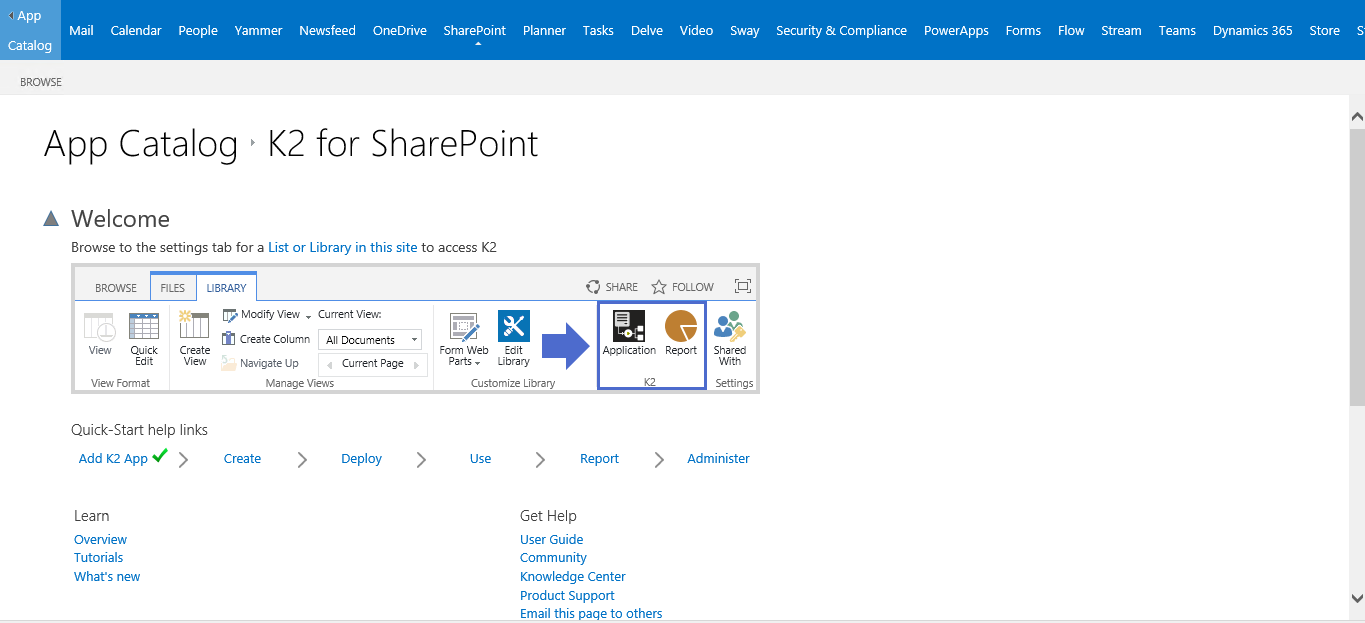
Scroll to the bottom of this page and click on Registration Wizard link under Administration:
This will kick off registration process where you first need to specify URL of your K2 server and click Next as shown below:

Note that there is no need to append K2 site URL with “/runtime/runtime” – registration wizard will do it for you, all it tries to do is to locate Runtime URL which is fixed as “runtime/runtime” relatively the K2 server URL itself. Once you click “Next”, you will be prompted for SharePoint Online credentials:

And after providing valid credentials you will be asked to confirm required permissions which will be granted to K2 for Office 365 app:

As you can see from the screenshot we are granting: Read directory data, Sign in and read user profile, Have full control of all site collections, Read and write managed metadata, Read and write user profiles. Some of the permissions here are SharePoint Online specific and others are Office 365 AAD permissions (e.g. Read directory data). I’m not sure why Read and write managed metadata, Read and write user profiles and Have full control of all site collections permissions listed twice in that list but let’s accept this “as is” for now.
Anyhow as soon as you click Accept you will briefly see adding relying parties page. This one does not require any input from your side – you just need to wait while realms being added to trust.k2.com:
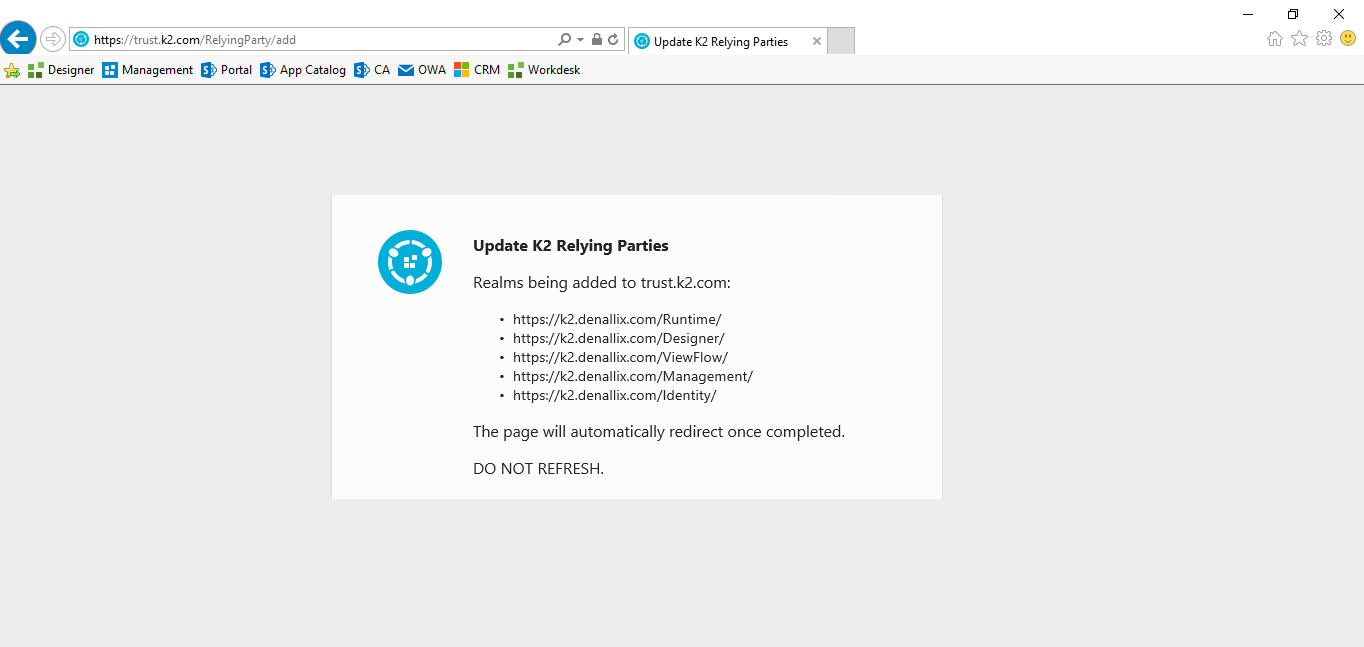
K2 Trust is used by K2 to handle claims authentication and Single Sign-On (SSO) with AAD, it is a Relying Party Security Token Service (RP-STS) used to broker authentication requests between K2 servers and AAD STS. Essentially it enables K2 to automatically handle setup and configuration of the authentication and claims infrastructure and using single K2 application for different tenants. You can read more about K2 Trust in K2 KB002029: “About K2 Trust”. Use of this intermediate RP-STS is the fundamental distinction between K2 for SharePoint online based and AAD app-based integration in K2.
From there you will be redirected to Configuring K2 Server Settings step where you need to wait till wizards create for you OAuth Resource, Claims, Administrative OAuth Token, SharePoint Service Broker and application settings. If you remember the amount of steps which are necessary to create all of this manually while integrating with AAD without SharePoint Online (see my blog post on that) you will see the difference here – it is fast and easy with Registration Wizard. Once it completes clicking Finish button:

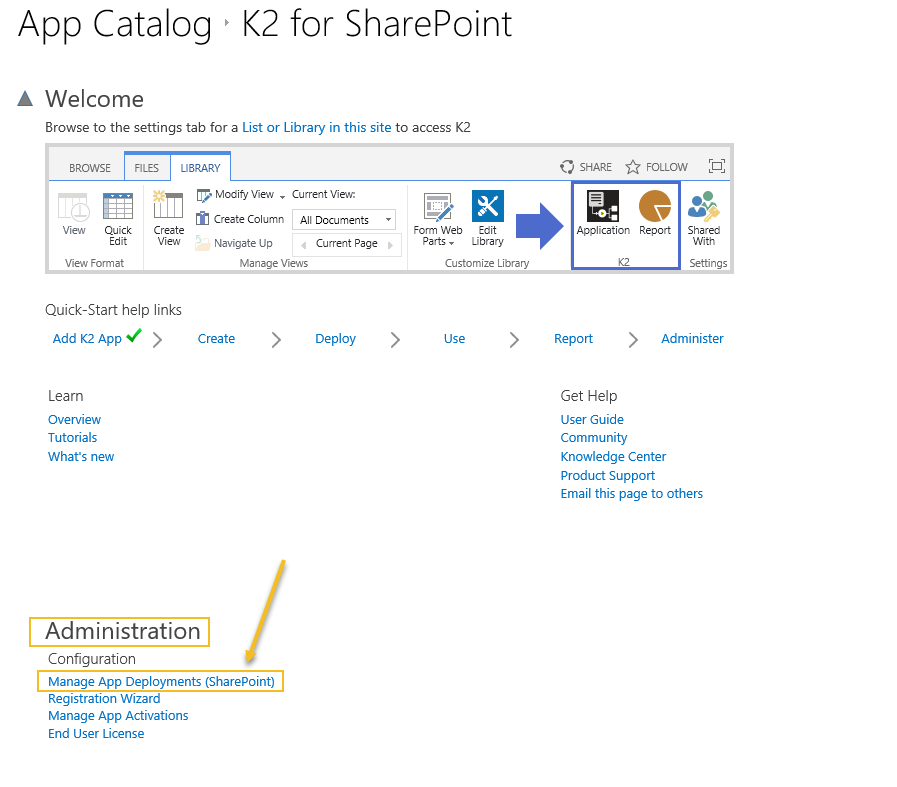
After clicking on “Finish” button we are redirected back to K2 for SharePoint app settings page, and we now can deploy and activate the app on one of our site collections. For that, we just click on Manage App Deployments (SharePoint) link under Administration section:
Here we can either specify specific site collection URL or make our app available for specific managed paths or site templates. In my case I’m just specifying site collection URL and click on Add:
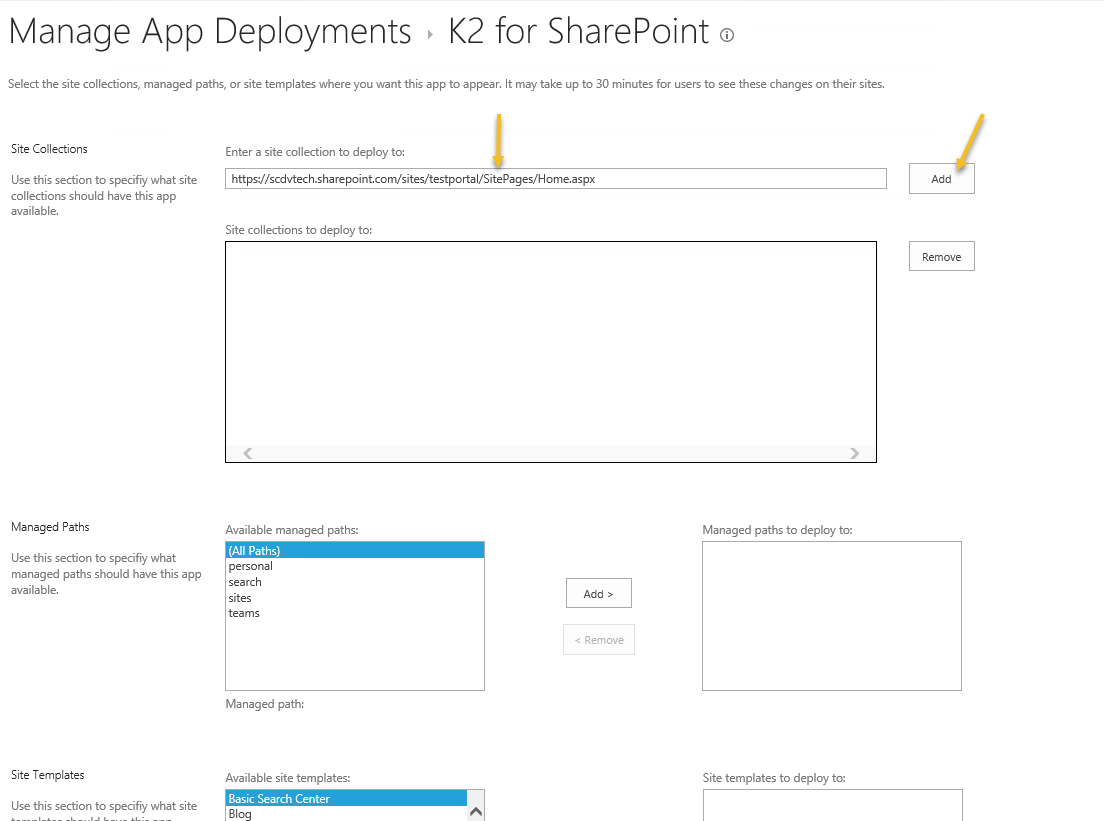
Once we clicked on Add we need to scroll down to the bottom of this page, hit OK and click “Trust It” button to complete deployment of the app to specified site collection:
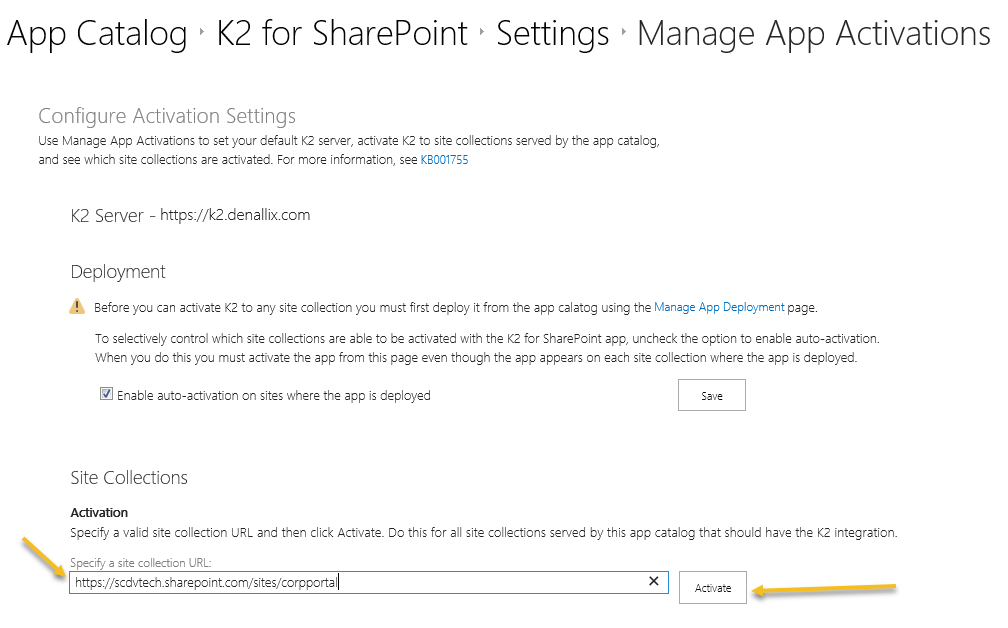
By default, no further actions required when we have “Enable auto-activation on sites where the app is deployed” option enabled by default. If we go to K2 for SharePoint app > Settings > Manage App Activations, we should see that this option is enabled and site collection to which we earlier deployed the app is listed under “Site collections activated” list:

There could be some delays in auto-activation and there are also some peculiarities in the way it handles SharePoint Online subsites. As per K2 Installation and Configuration Guide: “SharePoint Online instances do NOT include the remote event receiver, and hence do not get K2 for SharePoint automatically added to new subsites. For SharePoint Online, you must reactivate the site collection using the Manage App Activations page, which finds the new subsites and only activates those.”
In case automatic activation not fires we always can specify site collection URL on the Manage App Activations page and hit Activate:
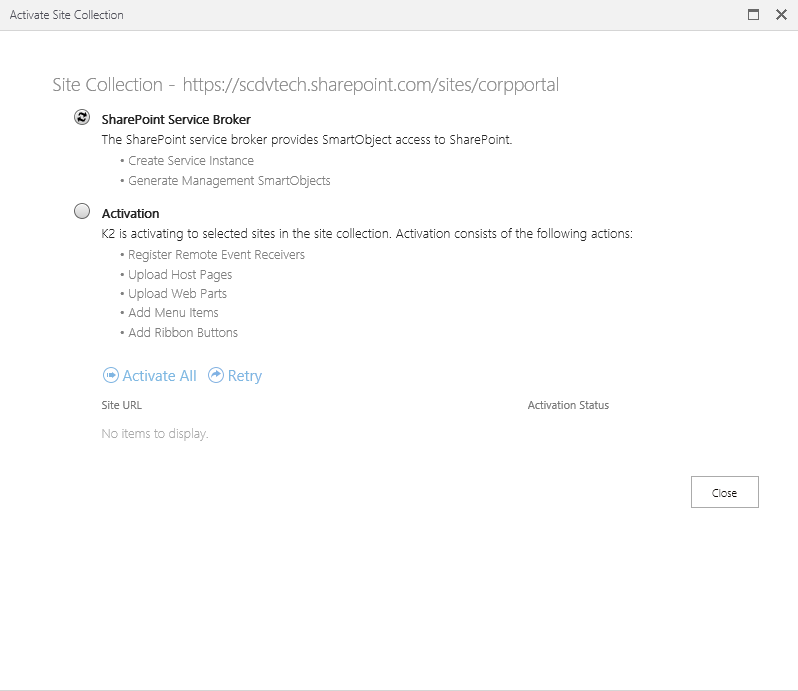
This will kick off Activation process for the site collection, which creates SharePoint Service Instance and Site Collection specific management SmartObjects and then performs Activation for the site collection:
What I’ve noticed during manual activation is that there we have a prompt for token creation:
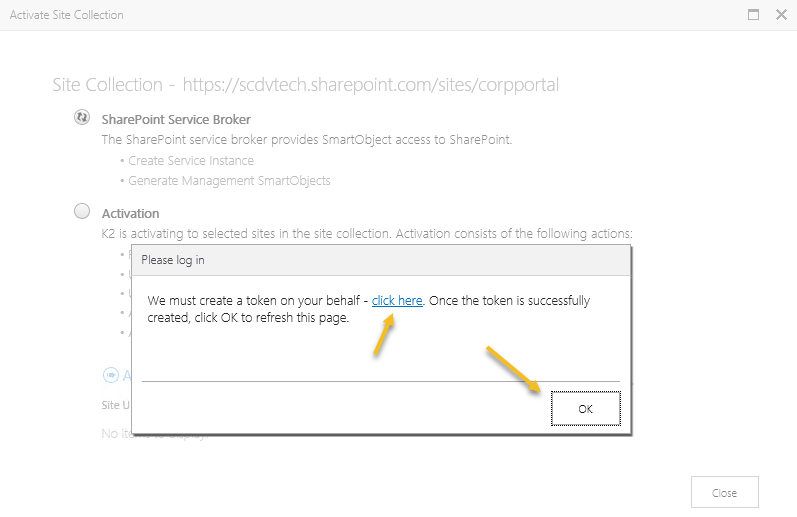
So, after you click on “click here” link you should get this:

You may have an issue when “Authorization Successful” page shown above opens in the same tab which runs your Activation Wizard preventing you from clicking OK and proceeding with activation. In that case, just re-run activation and it will detect that token is already in place and will be completed without extra prompts to create token:
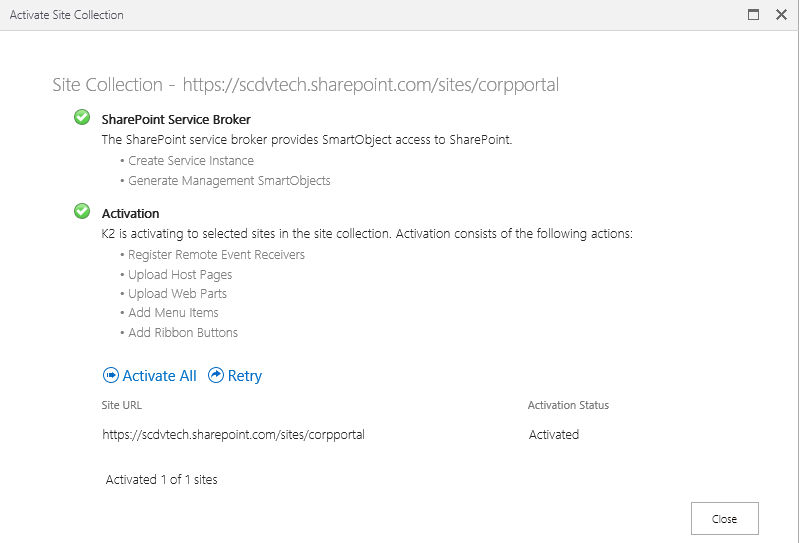
But the fact that we have that “Create token prompt” makes me wonder if automatic activation can truly happen for the brand-new SharePoint site collection without this user input action/create the token step. Anyhow after Activate Site Collection steps completed we just click the Close button and have our Site Collection activation completed.
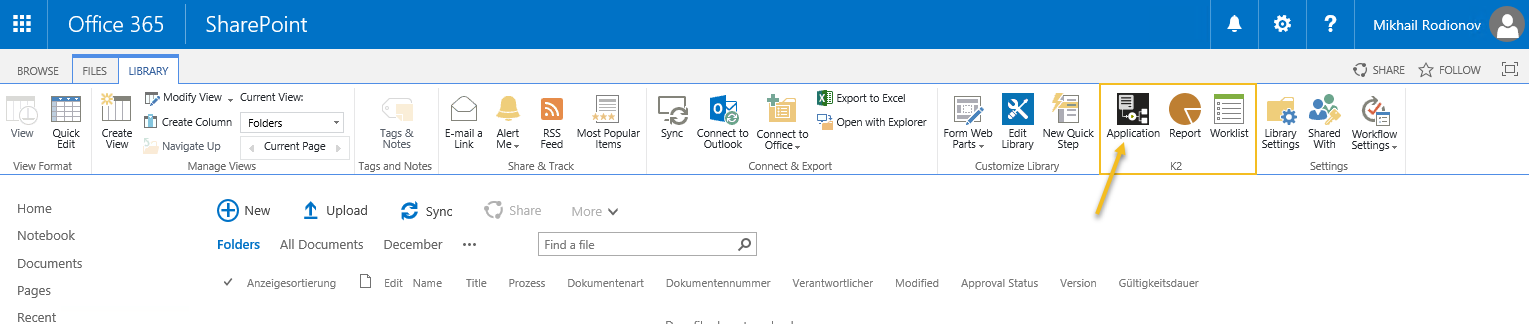
Essentially we now completed all configuration steps and you can navigate to the site collection where app deployed and activated and start using K2, for example, appify list or library. For that we just click on the K2 app icon on the library ribbon:
In case new style/theme is used for the site you can invoke K2 App settings as shown below:
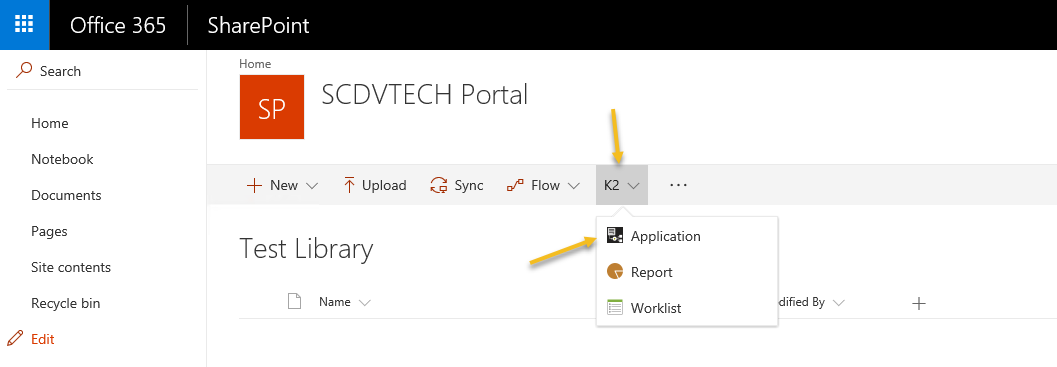
This button opens the standard menu which allows you to create K2 artifacts from SharePoint Online objects as well as design workflows around them (this part is essentially the same both for SharePoint on-premise and SharePoint Online).
But before you can use it you need grant your user Solution Designer and K2 Designer Permissions, otherwise, you may run into this error/warning:

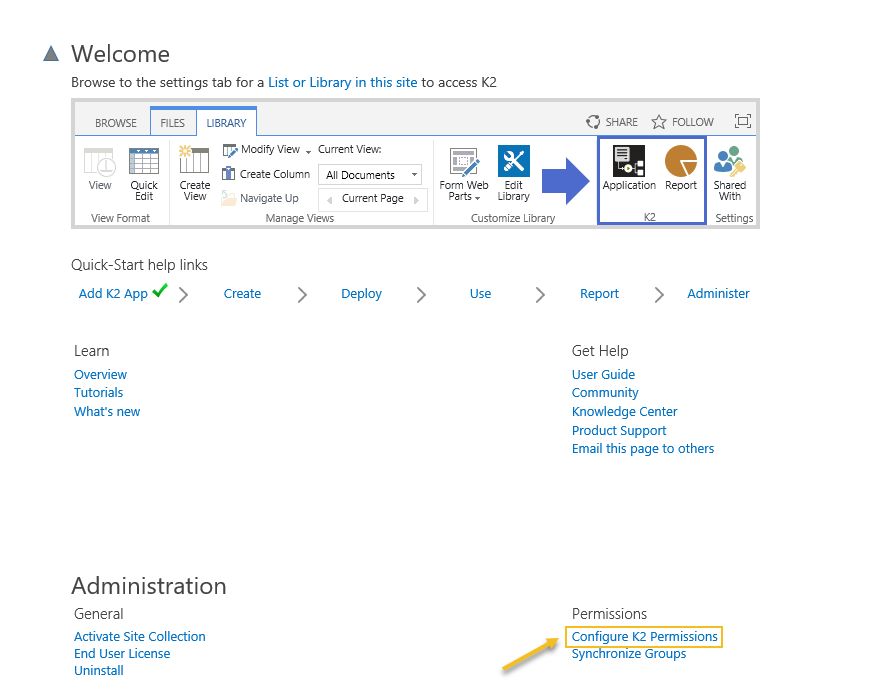
“Learn more…” link will open K2 KB “Permissions Required to Design SharePoint Solutions” which explains in detail how to do that. We just need to visit K2 for SharePoint app settings page one more time and click on Configure K2 Permissions link under Permissions section:
It will open Configure K2 Permissions page which shows you site collection groups which have required permissions, and by default site collection Members and Owners groups already have those permissions:
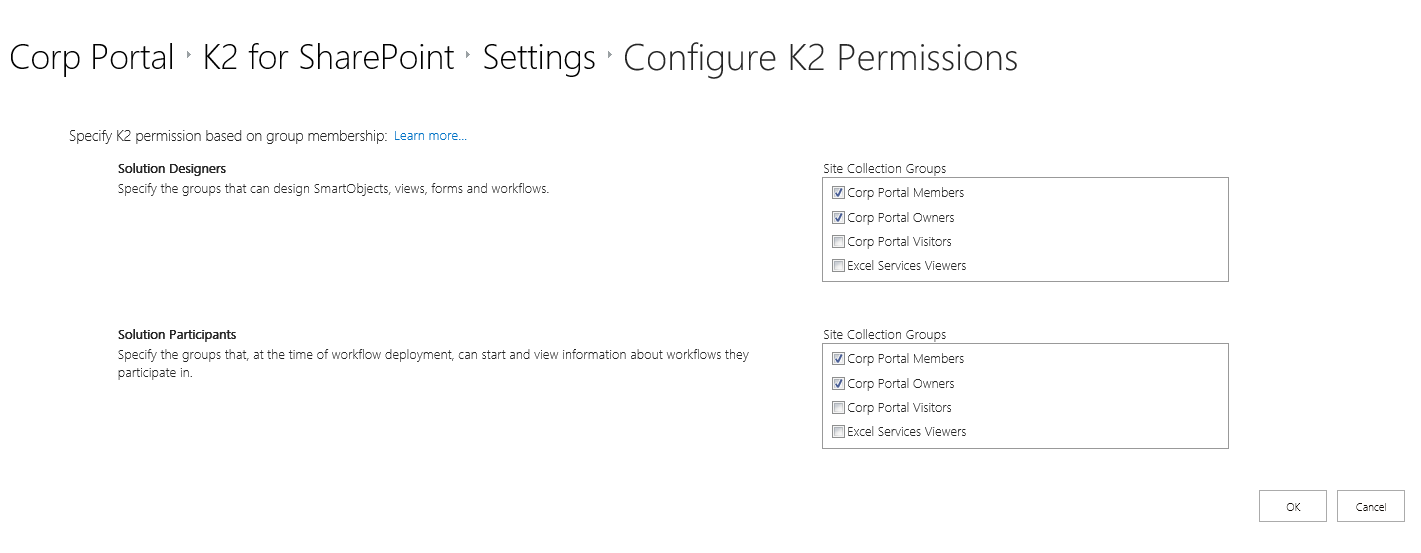
For freshly provisioned SharePoint Online site collection your SharePoint Online admin user does not have membership in any of those groups by default and it doesn’t prevent this user from doing everything we need with this site collection from SharePoint Online side, but you need to add your admin user into one of these groups to enable him to work with K2 app. And in case of group membership has been just changed, we conveniently have “Synchronize Groups” option under Permissions section of K2 for SharePoint app settings for that. There are also permissions controlled on K2 side, but by default, Everyone group has those rights granted.
After running K2 for SharePoint online app registration wizard, we have two K2 labels one for one- premise AD and another one for SharePoint Online:
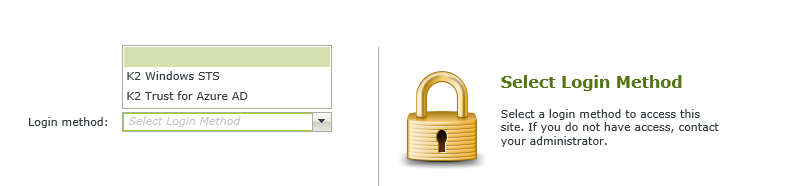
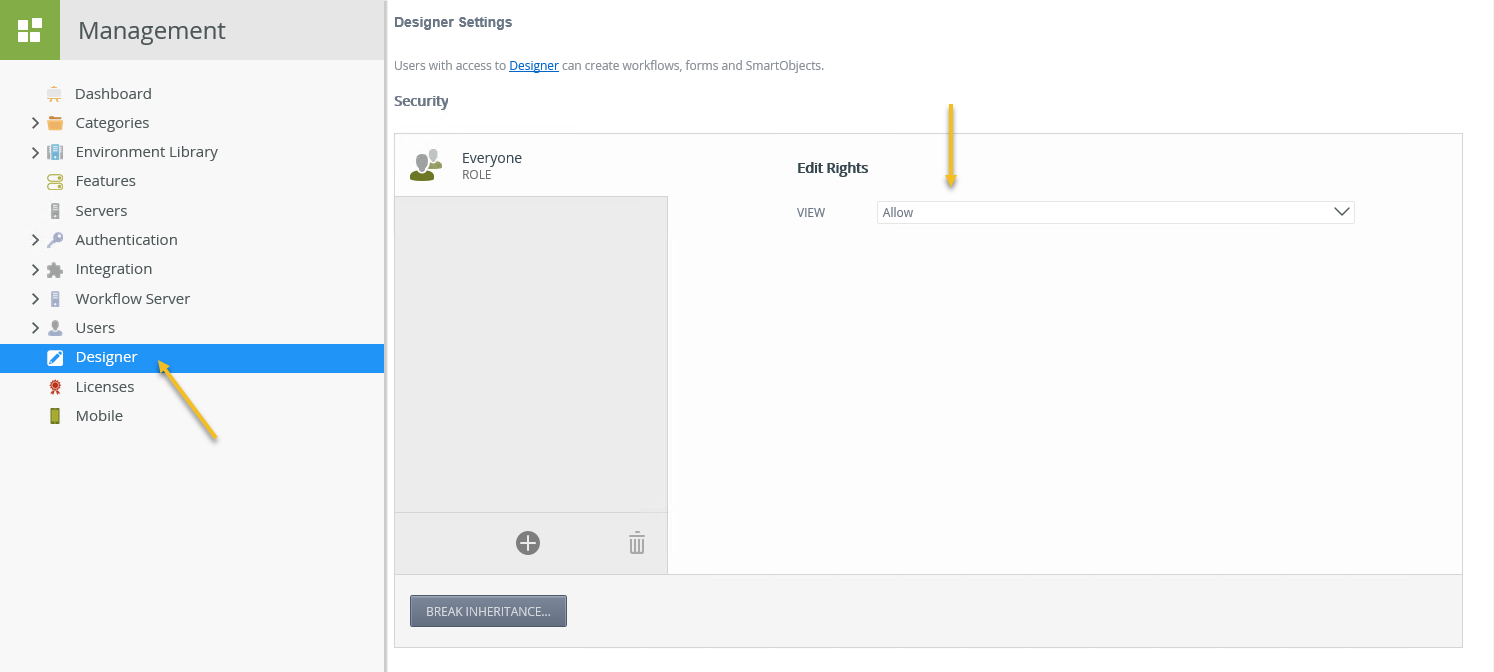
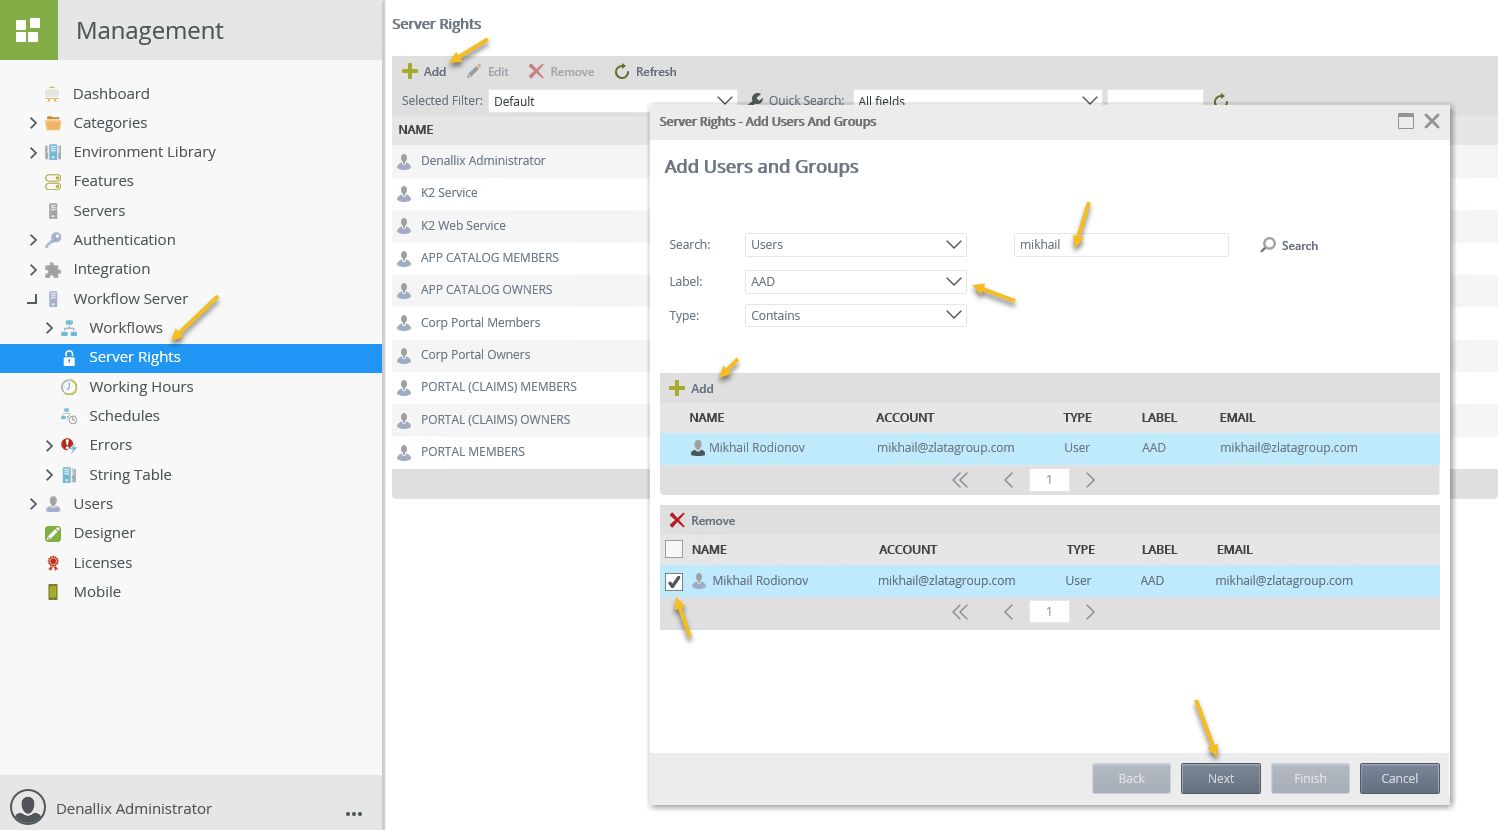
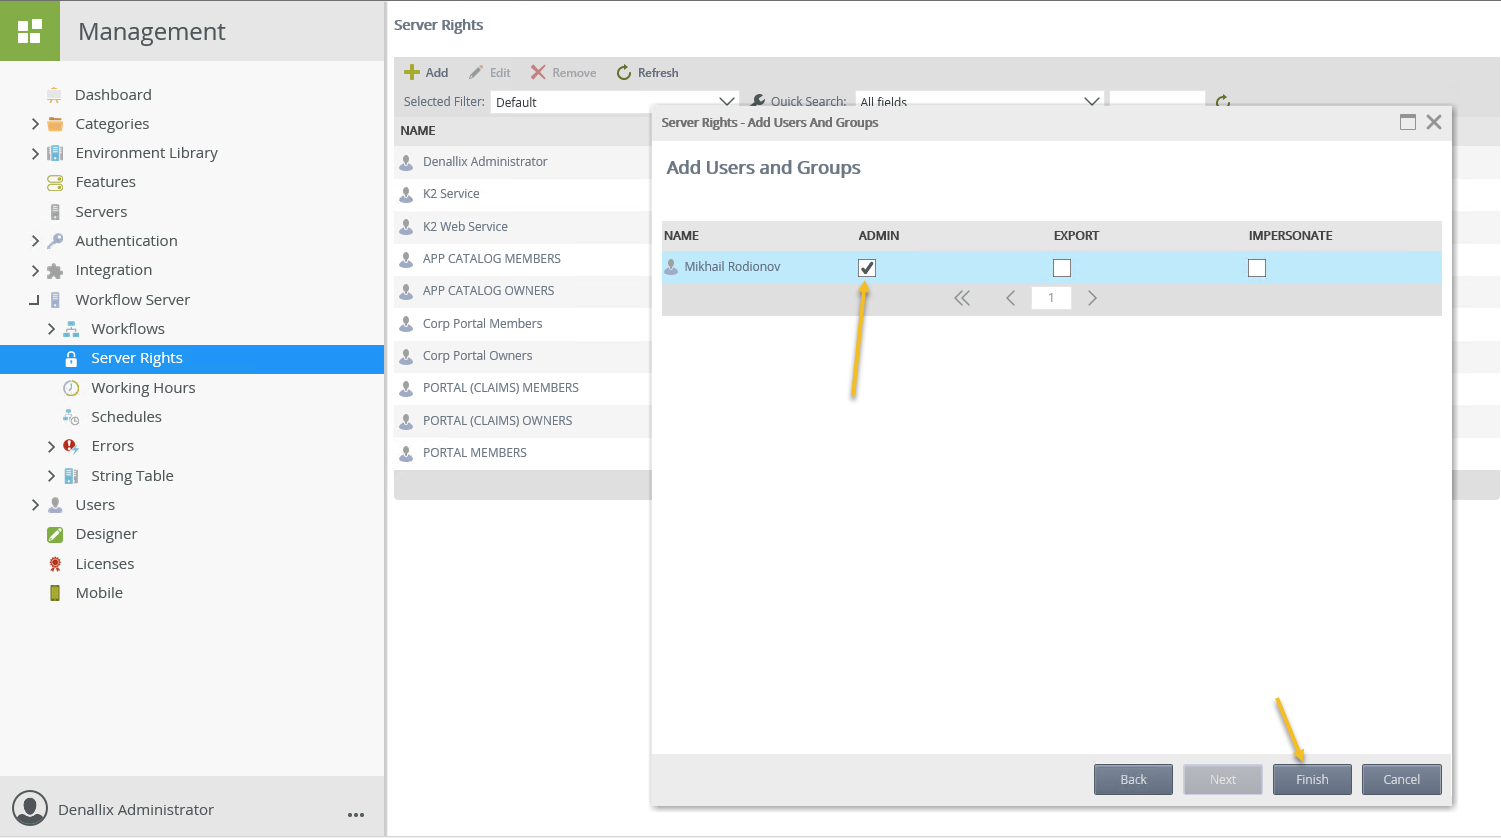
We have “K2 Windows STS” label for the on-premise AD and “K2 Trust for Azure AD” label for SharePoint online users. If you log in to K2 Management site using “K2 Windows STS” label with the K2 administrator account, you can grant K2 side permissions to your SharePoint Online user and see Designer permissions. Default designer permissions look as follows:
And to enable your SharePoint online user to access K2 Management site you should do this:
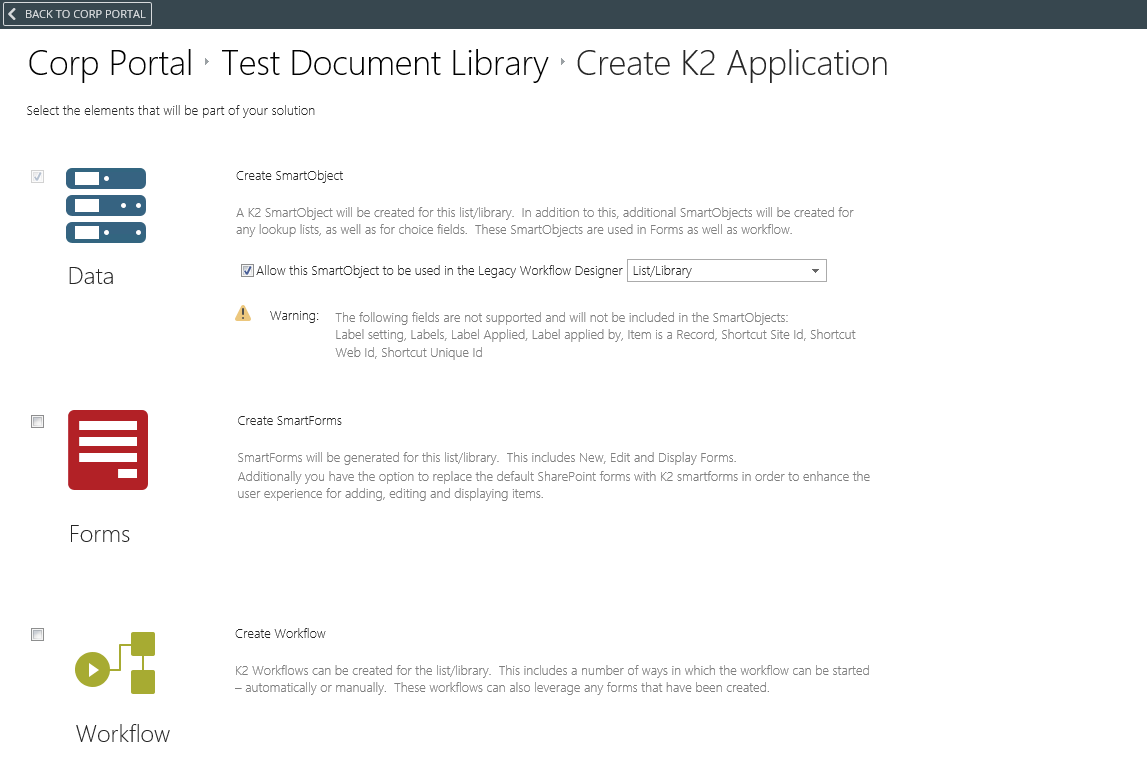
Once permissions set correctly you can finally click on K2 App Icon on the ribbon and start creating K2 SmartObjects, Forms, and Workflows:
I hope this blog post has been useful for you and in case you have any questions or feedback around this topic you may leave them in the comments section below this blog post.
