Windows Server 2025 lets you build a fully functional failover cluster without Active Directory. That’s a big deal for remote office/branch office (ROBO), edge, and infrastructure-light environments where standing up and maintaining AD introduces infrastructure, licensing, and operational overhead that’s hard to justify for a small two-node HA deployment.
For most of the history of Windows failover clustering, the first step was always the same: set up Active Directory, join your nodes to the domain, configure DNS and Kerberos, then start thinking about the cluster. That workflow still makes sense for large enterprise environments. But edge deployments, branch offices, and lightweight HA scenarios are now common in production, and spinning up a full AD infrastructure just to protect two Hyper-V hosts is overkill.
Windows Server 2025 supports workgroup clusters – you can build a failover cluster with no Active Directory at all. I’ve deployed several of these now, both in labs and in production ROBO scenarios. What follows is every step, with the common failure points called out along the way.
What is a Windows Server workgroup cluster?
A workgroup cluster is a Windows Failover Cluster whose nodes aren’t joined to Active Directory. Instead of domain services for authentication and identity management, the cluster relies on local accounts, certificates, and manually configured trust relationships between nodes. No Kerberos. No domain computer accounts.
What the cluster uses instead:
- Identical local administrator accounts on each node
- Certificate-based authentication for node-to-node trust
- DNS-based cluster access points instead of AD-backed cluster name objects
DNS in a workgroup cluster doesn’t need to come from Active Directory. Any DNS server the nodes can reach works – your existing infrastructure DNS, a router or firewall’s built-in DNS, or even static entries in each node’s hosts file for small deployments. The cluster just needs its name to resolve consistently to the cluster’s IP address from every node and client.
That sounds like a small difference from a traditional domain cluster, but it changes how you configure and maintain the cluster. There’s no automatic authentication between nodes. No centralized identity store. Every trust relationship has to be built explicitly using certificates and matching local credentials.
Here’s the thing: removing Active Directory doesn’t simplify the cluster’s requirements in absolute terms – it changes them. What you gain is independence from domain controllers, which is exactly what matters in edge and ROBO scenarios.
Domain cluster vs workgroup cluster
The table below summarizes the practical differences between a traditional domain-joined cluster and a workgroup cluster, so you can quickly see what changes when Active Directory is removed from the picture.
| Feature | Domain Cluster | Workgroup Cluster |
|---|---|---|
| Authentication | Kerberos | NTLM / Certificates |
| Identity Management | Active Directory | Local Users |
| Deployment Complexity | Moderate | More Manual |
| DNS Registration | Automatic | Manual |
| Management Style | Centralized | Per-Node |
| AD Dependency | Required | None |
| Workload Support | Full | Limited |
| Best Fit | Enterprise | ROBO / Edge / Small HA |
The decision comes down to infrastructure requirements. If Active Directory is already part of the environment and supports other business-critical services, a traditional domain cluster is the most straightforward option. In edge, ROBO, or isolated deployments where domain services provide little operational value, a workgroup cluster delivers the same high-availability capabilities with fewer dependencies.
When a workgroup cluster makes sense
Based on field experience, workgroup clusters are the right fit for ROBO environments where deploying domain controllers isn’t practical or cost-effective – think small retail locations, factory floors, or distributed sites with minimal IT presence. They’re also the right call for isolated environments that need HA but must remain air-gapped or separated from the main domain, small Hyper-V clusters protecting two or three VMs where AD overhead is disproportionate, and disaster recovery environments where you can’t guarantee domain controller availability during a failover event.
The core question is simple: does your HA environment actually need Active Directory, or has it just been assumed? In many edge and ROBO scenarios, the answer is no.
What you need before you start
Before running a single PowerShell command, make sure the following prerequisites are in place on all nodes. Skipping any of these is one of the most common reasons for cluster validation failures later. This checklist covers the baseline requirements for any workgroup cluster, with workgroup-specific adjustments highlighted where they apply. For the full official reference, see Microsoft’s Create a workgroup cluster documentation.
Shared storage is required for most clustered roles, but it doesn’t have to come from a dedicated hardware SAN. A software-defined storage solution – StarWind Virtual SAN is one option, covered later in this guide – can provide the required shared storage using the local disks in each node.
Hardware and OS requirements
- Windows Server 2025 installed on all nodes (Standard or Datacenter edition)
- At least 2 nodes; a quorum witness is strongly recommended for production
- Static IP addresses configured on all network adapters
- Proper hostname resolution between nodes (hosts file or DNS)
- Network connectivity tested on all paths, including the heartbeat network the nodes use for cluster communication and any dedicated storage network
- At least two network adapters per node: one for client/management traffic and one dedicated to cluster heartbeat and storage replication traffic. Additional NICs can separate heartbeat, storage, and client traffic further, but two is the practical minimum for production.
Lab environment for this guide
Throughout this walkthrough, the environment is configured as follows:
Node1 – 192.168.10.11 (Windows Server 2025)
Node2 – 192.168.10.12 (Windows Server 2025)
Cluster: WGCluster (DNS-based access point – the cluster name and IP are registered directly in DNS instead of an AD computer object)
Local admin account: clusteradmin
Workgroup name: WORKGROUP (default)
This lab uses StarWind Virtual SAN to provide the shared storage required by the cluster. Both nodes have identical local disks available for replication. Step 8 covers the storage setup in detail.
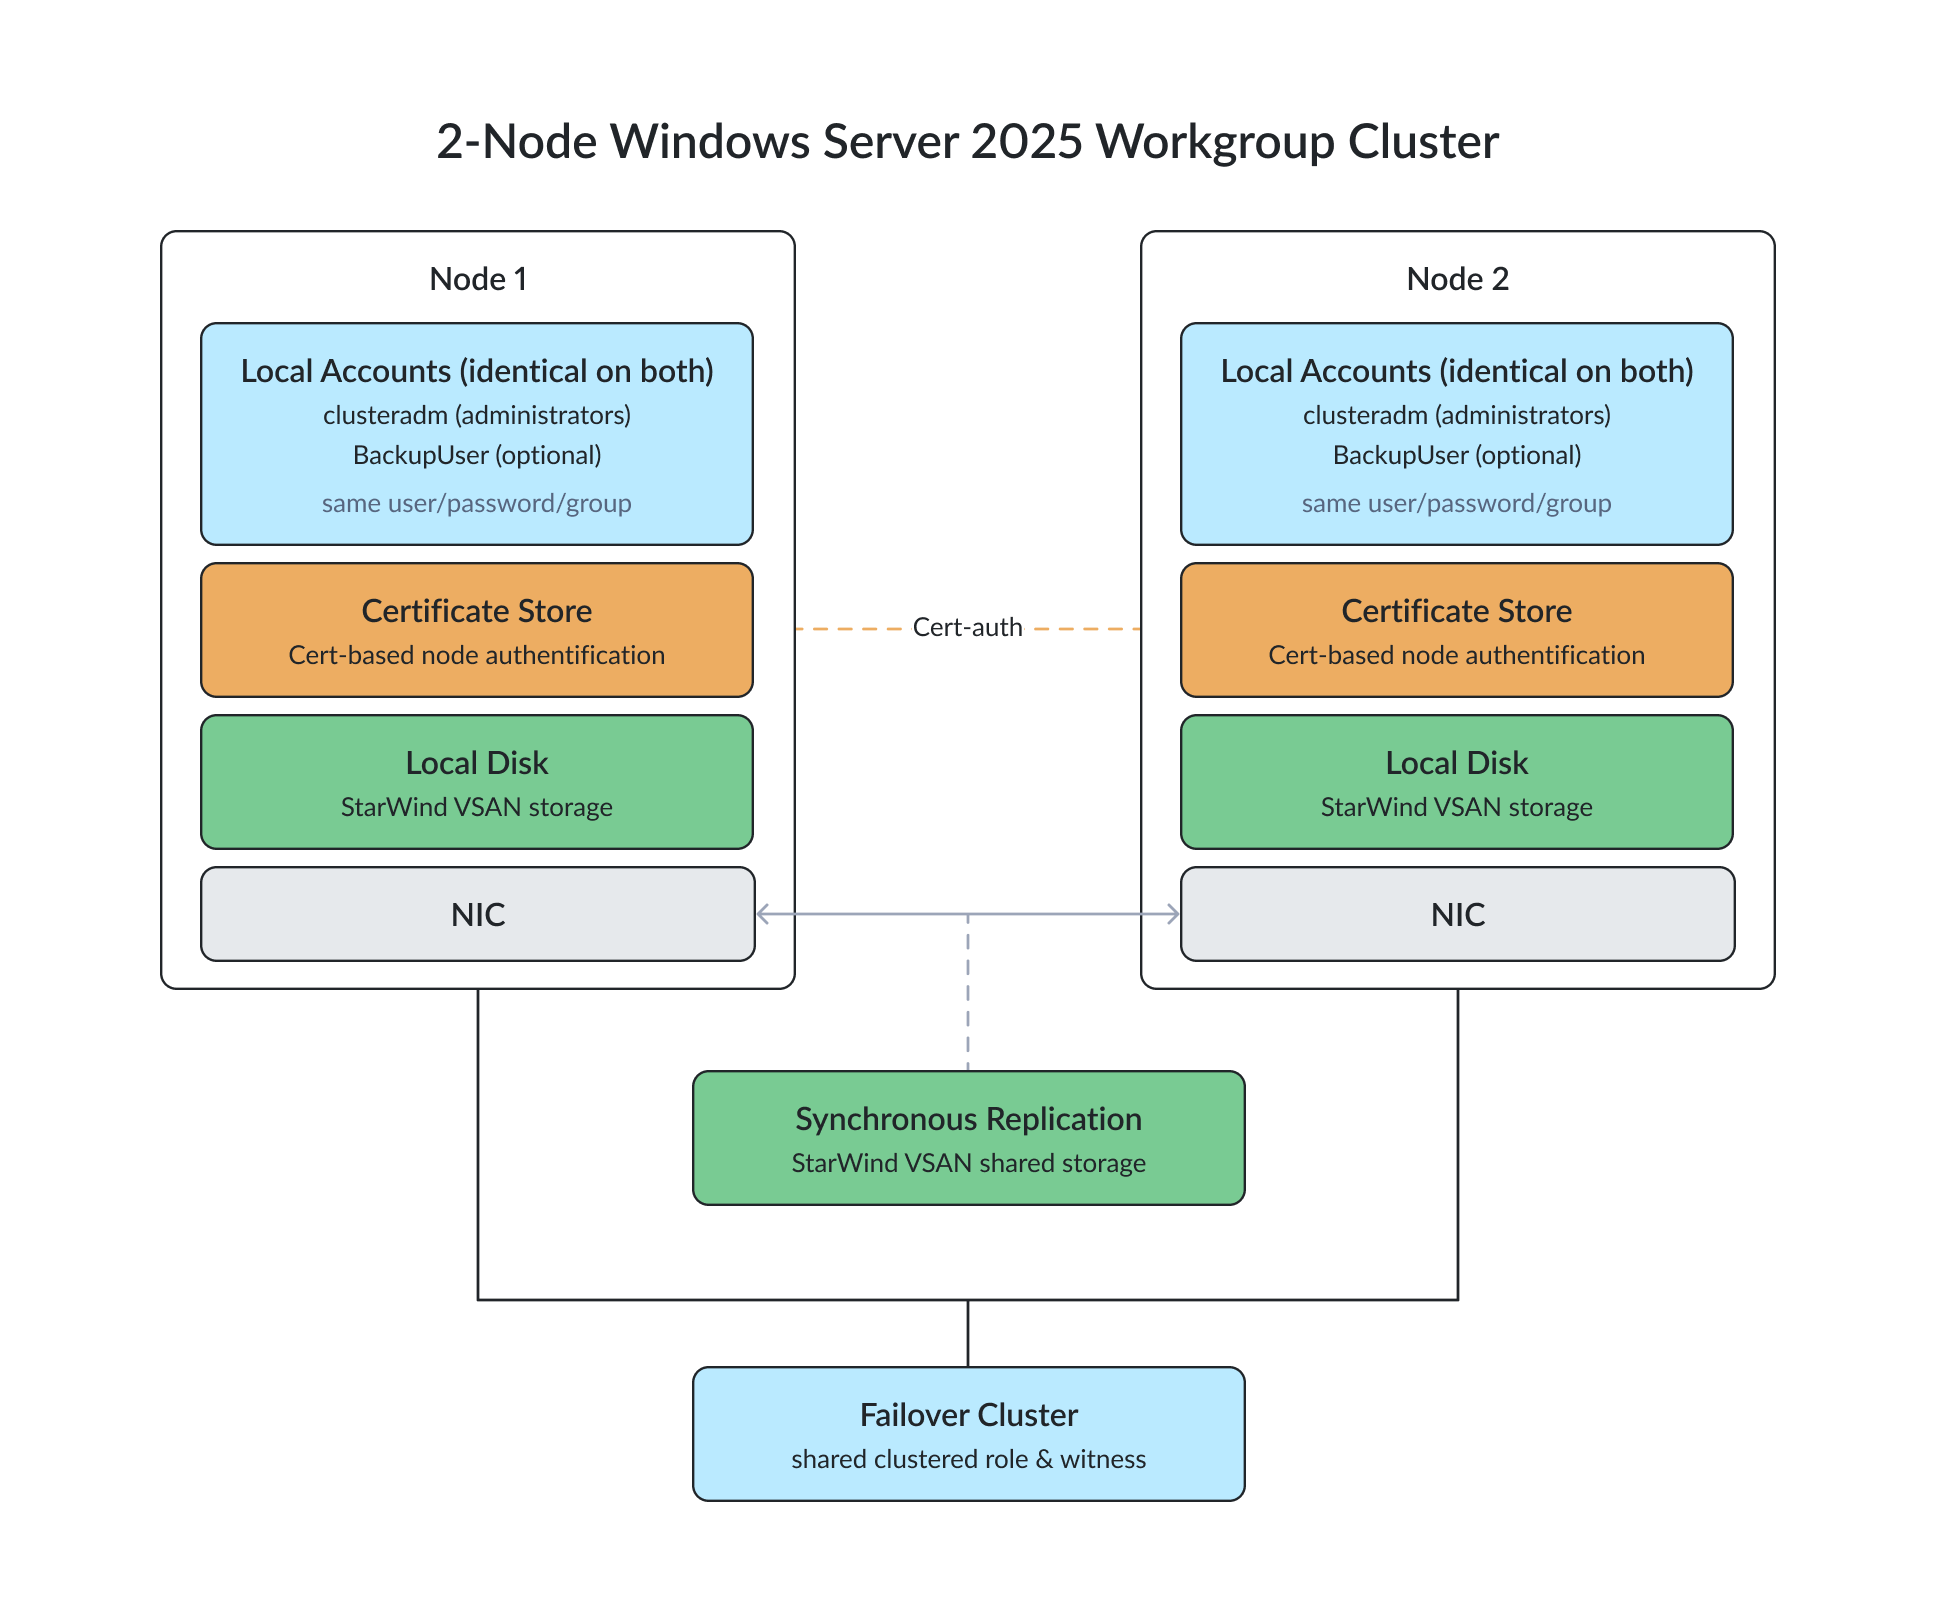
The diagram below shows the overall architecture. For readability, it shows a single NIC per node, but in production you should plan for at least two network adapters per node as described above.
Note: BackupUser is shown as an example of an additional local account you might create for backup software requiring local, non-administrative access. It’s not created as part of this walkthrough and can be omitted if you don’t need it.
Step 1: Configure matching local administrator accounts
This is the basis of authentication between cluster nodes. Without Active Directory, there’s no centralized mechanism for managing computer and user accounts, so each node must have identical local credentials. The username, password, and group membership have to match exactly.
Run these commands on every node that will be part of the cluster:
# Create the cluster admin account

net user clusteradmin StrongPassword123! /add

# Add to the local Administrators group

net localgroup administrators clusteradmin /add
If the passwords don’t match exactly between nodes, authentication fails silently during cluster validation. This is one of the most frustrating debugging scenarios in the workgroup cluster setup – double-check this before moving on.
Verify the account exists and has the correct group membership:
# Confirm account exists

net user clusteradmin

# Confirm administrator group membership

net localgroup administrators
Step 2: Configure WinRM and Trusted Hosts
Windows Remote Management (WinRM) enables remote administration and PowerShell remoting between cluster nodes. By default, it accepts connections only from trusted sources. Since workgroup clusters do not rely on Active Directory, each node must be configured manually to trust the other cluster members.
Enable PowerShell remoting on all nodes:
# Enable WinRM and PS remoting

Enable-PSRemoting -Force
Configure TrustedHosts. This setting defines which remote hosts can establish WinRM connections without Active Directory trust:
# Add both nodes to TrustedHosts

Set-Item WSMan:\localhost\Client\TrustedHosts -Value "Node1,Node2"

# Verify the setting was applied

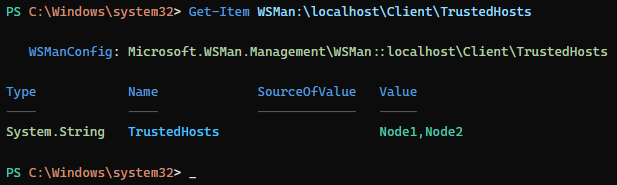
Get-Item WSMan:\localhost\Client\TrustedHosts
Do this on every node. If you skip one, that node won’t be able to initiate remote WinRM connections to its peers, and cluster creation will fail.
Step 3: Install the required Windows features
The Failover Clustering feature isn’t installed by default in Windows Server 2025. For Hyper-V deployments, install both Failover Clustering and the Hyper-V role, including their management tools, on every cluster node:
# Install Failover Clustering and Hyper-V with management tools

Install-WindowsFeature Failover-Clustering, Hyper-V -IncludeManagementTools

# Reboot after installation completes

Restart-Computer -Force
Restart each node after installation. Hyper-V requires a reboot to activate the hypervisor, and cluster validation can report misleading errors if the restart is still pending.
The Failover Clustering feature is required on all cluster nodes. Install the Hyper-V role only if the cluster will host VMs or provide Hyper-V high availability.
Step 4: Create and exchange self-signed certificates
This is the step that catches most people off guard when they first build a workgroup cluster. In a domain environment, Kerberos handles all node-to-node authentication automatically. In a workgroup cluster, you have to build that trust manually using certificates.
Each node generates its own certificate and imports the other node’s certificate into its Trusted Root store. This creates mutual trust between the nodes without requiring an external certificate authority.
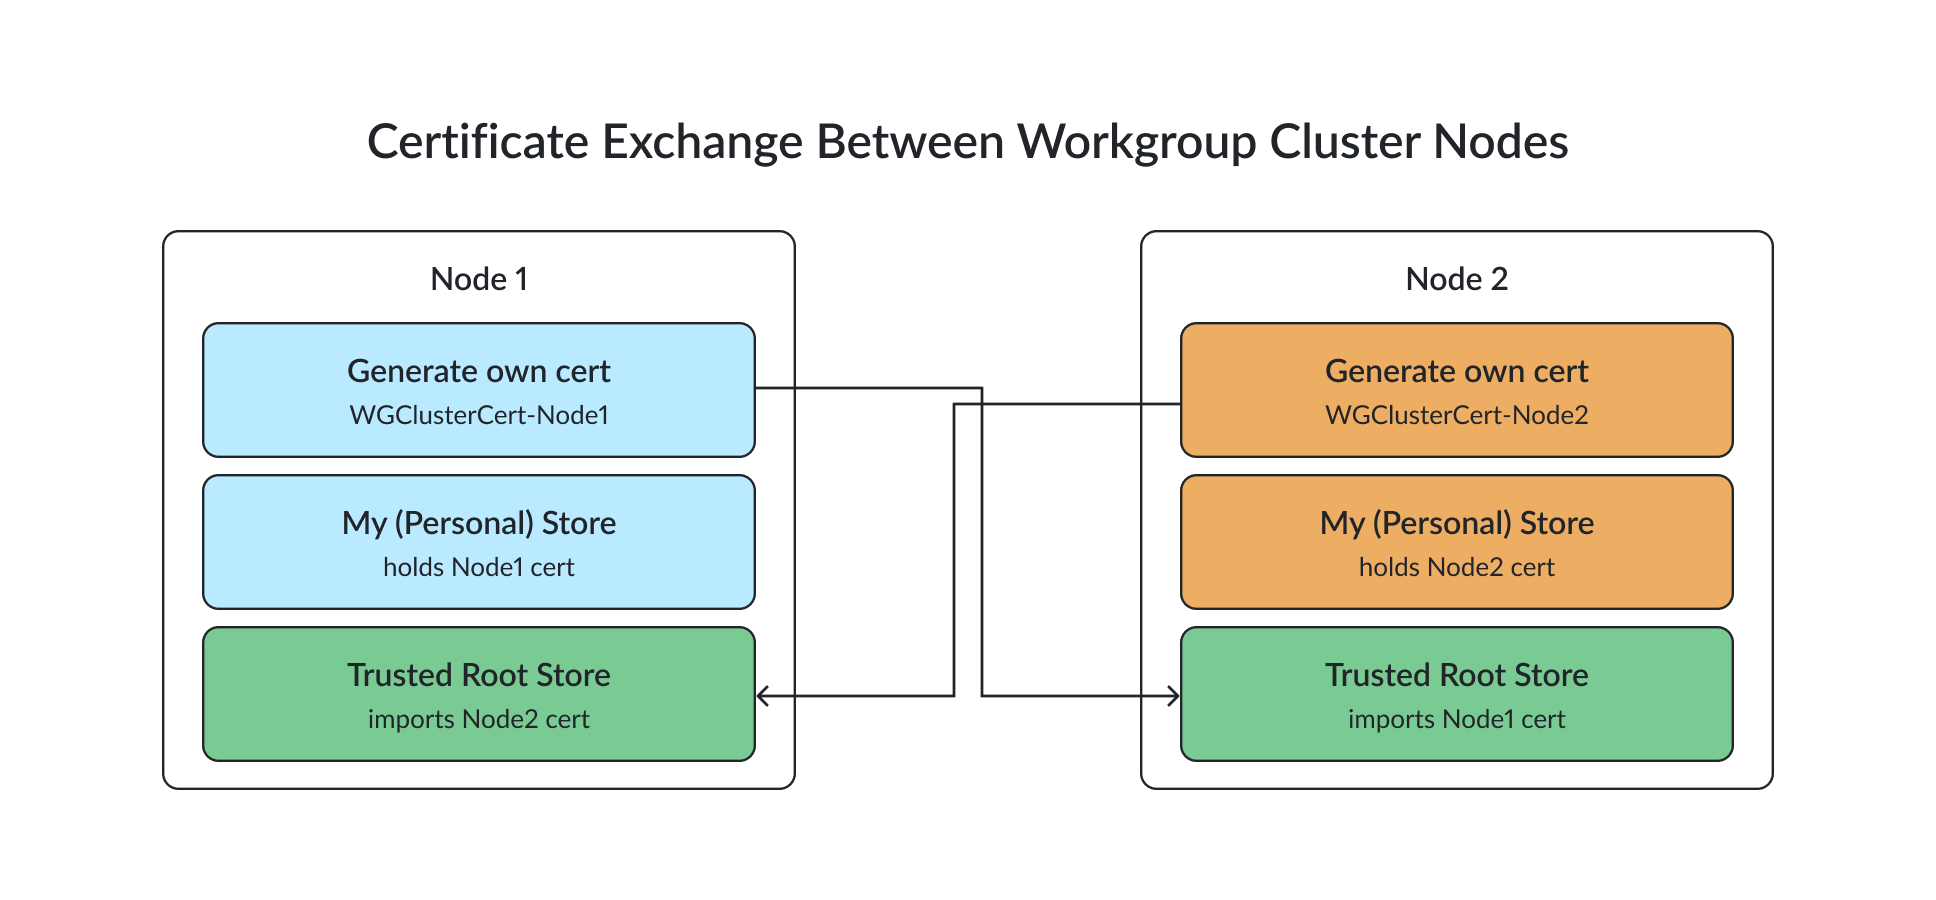
Generate certificates on each node. Run this on Node1:
# Generate a self-signed certificate for Node1

New-SelfSignedCertificate `

-DnsName "Node1" `

-CertStoreLocation "Cert:\LocalMachine\My" `

-KeyLength 2048 `

-FriendlyName "WGClusterCert-Node1"
Run this on Node2:
# Generate a self-signed certificate for Node2

New-SelfSignedCertificate `

-DnsName "Node2" `

-CertStoreLocation "Cert:\LocalMachine\My" `

-KeyLength 2048 `

-FriendlyName "WGClusterCert-Node2"
Export the certificates:
$cert = Get-ChildItem -Path cert:\LocalMachine\My | Where-Object {$_.Subject -like "Node*"}

Export-PfxCertificate -Cert $cert -FilePath "C:\ClusterCert.pfx" -Password (ConvertTo-SecureString "StrongPassword123" -AsPlainText -Force)
Import each node’s certificate on the other node:
# On Node2: import Node1's certificate into Trusted Root
Import-PfxCertificate -FilePath "C:\ClusterCert.pfx" -CertStoreLocation "cert:\LocalMachine\Root" -Password (ConvertTo-SecureString "StrongPassword123" -AsPlainText -Force)

# On Node1: import Node2's certificate into Trusted Root
Import-PfxCertificate -FilePath "C:\ClusterCert.pfx" -CertStoreLocation "cert:\LocalMachine\Root" -Password (ConvertTo-SecureString "StrongPassword123" -AsPlainText -Force)
Step 5: Configure the WinRM HTTPS Listener
Once the certificates are in place, configure WinRM to use HTTPS for secure communication. This uses the certificate you generated in the previous step. You will need the certificate thumbprint, which you can get from the certificate store.
# Get your certificate thumbprint

Get-ChildItem Cert:\LocalMachine\My | Where-Object {$_.FriendlyName -like " ClusterCert *"}

# Create the HTTPS WinRM listener (replace CERT_THUMBPRINT with actual value)

winrm create winrm/config/Listener?Address=*+Transport=HTTPS `

"@{Hostname='Node1';CertificateThumbprint='CERT_THUMBPRINT'}"

# Verify the listener was created

winrm enumerate winrm/config/listener
Run the equivalent commands on Node2, substituting Node2′s hostname and thumbprint. When done, verify you can reach each node over HTTPS by testing the WinRM connection from the opposite node.
Troubleshooting tip: If the HTTPS listener fails to create, the most common cause is that the certificate Subject name does not match the hostname. The -DnsName value used in Step 4 must exactly match the node’s actual hostname.
Step 6: Validate the cluster before creating it
Don’t skip this. Cluster validation is especially important for workgroup clusters because authentication issues surface here first, not after creation. Many administrators treat validation as a formality – for domain clusters that’s occasionally forgivable. For workgroup clusters, it isn’t.
# Run full cluster validation against both nodes

Test-Cluster -Node Node1,Node2

# Or run validation with a specific report path

Test-Cluster -Node Node1,Node2 -ReportName C:\ClusterValidation\Report
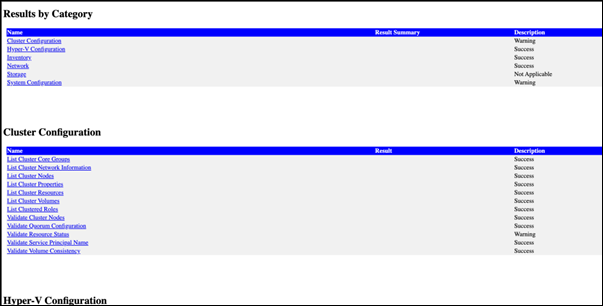
The validation report covers network configuration and connectivity between nodes, storage visibility and access, system configuration consistency, and failover clustering prerequisites.
You don’t need to pass every test to create a workgroup cluster. Storage tests may show warnings if you haven’t configured shared storage yet. What matters is that the network and system tests complete successfully.
Step 7: Create the workgroup cluster
With validation complete, you’re ready to create the cluster. The critical difference from a domain cluster is the -AdministrativeAccessPoint parameter. For workgroup clusters, this must be set to DNS rather than the default, which creates an AD computer object.
# Create the workgroup cluster with DNS access point

New-Cluster `

-Name WGCluster `

-Node Node1,Node2 `

-AdministrativeAccessPoint DNS

# If you have a specific IP for the cluster, add it:

New-Cluster `

-Name WGCluster `

-Node Node1,Node2 `

-StaticAddress 192.168.10.20 `

-AdministrativeAccessPoint DNS
A DNS access point means the cluster name is registered in DNS like any other hostname, instead of being backed by an Active Directory computer object. The cluster can function without a domain controller.
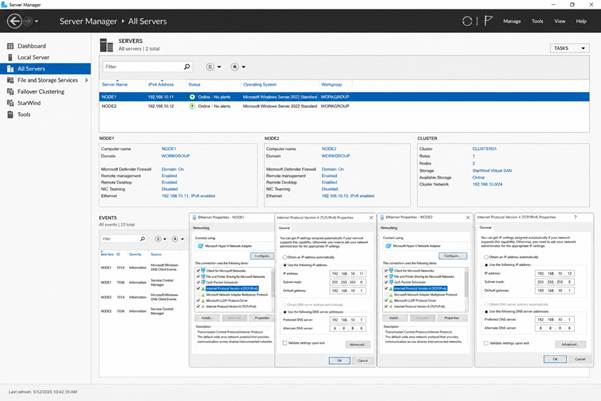
Once the cluster is created, Server Manager gives you a quick health check across both nodes, confirming that clustering, StarWind Virtual SAN, and networking are all reporting normally:
Step 8: Configure storage with StarWind Virtual SAN
Here’s where many workgroup cluster guides stop: they assume you already have shared storage, or they wave their hands and say “use a SAN or NAS.” That’s not helpful for ROBO and edge scenarios, which are precisely the environments where workgroup clusters make the most sense.
The whole point of a workgroup cluster is to reduce infrastructure dependencies. Removing the AD dependency and then replacing it with a requirement for a dedicated SAN, Fibre Channel infrastructure, or expensive external arrays doesn’t make sense.
This is where software-defined storage fits the workgroup cluster story. StarWind Virtual SAN is one option that works well here. Instead of relying on an external storage array, it uses the local storage in each cluster node and synchronously replicates data between them to provide the shared storage required for failover clustering.
What StarWind Virtual SAN does?
StarWind VSAN runs as a service on each cluster node. It takes local storage – HDD, SSD, or NVMe – on each node, creates virtual shared disks backed by that local storage, replicates writes synchronously between nodes so both copies stay identical, and presents those replicated virtual disks to the cluster nodes as Cluster Shared Volumes.
The result is highly available shared storage without dedicated external hardware. If one node fails, the other continues operating with no data loss because it already has a full, up-to-date copy of everything. For a full walkthrough of configuring StarWind Virtual SAN in a two-node, compute-and-storage-separated Hyper-V scenario, see StarWind’s official technical guide.
Why is SDS important for workgroup clusters?
Using SDS with a workgroup cluster eliminates multiple infrastructure dependencies at once: no AD, no SAN hardware, no Fibre Channel, no dedicated iSCSI target hardware, no external NAS. Two standard servers with local disks, StarWind VSAN installed on each, and the workgroup cluster configuration from this guide are all you need for a production HA environment. Other SDS solutions like Storage Spaces Direct can fill this role too – StarWind is what this guide covers.
Configuring the quorum witness
A two-node cluster should have a quorum witness to provide an additional vote during node or network failures. Failover Clustering uses a majority-based quorum model, so a two-node cluster without a witness has only two votes. If communication between the nodes is lost, neither node can maintain a majority, and clustered resources go offline.
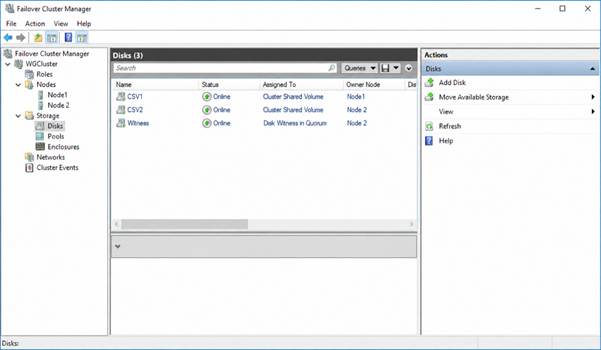
Workgroup clusters support three quorum witness types. A file share witness uses a shared folder on a separate server or NAS device – it’s the simplest option when you already have a third machine on the network. A cloud witness uses Azure Blob Storage and works well when nodes have Internet access but there’s no convenient third site for a file share. A disk witness is a small shared disk dedicated to quorum – StarWind Virtual SAN can provide this disk in the same way it provides the cluster’s main shared storage.
Configure a File Share Witness:
# Configure a File Share Witness
Set-ClusterQuorum -FileShareWitness \\witnessserver\ClusterWitness

Configure a Cloud Witness (Azure):

# Configure a Cloud Witness (Azure)
Set-ClusterQuorum -CloudWitness `
-AccountName "yourstorageaccount" `
-AccessKey "youraccesskey"
For a disk witness with StarWind, the linked StarWind guide walks through selecting the quorum witness option during setup.
Step 9: Post-creation verification
Once the cluster is running and storage has been configured, perform a set of checks to confirm everything is healthy before you start deploying workloads.
Check cluster health:
# Check overall cluster status

Get-Cluster

# Check all cluster nodes

Get-ClusterNode

# Check all cluster resources

Get-ClusterResource

# Check network adapters used by the cluster

Get-ClusterNetwork

Verify storage is online:

# List Cluster Shared Volumes

Get-ClusterSharedVolume

# Check CSV health and state

Get-ClusterSharedVolume | Select-Object Name, State, Node
Test a manual failover.
Always test failover before putting the cluster into production. Move the cluster group from one node to the other and verify the workload remains online throughout the operation:
# Move all cluster groups from Node1 to Node2
Move-ClusterGroup -Node Node2
# Move a specific role
Move-ClusterGroup -Name “Virtual Machine Role Name” -Node Node2
Common challenges and how to handle them
Being honest about the hard parts is more useful than pretending deployment always goes smoothly. Here are the issues that come up most often.
Certificate mismatches
Symptom: Cluster validation succeeds, but nodes can’t communicate properly after creation.
Cause: The -DnsName value used when creating the certificate doesn’t exactly match the node hostname, or the certificate wasn’t imported into the correct store. It must go into Trusted Root, not Personal.
Fix: Use certlm.msc to verify the certificate is in the Trusted Root Certification Authorities store, and confirm the Subject name matches the node hostname.
Get-ChildItem Cert:\LocalMachine\Root
Remote management issues
Symptom: You can’t connect to nodes remotely using Failover Cluster Manager or Enter-PSSession.
Cause: TrustedHosts hasn’t been configured correctly, or the clusteradmin credentials were entered incorrectly.
Fix: Verify that TrustedHosts contains the names of all cluster nodes. When connecting remotely, always specify credentials explicitly using -Credential (Get-Credential).
Authentication failures during cluster creation
Symptom: New-Cluster fails with “Access Denied” errors.
Cause: Password mismatch between the clusteradmin accounts on different nodes, or the account isn’t in the local Administrators group on all nodes.
Fix: Reset the password on all nodes to the same value simultaneously, then retest.
Workload limitations
Some workloads don’t support workgroup clusters. SQL Server Availability Groups, for example, require domain accounts and Kerberos by default, though workarounds exist. Any clustered role that depends on Active Directory integration won’t function in a workgroup cluster.
For Hyper-V VMs and Scale-Out File Server workloads, workgroup clusters work well. Verify your specific workload requirements before committing to this architecture.
For the official reference on workgroup cluster requirements and supported scenarios, see Microsoft’s Create a workgroup cluster documentation.
Final thoughts
Workgroup clusters in Windows Server 2025 are genuinely production-ready for the right scenarios. I’ve deployed them in branch offices where spinning up domain controllers would have been operationally impractical, and in edge environments where the entire point was minimizing footprint.
They’re not easier than domain clusters in absolute terms. You trade the complexity of maintaining Active Directory for the complexity of managing certificates and local accounts manually. What you gain is independence from domain controllers – no risk of cluster failure because a DC was unreachable.
Combined with StarWind Virtual SAN or another SDS solution, a workgroup cluster can deliver both compute and storage high availability without dedicated storage hardware or domain services. As outlined in Step 8, this architecture eliminates AD, SAN hardware, Fibre Channel, iSCSI, and NAS dependencies. Two standard servers with local storage get you a full HA environment. That’s a practical fit for ROBO and edge deployments where every piece of infrastructure you don’t have to maintain is a win.
If you’re evaluating this architecture, the StarWind Virtual SAN free version works for lab validation. You can verify the full workgroup cluster plus replicated storage setup before deploying to production.