


VMware vCenter server appliance is evolving with every major release of VMware vSphere Suite. The product, which manages the whole vSphere infrastructure, can be either installed on a Windows server or deployed as pre-configured virtual appliance called vCenter Server Appliance (VCSA).
Over several VCSA releases, VMware managed to make this product equal to the Windows-based one, and it pushes the development even further so now the Linux based product has more features than the vCenter server installed on Windows.
However, many VMware admins are also Microsoft guys and like the graphical user interface to work with. That’s why today we’ll have a look at 5 Tips to manage this appliance. We won’t go into the configuration steps within this post as this has been documented many times.
Tip N°1: Change the password of the Root User
There is a default password on the appliance which has been assigned during the installation process. You must remember this password in order to log in and change this password.
I assume you know this password so let’s login to the management interface located at
https://IP_of_VCSA:5480
use root username and password you used when you first installed this product.
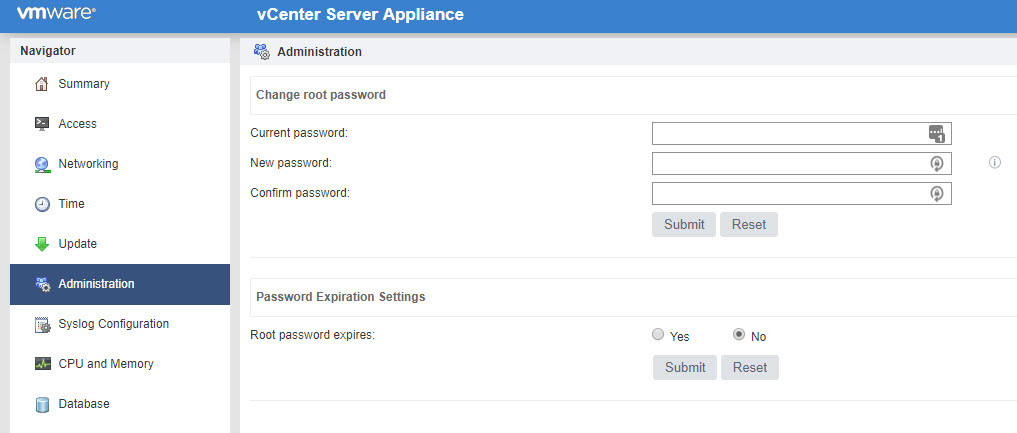
In vCenter Server Appliance you can establish your own password expiration days and warning email policies under the Administration tab of the Virtual Appliance Management Interface (VAMI) too.
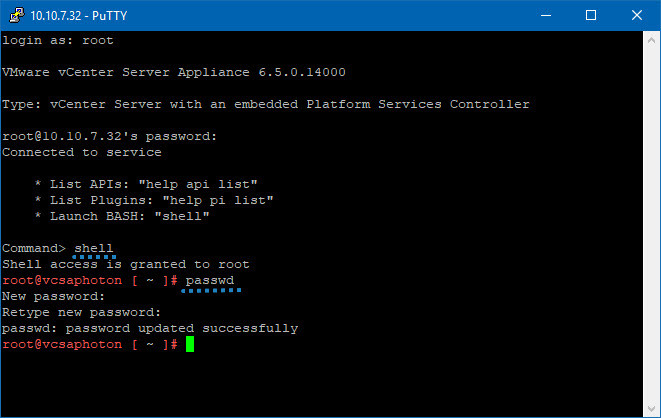
You should know that it is also possible to change the password via the console. For whichever reason, one day you might not have an access to the UI but you can open a console session directly.
Tip N°2: Change the password of the Root User via the console
To be able to access the remote console session, you must first enable SSH within the UI. You can do so by going to the Access TAB > Edit > Check Enable SSH Login check box.
Now, let’s get back to the console and changing our root user password via the CLI. Open Putty client and login by using your root account.
Type this:
Shell
Hit Enter and then type:
password
You’ll get a prompt inviting you to enter your new root password. Once done you’ll have to re-enter the root password once more time.
Tip N°3: Create and export a support bundle from VMware vCSA
If you want to export the support bundle of the vCenter Server instance from VCSA in order to troubleshoot some problem, you can do that by using the URL displayed on the Direct Console User Interface (DCUI) home screen.
You can also collect the support bundle from the vCenter Server Appliance Bash shell, by running the support.sh script.
The support bundle is exported in .tgz format.
Let’s have a look at how to do that. First:
Step 1: Log in to the Windows host machine on which you want to download the bundle, open a web browser and enter the URL to the support bundle displayed in the DCUI.
https://IP_of_VCSA:443/appliance/support-bundle
Step 2: Enter the username and password of the root user and press Enter.
The support bundle is downloaded as .tgz file on your Windows machine directly.
Note that you can also create that support bundle from within the VAMI user interface. On the Summary tab > Click the green button called Create Support Bundle.

Tip 4: Restart the management network of VCSA
If you have some network connection problems, you can try to restart the management network of the vCenter Server Appliance.
Login to the direct console user interface (DCUI) of the appliance and select Restart Management Network. Press enter to proceed.

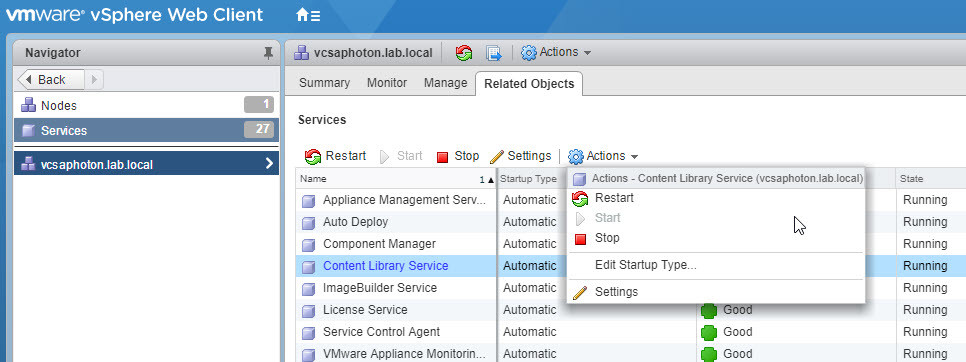
Tip N° 5: Start, Stop, or Restart Services in the vCenter Server Appliance
Sometimes you might need to restart a service which runs in the VCSA. We will use vSphere web client for the job.
Login to vSphere web client via this address:
https://IP_of_VCSA/vsphere-client
On the vSphere Web Client Home page, Administration > Select the vCenter node > Related Objects TAB > Select service you want to restart > From the Actions menu, select an operation.
You can start, stop, and restart the service.
VMware vCenter server appliance is a new product which, as I said, evolves in every release. VMware has already announced that next major release of VMware vSphere will have the last version where vCenter server will be able to be installed on Windows machine.
VMware wants to end the dependency on Windows system for their important management product which vCenter server is.
It’s time for VMware admins to switch tool, not worry too much about the underlying OS, and concentrate on the management of their infrastructure, creating and optimizing new VMs and maximize the consolidation ratios.
VMware VCSA is a really great product to use, easy to deploy and configure. It’s also possible to migrate Windows-based vCenter server into vCSA. VMware provides a built-in tool for that which is accessible via the Installer of the VCSA.
