

StarWind Virtual Tape Library: Configuration Guide for Cloud Storage, VTL Deployed as a Windows Applications using GUI
- April 04, 2019
- 29 min read
- Download as PDF
Annotation
Relevant products
This guide is applicable for StarWind VTL (build version 12767 and later).
Purpose
StarWind Virtual Tape Library (VTL) is a software solution that allows you to emulate physical Tape Libraries while storing data on the hard disk drives. The solution targets companies that want to completely quit using the physical Tape Library, as well as simplify and accelerate the process of data backup and recovery.
This document outlines how to configure a StarWind VTL and includes steps on how to replicate the tapes to the cloud object storage.
Audience
This technical guide is intended for storage and virtualization architects, system administrators, and partners designing virtualized environments using StarWind Virtual Tape Library (VTL).
Expected result
The end result of following this guide will be a fully configured StarWind VTL with replicated tapes to the cloud object storage.
Prerequisites
StarWind VTL system requirements
Prior to installing StarWind Virtual SAN, please make sure that the system meets the requirements, which are available via the following link: https://www.starwindsoftware.com/system-requirements#virtual-tape-library
Recommended RAID settings for HDD and SSD disks:
https://knowledgebase.starwindsoftware.com/guidance/recommended-raid-settings-for-hdd-and-ssd-disks/
IMPORTANT NOTE: In order to fit the ransomware resiliency, the VTL should be located on the dedicated storage/host which must be isolated from the production environment. Please read the following document for details:
Backing up StarWind Virtual SAN Environment: Best Practice.
Installing StarWind VTL
1. Launch the downloaded setup file on the server where StarWind VTL has to be installed.
2. Read and accept the License Agreement.
3. Read carefully the information about new features and improvements.
Note: the text in red indicates warnings for users who are updating existing software installations.
4. Click Browse to modify the installation path if necessary.
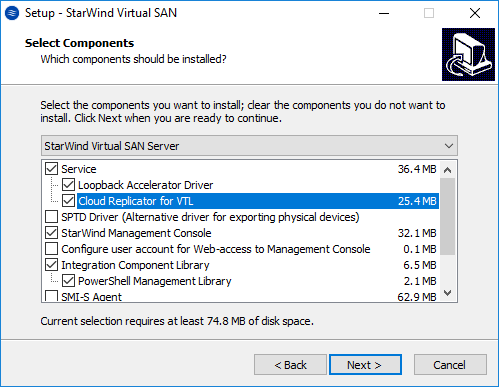
5. To install StarWind VTL service along with StarWind Virtual SAN service, enable the checkboxes as in the image below.
6. Specify the Start Menu folder.
7. Enable the checkbox to create a desktop icon.
8. Select the appropriate option to enter the license key.
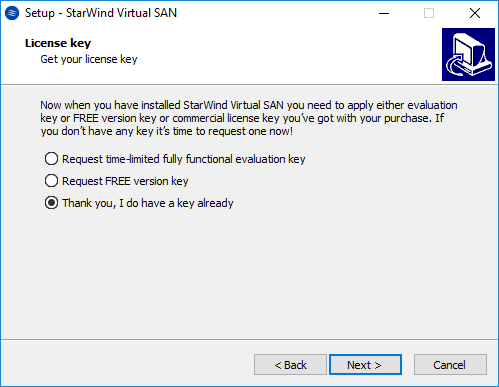
9. Review the licensing information and click Next to apply the license key.
10. Verify the installation settings and click Install to continue or Back to make any changes.
11. Enable the appropriate checkbox to launch the StarWind Management Console right after the setup wizard is closed.
12. Click Finish to close the wizard.
Configuring Virtual Tape Library
1. Launch the StarWind Management Console by double-clicking the StarWind tray icon.
NOTE: If StarWind service and Management Console are installed on the same server, the Management Console will automatically add the local StarWind instance to the Console tree after the first launch. Then, the Management Console automatically connects to it using the default credentials. To add remote StarWind servers to the Console, use the Add Server button on the control panel.
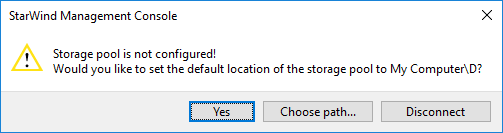
2. StarWind Management Console will ask to specify the default storage pool on the server you are connecting to for the first time. Please, configure the default storage pool to use one of the volumes you have prepared as StarWind storage earlier. All the devices created through the Add Device wizard will be stored on that storage pool by default.
3. Press the Yes button to configure the storage pool. Should you require to change the storage pool destination, press Choose path… and point the browser to the necessary disk.
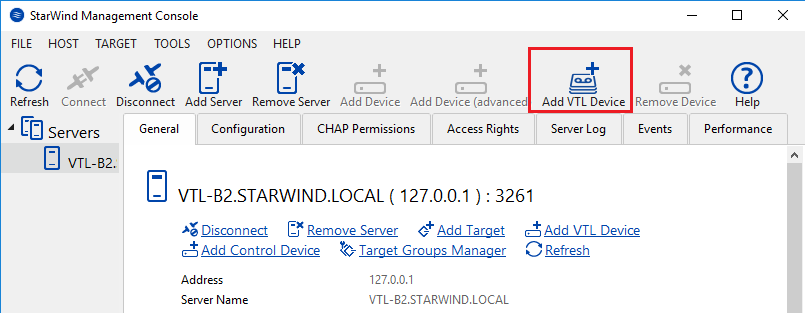
4. Select the StarWind server where the device needs to be created.
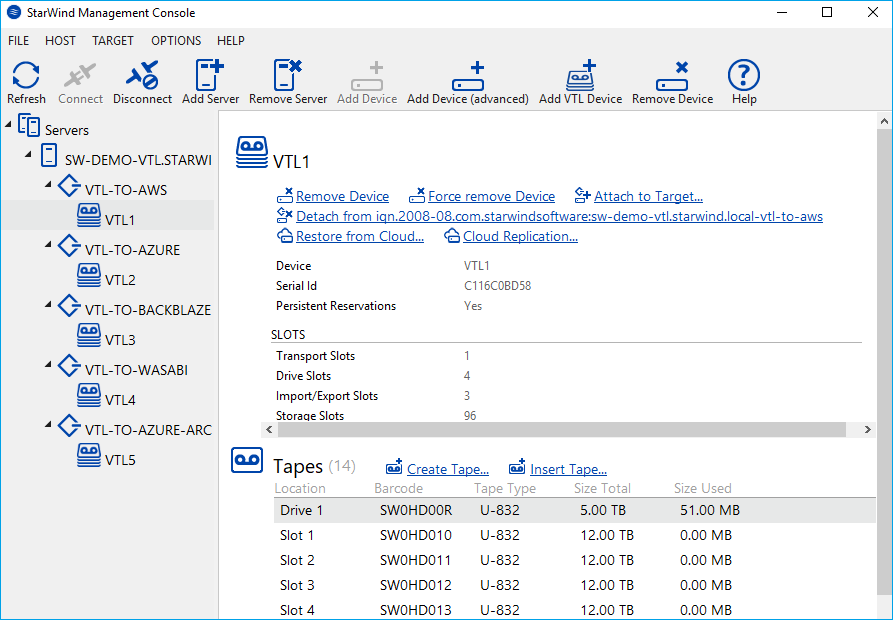
5. Press the Add VTL Device button on the toolbar.
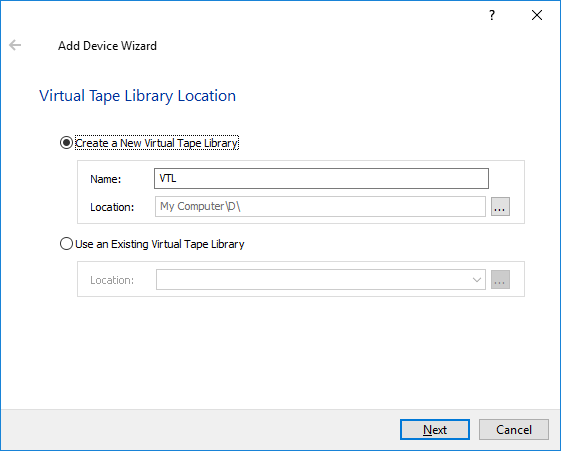
6. Specify the Virtual Tape Library location in the appeared window and click Next.
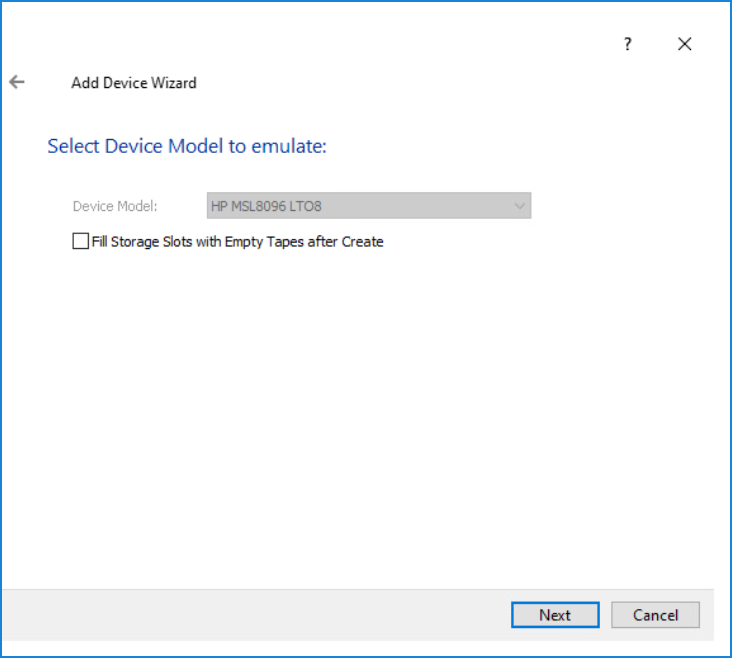
7. Select the Device Model from a drop-down list. You can also fill all slots in the newly created Tape Library with empty tapes.
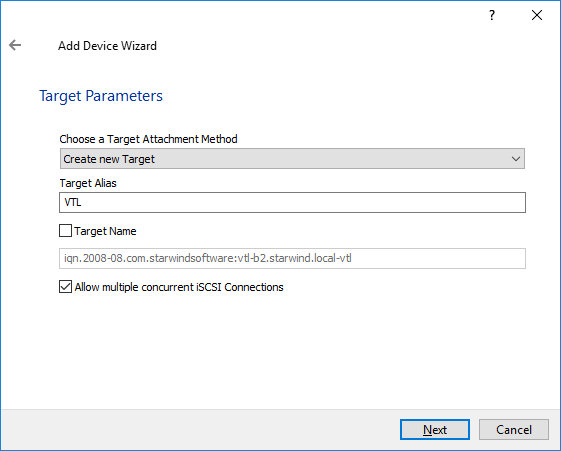
8. Provide Target Alias or choose the default one.
9. Press the Create button to start the creation process.
10. Once the device creation is completed, click Close.
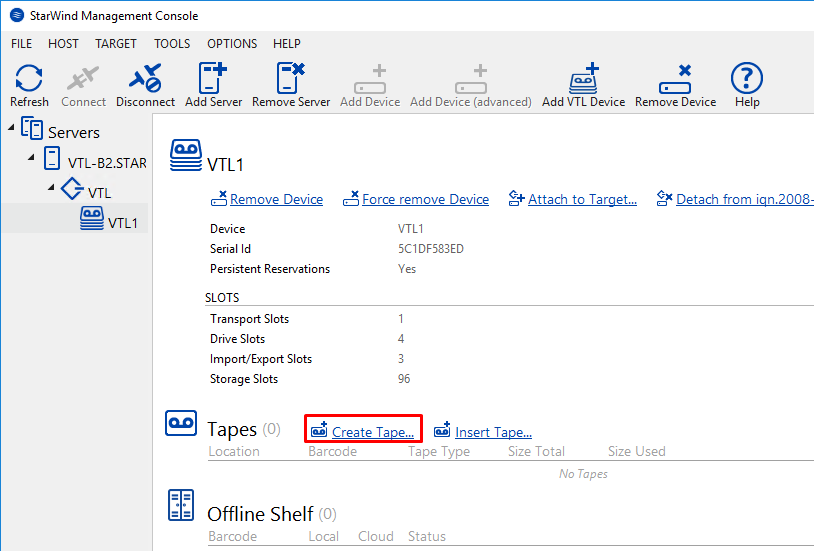
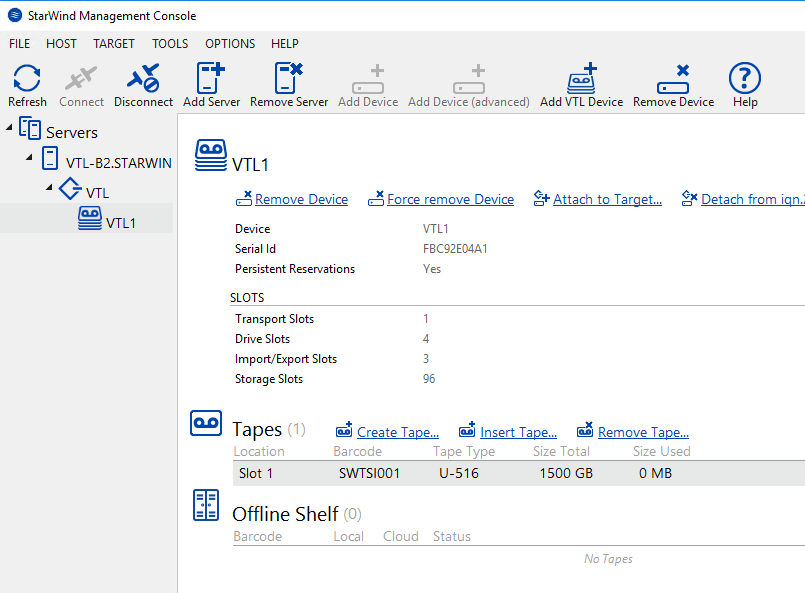
11. Once the VTL device is created, the tapes can be added. To do this, select the VTL device and click the Create Tape button located in the Tapes section.
12. The Create Tape wizard will appear. Optionally, select the checkbox and specify the custom path where the tape files must be stored.
13. Specify the Number of Tapes, Tape Type, and other parameters and click the Create button. It’s possible to customize the tape parameters.
14. The created tape appears in the first slot of the VTL device in the StarWind Management Console.
If required, create new tapes in the same way.
Selecting the Cloud Storage Provider
To further proceed with configuring StarWind VTL Cloud Replication, please select the cloud storage provider of your choice:
Microsoft Azure
Getting Cloud Account Credentials in Microsoft Azure Cloud Storage
1. From a browser, navigate to the Azure portal and sign in with your Azure account.
2. Create a Resource group in the Azure portal. It’s a container that collects related resources for an Azure solution, or those resources that ought to be managed as a group. Make sure you have selected the location with minimal network latency.
3. In the portal, click New. In the Search the marketplace field, type “Resource group”. Locate Resource group from the returned list and click it to open the Resource group window. Near the bottom of the Resource group window, click Create.

4. Navigate to Resource group and select it. In the top menu, select Add. In the Search the marketplace field, type “Virtual Network”. Locate Virtual Network from the returned list and click it to open the Virtual Network window. Use Resource Manager as a deployment model.

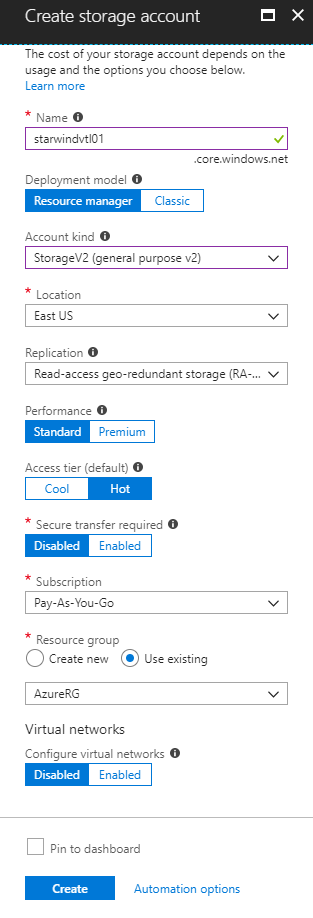
5. In the Search the marketplace field, type “Storage account”. Locate “Storage account – blob, file, table, queue” from the returned list and click it to open the Storage account window.
6. Select the account type as StorageV2 (general purpose v2).
7. Specify the performance tier: Standard or Premium. Select Replication plan.
8. Specify default Access tier: Hot or Cool. Click here for more details.
Creating Microsoft Azure Blob
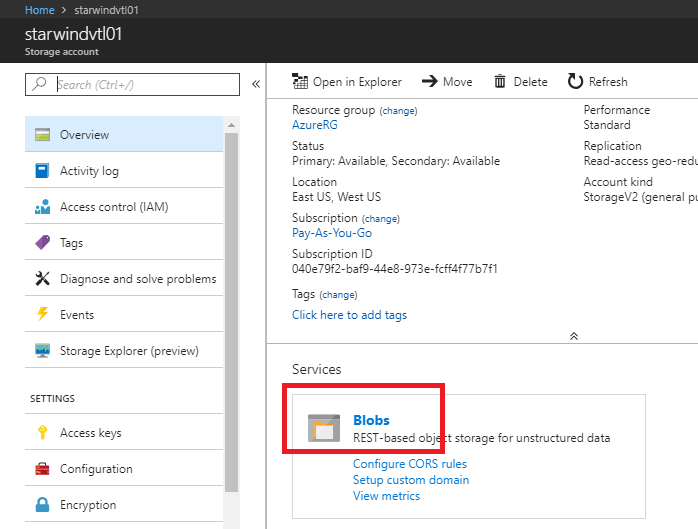
1. Open a storage account. Navigate to Blobs.
2. Create a Blob.

3. Go back to the storage account. Open Access Keys.
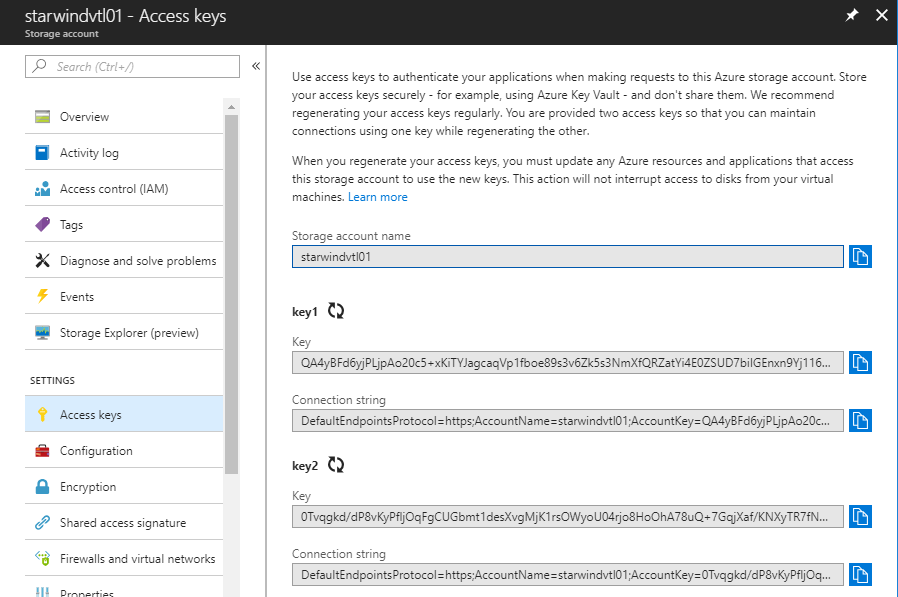
4. Click copy key1 or key2 to get access.
NOTE: When generating a new access key, the old one will no longer work.
5. To proceed with configuring StarWind VTL Cloud Replication, please return to the Configuring Cloud Replication section.
Amazon Web Services (AWS)
Getting Access Key ID and Secret Access Key in AWS
1. To get the Access key ID and Secret access key, launch AWS Management Console.
2. Then click Services -> Security, Identity & Compliance -> IAM.
3. Click Users, select the existing User or create the new one.
4. Make sure to assign necessary Permissions to the corresponding User.
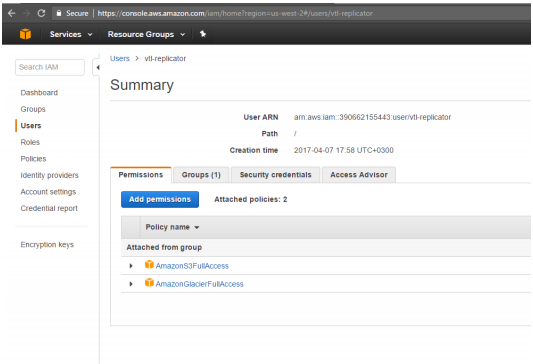
5. In the User’s profile, click the Security Credentials and press the Create access key button.

6. Click Show in the Secret access key field.
NOTE: Save the Access key ID and Secret access key as this information will be used during the configuration process.
NOTE: In some cases, the user might need to have restricted access to the cloud resources. Please follow the guide here to change the user’s permissions: https://docs.aws.amazon.com/IAM/latest/UserGuide/id_users_change-permissions.html
rCreating Amazon S3 Bucket
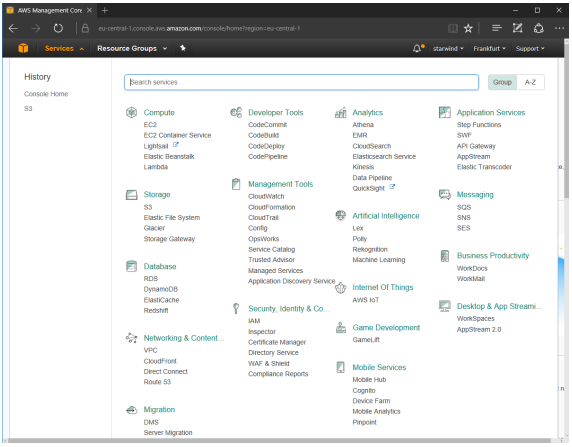
1. To create Amazon S3 bucket, select Storage and S3, and сlick the Create Bucket button.

3. Enter an appropriate Bucket Name, choose the Region in a drop-down menu and click Create.
4. The newly created bucket will appear in the list.

5. To proceed with configuring StarWind VTL Cloud Replication, please return to the Configuring Cloud Replication section.
Wasabi
Getting Account ID and Application Key in Wasabi Cloud Storage
1. Sing up to Wasabi using the following link: https://wasabi.com/
2. In the left-side menu of the Wasabi console, go to Access Keys and click on Create New Access Key.
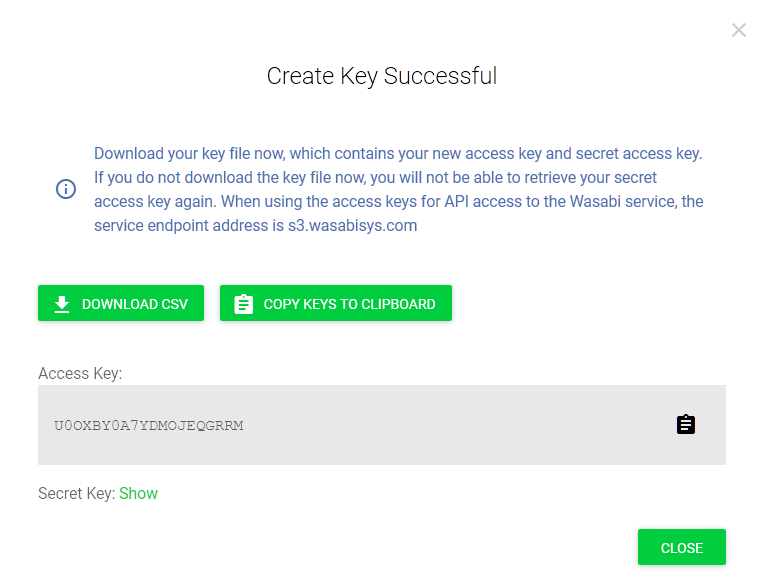
3. Press DOWNLOAD CSV or COPY KEYS TO CLIPBOARD to save the values.
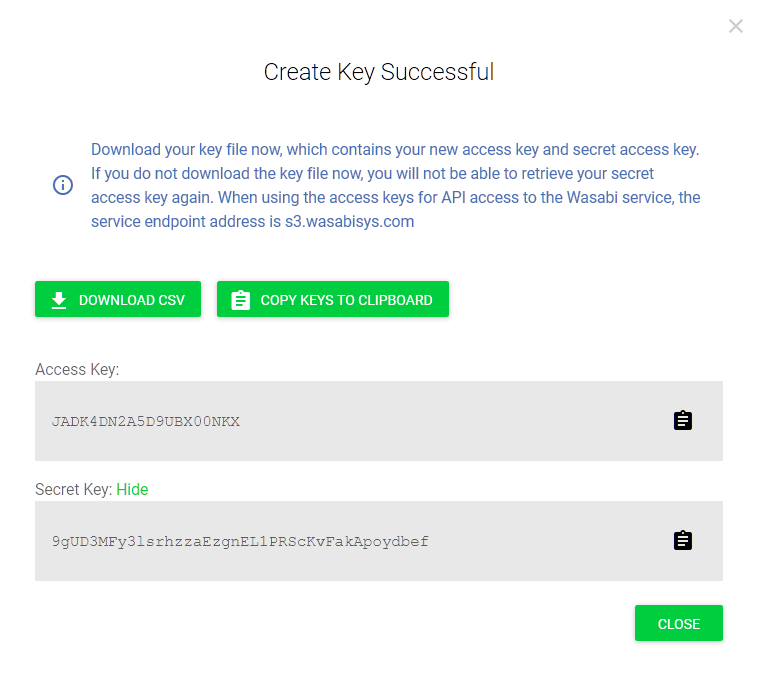
NOTE: Make sure the keys are saved, as it is not possible to view the Secret Key once again after pressing the Close button.
Creating Wasabi Bucket
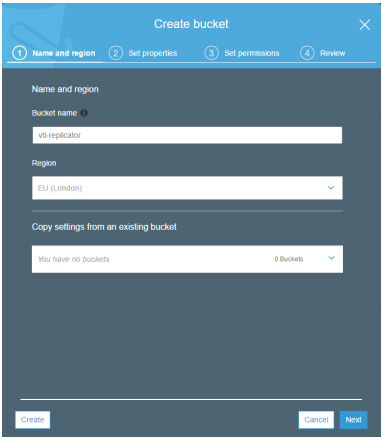
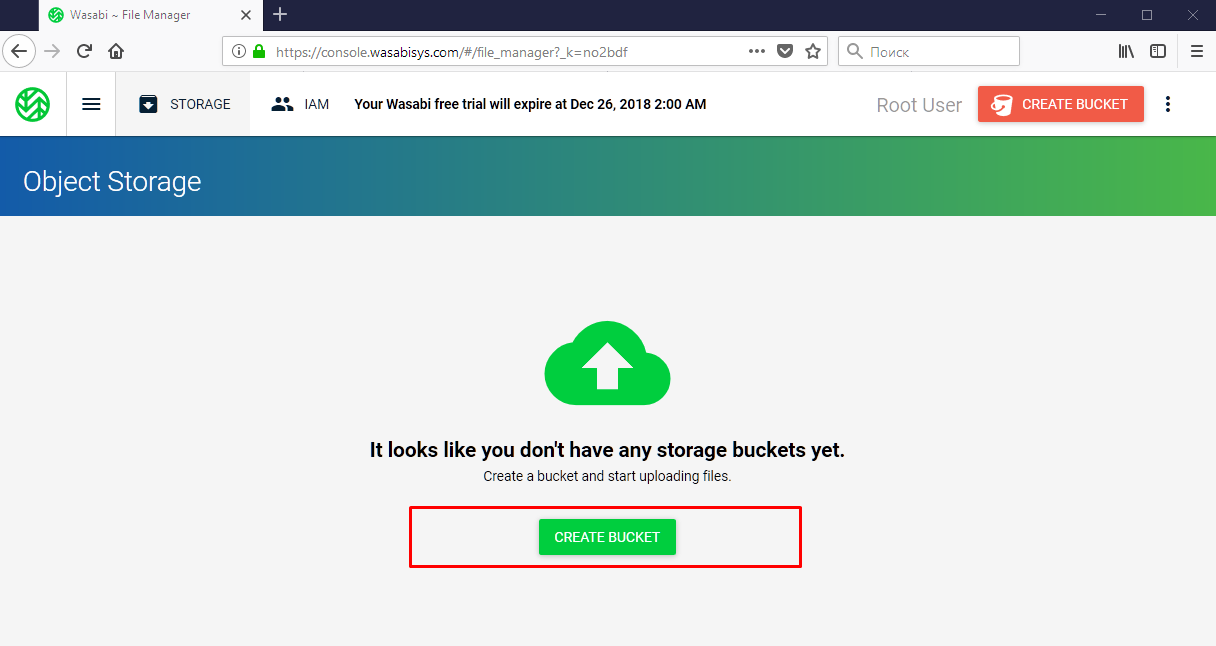
1. To create the Wasabi bucket, open the Buckets section and click the CREATE BUCKET button.
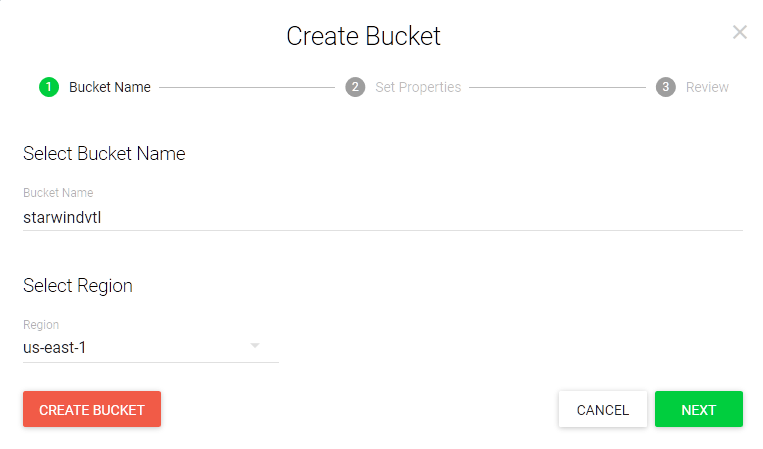
2. Specify the Bucket Name and click the Create Bucket button.
3. To proceed with configuring StarWind VTL Cloud Replication, please navigate to the Configuring Cloud Replication section.
Baсkblaze B2 Cloud Storage
Getting Account ID and Application Key in Backblaze B2 Cloud Storage
1. Sing up to Backblaze B2 Cloud Storage using the following link: https://www.backblaze.com/b2/cloud-storage.html
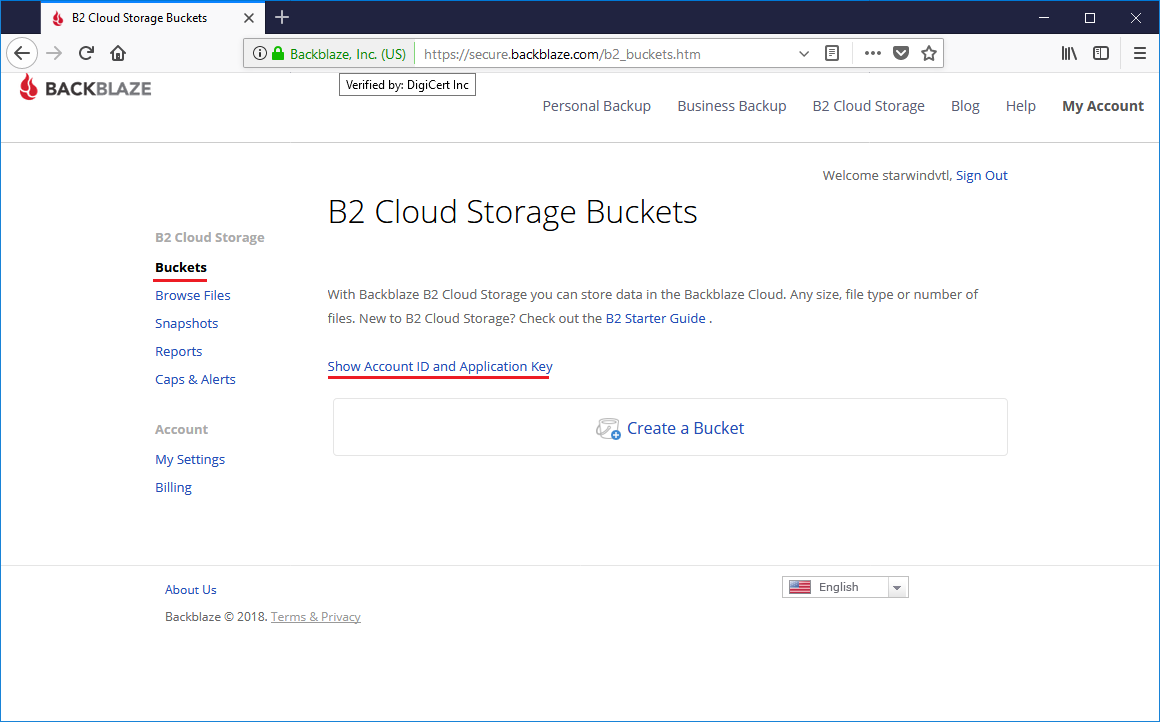
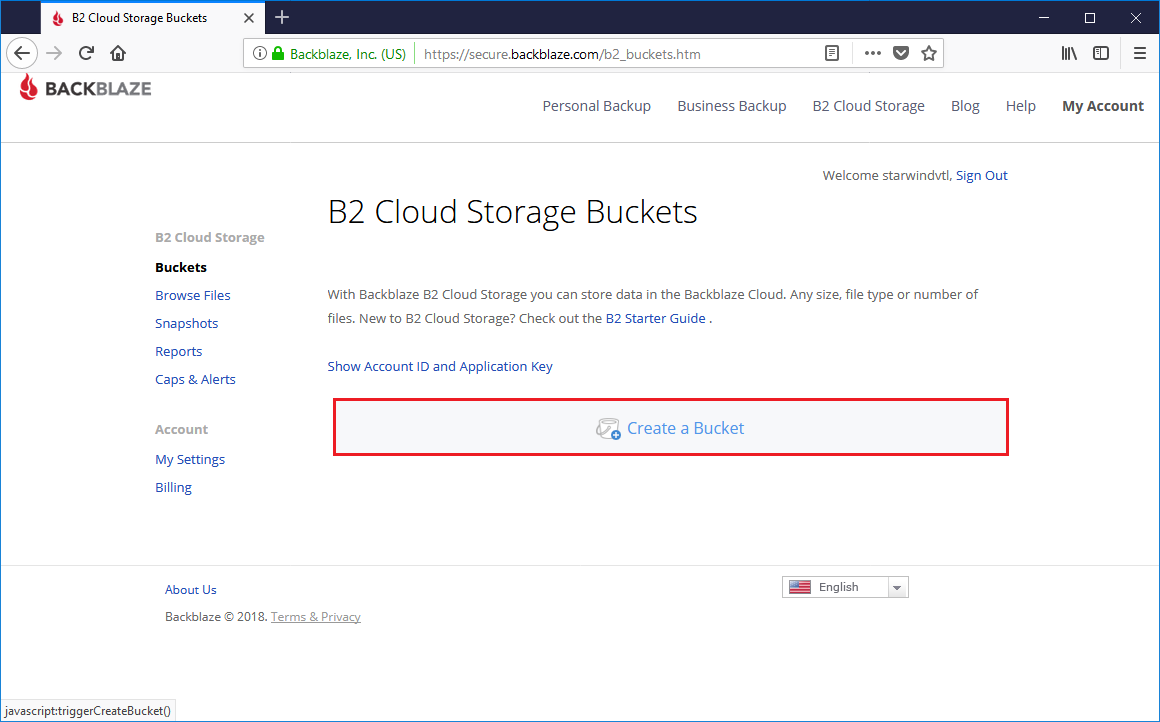
2. To get the Account ID and Application Key, sing into Backblaze B2 Cloud Storage, open Buckets and click on the Show Account ID and Application Key link.
 3. Click Create Application Key to get it.
NOTE: When you create a new application key, the old one will no longer work.
Creating Backblaze B2 Cloud Storage Bucket
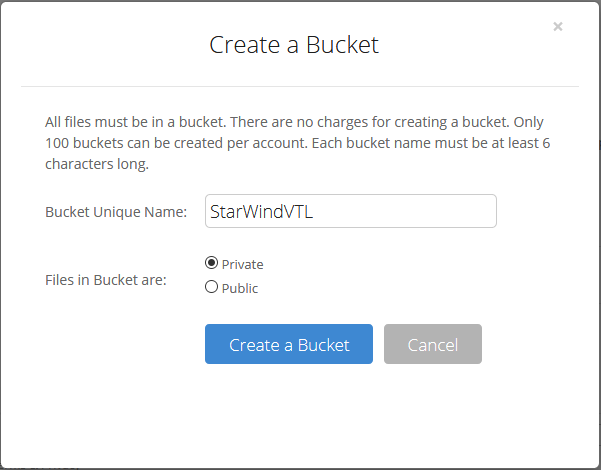
1. To create the B2 Cloud Storage Bucket, open the Buckets section and click on the Create a Bucket button.
 2. Specify a Bucket Unique Name and click on the Create a Bucket button.
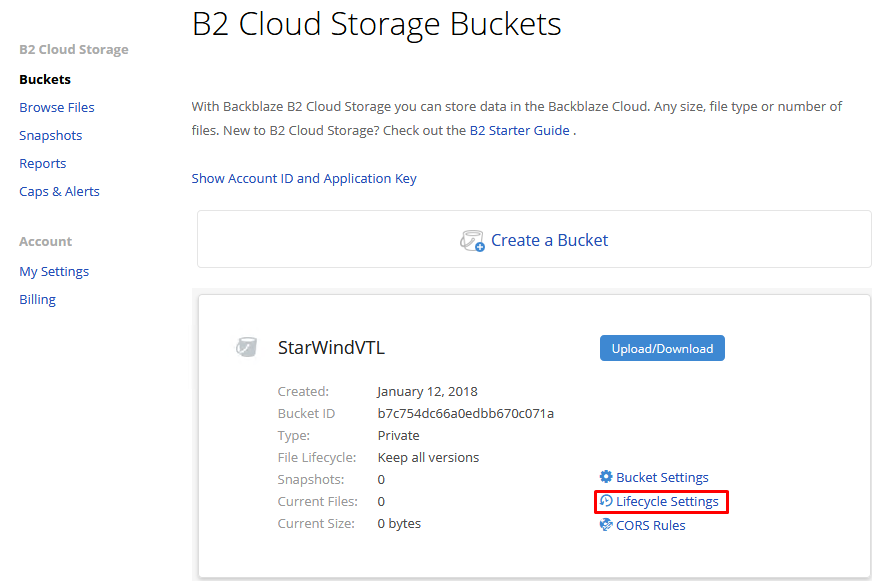
3. Once the bucket is created, click on the Lifecycle Settings button to specify the custom lifecycle rules.
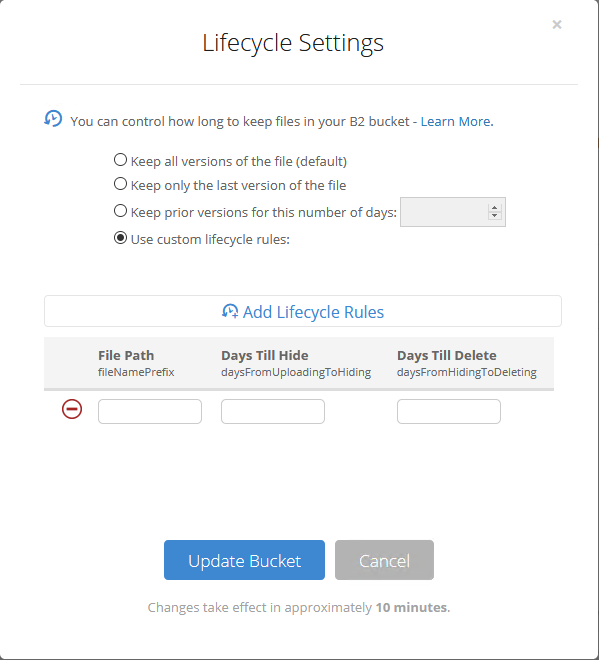
4. In Lifecycle Settings, choose Use custom lifecycle rules, edit rules, and click Update Bucket.
5. To proceed with configuring StarWind VTL Cloud Replication, please navigate to the Configuring Cloud Replication section.
Configuring Cloud Replication
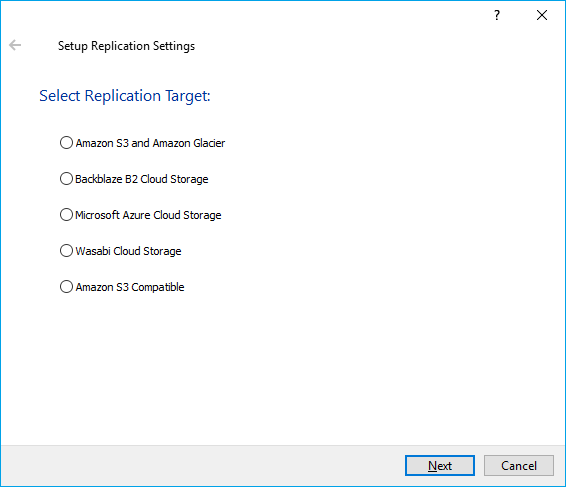
1. To enable the replication between StarWind and cloud storage, navigate to the VTL device and click Cloud Replication.
2. Choose the required cloud storage and click Next.
Amazon S3 and Amazon Glacier
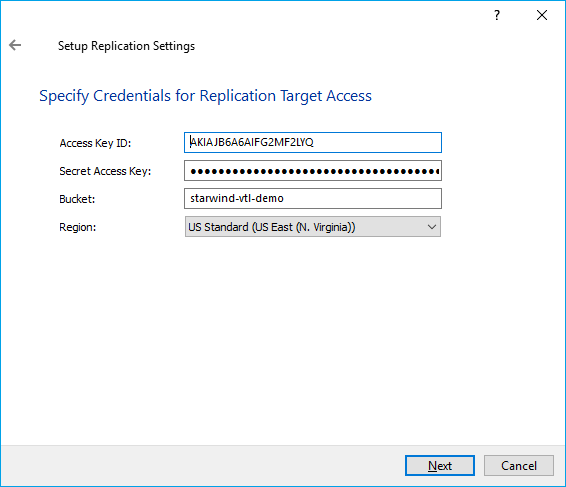
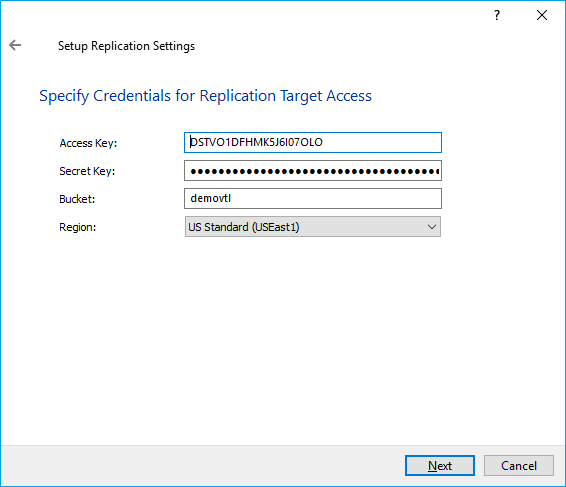
1. In the Replication Settings, specify Access Key ID, Secret Access Key, Bucket and Region obtained and configured previously and press the Next button.
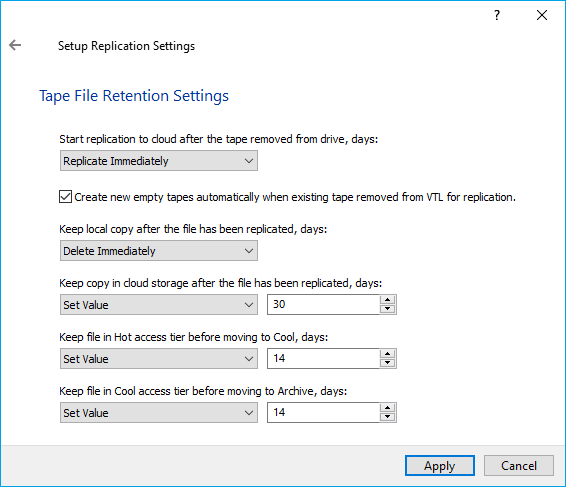
2. Specify Tape File Retention Settings and click Apply. Optionally, select Create new empty tapes automatically when the existing tape is exported for replication.

3. The automatic tape replication to the cloud storage is successfully configured according to the retention policy specified above.
IMPORTANT NOTE: Retention settings should be configured according to your corporate RTO and RPO requirements.
Backblaze B2 Cloud Storage
1. In the Replication Settings, specify Key ID, applicationKey, Bucket obtained and configured previously and press the Next button.

2. Specify Tape File Retention Settings and click Apply. Optionally, select Create new empty tapes automatically when the existing tape is exported for replication.

3. The automatic tape replication to the cloud storage is successfully configured according to the retention policy specified above.
IMPORTANT NOTE: Retention settings should be configured according to your corporate RTO and RPO requirements.
Microsoft Azure Cloud Storage
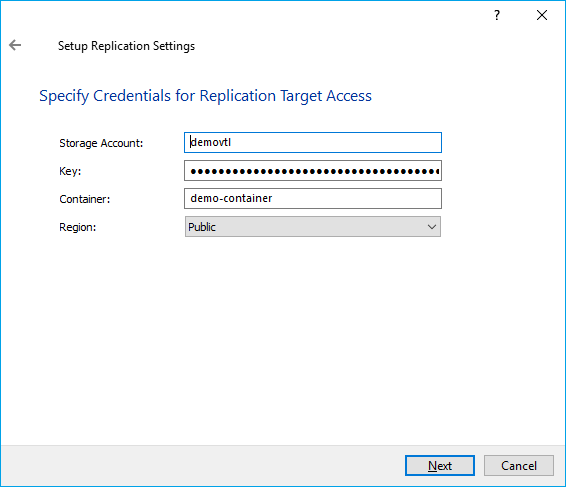
1. In the Replication Settings, specify Storage Account, Key, Container, Region obtained and configured previously and press the Next button.
2. Specify Tape File Retention Settings and click Apply. Optionally, select Create new empty tapes automatically when the existing tape is exported for replication.
3. The automatic tape replication to the cloud storage is successfully configured according to the retention policy specified above.
IMPORTANT NOTE: Retention settings should be configured according to your corporate RTO and RPO requirements.
Wasabi Cloud Storage
1. In the Replication Settings, specify Access Key, Secret Key, Bucket, Region obtained and configured previously and press the Next button.
2. Specify Tape File Retention Settings and click Apply. Optionally, select Create new empty tapes automatically when the existing tape is exported for replication.
3. The automatic tape replication to the cloud storage is successfully configured according to the retention policy specified above.
IMPORTANT NOTE: Retention settings should be configured according to your corporate RTO and RPO requirements.
Mounting VTL on the Backup Host
To pass-through the VTL device to the Windows server with the backup software provider, the corresponding VTL iSCSI target should be mounted first.
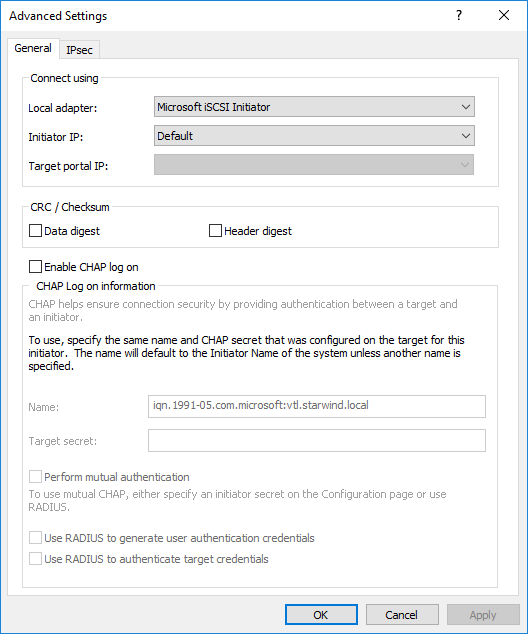
1. Open Microsoft iSCSI Initiator, navigate to the Discovery tab, and press the Discover Portal button.
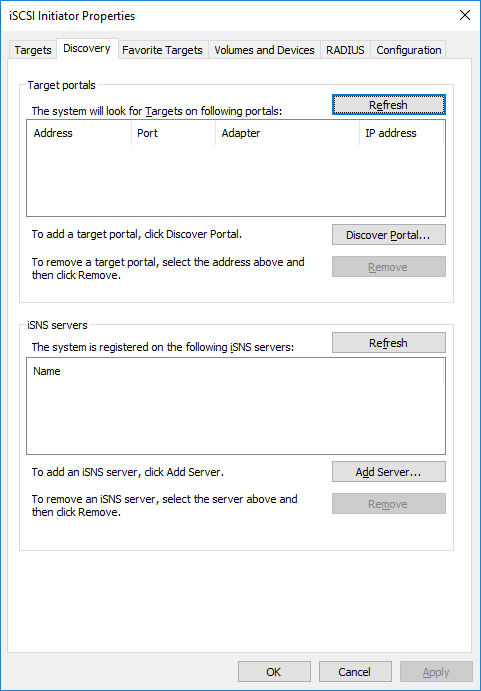
2. Enter the localhost address (127.0.0.1) and press the Advanced button.
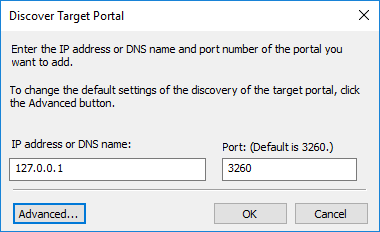
3. Select Microsoft iSCSI Initiator from the Local Adapter drop-down list and press OK.
4. The newly added Discovery Portal will appear in the list.
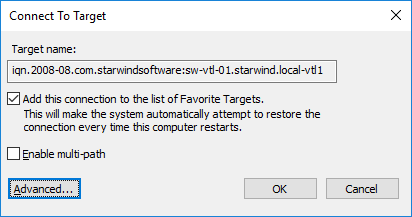
5. Navigate to the Targets tab, find the iSCSI target which corresponds to the StarWind VTL device, and press the Connect button.
6. Leave the Enable Multipath checkbox empty and press the Advanced button.
7. Set Local adapter as Microsoft iSCSI Initiator, specify 127.0.0.1 / 3260 as Target portal IP and double-click the OK button to complete the target connection.
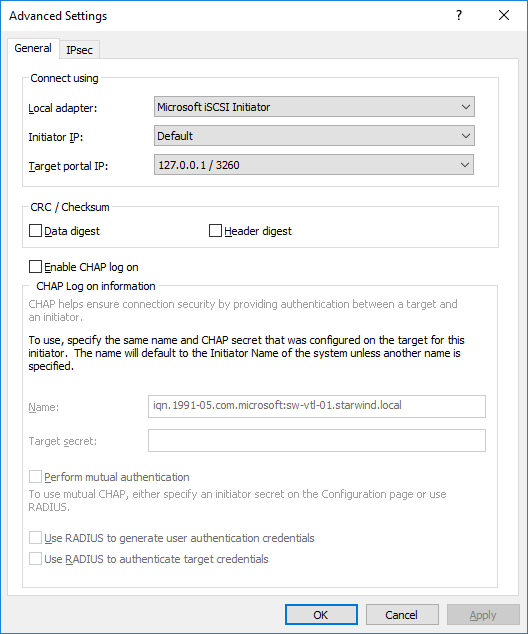
The VTL iSCSI target should be shown as Connected in the list.
Installing tape library drivers
It’s recommended to install the latest update driver from HP. The driver for HP MSL8096 can be downloaded here:
HPE StoreEver Tape Drivers for Microsoft Windows. The current version that supports Windows Server 2022 is 4.6.0.0. HP drivers must be installed on the host (localhost in this example) where StarWind VTL device is mounted via iSCSI.
1. Extract the downloaded driver and launch cpqsetup.exe.
2. Choose the Select All checkbox and click Install.
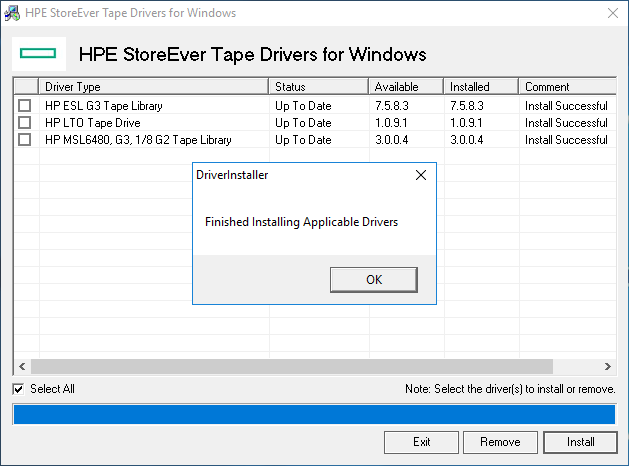
3. Once the drivers are installed, the Medium Changer devices is shown as Hewlett Packard MSL G3 Series library (x64 based).
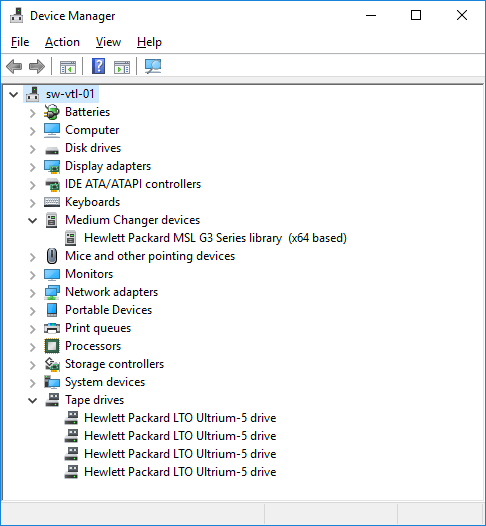
The tape library is ready to be added to the server with the backup software provider.
Backing Up to StarWind Virtual Tapes
Choose the required backup software provider to add StarWind Virtual Tape Library to:
Microsoft System Center Data Protection Manager
Adding StarWind VTL Device to Microsoft SCDPM
In case of any question regarding Microsoft SCDP deployment, please refer the following link:
https://docs.microsoft.com/en-us/system-center/dpm/install-dpm?view=sc-dpm-1807
1. DPM automatically detects tape devices that are attached to it and they are displayed in the Libraries workspace of the Management view. If the tape isn’t displayed, it can be detected manually with the Rescan button.
2. After the rescan, check that the details displayed in Device Manager and in the tape library are the same.

3. To add more tapes, select the tape library in the Libraries workspace of the Management view, and then click Add.
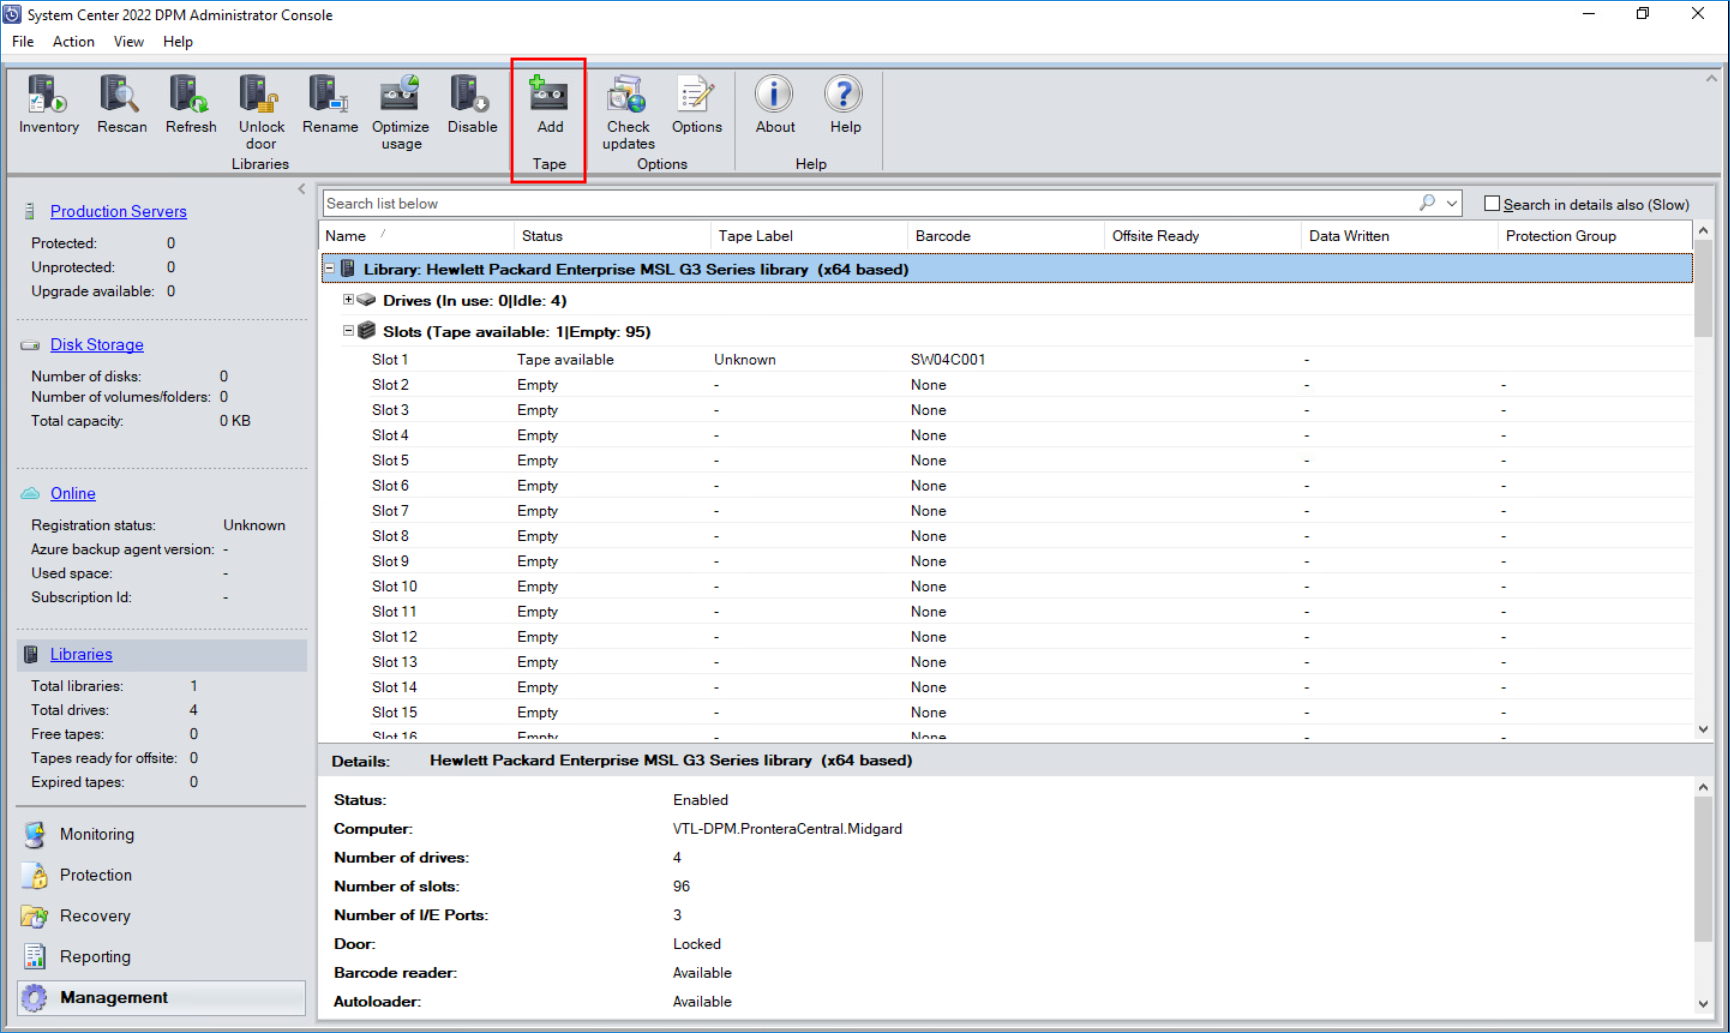
4. The I/E port door named “Hewlett Packard MSL G3 Series library” will be opened, and more tapes can be created using StarWind management console as described in the previous steps.
NOTE: Do not press OK in case more tapes need to be created.

NOTE: While adding/removing tapes to the tape library using the Unlock library door or Add tape, DPM will automatically inventory the library.
While adding/removing tapes to the tape library without using Unlock library door or Add tape, the Inventory library action must be used to update the information in DPM Administrator Console.
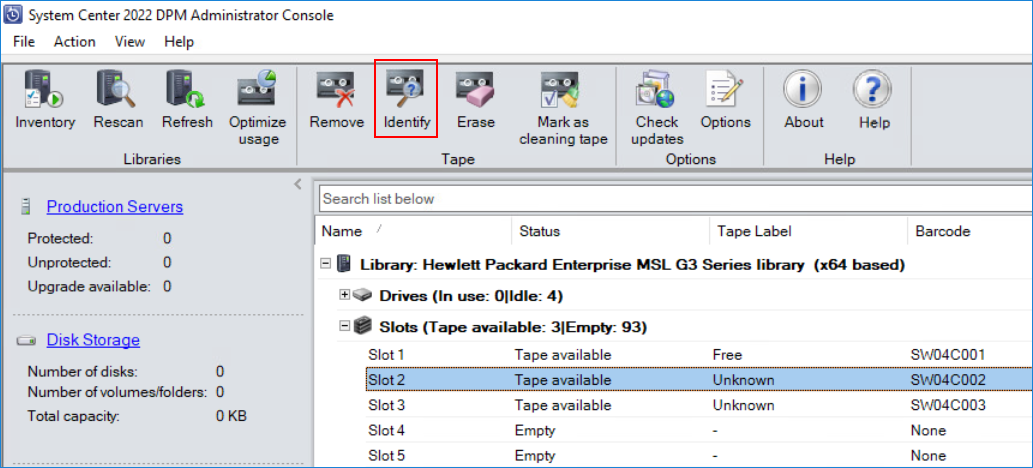
5. Once the tapes are created using StarWind management console, press OK. DPM will detect the newly added tapes as shown in the screenshot.

6. Prior to using the newly added tapes, Identify the “Unknown” tapes so they become “Free” and ready to be used.
Configuring protection group for DPM
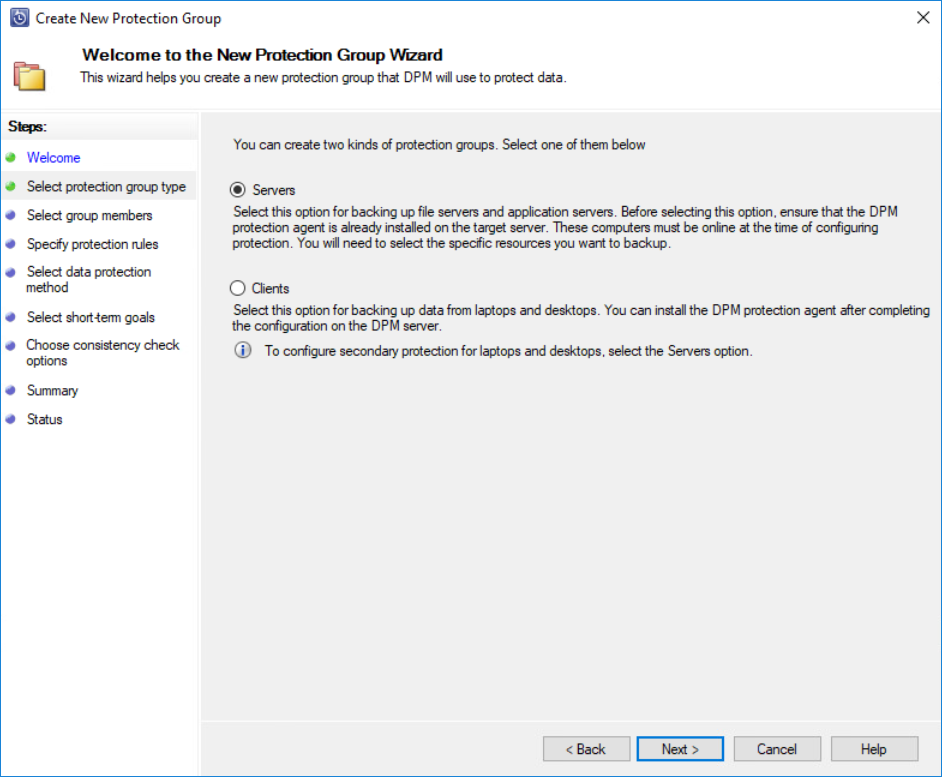
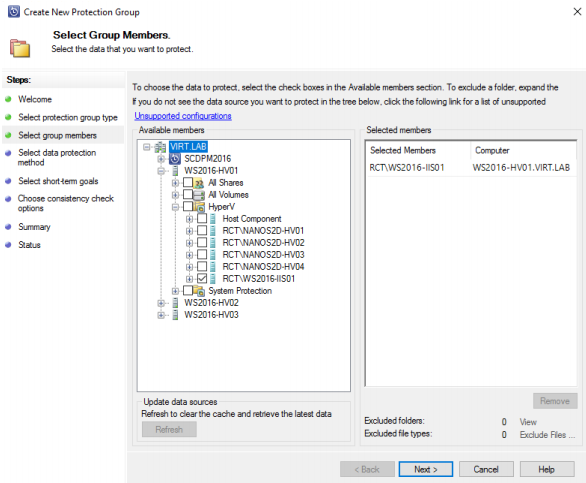
1. Open DPM Management Console in the Protection workspace of the Management view, and then click New+
2. Select the required backup option (Servers / Clients).
3. Choose the data that needs to be protected.
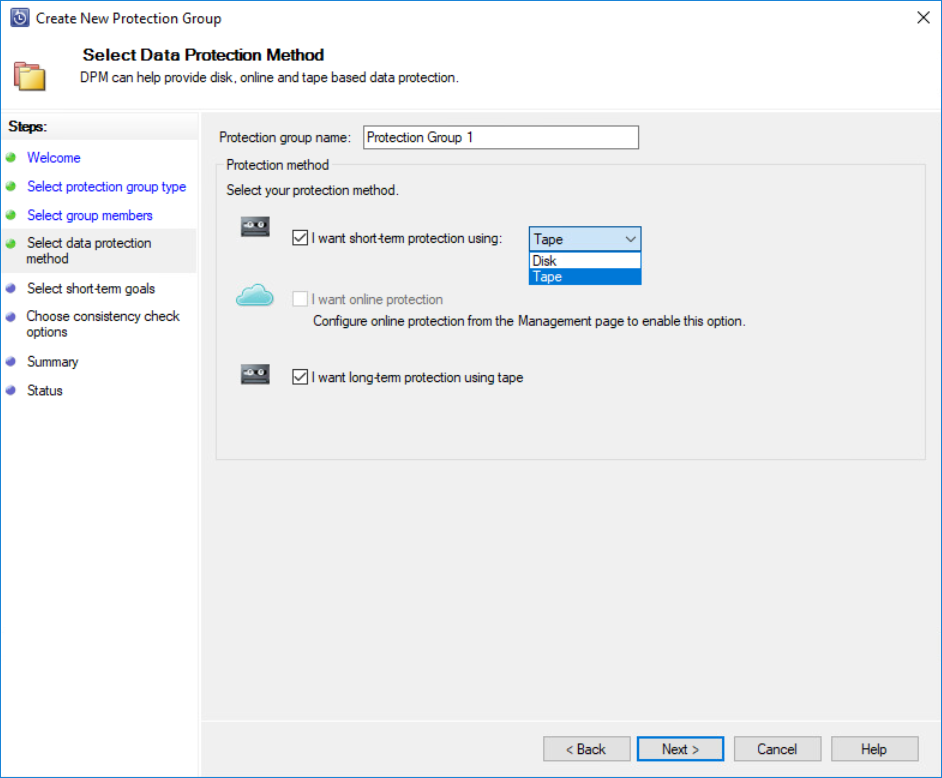
4. In Protection Group Wizard, select the required protection option:
• short-term protection (Disk / Tape)
• long-term protection (Tape)
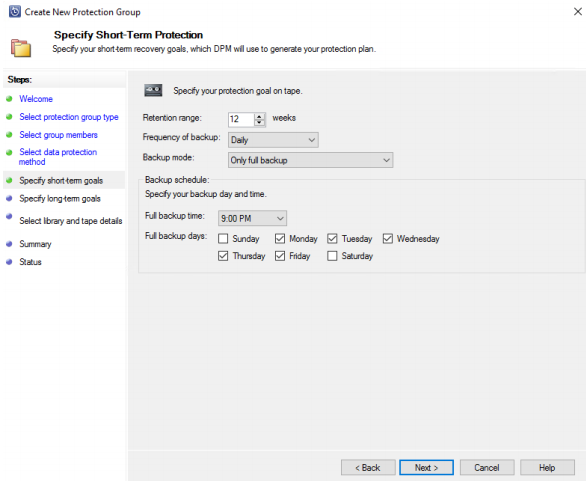
5. In Protection Group Wizard, specify the short-term goals.
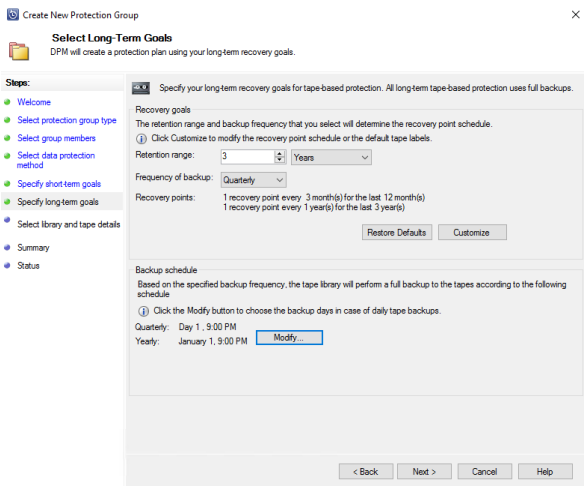
6. Specify the required Long-Term Goals.
7. Specify the required Library and Tape Details.
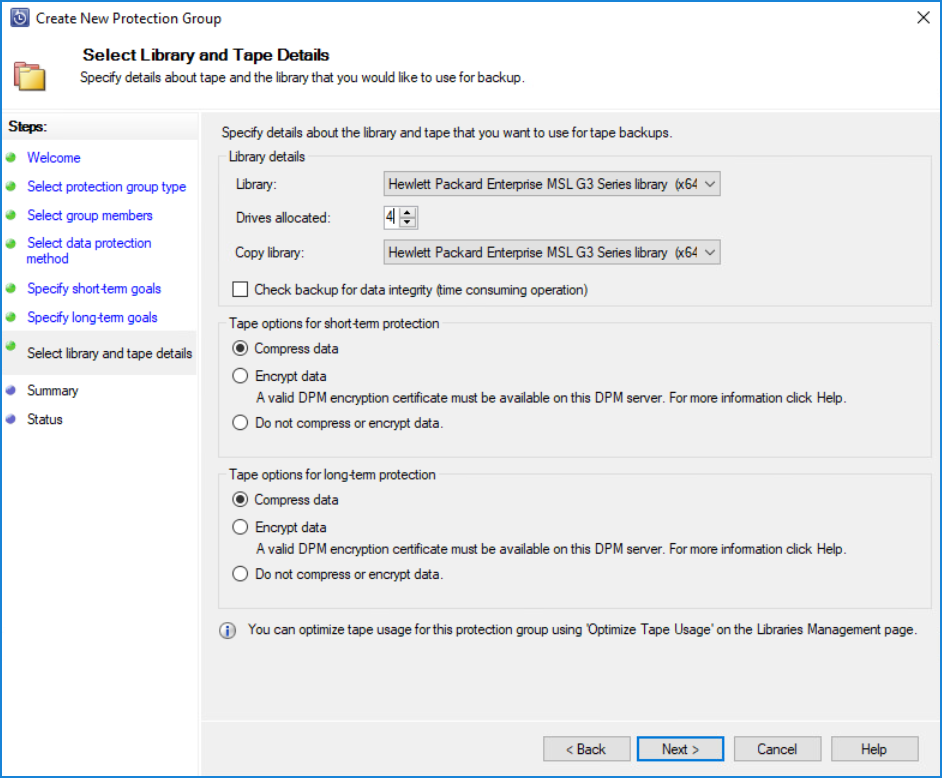
8. Review the Summary and click Create Group.
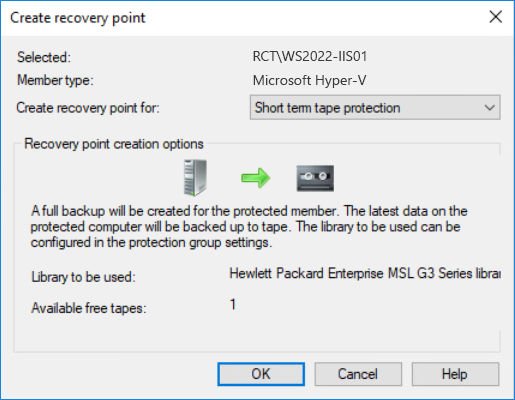
9. To create a manual recovery point, navigate to the Protection workspace of the Management view, right-click on the protected item and select Create recovery point… Select Short term tape protection or Long term tape protection.
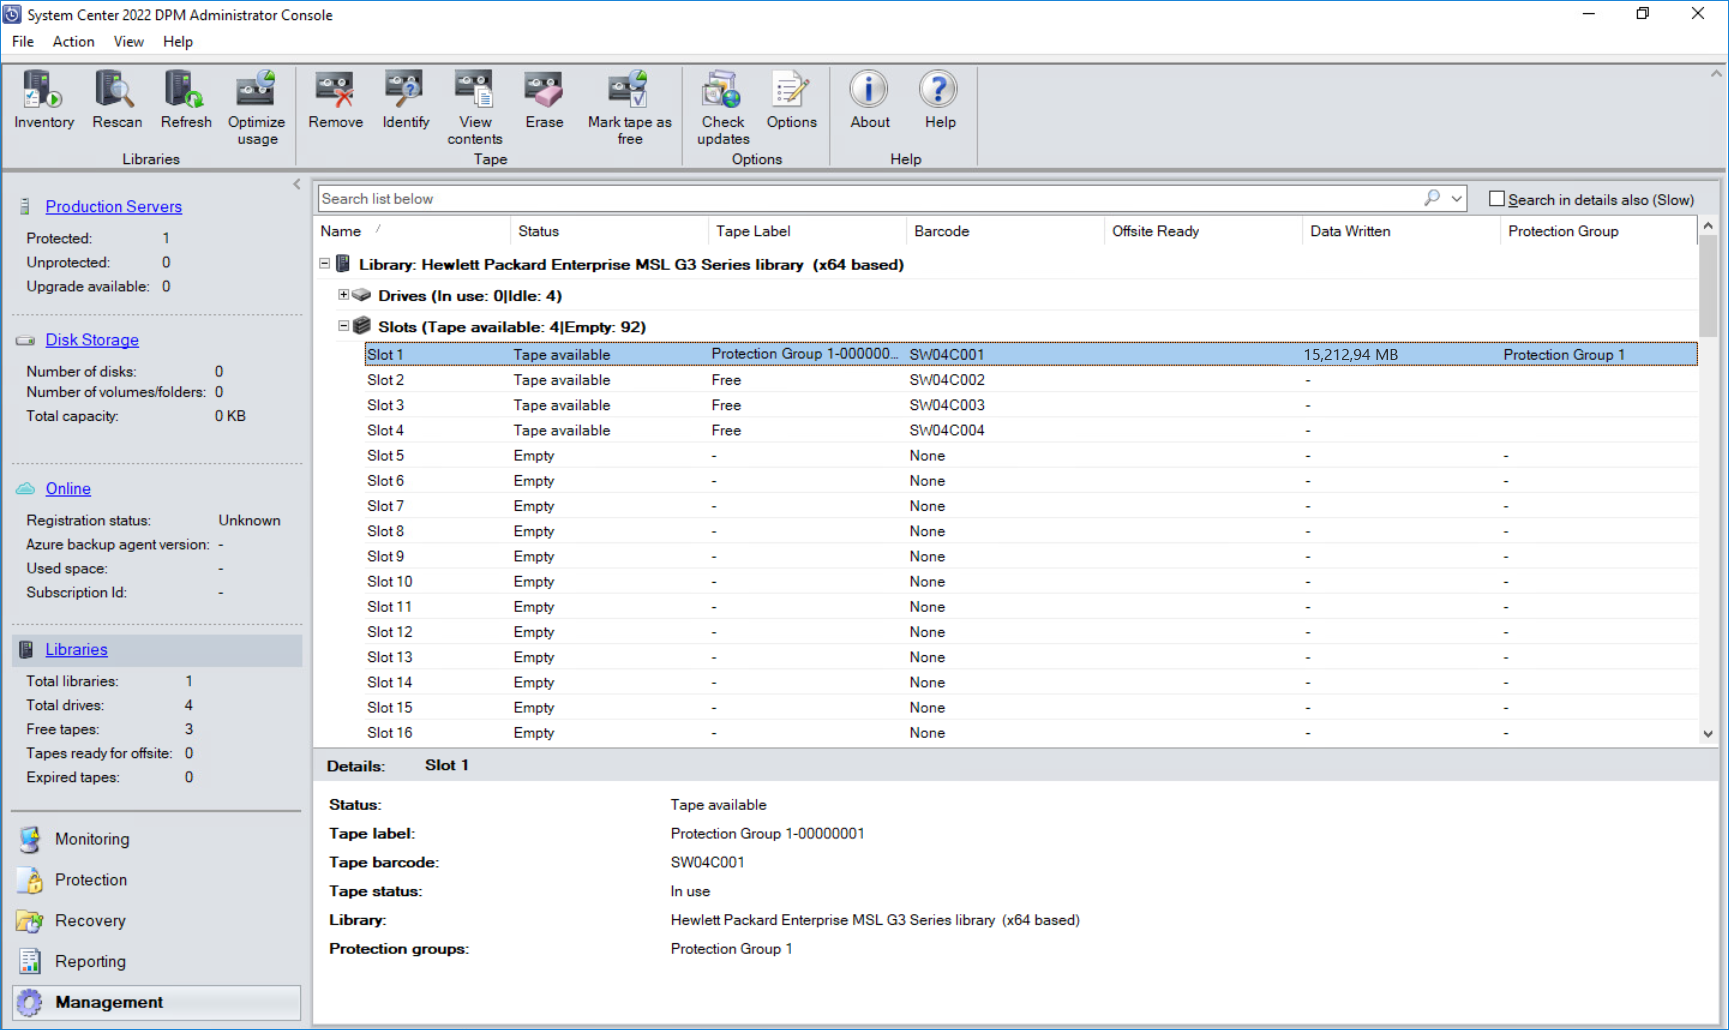
10. Open the Libraries workspace of the Management view, the protection group named “Tape Protection Group 1” is assigned to slot 1.
Restoring data from tape
1. Make sure that the tape library is online and does not report any errors; this can be done by verifying the alerts in the Monitoring view of the DPM console or in the Libraries workspace of the Management view of the DPM console.
2. In the DPM console, go to Recovery and choose the data source to recover.
3. Mark the data source and choose the data and time for the restore. Right-click on the data source and choose Recover… to start the Recovery wizard.
4. In the Review Recovery Selection wizard, review the data source that is chosen for recovery and click on Next to continue.
5. In the Select Recovery Type wizard, choose one of the recovery options:

6. To recover data as a virtual machine, select Recover as virtual machine to any host option.
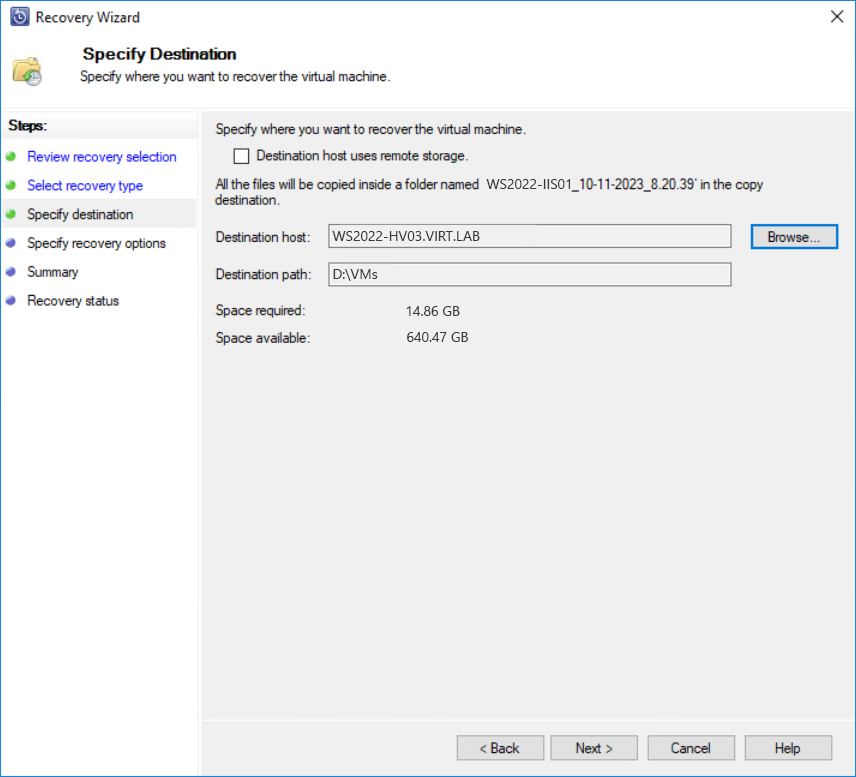
7. In the Specify Destination wizard, select the location to recover the virtual machine to.
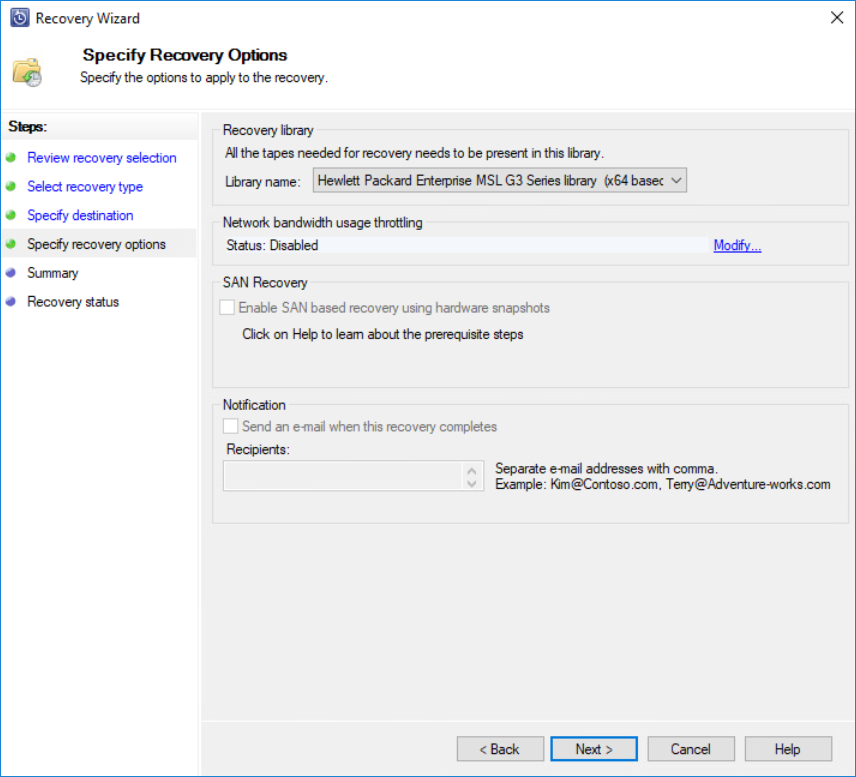
8. In the Specify Recovery Options wizard, configure specific options for the recovery.
NOTE: Make sure to choose the library that hosts all the tapes that are needed for the recovery.
9. In the Summary step, verify the recovery settings, and click Recover to start the process of recovering the virtual machine to a different host.
NOTE: DPM uses a scratch before it sends the data to the selected data source. It is very important that the DPM %systemdrive% server has more than 10 GB of free disk space.
DPM supports item-level recovery (ILR), which allows performing a specific recovery of files, folders, volumes, and virtual hard disks from a host-level backup of Hyper-V virtual machines to a network share or a volume on a DPM protected server. However, ILR is not supported when restoring from tapes. Only an entire VM or a single virtual hard disk can be restored.
10. To restore files from the cloud storage, please navigate to the Restoring tapes from the cloud storage section.
Veeam Backup & Replication
Please refer to the following guide if having any questions about Veeam Backup & Replication deployment:
https://www.veeam.com/documentation-guides-datasheets.html?ad=menu-resources
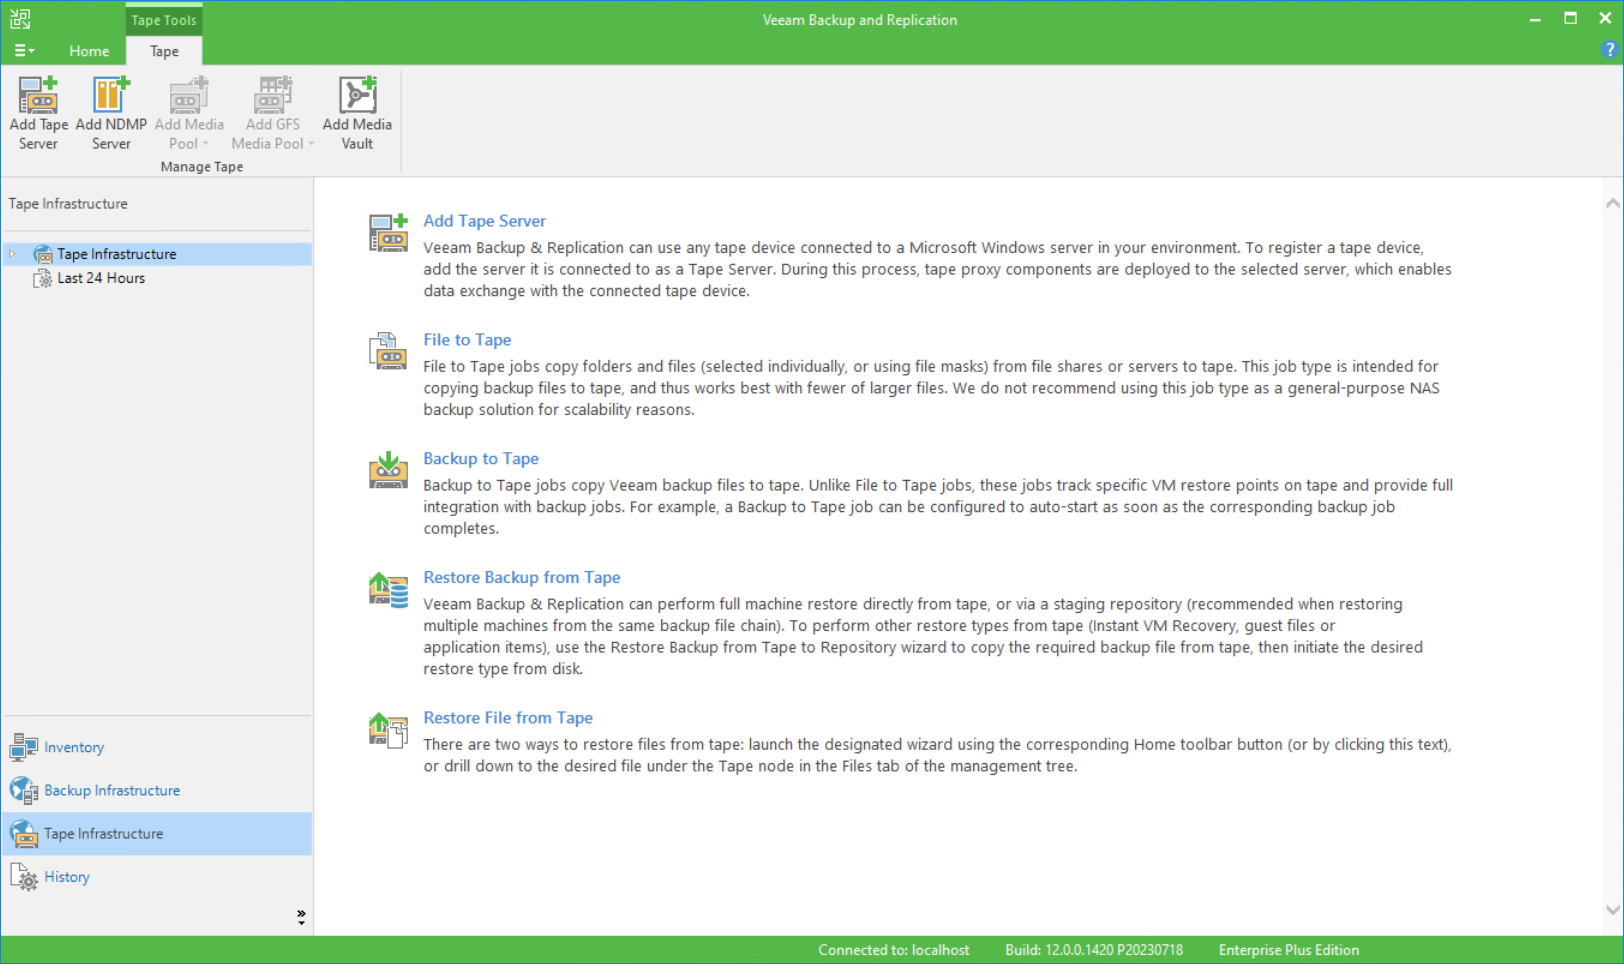
1. Open the Veeam Backup & Replication console. Open the Tape Infrastructure tab.
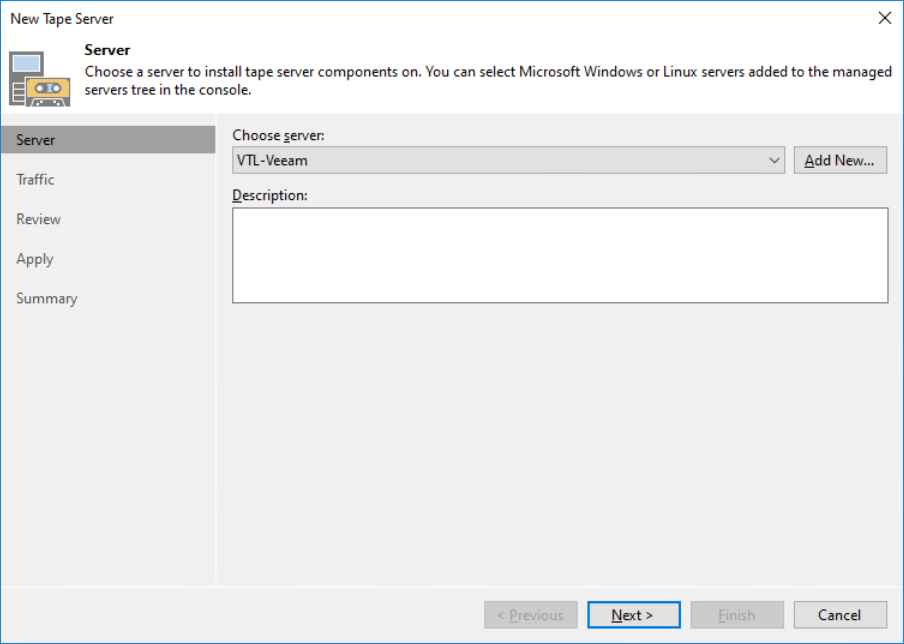
2. Open the Add Tape Server wizard. Choose the local server and press Next.
3. Complete the wizard, select Start tape library inventory when I click Finish and press the Finish button.
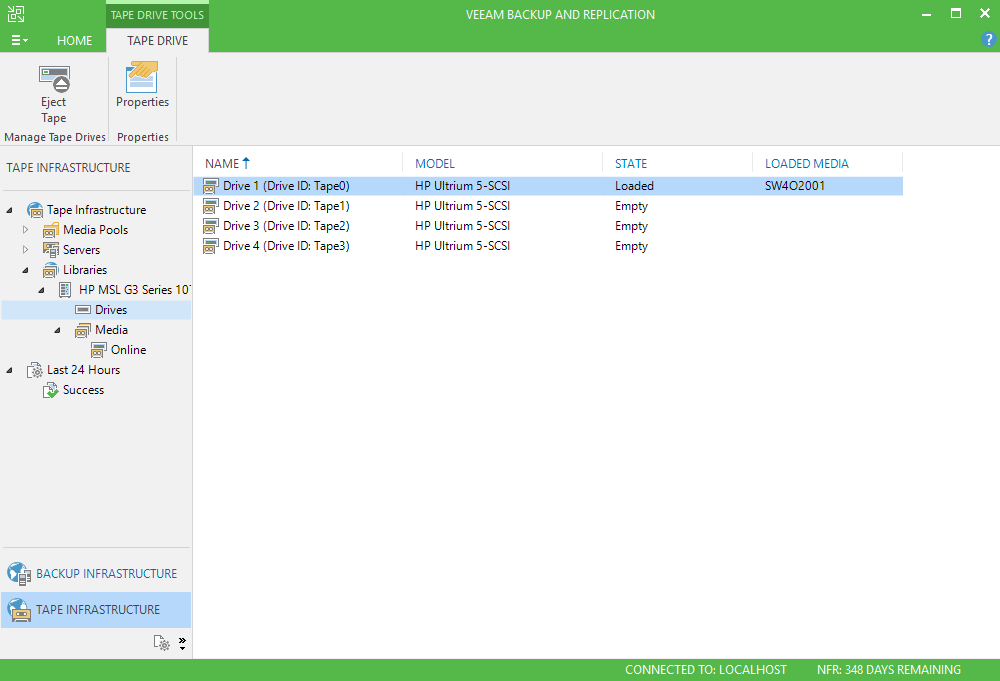
4. After Tape Inventory job is finished, the newly added tape library device will appear.
 NOTE: You can also configure Backups to Tape Job. For more details, please refer to the following link: https://helpcenter.veeam.com/docs/backup/vsphere/creating_backup_to_tape_jobs.html?ver=95
5. Before using the new tape, erase it. To erase tapes, click Media and right-click the required tape to erase.
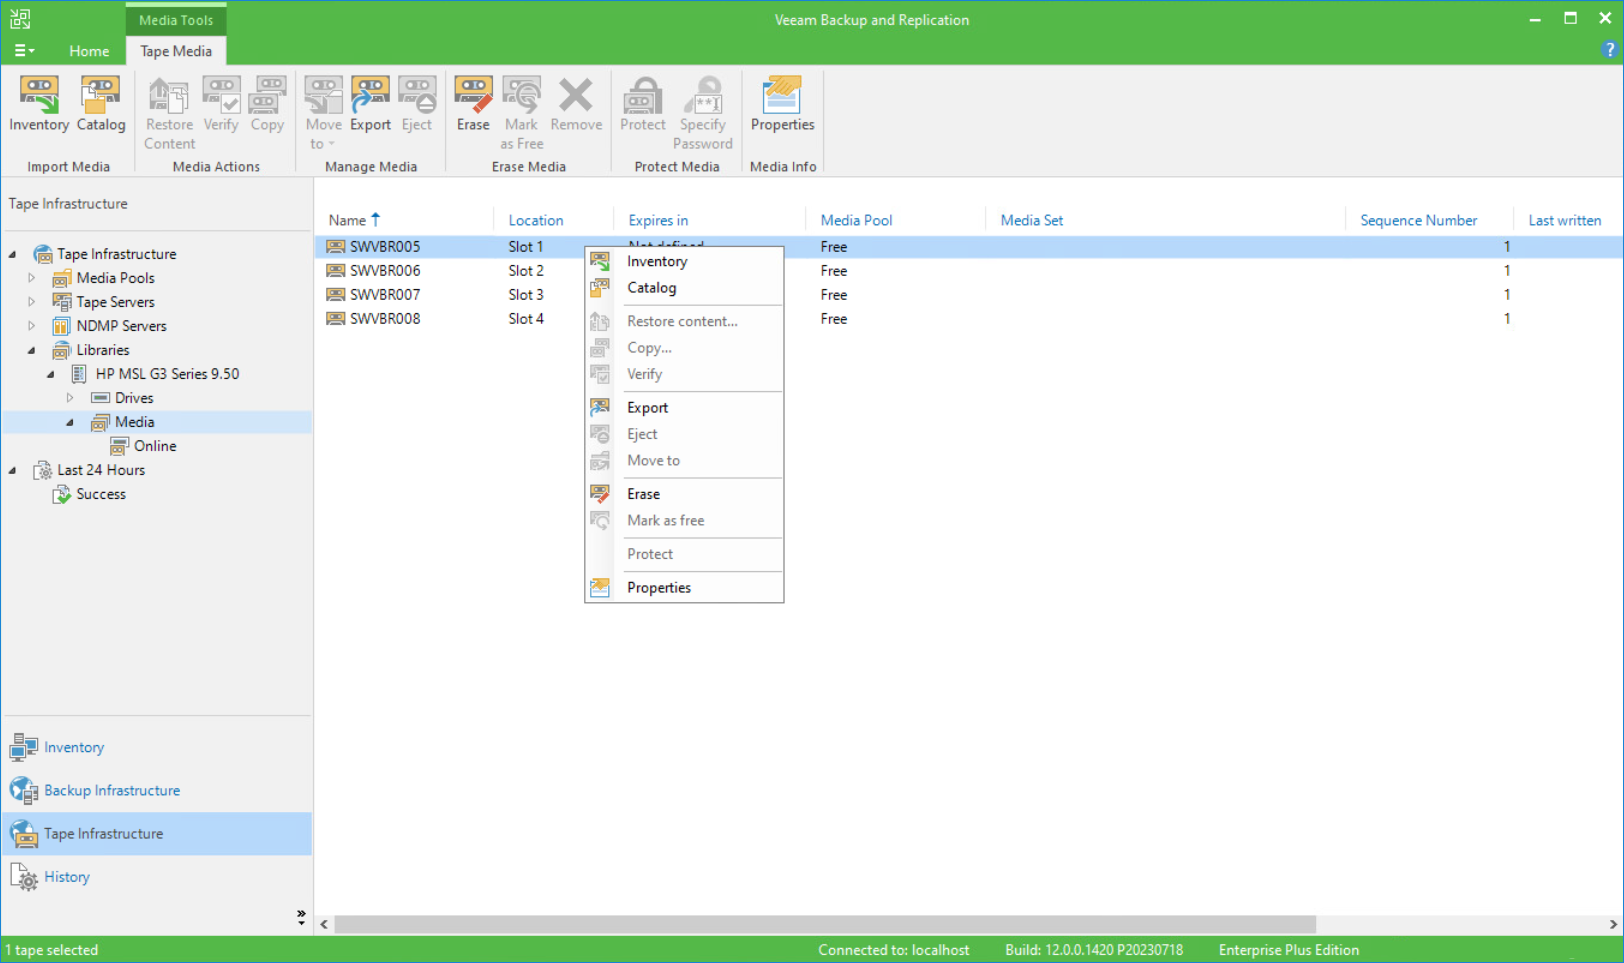 The tape will be loaded into Drive.
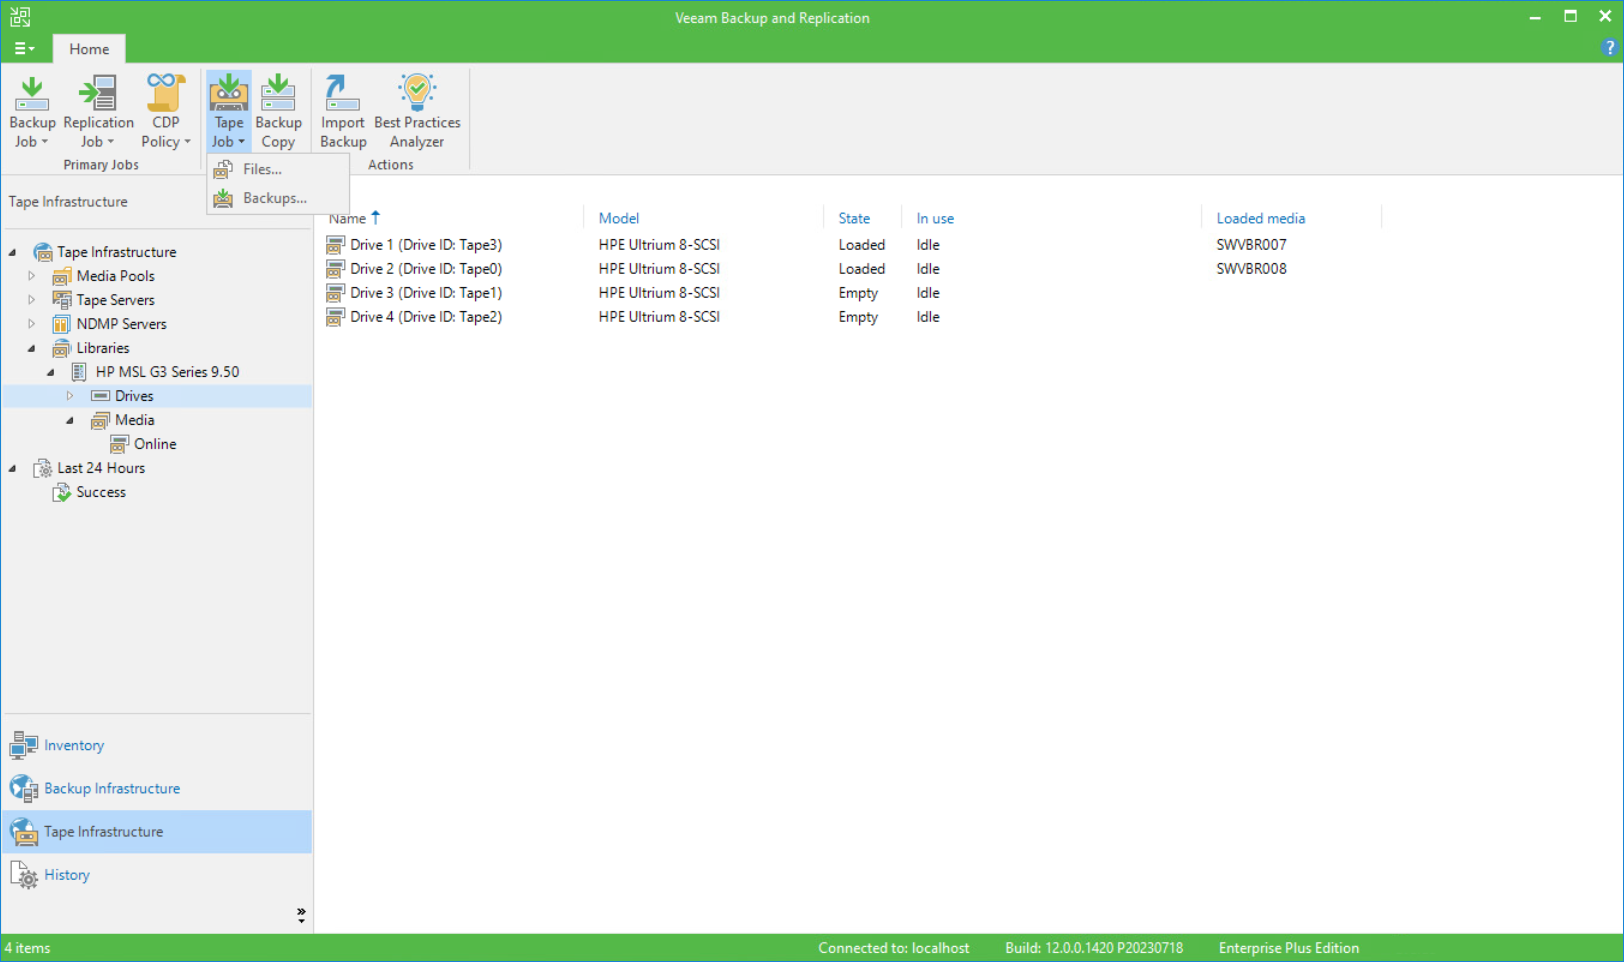
6. Navigate to the Home tab, click Tape Job and select Files to run the File to Tape job wizard.
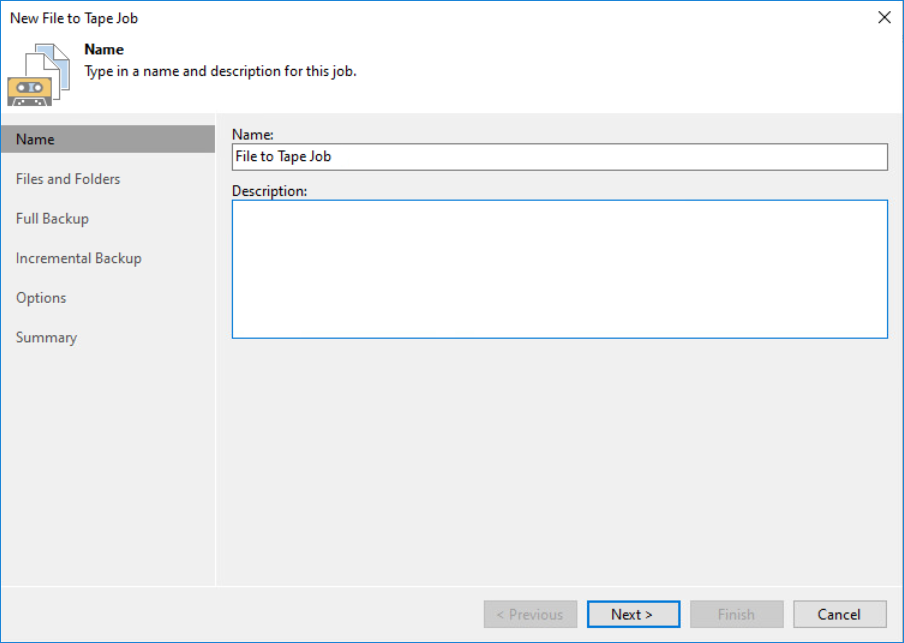
7. Specify the job name and description in the appeared window, and press Next.
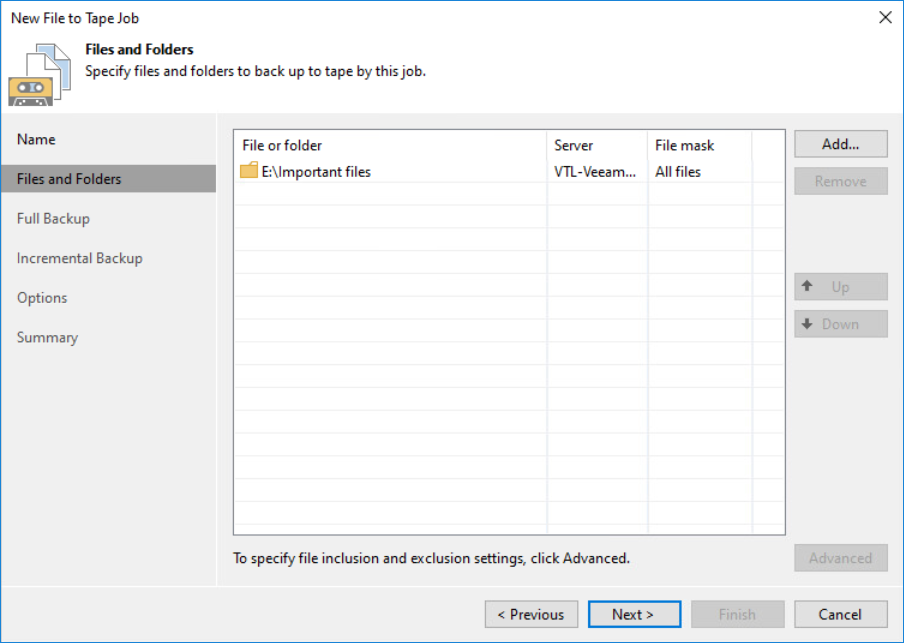
8. Choose files to be backed up and press Next.
9. Press Add New to add the new Media Pool.
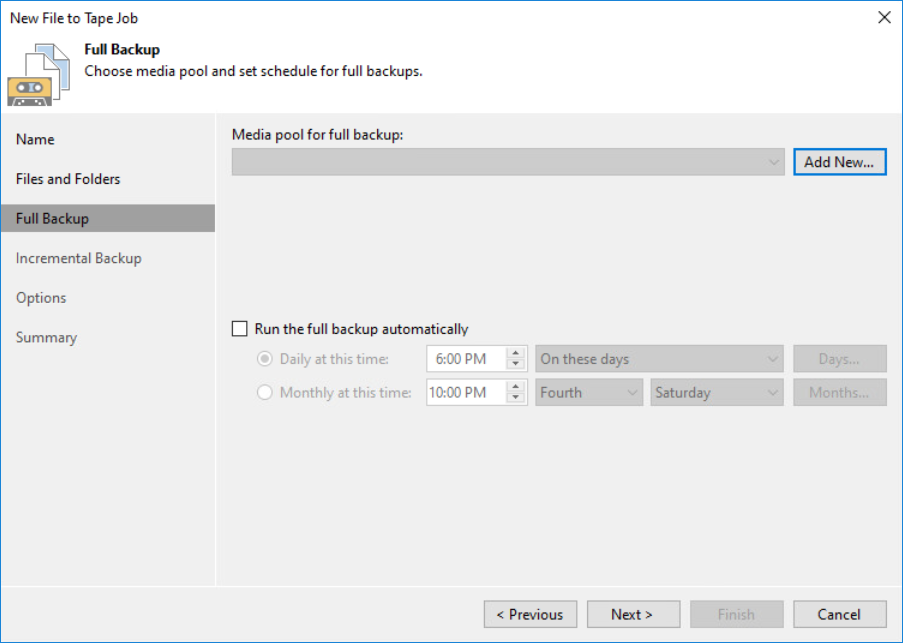
10. The New Media Pool wizard will appear. Specify the name and description of the new Media Pool and click Next.
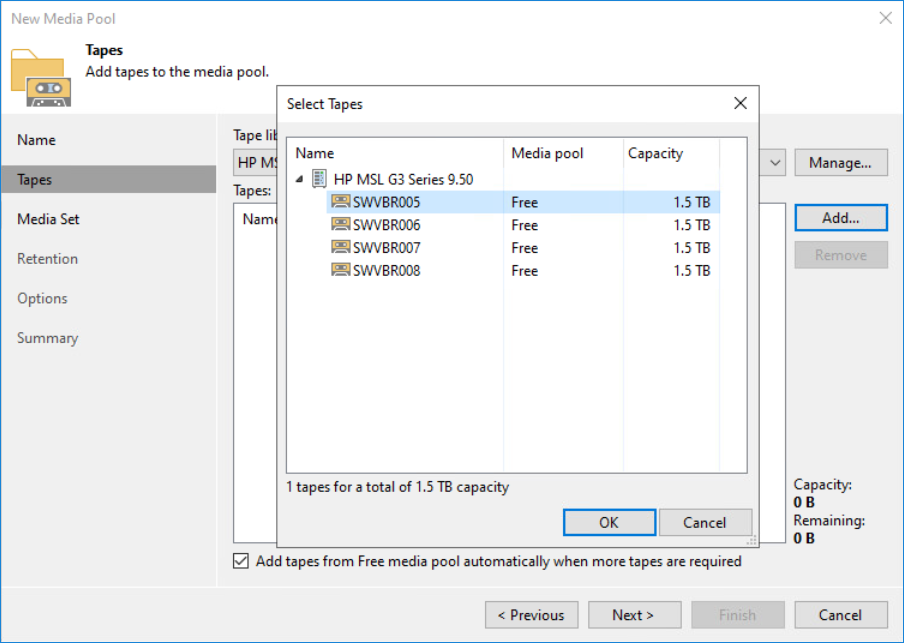
11. Add the existing tape(s) to the Media Pool, click OK and Next to select the tapes.
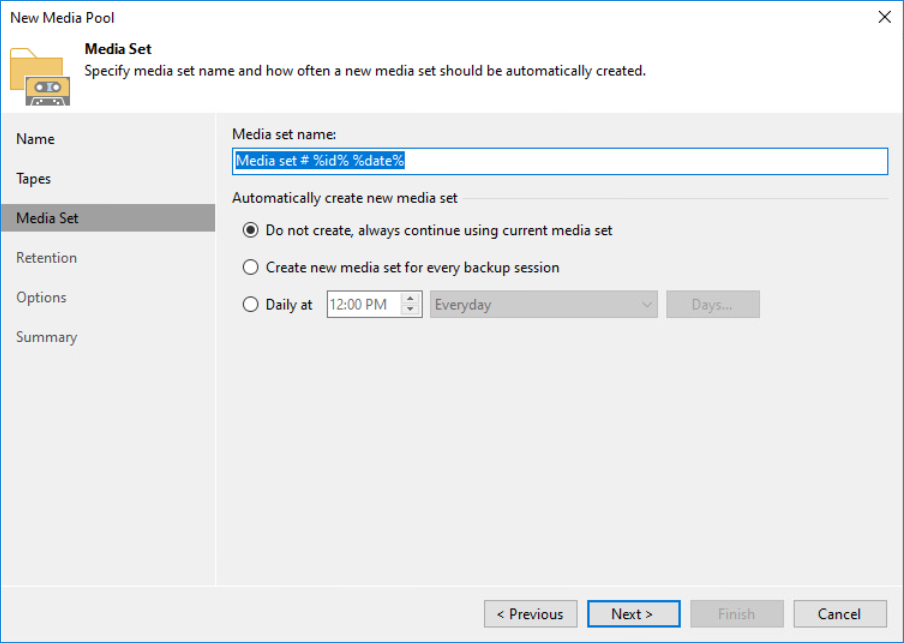
12. Specify the Media Set name, configure additional settings if necessary, and click Next.
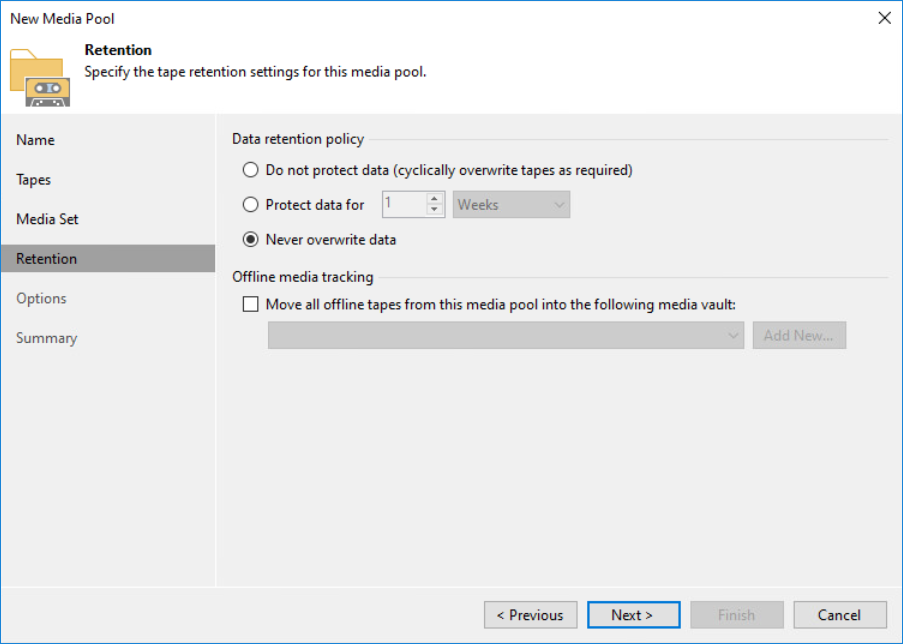
13. Specify the preferred retention settings if necessary and press Next.
14. Specify the additional options if necessary and click the Apply button.
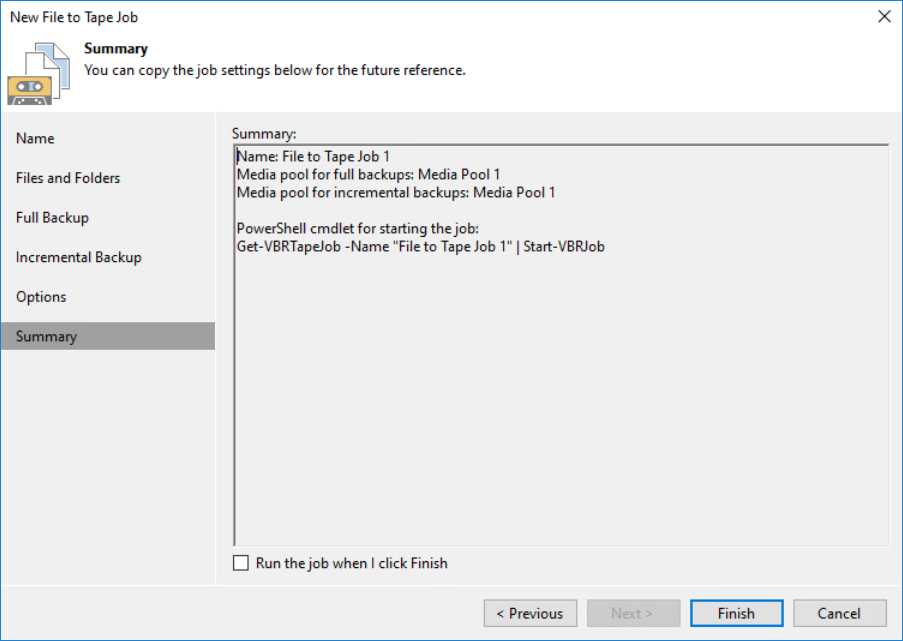
15. Review the Summary and press Finish.
16. Move back to the New File to Tape Job wizard and press Next to continue.
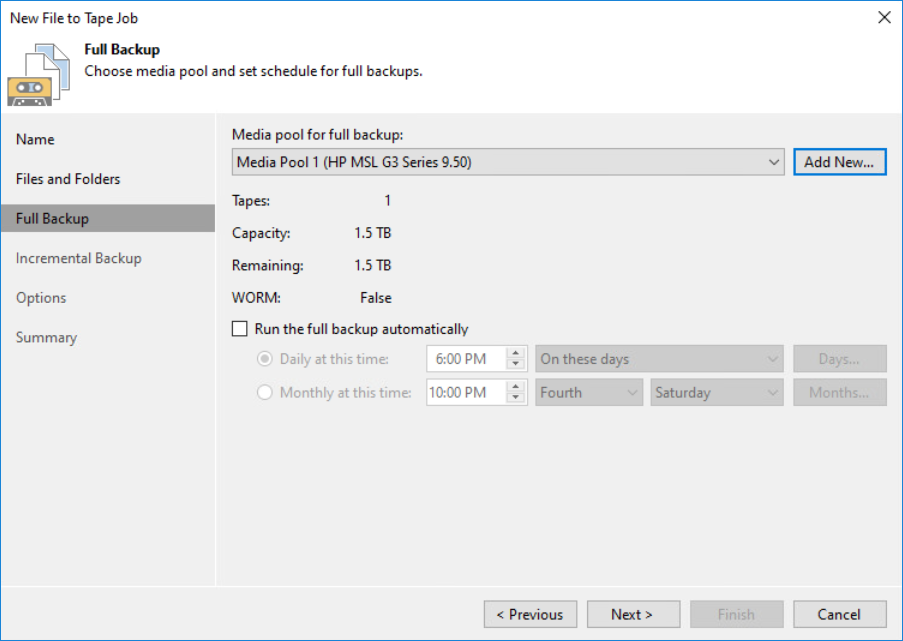
17. Configure the Incremental Backup schedule if necessary. Choose the same Media Pool or add the new Media Pool for the incremental backups.
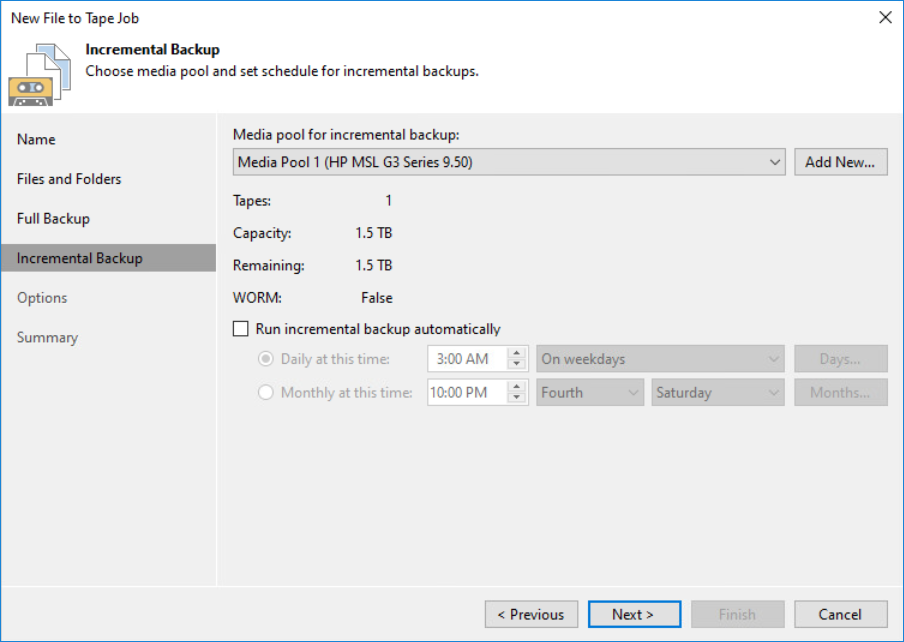
Press Next to proceed.
18. In the Options tab, specify the additional settings and check the Export current media set upon job completion box to allow the automatic tape offload to cloud storage after backup job is completed. It is also recommended to Eject media upon job completion. Click Apply.
 19. Review the summary, select the Run the job when I click Finish checkbox if the backup job needs to be run right away, and click Finish.
20. The job status and progress can be checked in the History tab.

21. After the job is finished, the tape is automatically ejected, exported, and marked as Offline according to job settings configured above.
20. Since the tape was automatically exported upon job completion and StarWind VTL Replication policy was set to Replicate Immediately, the replication process to the cloud storage has started automatically. The progress can be checked in StarWind Management Console using the Offline Shelf overview.

NOTE: In order to automate moving newly created tapes to free media pool in Veeam Backup & Replication, please follow the instructions in this KB article.
NOTE: The tape can be kept in its tape library slot upon backup job completion and offloaded to the cloud storage later. For this purpose, use the disable Export current media set upon job completion and Eject media upon job completion options in File to Tape Job settings using Veeam Backup & Replication Console.
21. After the backup job is finished, in the Veeam B&R console, navigate to Tape Infrastructure –>Libraries -> Media –> Online and choose the tape to upload, right-click it, and press Export. The tape will be automatically offloaded to the cloud storage according to the specified Retention Settings of StarWind VTL.
22. When the tape is successfully uploaded to the cloud, the tape location status in Offline Shelf overview will be marked as Cloud.

23. If the local copy of the tape is not removed after replication, but already moved to Offline Shelf, it can be inserted back into the library by clicking the Insert button.
To restore files from the cloud storage, please navigate to Restoring tapes from the cloud storage section.
Veritas Backup Exec™
Adding StarWind VTL Device to Veritas Backup Exeс™
In case of any question regarding Veritas Backup Exec™ deployment, please refer the following link:
https://www.veritas.com/content/support/en_US/doc/59226269-99535599-0/v59899992-99535599
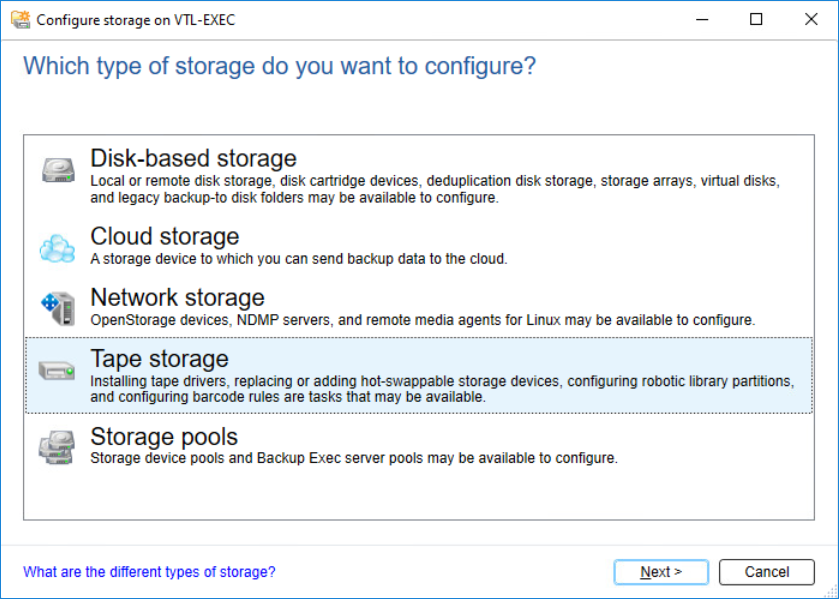
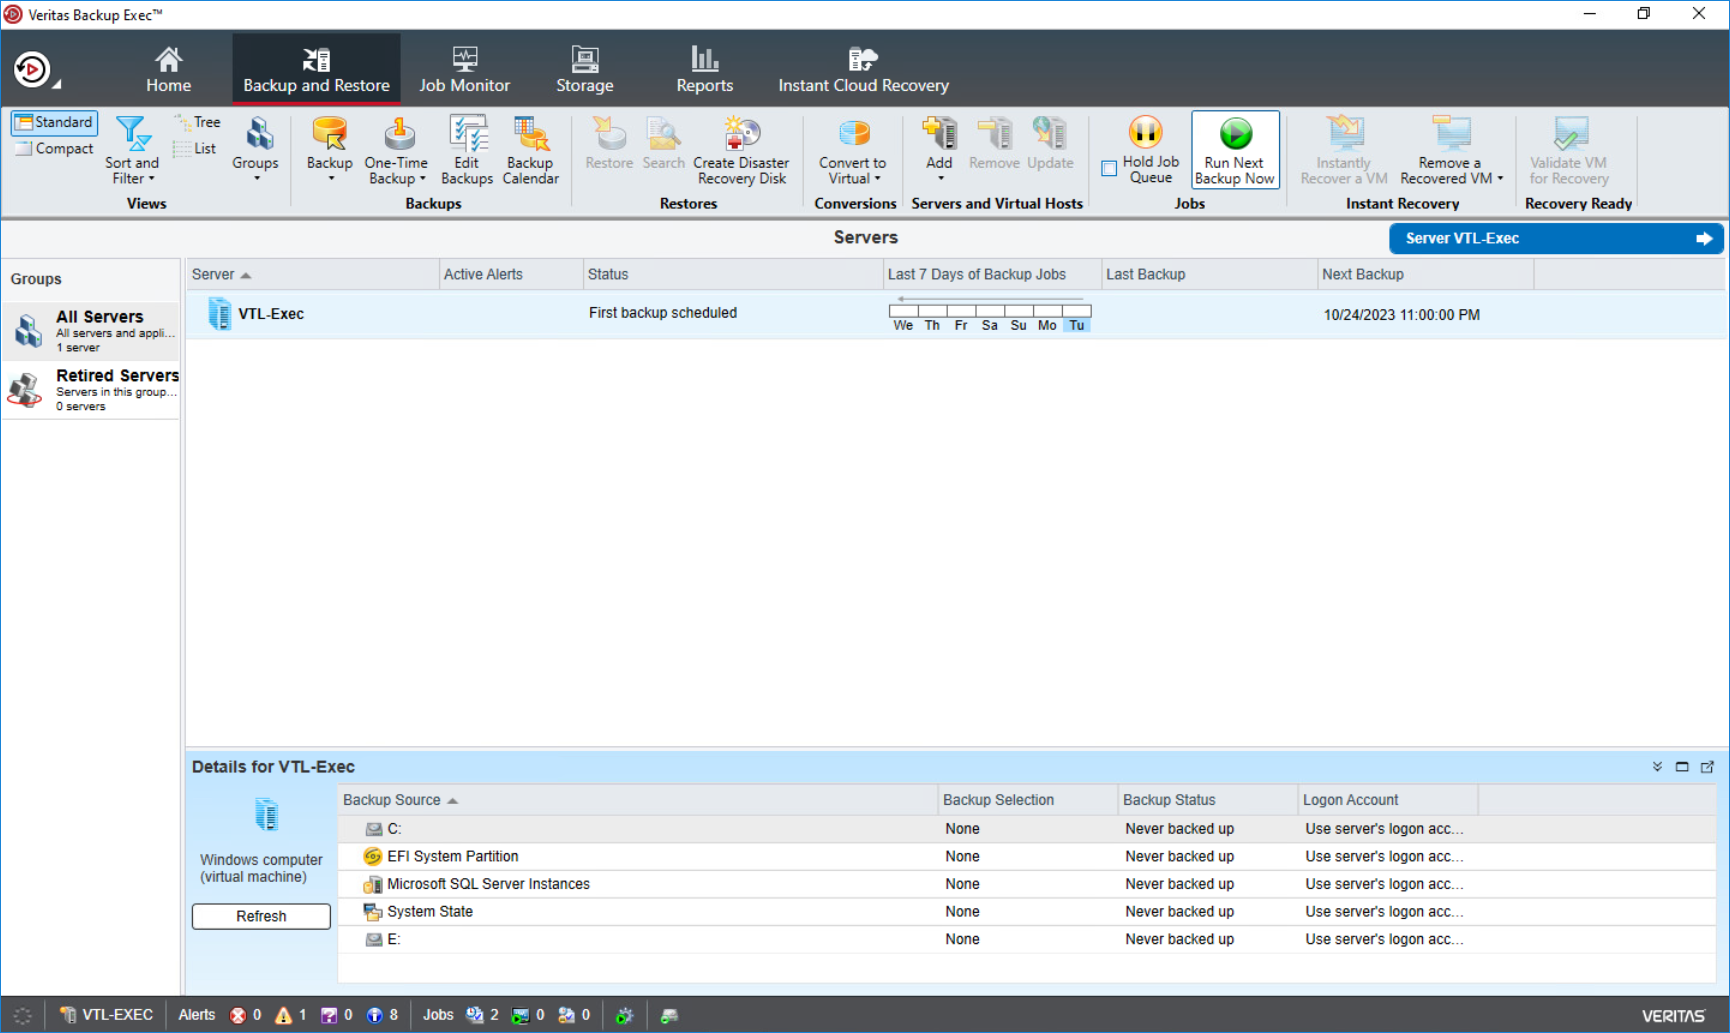
1. In Veritas Backup Exec™ console, click the Storage tab and Configure Storage.

2. In the opened window, select Tape storage and click Next.
3. Select Run the Hot-swappable Device Wizard and click Next.
4. Follow the steps suggested by Hot-Swappable Device Wizard and to complete it.
NOTE: If the tape device has not appeared in the Storage tab, initiate the restart.
5. Double-click Slots to scan, erase, inventory and catalog the tapes.
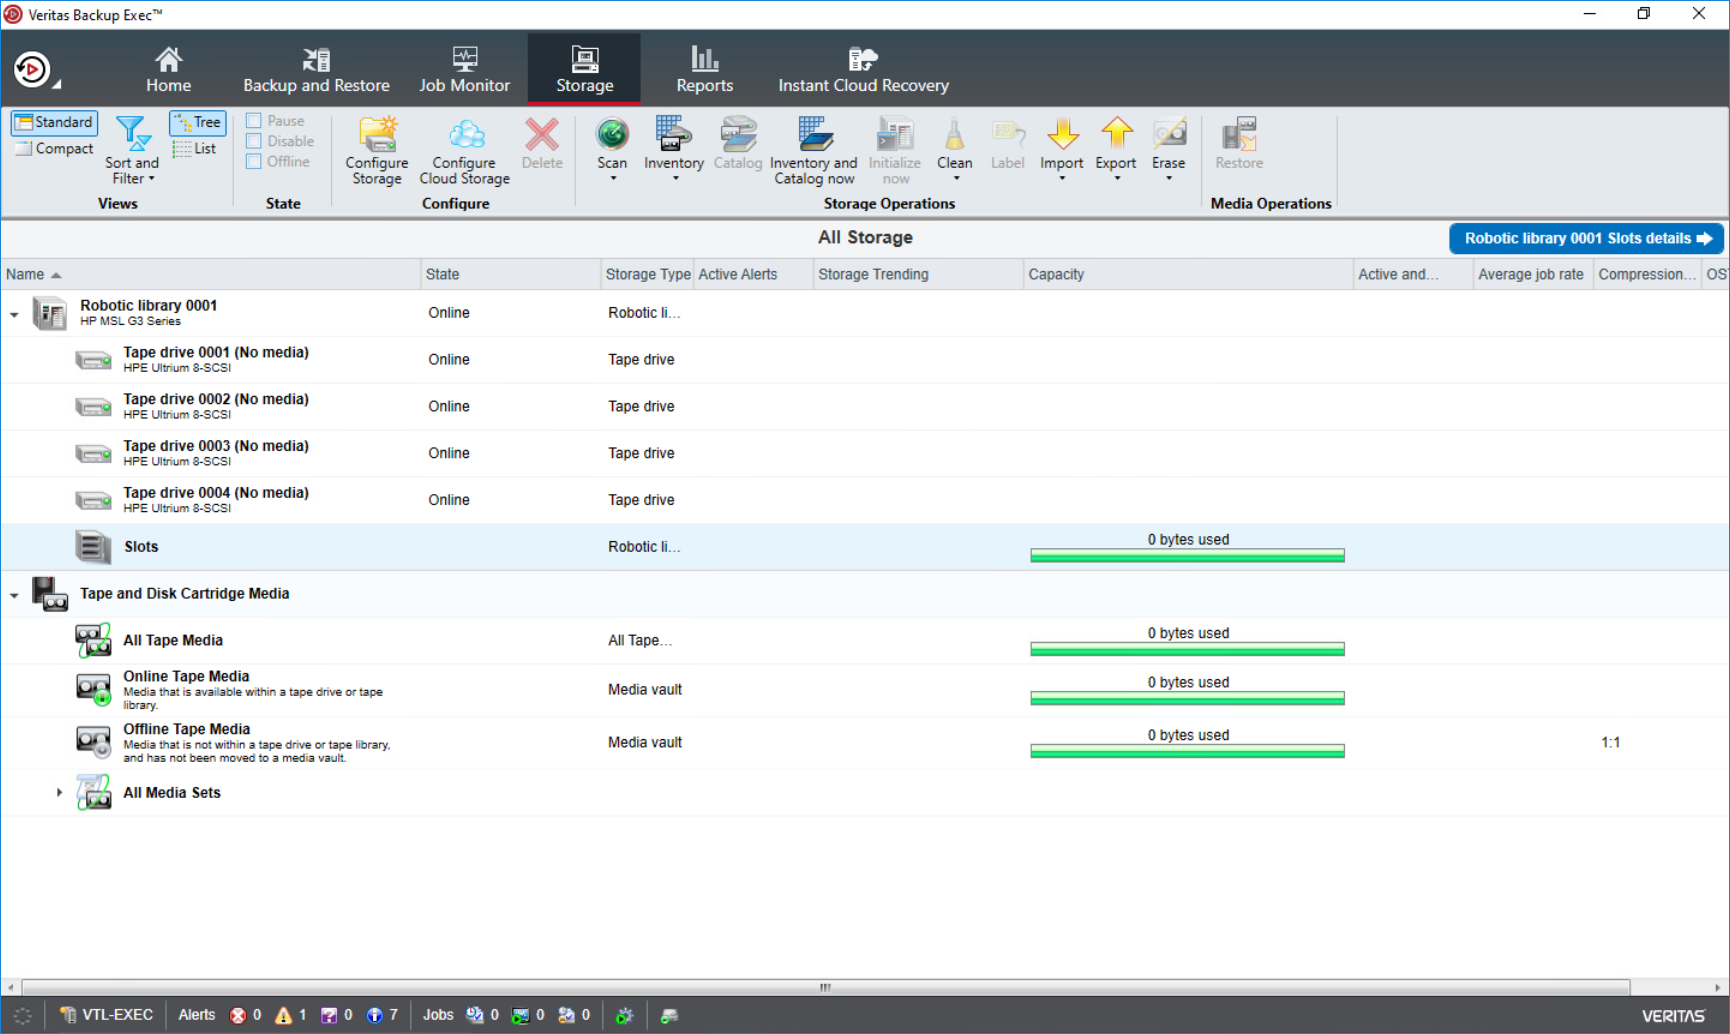
6. Choose the tape and perform the necessary operations.

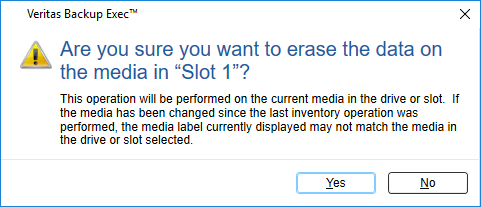
7. Confirm the data erasure when requested.
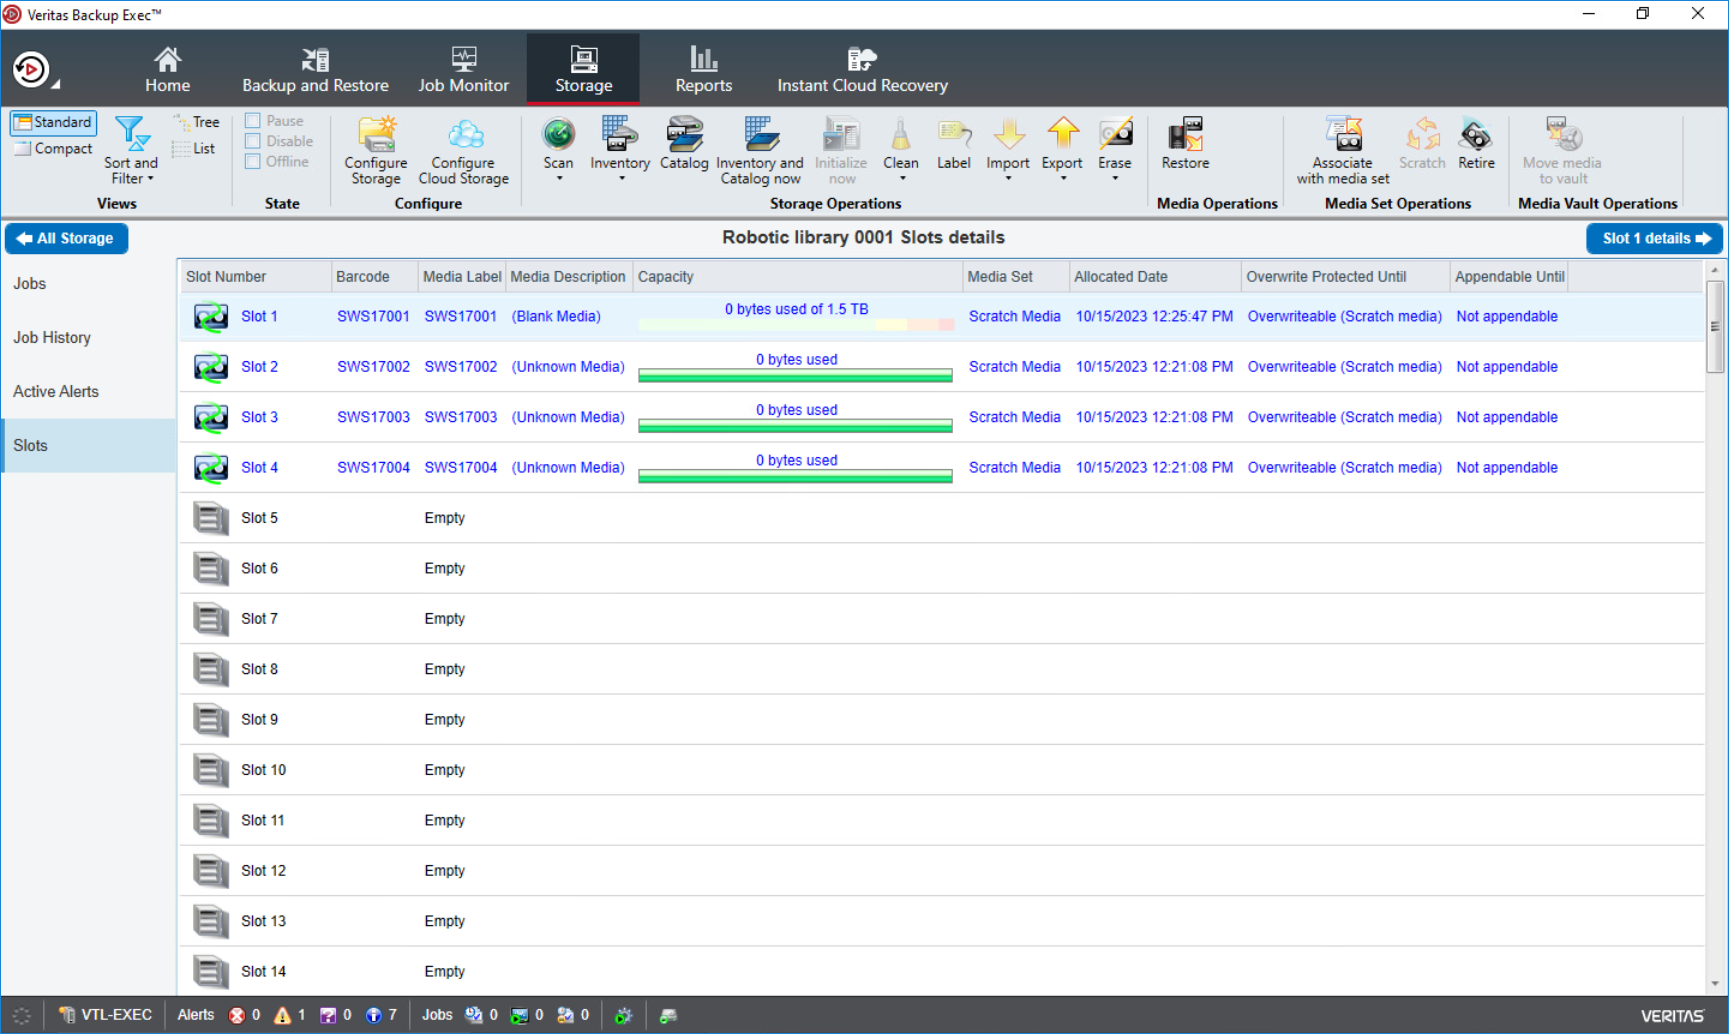
8. The prepared tape should look like in the screenshot below.
Configuring Backup to Tape job in Veritas Backup Exec™
In this part, the backup/restore process of the folder is shown as an example.
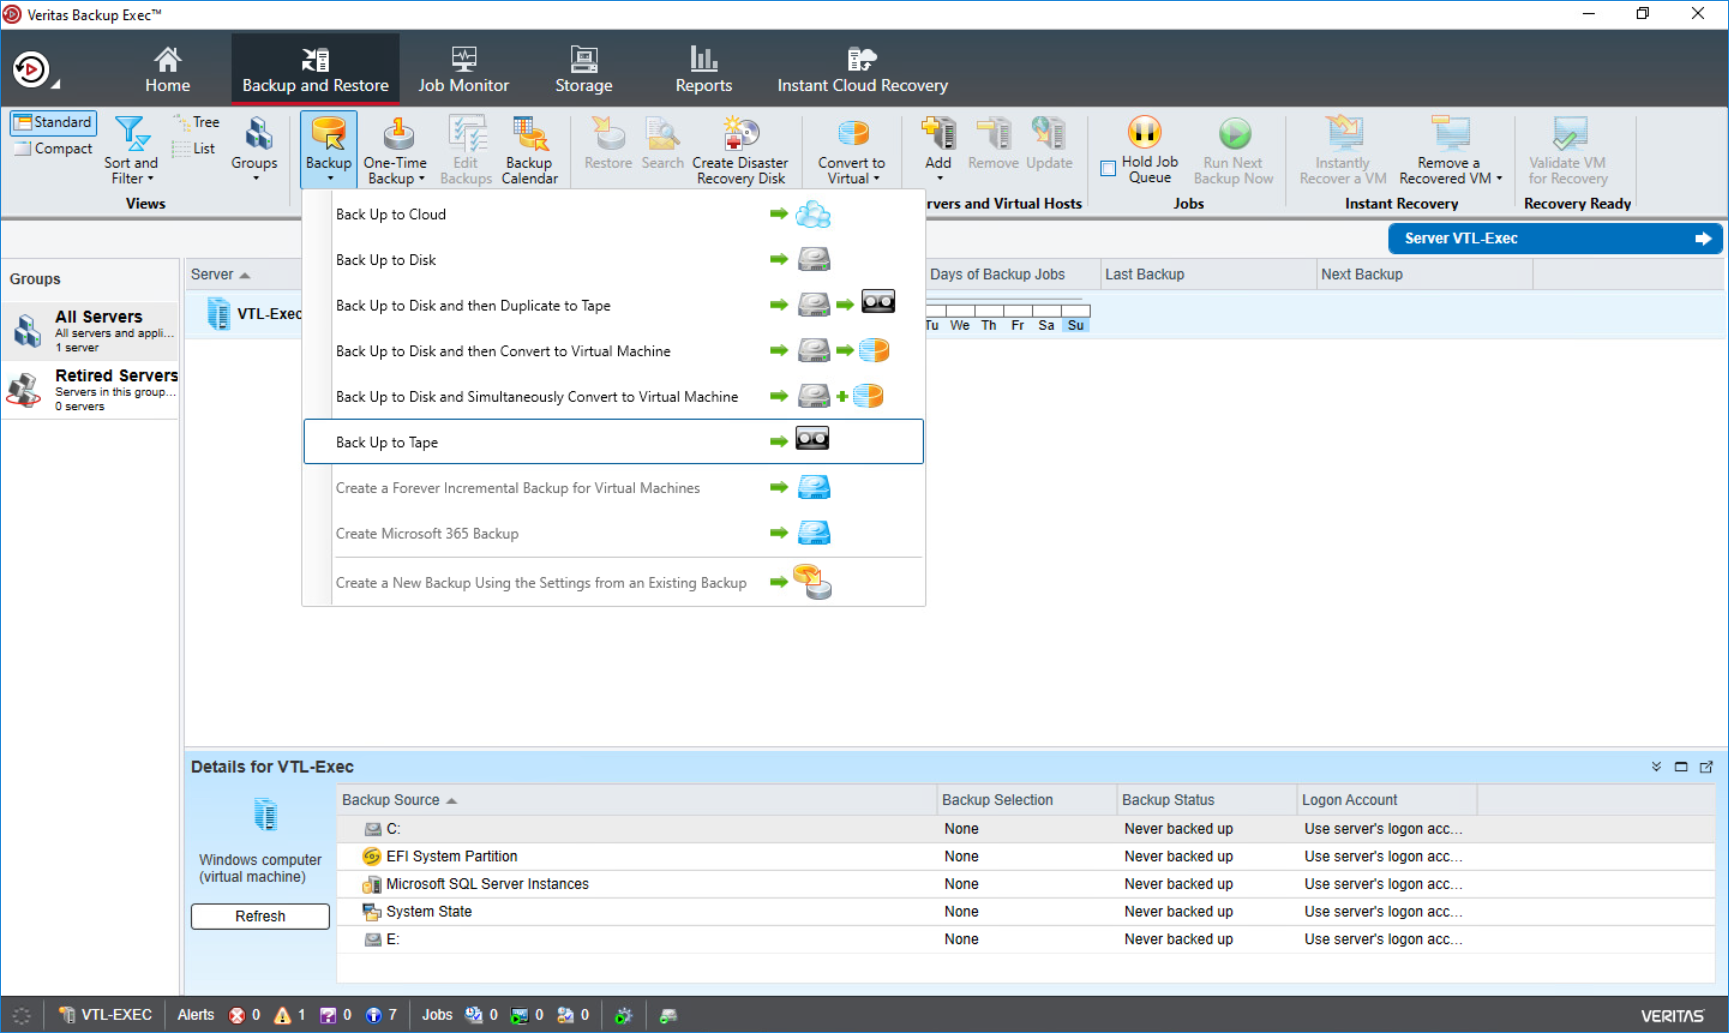
1. In the Backups group, click on the Backup and Restore tab. Click Backup and select Back Up to Tape.
2. Configure the Backup settings and click OK.

3. Once the job is configured, click the appropriate button to start it.
4. When the backup process starts, the progress is shown in the Status section. Double-click on the server to see the details.
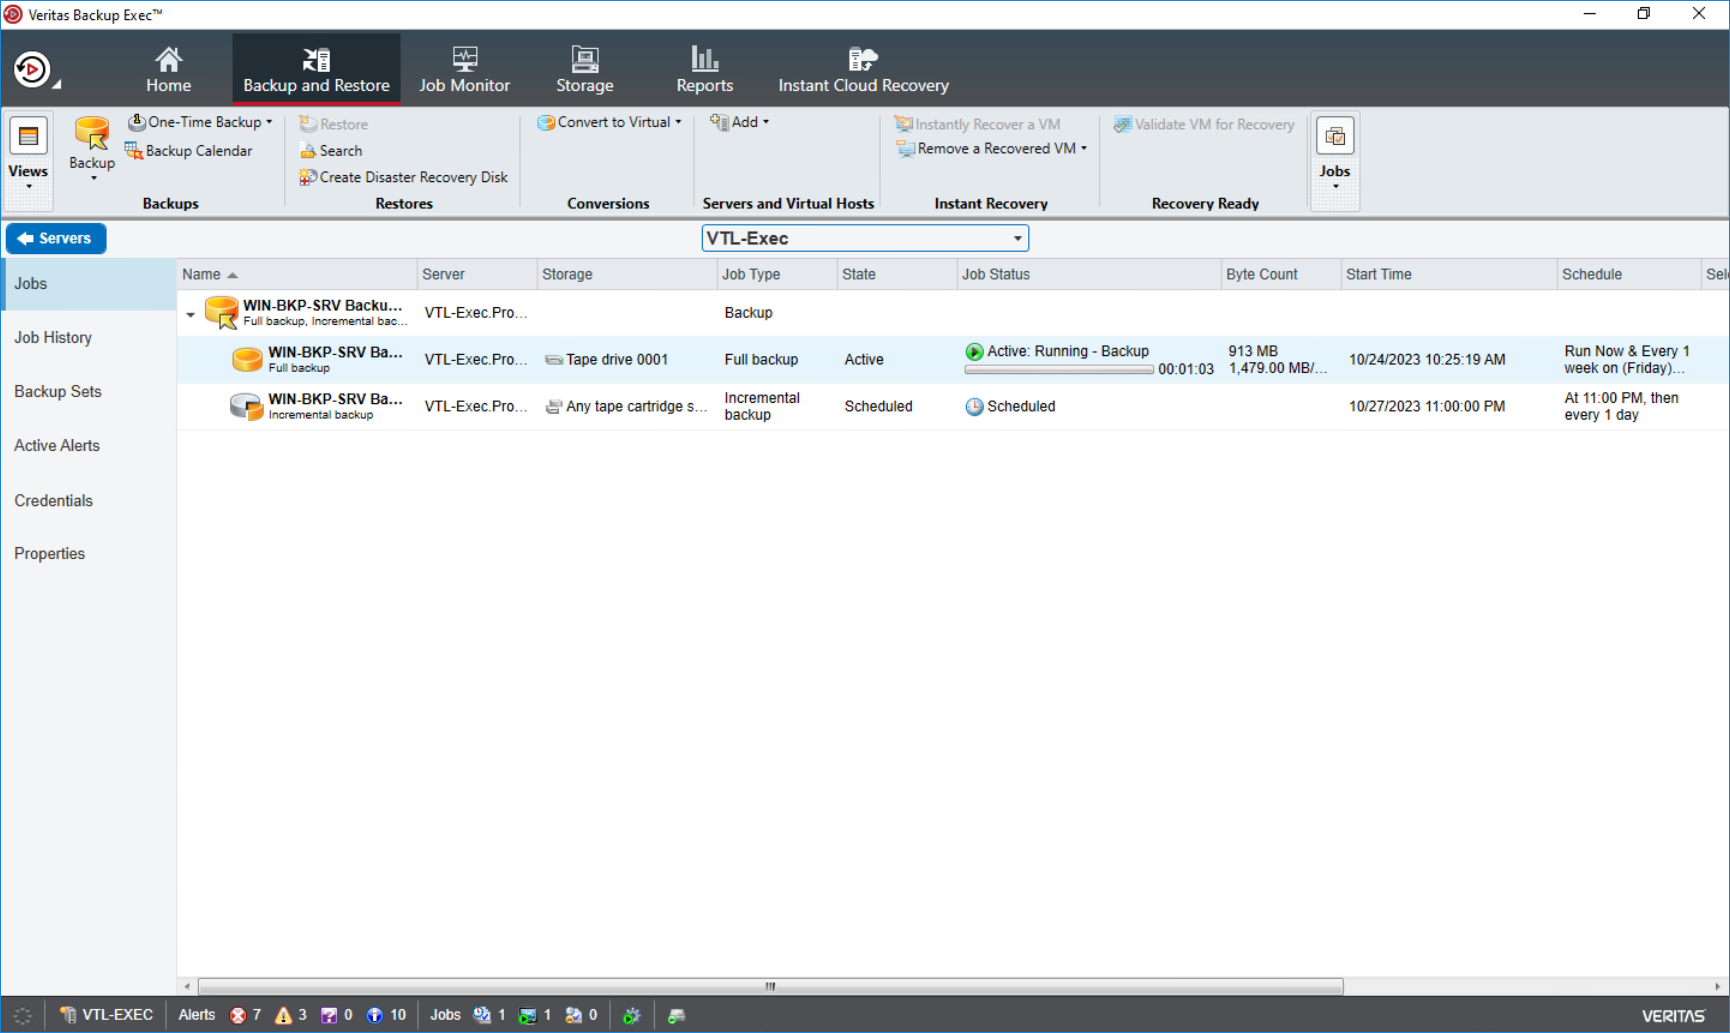
5. To check the amount of the occupied storage space, navigate to the Capacity section.
Restore data from Veritas Backup Exec™
1. To restore data, click Restore in the Backup and Restore tab.
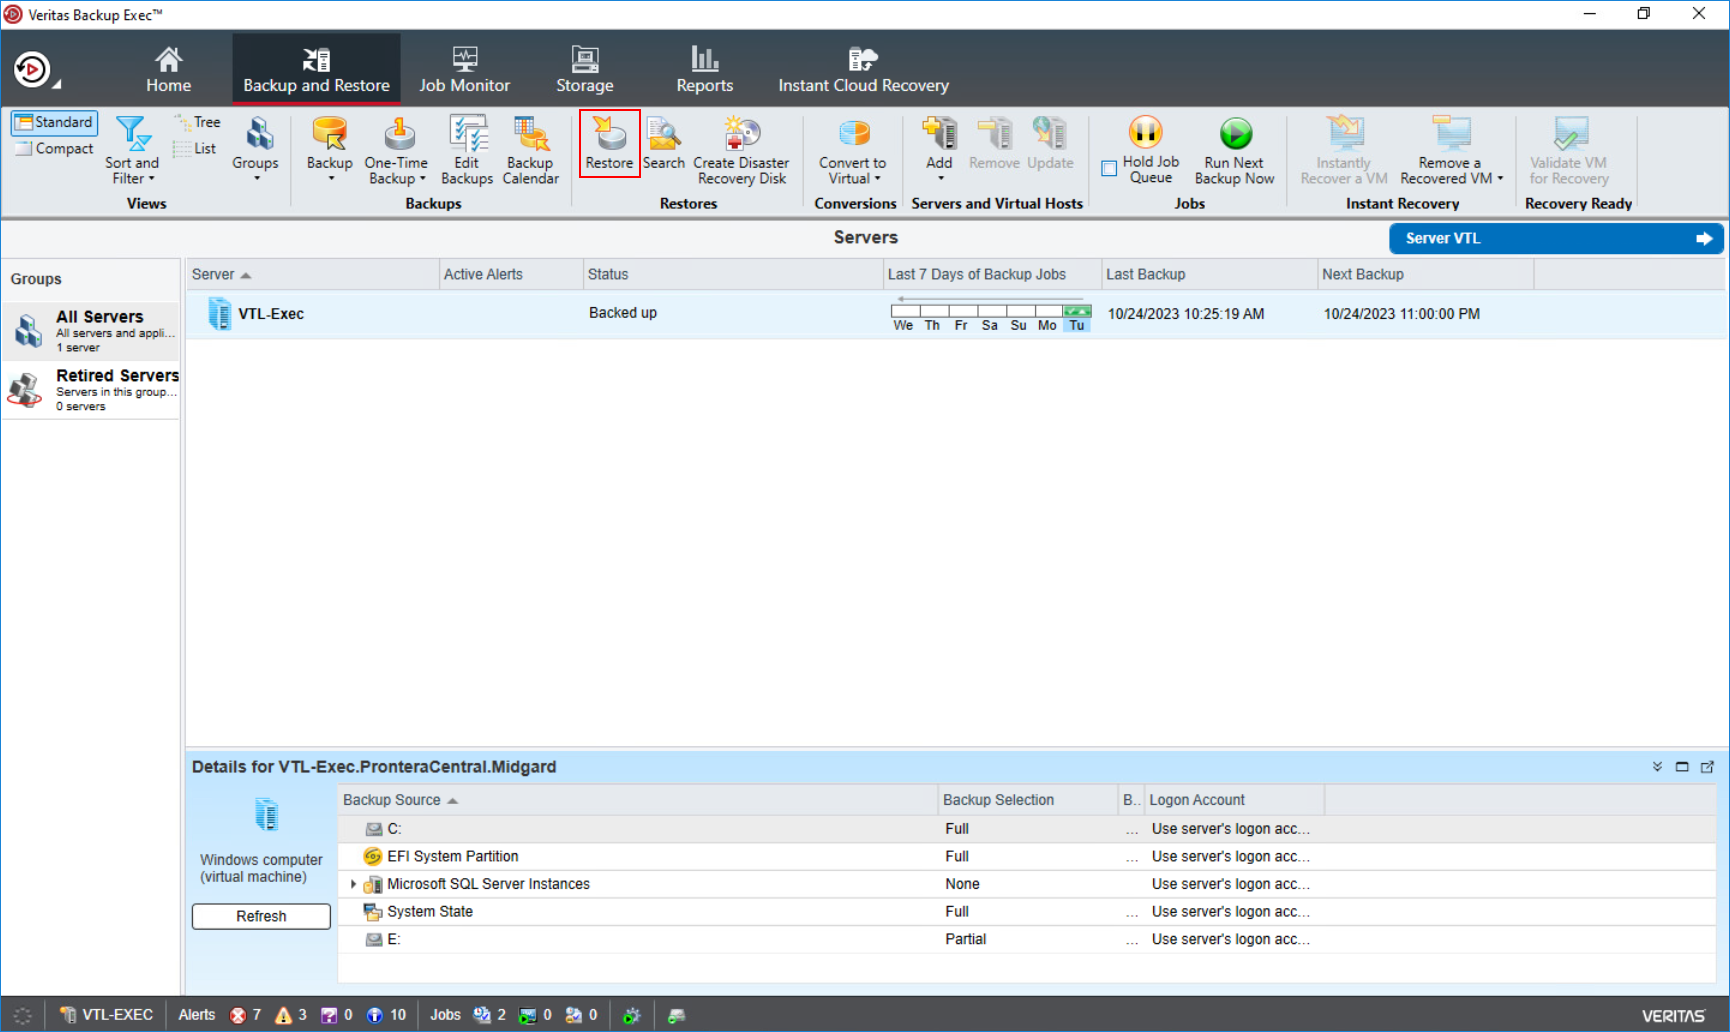
2. Select the type of data to restore.
3. Select the appropriate restore option.
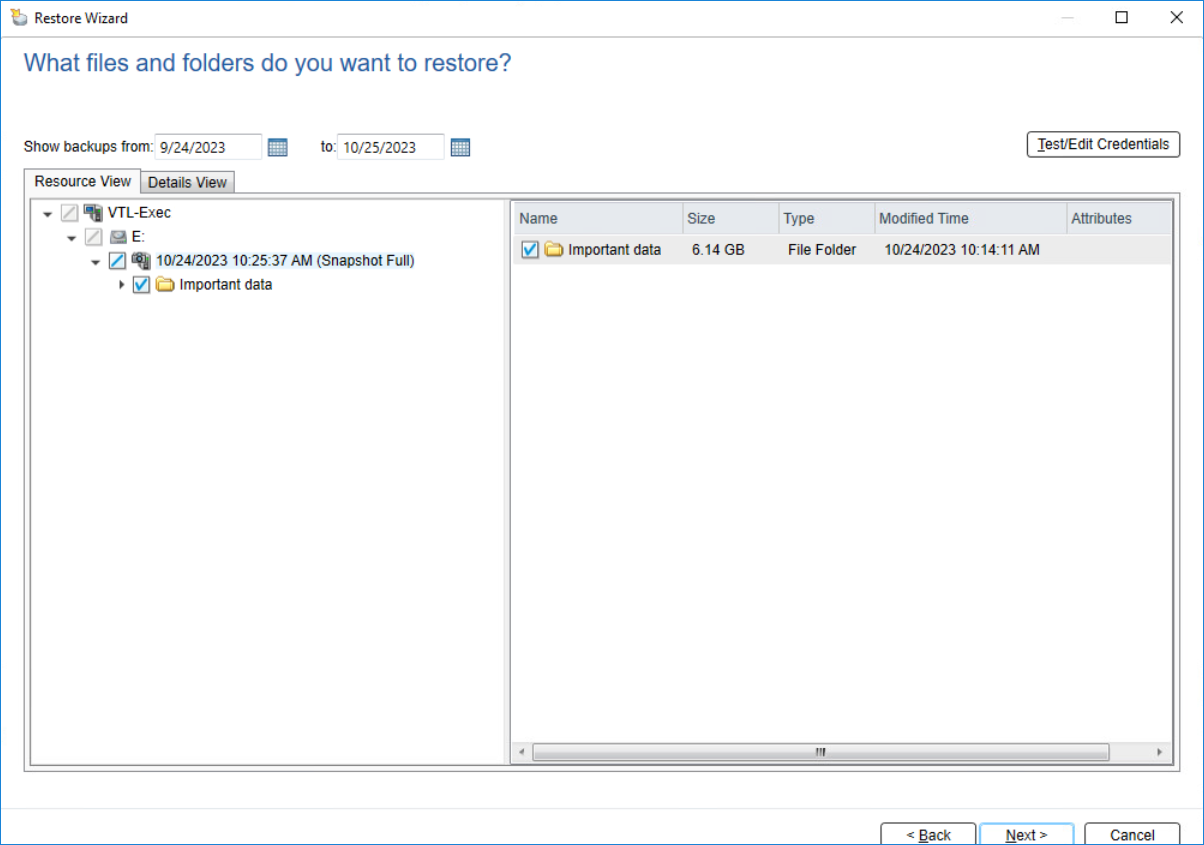
4. Select files and folders to restore.
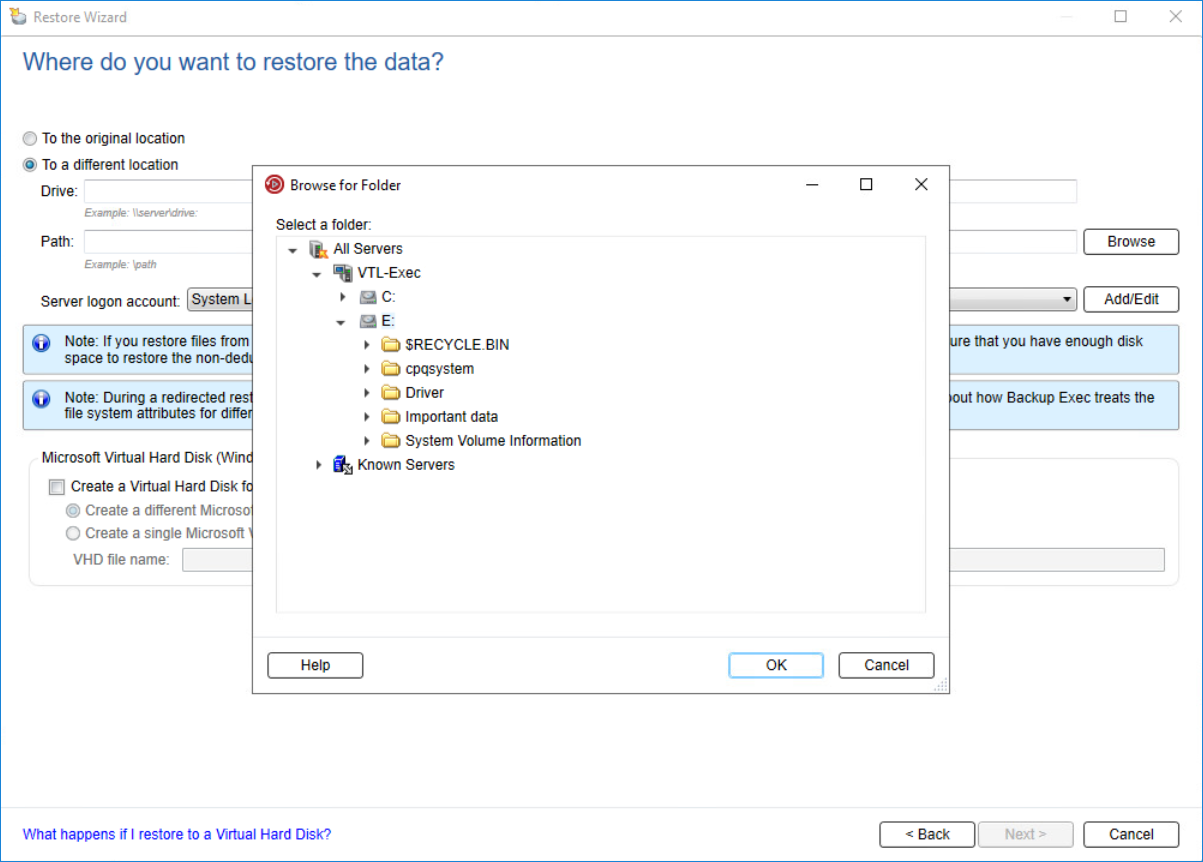
5. In the Browse for Folder window, specify the destination folder for the restored data and click OK. Then click Next.
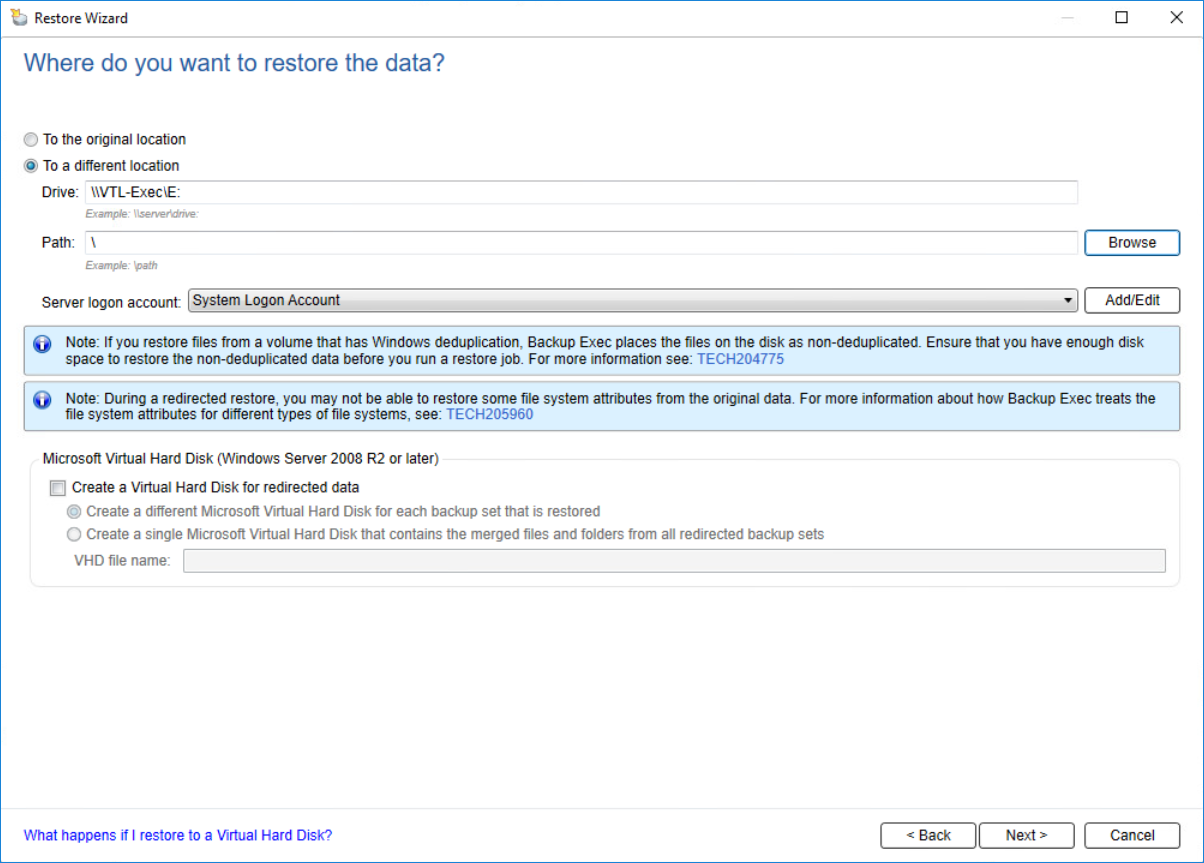
6. Confirm the restore location and click Next.
7. Select the settings for file integrity, hierarchy, and security for the restored data.

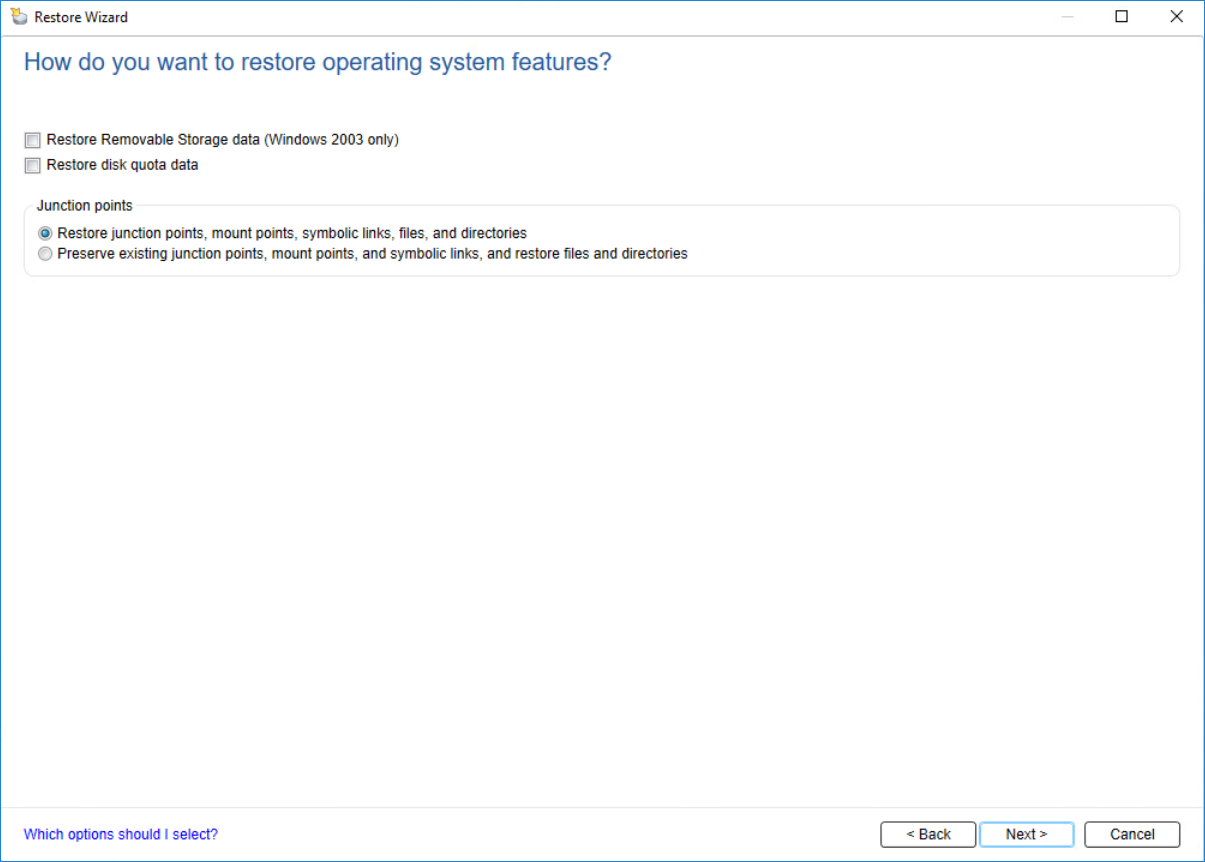
8. Select options for restoring operating system features.
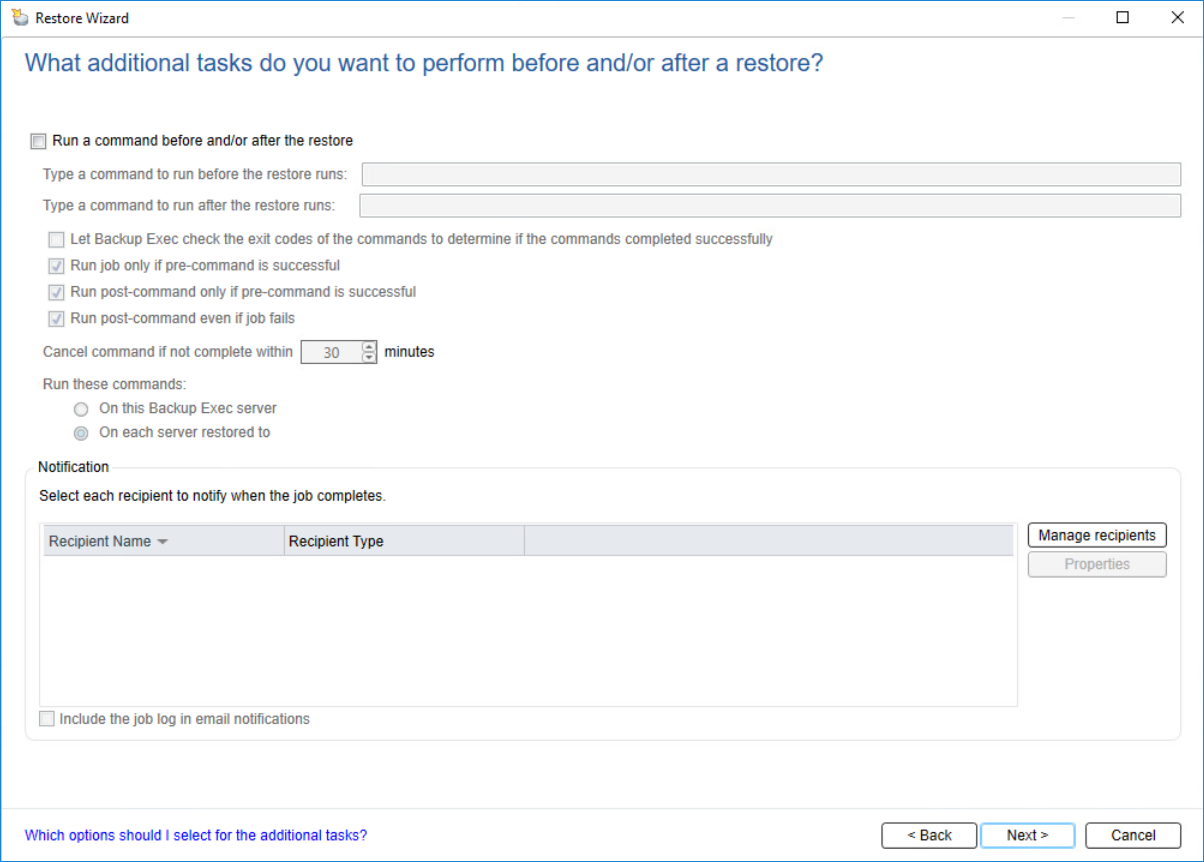
9. Specify additional tasks to perform before and/or after a restore.
10. Specify the restore job Name, Storage, and Schedule.
11. Double-check the summary and complete the restore job by clicking Finish.
12. To check the job progress, navigate to the Backup and Restore tab.
13. To see the restoring details, double-click on the server.
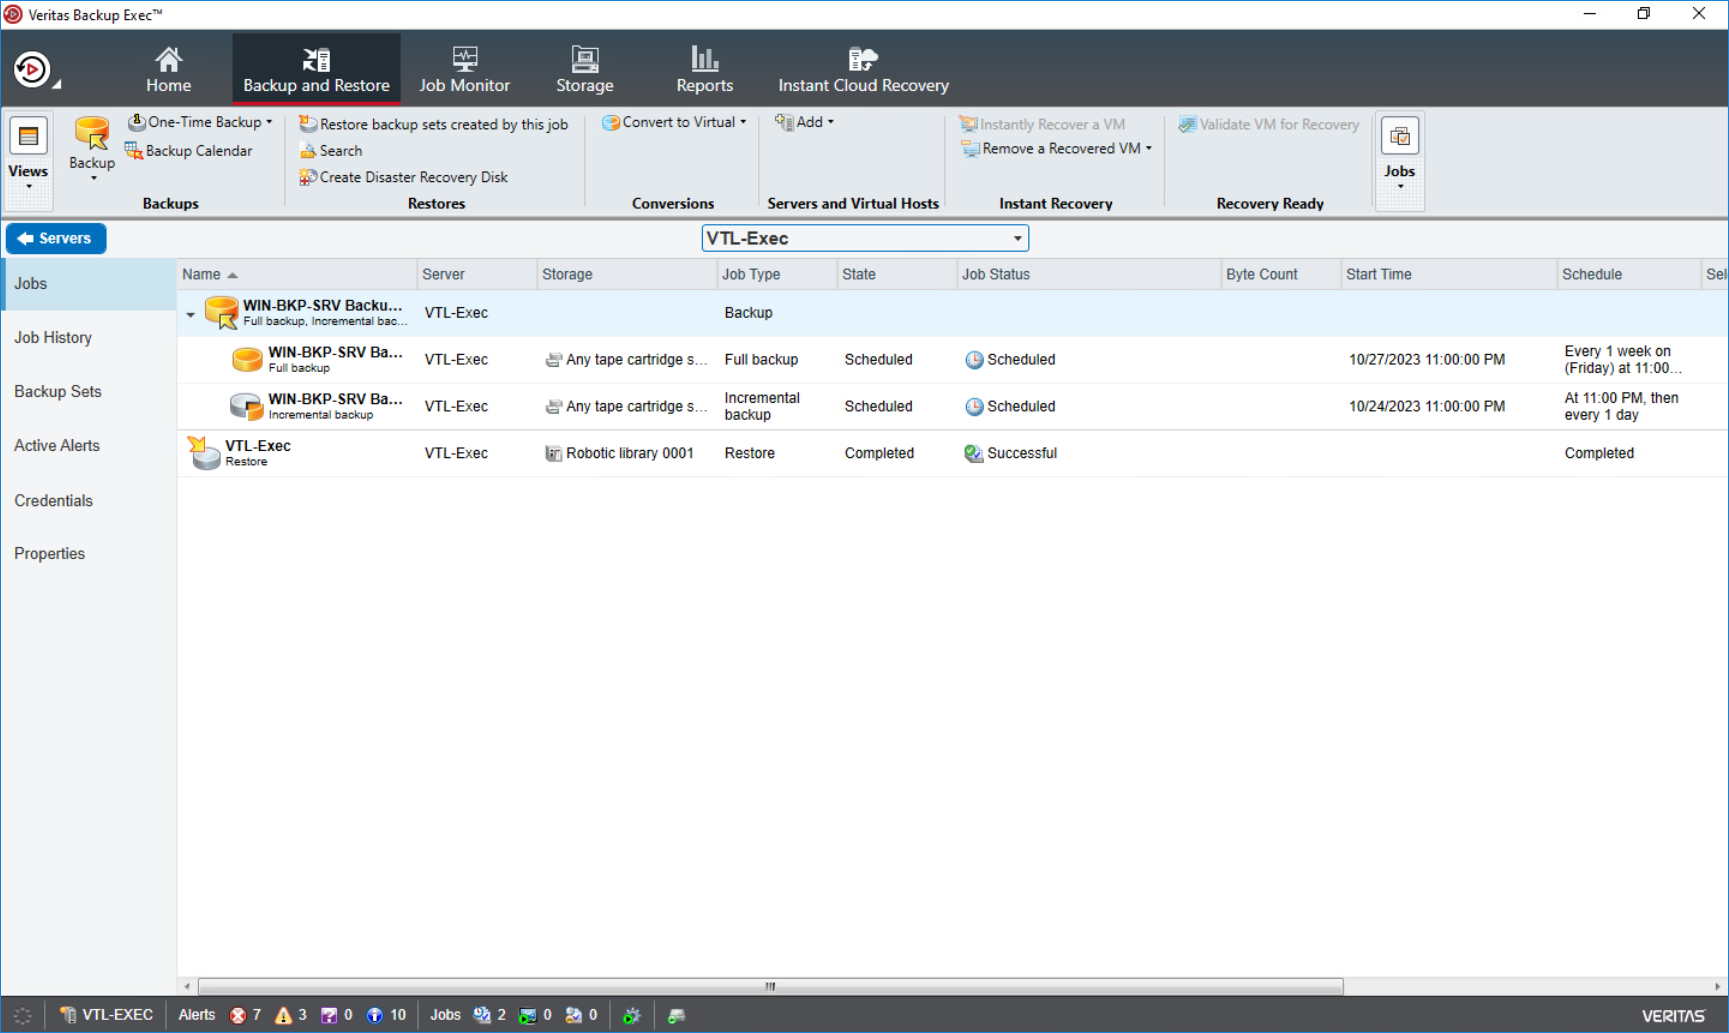
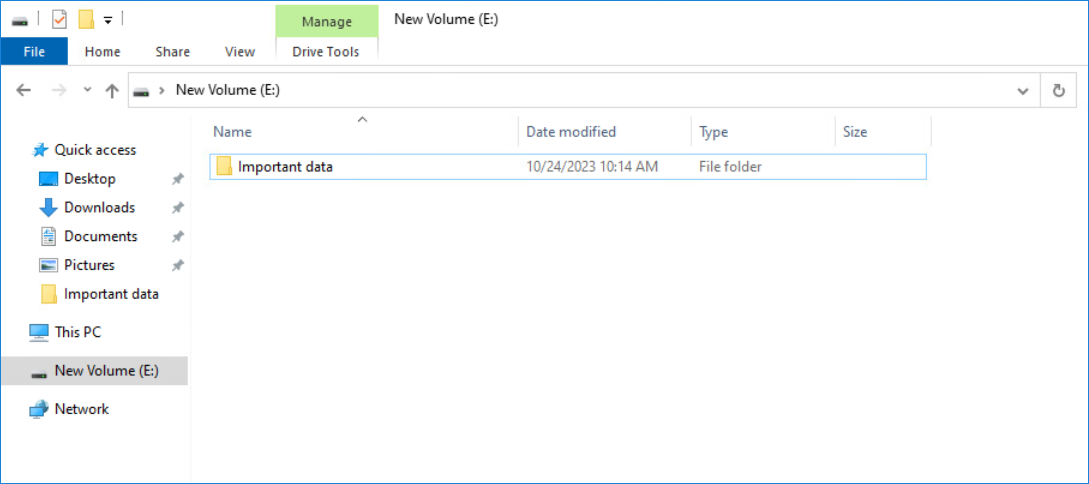
14. The restored files can be found in the specified folder.
To restore files from the cloud storage, please navigate to Restoring tapes from the cloud storage section.
Restoring Tapes from Cloud Storage
After the time specified in StarWind VTL Retention Settings, the local copy of the tape will be deleted, but the tape can be restored from the cloud. In this case, information about the tape is located in the local database.
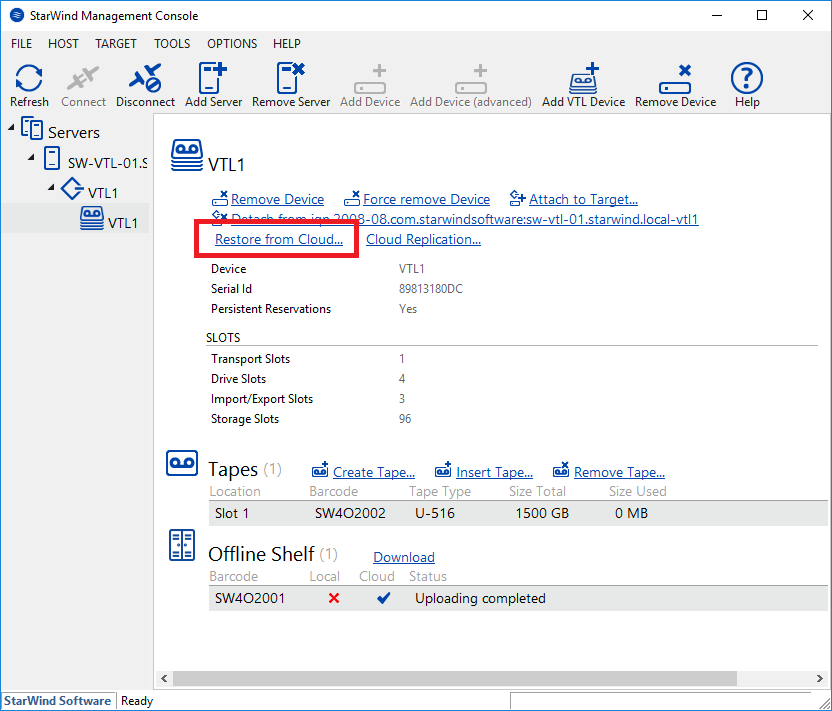
1. To restore the tape from the Cloud, open StarWind Management Console and choose the VTL device.
2. Click on the Restore from Cloud… option.
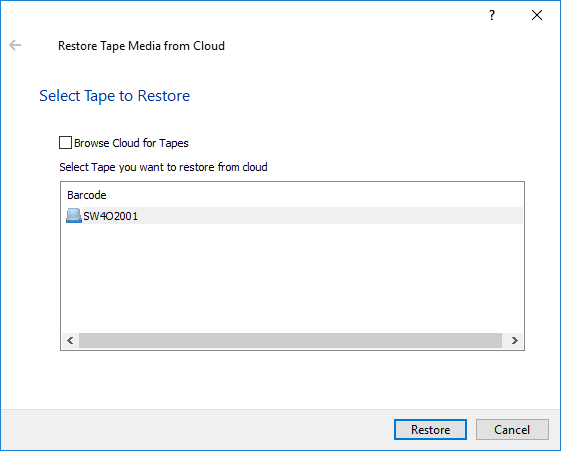
3. Identify the tape using its barcode. Click on the tape and press Restore.
4. The download progress can be checked in the Offline Shelf overview. When the download is completed, the tape location status in Offline Shelf overview will be marked as Local and Cloud.
Conclusion
Following this guide, a StarWind VTL was deployed and tapes replication was configured to the cloud object storage.
