

StarWind Virtual SAN: Feature Configuration Guide for Gentle Shutdown with APC PowerChute
- December 17, 2018
- 20 min read
- Download as PDF
Annotation
Relevant Products
StarWind Virtual SAN (VSAN)
Purpose
The purpose of this integration is to provide a reliable solution for managing unexpected power outages and planned hardware maintenance. By using PowerChute, users can ensure a gentle shutdown of VMs and hosts, effectively placing StarWind devices into maintenance mode to safeguard data and minimize synchronization times post-power outage.
Audience
The guide is aimed at system administrators, IT professionals, and data center managers who use StarWind Virtual SAN® and protect their servers with APC Smart-UPS.
Expected Result
After successful integration, PowerChute should enable the efficient and safe shutdown of VMs and hosts in case of power outages, with StarWind devices smoothly transitioning into maintenance mode. This setup aims to prevent potential issues with setup and reduce the time needed for StarWind devices synchronization after power is restored.
Introduction to PowerChute
PowerChute is a cross-platform application for managing APC Smart-UPS allowing users to manage UPS and prevent the unexpected power outage or plan the hardware maintenance when needed.
The combination of the PowerChute Network software and StarWind Maintenance Script allows users to gently turn off VMs and hosts, put the StarWind devices into maintenance mode and prevent the impact of an unexpected blackout. Users can save their data and avoid long synchronization.
NOTE: It’s recommended to install PowerChute on a dedicated machine (or server) that has its own UPS.
Disclaimer: StarWind Support does not write scripts on demand. Custom script troubleshooting is not supported. For PowerChute configuration please reach out to APC support.
Selecting the Environment
Please select the required option:
Installing PowerChute for Hyper-V
Installing PowerChute Network
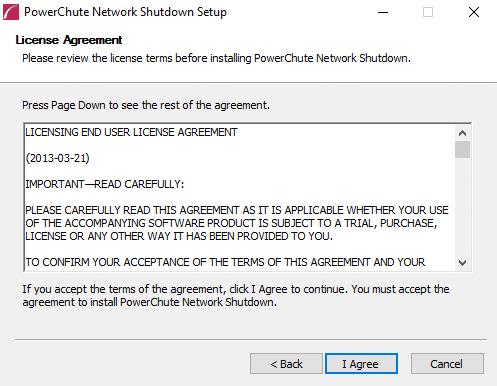
1. Launch the downloaded setup file on the server to install PowerChute Network. The Setup wizard will appear. Read and accept the License Agreement.
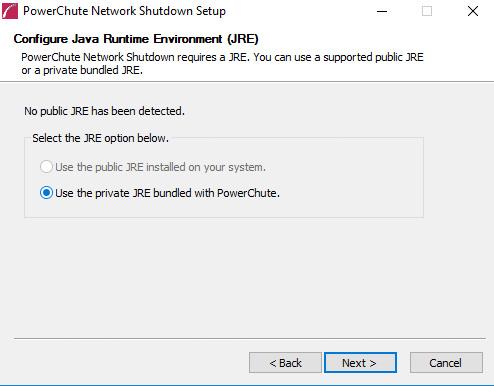
2. PowerChute Network requires a Java Runtime Environment (JRE). Choose the Use the private JRE bundled with PowerChute option.
3. Select the Enable SNMP Support checkbox to manage the PowerChute from a different console.
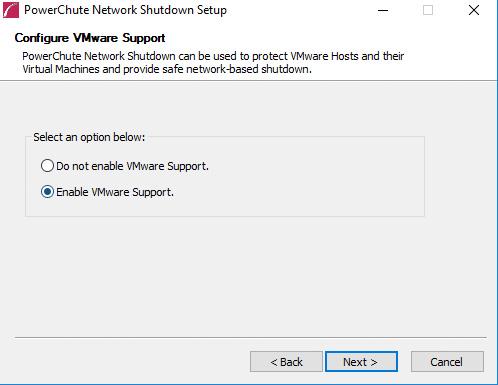
4. Select Do not enable VMware Support.
5. Select Browse to modify the installation path if necessary. Otherwise, save the path offered by default. 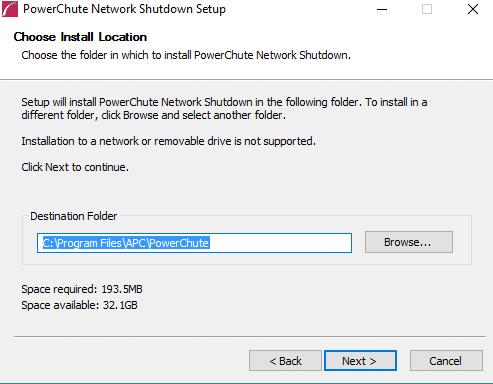
6. Click Install to continue.
7. Click Finish to close the wizard.
Configuring PowerChute Network
1. On the Welcome page, read the information and click Next.
2. In Network Configuration, select the appropriate network configuration.
3. Specify the required connection scenario.
4. On the Security step, specify the Network Management Card credentials of APC Smart UPS.
9. Verify the information and click Apply to finish the configuration.
Applying StarWind Maintenance Script
StarWind has designed the script which allows users to gently turn off VMs and hosts, put the StarWind devices into Maintenance mode to prevent the data loss and long synchronization process.
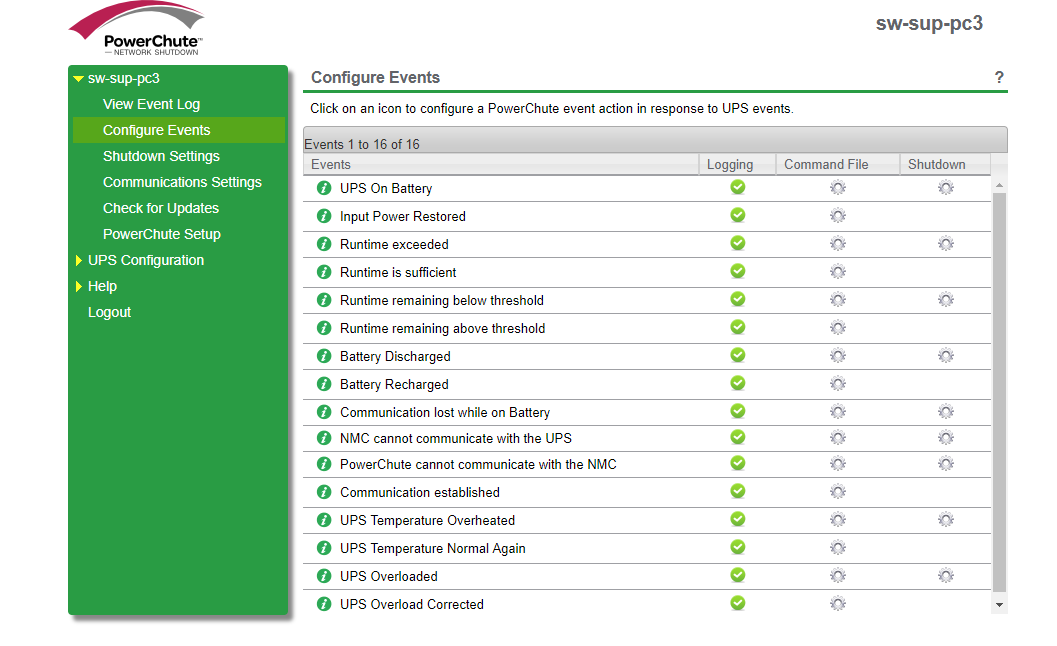
1. Navigate to Configure Events and click on UPS on Battery command file.
 2. Enable the command file checkbox for the UPC on Battery event (local or network path can be selected).
3. Select the following script file:
# Execute lines below before running this script, to generate SecureString passwords

#################################################################################

#mkdir c:\shutdown

#Read-Host -Prompt "Enter password for service user" -AsSecureString | ConvertFrom-SecureString | out-file c:\shutdown\cred.txt

#(type in the password of the user you want to use for running the script)

#cat c:\shutdown\cred.txt


$password = get-content C:\shutdown\cred.txt | convertto-securestring

$user = "Domain\ServiceUser"  #Specify domain/user credentials

$cred = New-Object System.Management.Automation.PSCredential ($user,$password)


$StarWind = 'SW-HCA-VM-01' #specify your StarWind VM (or host) ip-address


#Getting StarWind devices in to "Maintenance Mode"

Import-Module StarWindX


try

{

    $server = New-SWServer -host $StarWind -port 3261 -user root -password starwind

    $server.Connect()

    write-host "Devices:" -foreground yellow


    foreach($device in $server.Devices){

        if( !$device ){

            Write-Host "No device found" -foreground red

            return

        } else {

            $device.Name

            $disk = $device.Name

            if ($device.Name -like "HAimage*"){

                $device.SwitchMaintenanceMode($true, $true)

                write-host "$disk entered maintenance mode"

            } else {

                write-host "$disk is not an HA device, maintenance mode is not supported"

            }

        }

    }

}

catch

{

       Write-Host $_ -foreground red

}

finally

{

       $server.Disconnect()

}


#Here I'll start a new PowerShell remote session with the selected host


Enter-PSSession -ComputerName $StarWind -Credential $cred

$action = New-ScheduledTaskAction -Execute 'Powershell.exe' -Argument '-ExecutionPolicy Bypass c:\SW_Maintenance_Off.ps1 -RunType $true -Path c:\SW_Maintenance_Off.ps1'


$trigger = New-ScheduledTaskTrigger -AtStartup -RandomDelay 00:00:30


$settings = New-ScheduledTaskSettingsSet -Compatibility Win8


$principal = New-ScheduledTaskPrincipal -UserId SYSTEM -LogonType ServiceAccount -RunLevel Highest


$definition = New-ScheduledTask -Action $action -Principal $principal -Trigger $trigger -Settings $settings -Description "Maintenance Mode"


Register-ScheduledTask -TaskName "Maintenance Mode off" -InputObject $definition
NOTE: VMs or Nodes might be needed to install some Windows updates, so it is highly recommended to set them up in the PowerChute console before running this script itself.
Allow PowerShell remote session on both hosts to use this script. Setup power-off configuration in PowerChute console for all the VMs, then run the following script from PowerChute console (apply the Maintenance mode on StarWind devices).
Installing PowerChute for VMware
Installing PowerChute Network
1. Launch the downloaded setup file on the server to install PowerChute Network. The Setup wizard will appear. Read and accept the License Agreement.
2. PowerChute Network requires a Java Runtime Environment (JRE). Choose the Use the private JRE bundled with PowerChute option.
3. Select the Enable SNMP Support checkbox to manage the PowerChute from a different console.
4. If VMware is used in the environment, select Enable VMware Support.
5. Select Browse to modify the installation path if necessary. Otherwise, save the path offered by default.
6. Click Install to continue.
7. Click Finish to close the wizard.
Configuring PowerChute Network
1. On the Welcome page, read the information and click Next.
2. In Network Configuration, select the appropriate network configuration: IPv4 or IPv6.
3. Specify the required connection scenario.
4. In VMware Configuration, specify the connection method to the environment: Standalone VMware Host for single host or Host managed by vCenter Server for vCenter.
5. Specify the IP address and credentials of the vCenter.
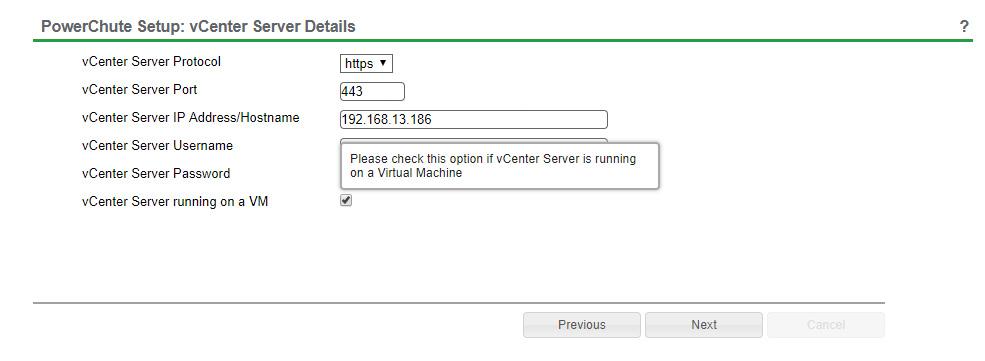
NOTE: Select the vCenter Server running on a VM option if vCenter is running on the VM inside the ESXi host.
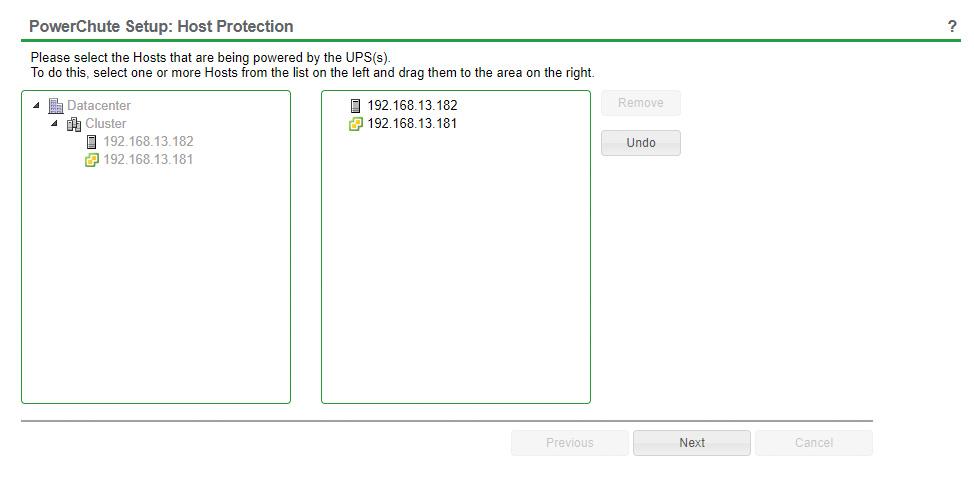
6. Select the hosts powered by the UPS(s).
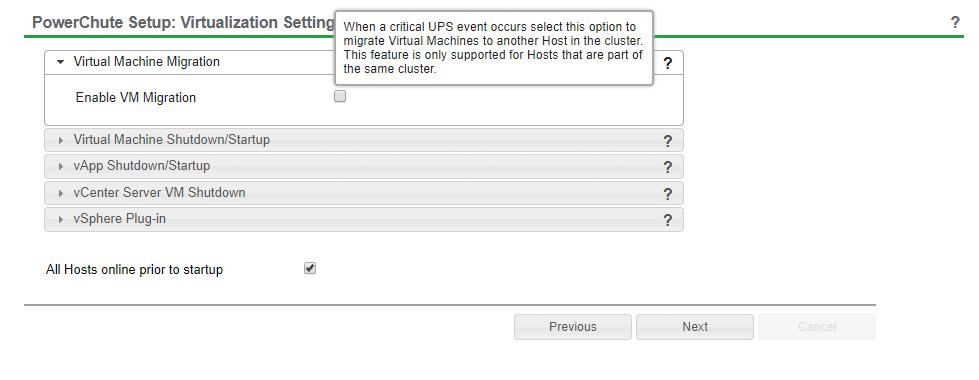
7. Specify the Virtualization Settings.
8. On the Security step, Specify the Network Management Card credentials of APC Smart UPS.
9. Verify the information and click Apply to finish the configuration.
Applying StarWind Maintenance Script
StarWind has designed the script which allows users to gently turn off VMs and hosts, put the StarWind devices into Maintenance mode to prevent the data loss and long synchronization process.
1. Navigate to Configure Events and click on UPS on Battery command file.
2. Enable the command file checkbox for the UPC on Battery event (local or network path can be selected).
Select the following script file:
################################################################################

#

# Variables:  $vcenter - The IP/DNS of your vCenter Server

#             $username/password - credentials for your vCenter Server

#             $username4host/password4host - credentials for yours VM host

#             $cluster - Name of specific cluster to target within vCenter

#             $datacenter - Name of specific datacenter to target within vCenter

#             $StarWind - IP address of one of StarWind VMs

#

#################################################################################

# Execute lines below before running this script, to generate securestring passwords

#################################################################################

#mkdir c:\shutdown

#Read-Host -Prompt "Enter password for vCenter" -AsSecureString | ConvertFrom-SecureString | out-file c:\shutdown\cred.txt

#(type in the password of the user you want to use for running the script)

#cat c:\shutdown\cred.txt

#

#Read-Host -Prompt "Enter password for ESXI hosts" -AsSecureString | ConvertFrom-SecureString | out-file c:\shutdown\cred4host.txt

#(type in the password of the user you want to use for running the script)

#cat c:\shutdown\cred4host.txt

################################################################################


# Some variables

$vcenter = "192.168.1.235"

$username = "administrator@vsphere.local"

$username4host = "root"

$cluster = "SW-SUP-CLUSTER"

$datacenter = "SWDATACENTER"

$vCenterVMName = "SW-SUP-VCENTER" #Name of vCenter VM

$StarWindVM1 = "SW-SUP-FS-00" #Name of first StarWind VM

$StarWindVM2 = "SW-SUP-FS-01" #Name of second StarWind VM

$StarWind = "192.168.1.233" #IP address of one of StarWind VMs

$ESXIhost1 = "192.168.1.231" #Name of first ESXI Host

$ESXIhost2 = "192.168.1.232" #Name of second ESXI Host


$password = get-content C:\shutdown\cred.txt | convertto-securestring

$password4host = get-content C:\shutdown\cred4host.txt | convertto-securestring

$credentials = new-object System.Management.Automation.PSCredential $username, $password

$credentials4host = new-object System.Management.Automation.PSCredential $username4host, $password4host

$time = ( get-date ).ToString('HH-mm-ss')

$date = ( get-date ).ToString('dd-MM-yyyy')

$logfile = New-Item -type file "C:\shutdown\ShutdownLog-$date-$time.txt" -Force


Write-Host ""

Write-Host "Shutdown command has been sent to the vCenter Server." -Foregroundcolor yellow

Write-Host "This script will shutdown all of the VMs and hosts located in $datacenter." -Foregroundcolor yellow

Write-Host ""

Sleep 5


Add-Content $logfile "$(get-date -f dd/MM/yyyy) $(get-date -f HH:mm:ss) PowerOff Script Engaged"

Add-Content $logfile ""


# Connect to vCenter

$counter = 0

if ($counter -eq 0){

       Set-PowerCLIConfiguration -InvalidCertificateAction ignore -Confirm:$false | Out-Null

}

Write-Host "Connecting to vCenter - $vcenter.... " -nonewline

Set-PowerCLIConfiguration -InvalidCertificateAction ignore -confirm:$false

Add-Content $logfile "$(get-date -f dd/MM/yyyy) $(get-date -f HH:mm:ss) Connecting to vCenter - $vcenter"

$success = Connect-VIServer $vcenter -Credential $credentials -WarningAction:SilentlyContinue

if ($success) { Write-Host "Connected!" -Foregroundcolor Green }

else

{

    Write-Host "Something is wrong, Aborting script" -Foregroundcolor Red

    Add-Content $logfile "$(get-date -f dd/MM/yyyy) $(get-date -f HH:mm:ss) Something is wrong, Aborting script"

    exit

}

Write-Host ""

Add-Content $logfile  ""


# Turn Off vApps

Write-Host "Stopping VApps...." -Foregroundcolor Green

Write-Host ""

Add-Content $logfile "$(get-date -f dd/MM/yyyy) $(get-date -f HH:mm:ss) Stopping VApps..."

Add-Content $logfile ""


$vapps = Get-VApp | Where { $_.Status -eq "Started" }


if ($vapps -ne $null)

{

    ForEach ($vapp in $vapps)

    {

            Write-Host "Processing $vapp.... " -ForegroundColor Green

            Write-Host ""

            Add-Content $logfile "$(get-date -f dd/MM/yyyy) $(get-date -f HH:mm:ss) Stopping $vapp."

            Add-Content $logfile ""

            Stop-VApp -VApp $vapp -Confirm:$false | out-null

            Write-Host "$vapp stopped." -Foregroundcolor Green

            Write-Host ""

    }

}


Write-Host "VApps stopped." -Foregroundcolor Green

Add-Content $logfile "$(get-date -f dd/MM/yyyy) $(get-date -f HH:mm:ss) VApps stopped."

Add-Content $logfile ""


# Change DRS Automation level to partially automated...

Write-Host "Changing cluster DRS Automation Level to Partially Automated" -Foregroundcolor green

Get-Cluster $cluster | Set-Cluster -DrsAutomation PartiallyAutomated -confirm:$false


# Change the HA Level

Write-Host ""

Write-Host "Disabling HA on the cluster..." -Foregroundcolor green

Write-Host ""

Add-Content $logfile "Disabling HA on the cluster..."

Add-Content $logfile ""

Get-Cluster $cluster | Set-Cluster -HAEnabled:$false -confirm:$false


# Get VMs again (we will do this again instead of parsing the file in case a VM was powered in the nanosecond that it took to get here....

Write-Host ""

Write-Host "Retrieving a list of powered on guests...." -Foregroundcolor Green

Write-Host ""

Add-Content $logfile "$(get-date -f dd/MM/yyyy) $(get-date -f HH:mm:ss) Retrieving a list of powered on guests...."

Add-Content $logfile ""

$poweredonguests = Get-VM -Location $cluster | where-object {$_.PowerState -eq "PoweredOn" }


Add-Content $logfile "$(get-date -f dd/MM/yyyy) $(get-date -f HH:mm:ss) Checking to see if vCenter is virtualized"


# Retrieve host info for vCenter

if ($vcenterVMName -ne "NA")

{

    Add-Content $logfile "$(get-date -f dd/MM/yyyy) $(get-date -f HH:mm:ss) vCenter is indeed virtualized, getting ESXi host hosting vCenter Server"

    $vCenterHost = (Get-VM $vCenterVMName).Host.Name

    Add-Content $logfile "$(get-date -f dd/MM/yyyy) $(get-date -f HH:mm:ss) $vCenterVMName currently running on $vCenterHost - will process this last"

}

else

{

    Add-Content $logfile "$(get-date -f dd/MM/yyyy) $(get-date -f HH:mm:ss) vCenter is not virtualized"

}


Add-Content $logfile "$(get-date -f dd/MM/yyyy) $(get-date -f HH:mm:ss) Proceeding with VM PowerOff"

Add-Content $logfile ""


# And now, let's start powering off some guests....

ForEach ( $guest in $poweredonguests )

{

    if ($guest.Name -notmatch $vCenterVMName -and $guest.Name -notmatch $StarWindVM1 -and $guest.Name -notmatch $StarWindVM2)

    {

        Write-Host "Processing $guest.... " -ForegroundColor Green

        Write-Host "Checking for VMware tools install" -Foregroundcolor Green

        $guestinfo = get-view -Id $guest.ID

        if ($guestinfo.config.Tools.ToolsVersion -eq 0)

        {

            Write-Host "No VMware tools detected in $guest , hard power this one" -ForegroundColor Yellow

            Write-Host ""

            Add-Content $logfile "$(get-date -f dd/MM/yyyy) $(get-date -f HH:mm:ss) $guest - no VMware tools, hard power off"

            Stop-VM $guest -confirm:$false | out-null

        }

        else

        {

           write-host "VMware tools detected.  I will attempt to gracefully shutdown $guest"

           Write-Host ""

           Add-Content $logfile "$(get-date -f dd/MM/yyyy) $(get-date -f HH:mm:ss) $guest - VMware tools installed, gracefull shutdown"

           $vmshutdown = $guest | shutdown-VMGuest -Confirm:$false | out-null

        }

    }

}


# Let's wait a minute or so for shutdowns to complete

Write-Host ""

Write-Host "Giving VMs 2 minutes before resulting in hard power off"

Write-Host ""

Add-Content $logfile ""

Add-Content $logfile "$(get-date -f dd/MM/yyyy) $(get-date -f HH:mm:ss) Waiting a couple minutes then hard powering off all remaining VMs"

Sleep 120


# Now, let's go back through again to see if anything is still powered on and shut it down if it is

Write-Host "Beginning Phase 2 - anything left on.... night night...." -ForegroundColor red

Write-Host ""


# Get our list of guests still powered on...


$poweredonguests = Get-VM -Location $cluster | where-object {$_.PowerState -eq "PoweredOn" }


if ($poweredonguests -ne $null)

{

    ForEach ( $guest in $poweredonguests )

    {

        if ($guest.Name -notmatch $vCenterVMName -and $guest.Name -notmatch $StarWindVM1 -and $guest.Name -notmatch $StarWindVM2)

        {

            Write-Host "Processing $guest ...." -ForegroundColor Green

            #no checking for toosl, we just need to blast it down...

            write-host "Shutting down $guest - I don't care, it just needs to be off..." -ForegroundColor Yellow

                        Write-Host ""

            Add-Content $logfile "$(get-date -f dd/MM/yyyy) $(get-date -f HH:mm:ss) $guest - Hard Power Off"

            Stop-VM $guest -confirm:$false | out-null

        }

    }

}


# Wait 30 seconds

Write-Host "Waiting 30 seconds and then proceeding with host power off"

Write-Host ""

Sleep 30

Write-Host "Putting StarWind devices in to Maintenance Mode "

Write-Host ""


#Getting StarWind devices in to "Maintenance Mode"

Import-Module StarWindX


try

{

    $server = New-SWServer -host $StarWind -port 3261 -user root -password starwind

    $server.Connect()

    write-host "Devices:" -foreground yellow


    foreach($device in $server.Devices){

        if( !$device ){

            Write-Host "No device found" -foreground red

            return

        } else {

            $device.Name

            $disk = $device.Name

            if ($device.Name -like "HAimage*"){

                $device.SwitchMaintenanceMode($true, $true)

                write-host "$disk entered maintenance mode"

            } else {

                write-host "$disk is not an HA device, maintenance mode is not supported"

            }

        }

    }

}

catch

{

       Write-Host $_ -foreground red

}

finally

{

       $server.Disconnect()

}


Enter-PSSession -ComputerName $StarWindVM1 -Credential Administrator


$action = New-ScheduledTaskAction -Execute 'Powershell.exe' -Argument '-ExecutionPolicy Bypass c:\SW_Maintenance_Off.ps1 -RunType $true -Path c:\SW_Maintenance_Off.ps1.ps1'


$trigger = New-ScheduledTaskTrigger -AtStartup -RandomDelay 00:00:30


$settings = New-ScheduledTaskSettingsSet -Compatibility Win8


$principal = New-ScheduledTaskPrincipal -UserId SYSTEM -LogonType ServiceAccount -RunLevel Highest


$definition = New-ScheduledTask -Action $action -Principal $principal -Trigger $trigger -Settings $settings -Description "Maintenance Mode"


Register-ScheduledTask -TaskName "Maintenance Mode off" -InputObject $definition


Add-Content $logfile ""

Add-Content $logfile "$(get-date -f dd/MM/yyyy) $(get-date -f HH:mm:ss) Processing power off of all hosts now"

Sleep 30


# and now its time to slam down the hosts - I've chosen to go by datacenter here but you could put the cluster

# There are some standalone hosts in the datacenter that I would also like to shutdown, those vms are set to

# start and stop with the host, so i can just shut those hosts down and they will take care of the vm shutdown


shutdown-VMGuest $vCenterVMName -Confirm:$false

Write-Host "Waiting for vCenter shutdown" -ForegroundColor Green

Add-Content $logfile "$(get-date -f dd/MM/yyyy) $(get-date -f HH:mm:ss) Shutting down $vCenterVMName"

Sleep 300


Connect-VIServer $ESXIhost1 -Credential $credentials4host -WarningAction:SilentlyContinue

        Write-Host "Shutting down $ESXIhost1" -ForegroundColor Green

        Add-Content $logfile "$(get-date -f dd/MM/yyyy) $(get-date -f HH:mm:ss) Shutting down $ESXIhost1"

        Stop-VMHost $ESXIhost1 -Confirm:$false -Force

Sleep 120


Connect-VIServer $ESXIhost2 -Credential $credentials4host -WarningAction:SilentlyContinue

        Write-Host "Shutting down $ESXIhost2" -ForegroundColor Green

        Add-Content $logfile "$(get-date -f dd/MM/yyyy) $(get-date -f HH:mm:ss) Shutting down $ESXIhost2"

        Stop-VMHost $ESXIhost2 -Confirm:$false -Force


Add-Content $logfile ""

Add-Content $logfile "$(get-date -f dd/MM/yyyy) $(get-date -f HH:mm:ss) All done!"

# That's a wrap
NOTE: Install Power-CLI to use this script: Log in to StarWind VM and install vSphere PowerCLI on each StarWind virtual machine by adding the PowerShell module (Internet connectivity is required). To do so, run the following command in PowerShell:
Install-Module -Name VMware.PowerCLI -AllowClobber
Exit StarWind Maintenance Mode
To turn off the StarWind Maintenance Mode, put the following script directly to C:\ and name it as SW_Maintenance_Off.ps1.
Write-Host "Waiting untill service is starting"

$ServiceName = 'StarWindService'

$StarWind = 'SW-HCA-VM-01' #specify your StarWind VM (or host) ip-address

 $arrService = Get-Service -Name $ServiceName

 if ($arrService.Status -ne "Running"){

 Start-Service $ServiceName

 Write-Host "Starting " $ServiceName " service"

 " ---------------------- "

 " Service is now started"

 }

 if ($arrService.Status -eq "running"){

 Write-Host "$ServiceName service is already started"


#Getting StarWind devices in to "Maintenance Mode"

Import-Module StarWindX


try

{

    $server = New-SWServer -host $StarWind -port 3261 -user root -password starwind

    $server.Connect()

    write-host "Devices:" -foreground yellow


    foreach($device in $server.Devices){

        if( !$device ){

            Write-Host "No device found" -foreground red

            return

        } else {

            $device.Name

            $disk = $device.Name

            if ($device.Name -like "HAimage*"){

                $device.SwitchMaintenanceMode($false, $true)

                write-host "$disk exited maintenance mode"

            } else {

                write-host "$disk is not an HA device, maintenance mode is not supported"

            }

        }

    }

}

catch

{

       Write-Host $_ -foreground red

}

finally

{

       $server.Disconnect()

}


Unregister-ScheduledTask -TaskName "Maintenance Mode off" -Confirm:$false

 }
Conclusion
The integration of PowerChute offers a robust solution for managing power supply issues in virtualized environments. This setup is essential for the scenarios where power interruptions are a concern. By following the instructions for installing and configuring PowerChute, users can enhance the resilience and reliability of their IT infrastructure against unexpected power disruptions.
