StarWind Command Center:
Quick Start Guide
- June 09, 2020
- 19 min read
- Download as PDF
Introduction
StarWind Command Center is designed to deliver true single-pane-of-glass monitoring and management for StarWind HyperConverged Appliances on Hyper-V. It combines both monitoring and management functionality to not only check Hyper-V cluster and nodes’ health state as well as performance metrics from convenient dashboards but also administrate the entire StarWind HCA Hyper-V environment starting from nodes and networks and up to VM management.
Getting started with StarWind Command Center
Logging into the Command Center
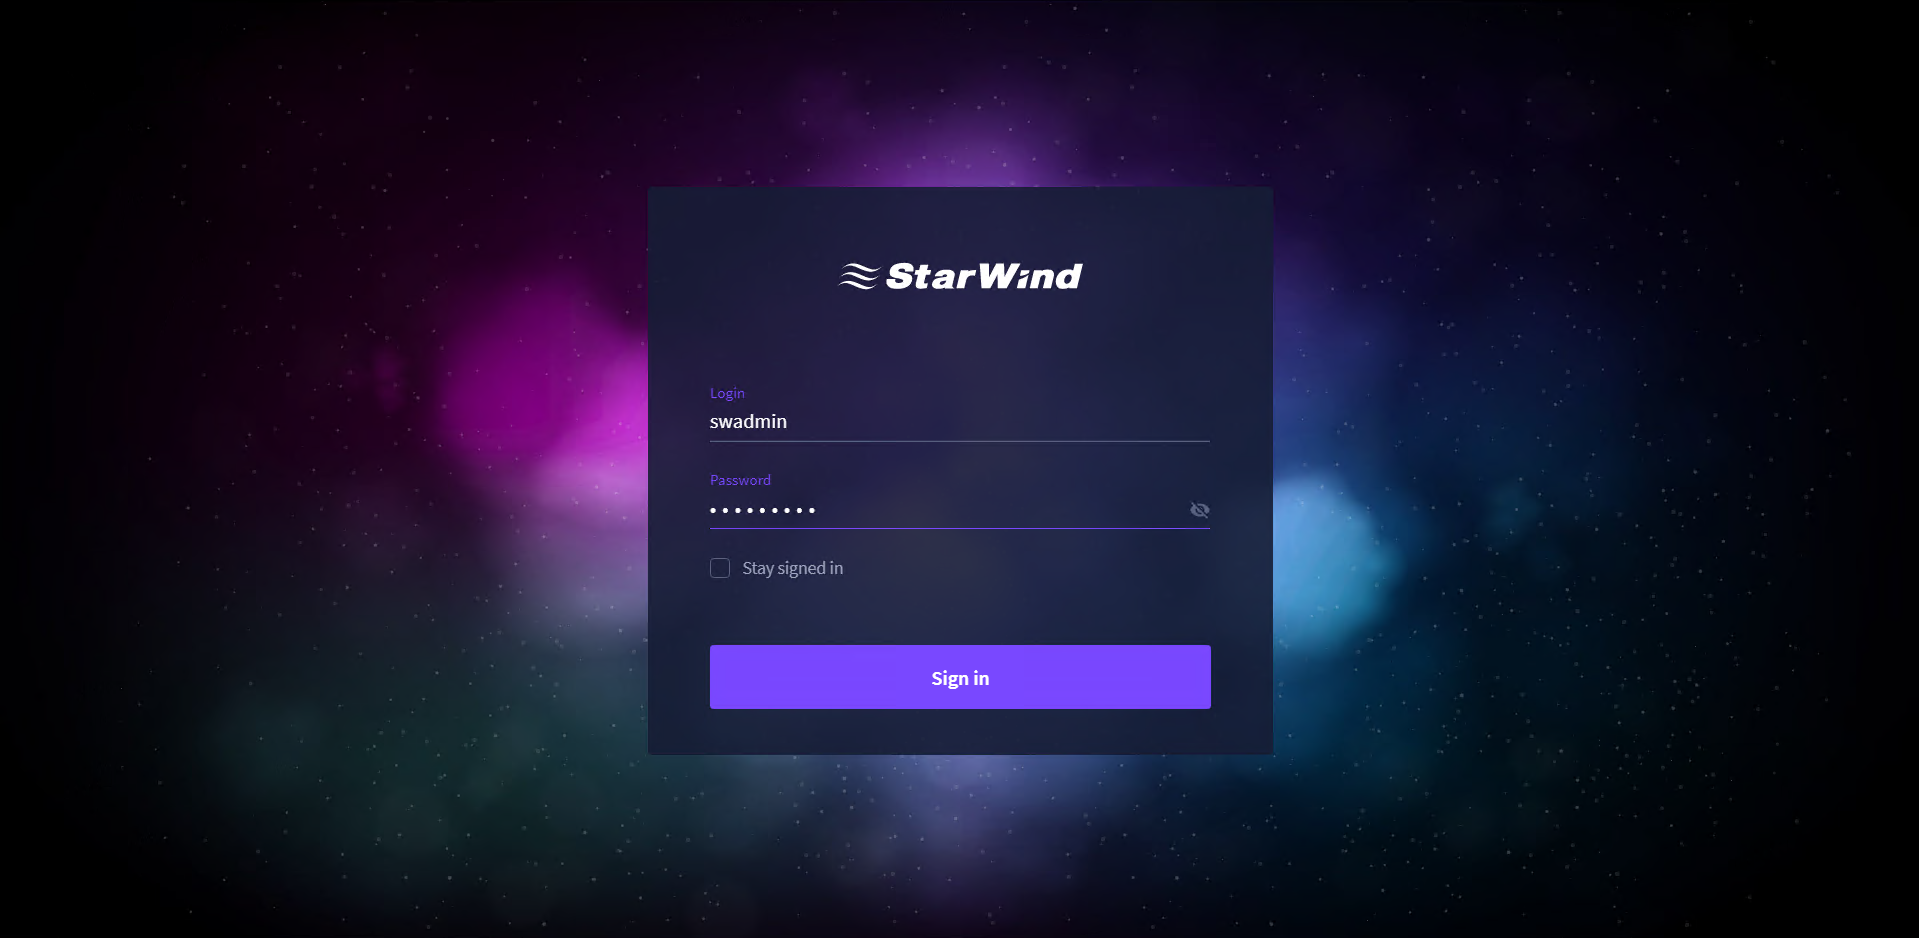
1. To log into StarWind Command Center, enter https://*Command Center IP address* in a web browser. Please use credentials that were configured during the installation.
Main Menu Options
This part provides a detailed description of StarWind Command Center monitoring and management capabilities.
DASHBOARD
The DASHBOARD item provides a set of widgets that allow monitoring of virtualized infrastructure.
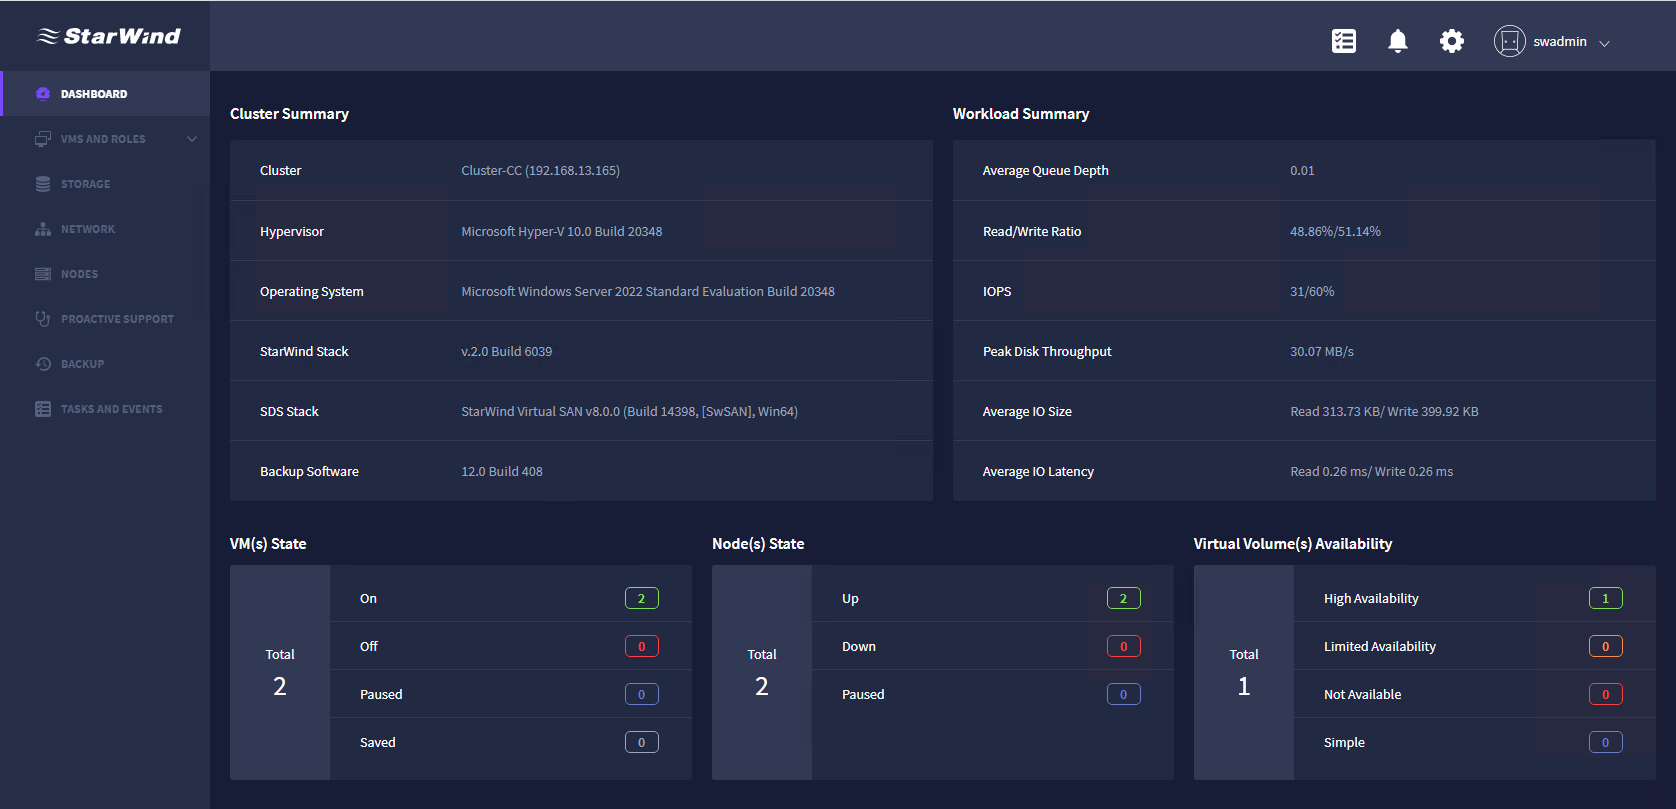
DASHBOARD consists of the following widgets:
1. Cluster Summary – delivers the general information about the cluster (including the cluster name and IP address), hypervisor, operating system, StarWind Stack version, SDS Stack version, and backup software.
2. Workload Summary – delivers the general cluster workload information, including the average queue depth, read/write ratio, IOPS (workload intensity measured in percentile), peak disk throughput, average IO size, and average IO latency.
3. VM(s) State – delivers the overall information on the state of the clustered VMs, including on, off, paused, and saved ones.
4. Node(s) State – delivers the overall information on the state of the clustered nodes, including up, down, and paused ones.
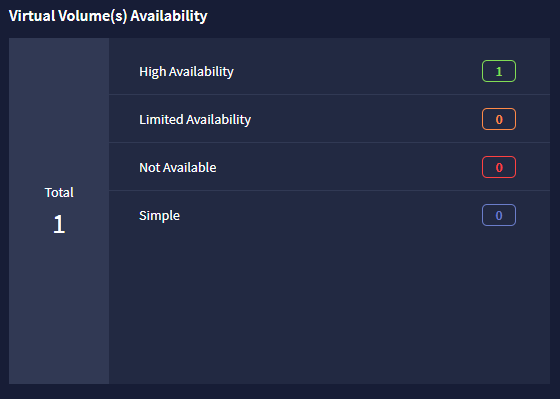
5. Virtual Volume(s) Availability – delivers the overall information on the state of virtual volumes, including those that are of high availability (StarWind HA volumes that are synchronized and available on both nodes), limited availability (StarWind HA volumes that are synchronized and available currently only from one node) and ones that are not available (offline StarWind volumes) and simple (StarWind volumes that are not replicated).
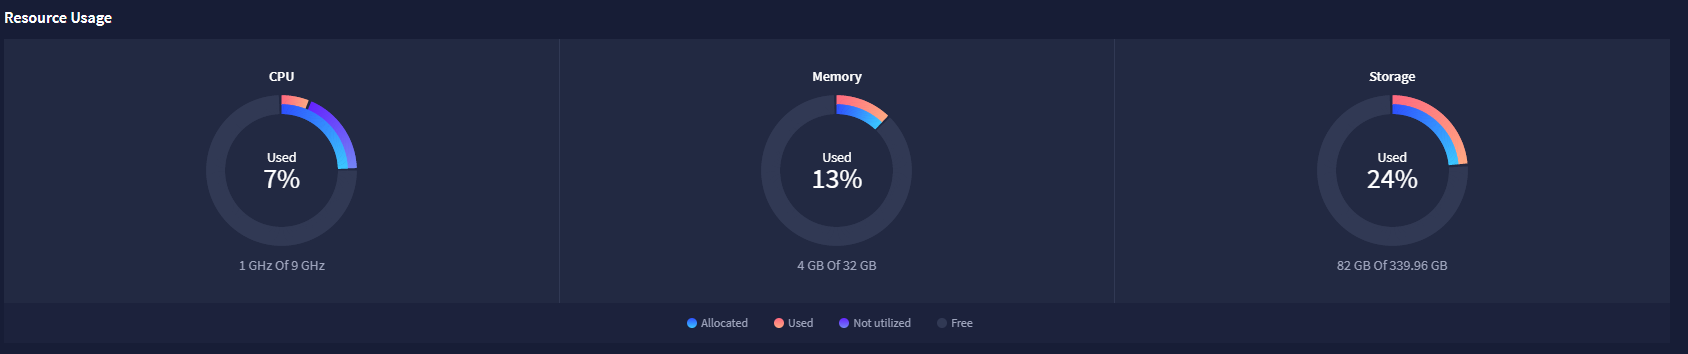
6. Resource usage – delivers information on usage of CPU, Memory, Storage, and Backup Repository.
7. Performance – delivers the information in the form of graphs about IOPS, Disk Throughput, and Cluster-Wide Controller Latency. These metrics can be checked live, for last hour, last day, last week, last month, or last year.
8. Tasks and events – delivers the information on tasks and events in StarWind Command Center.
VMs and ROLES
The VMs and ROLES item contains VIRTUAL MACHINES and ROLES sections.
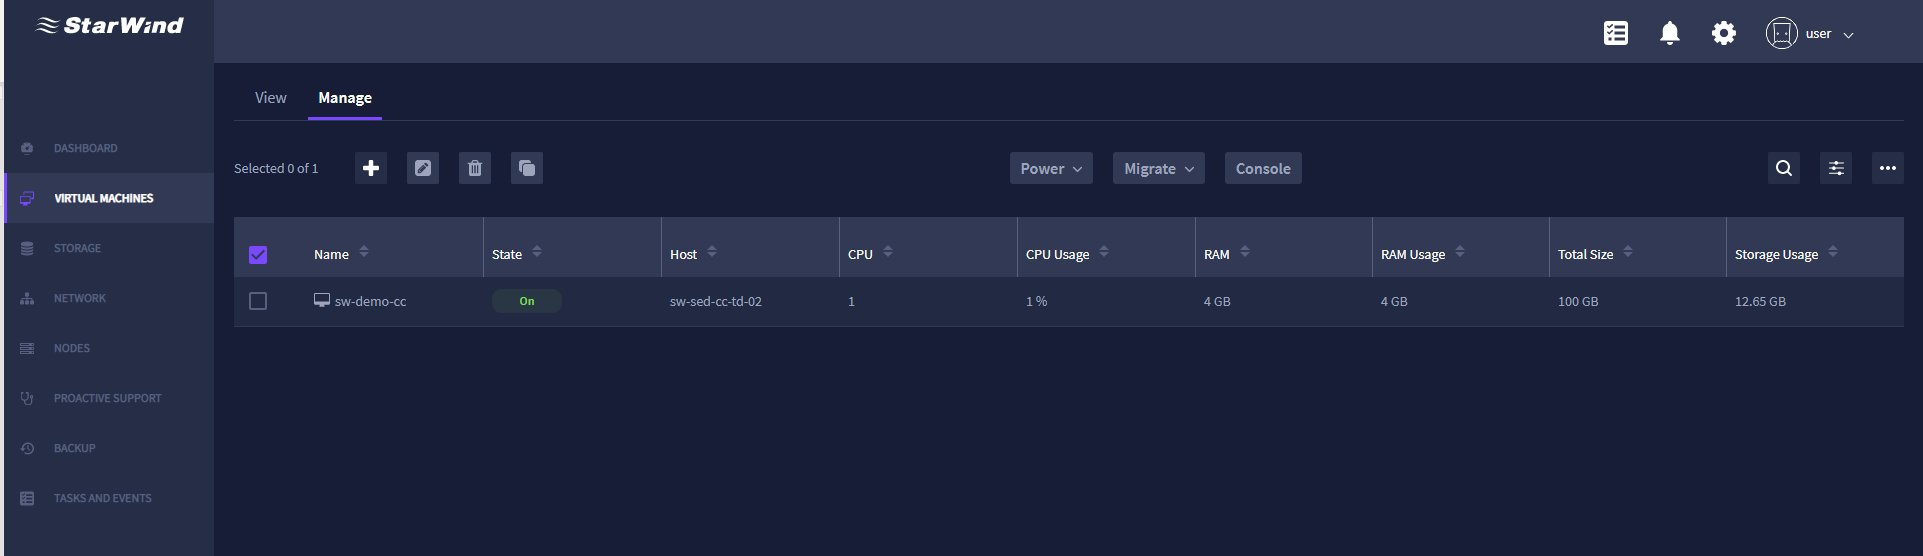
The VIRTUAL MACHINES item consists of View and Manage tabs.
View
The View tab consists of the following widgets:
1. VM(s) Summary – provides information on a number of VMs, their state, and availability.

2. Resources Usage – provides information on CPU, memory, and storage utilization.
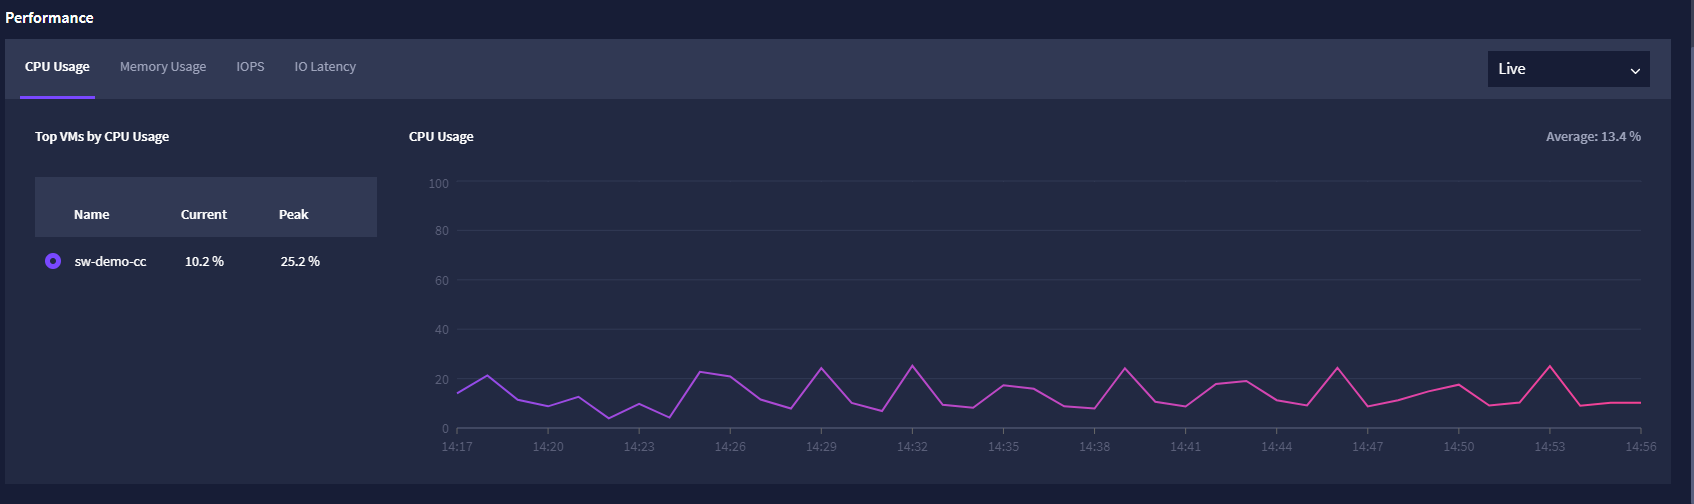
3. Performance – provides information on the CPU usage, memory usage, IOPS, and IO latency as per the selected VM in the form of graphs.
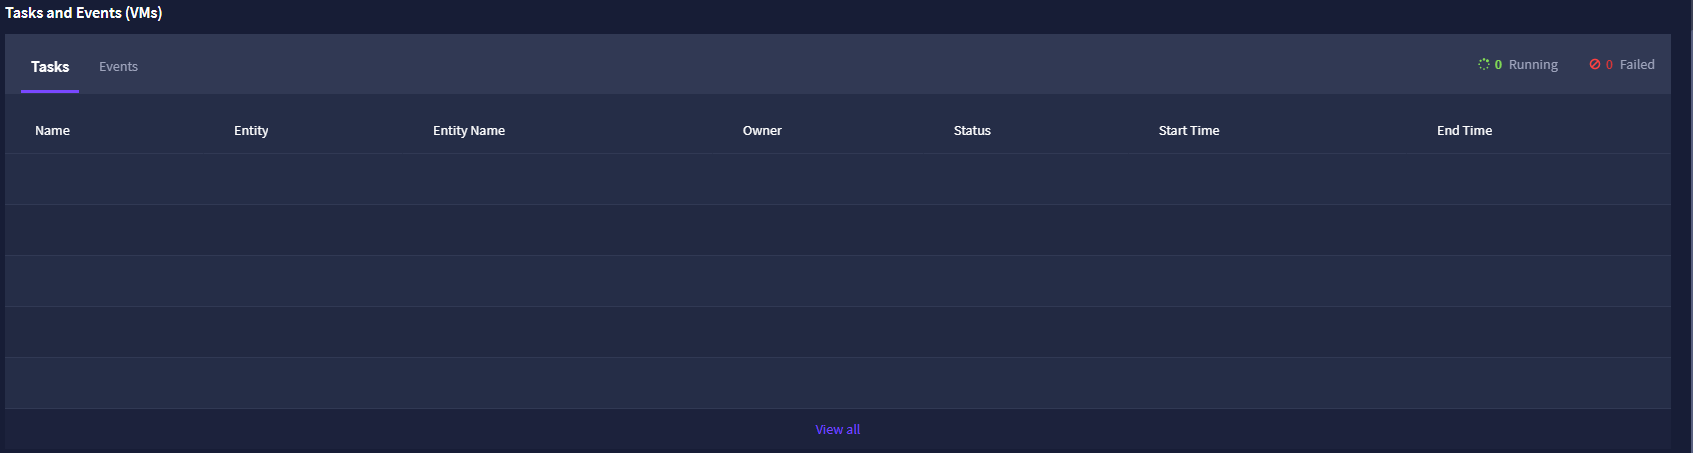
4. Tasks and Events (VMs) – provides information on the running and executed tasks and events related to VM operation.
Manage
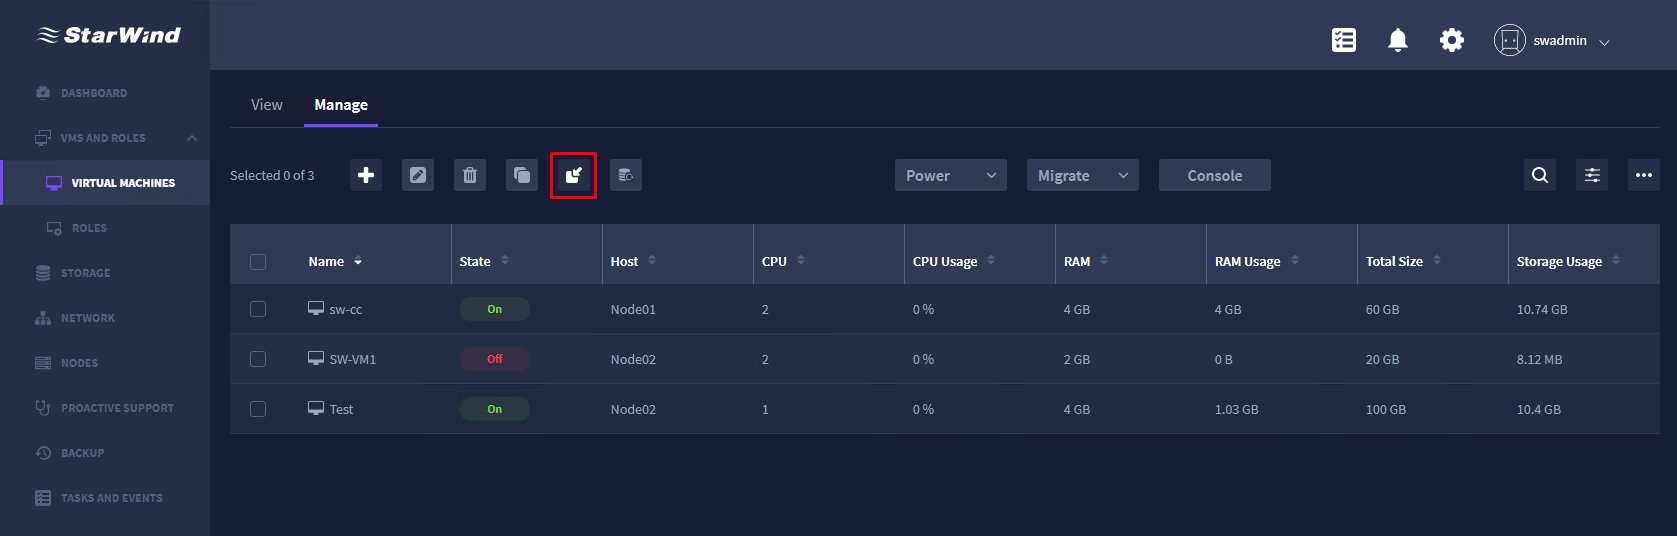
This option delivers the ability to perform various operations with VMs such as creating new VMs, editing the settings of the existing VMs, removing VMs, cloning VMs, migrating VMs, opening VM console, migrating VMs from external Hyper-V host, backup jobs of the VM
Creating a new VM
1. To create a new VM, click the Add icon
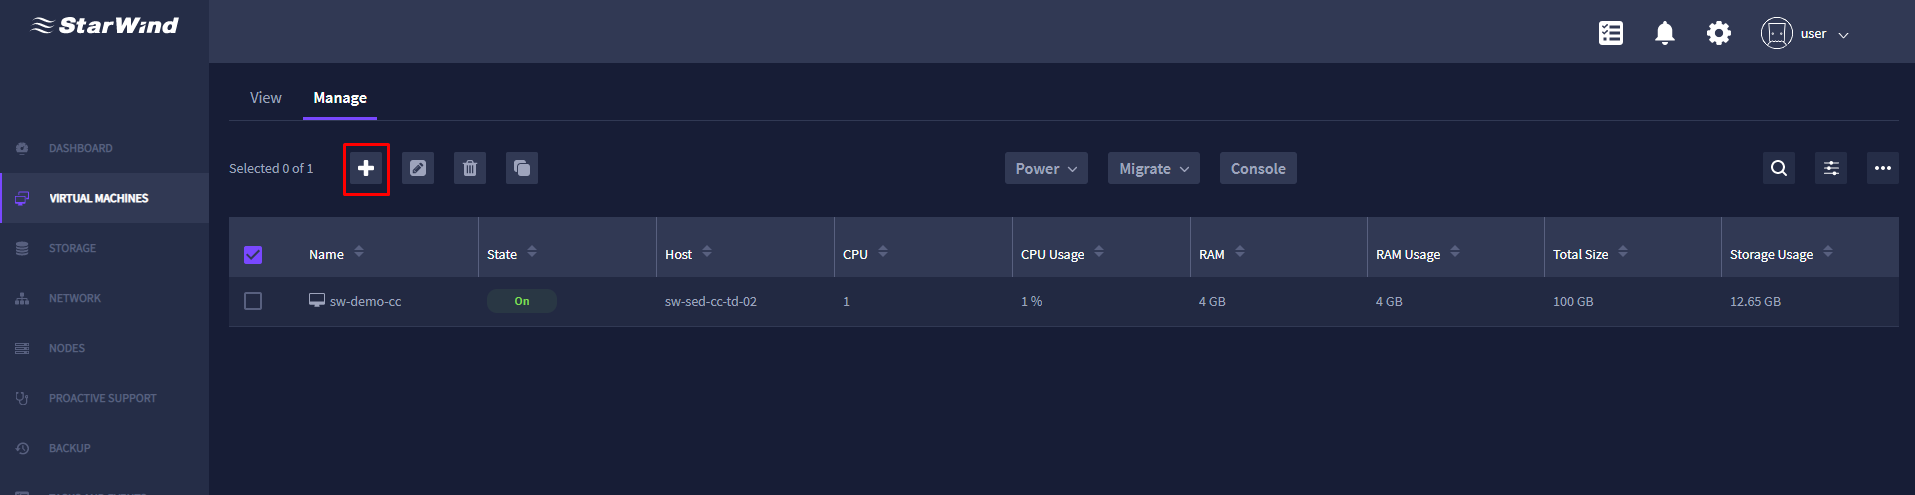
2. Specify the required name, number of vCPUs, amount of RAM, disk size, assign a network adapter, installation media, boot order, and VM files location.
3. To add a new or existing disk or a network adapter to a VM, click the Add device button and select the required option.
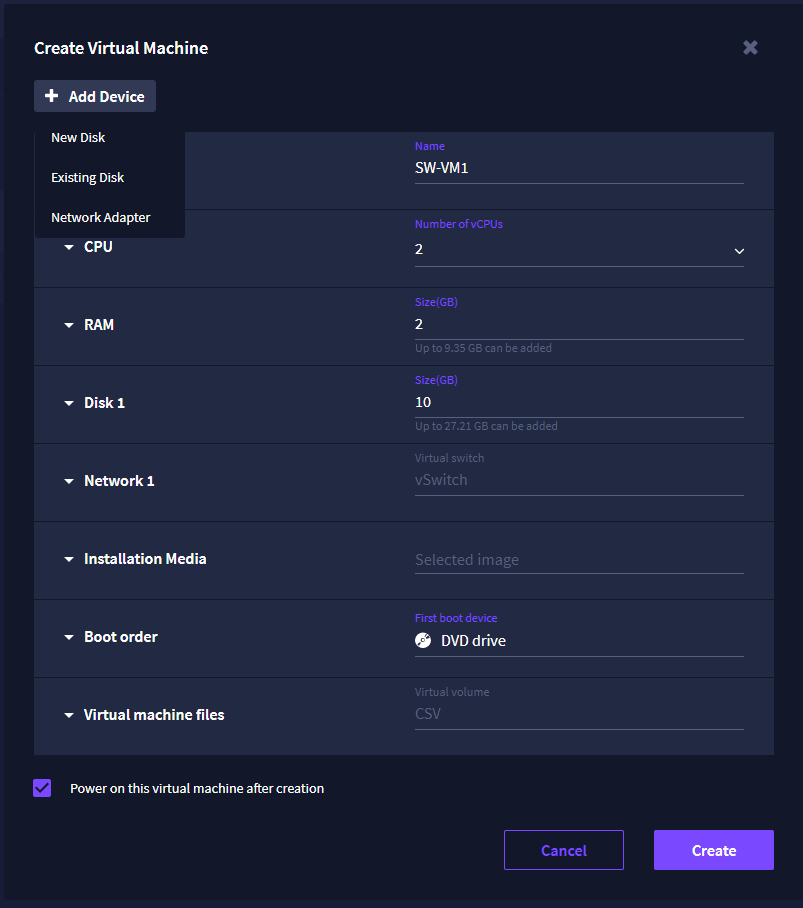
4. Click Create to create a new VM.
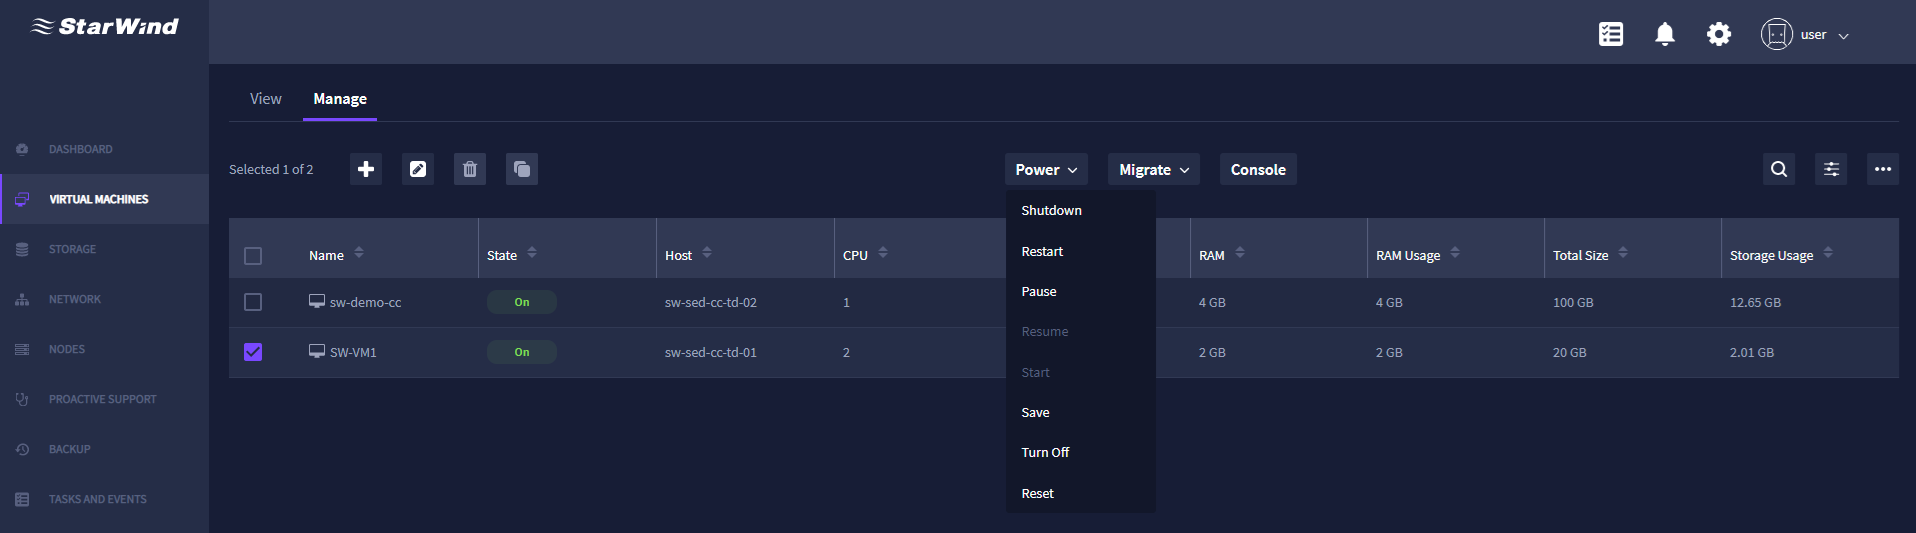
Performing power management operations on a VM
1. To perform power management operations with a VM, select the required VM, and click the Power button.
2. In the drop-down list, select the required option: Shutdown, Restart, Pause, Resume, Start, Save, Turn Off, or Reset.
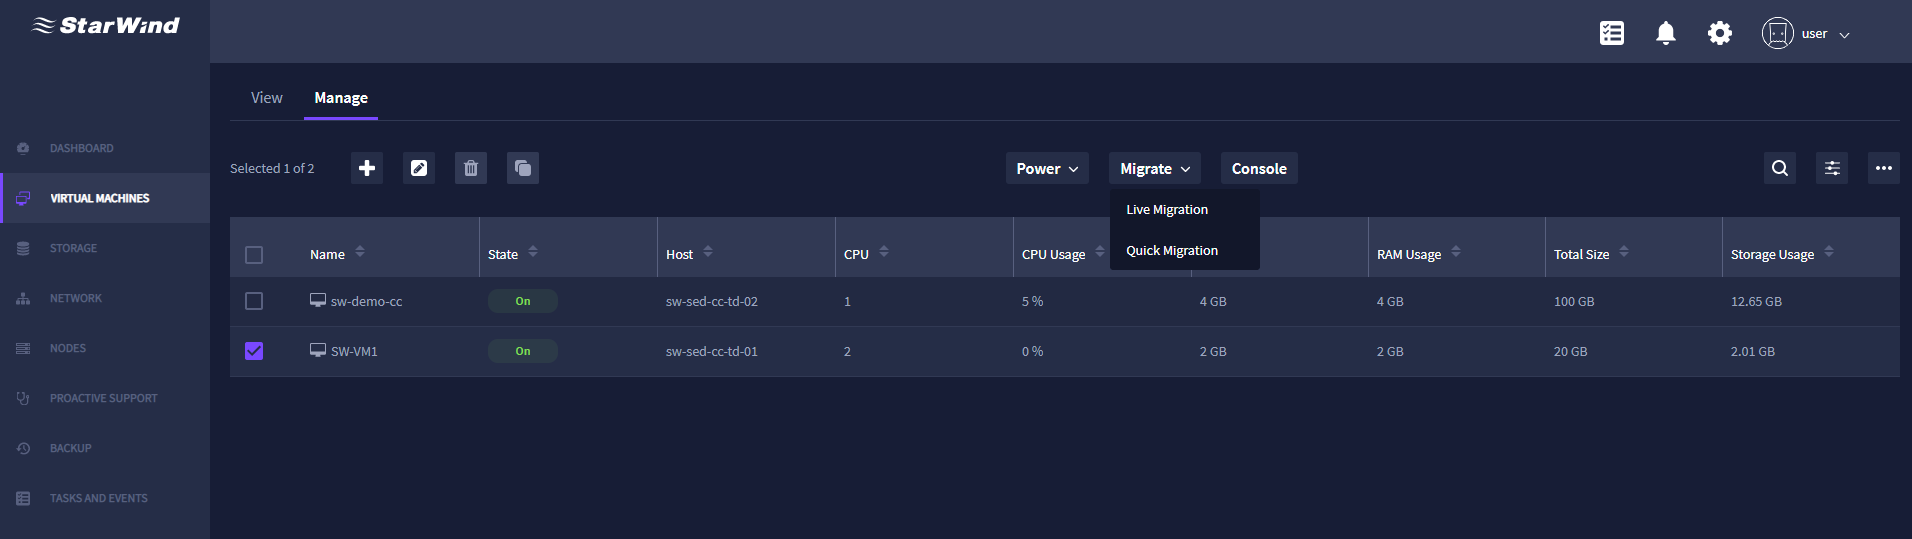
Performing VM migration
1. To perform migration operations with a VM, select the required VM, and expand the Migrate drop-down list.
2. In the drop-down list, select the required action: Live Migration or Quick Migration.
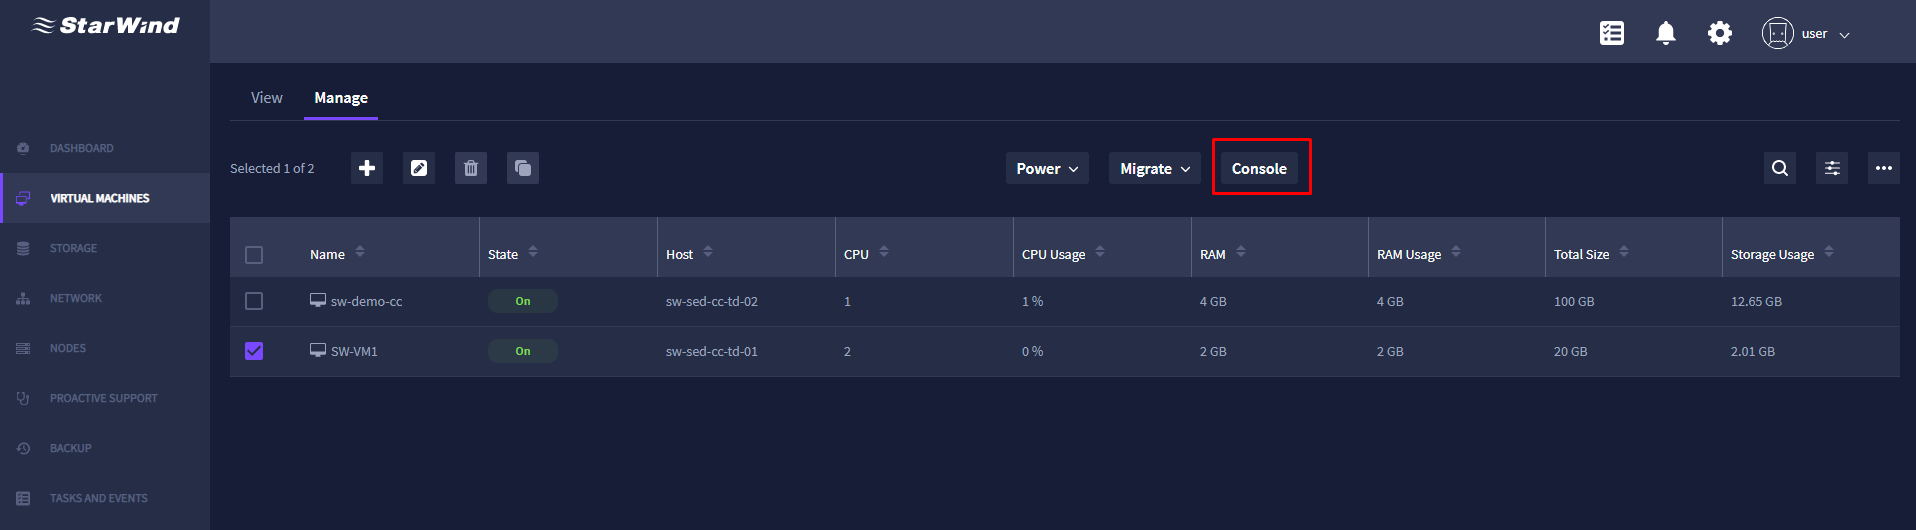
Accessing the VM console
1. To access the VM console, select the required VM, and click the Console button.
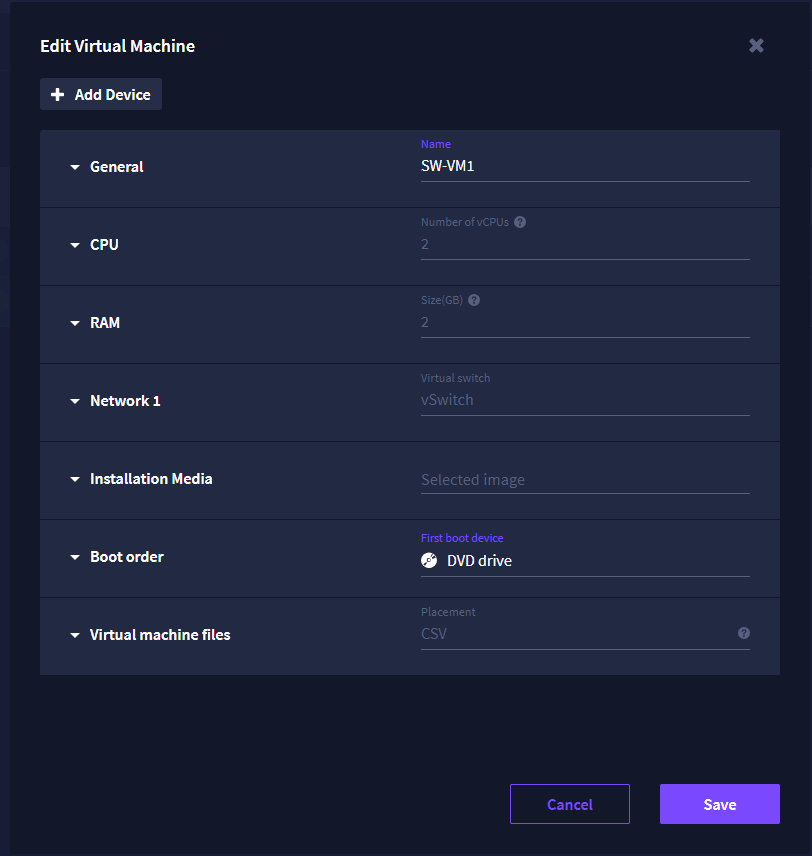
Modify the existing VM settings
1. To modify the existing VM settings, select the required VM, and click the Edit icon.
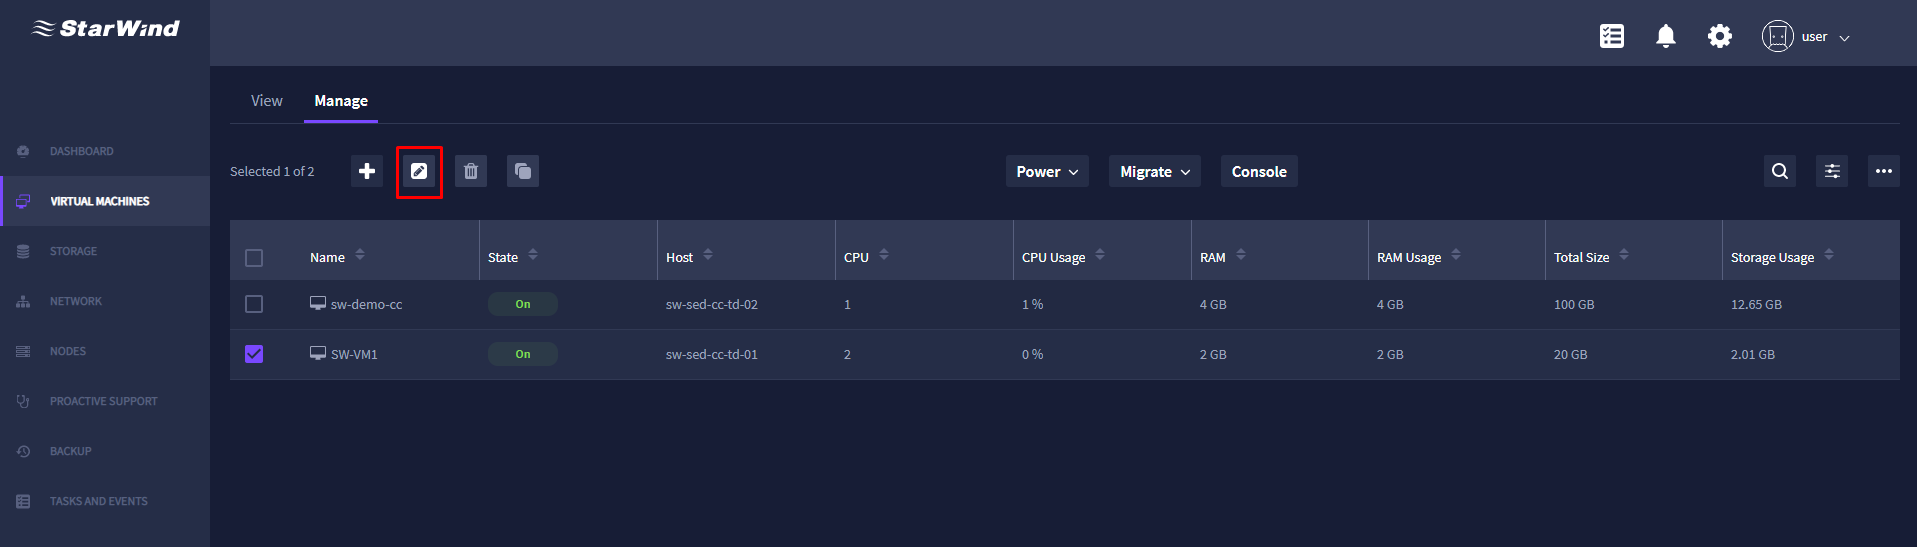
2. Specify the required settings and click Save.
Deleting a VM
1. To delete an existing VM, select the required VM, shut it down, and click the Delete icon.
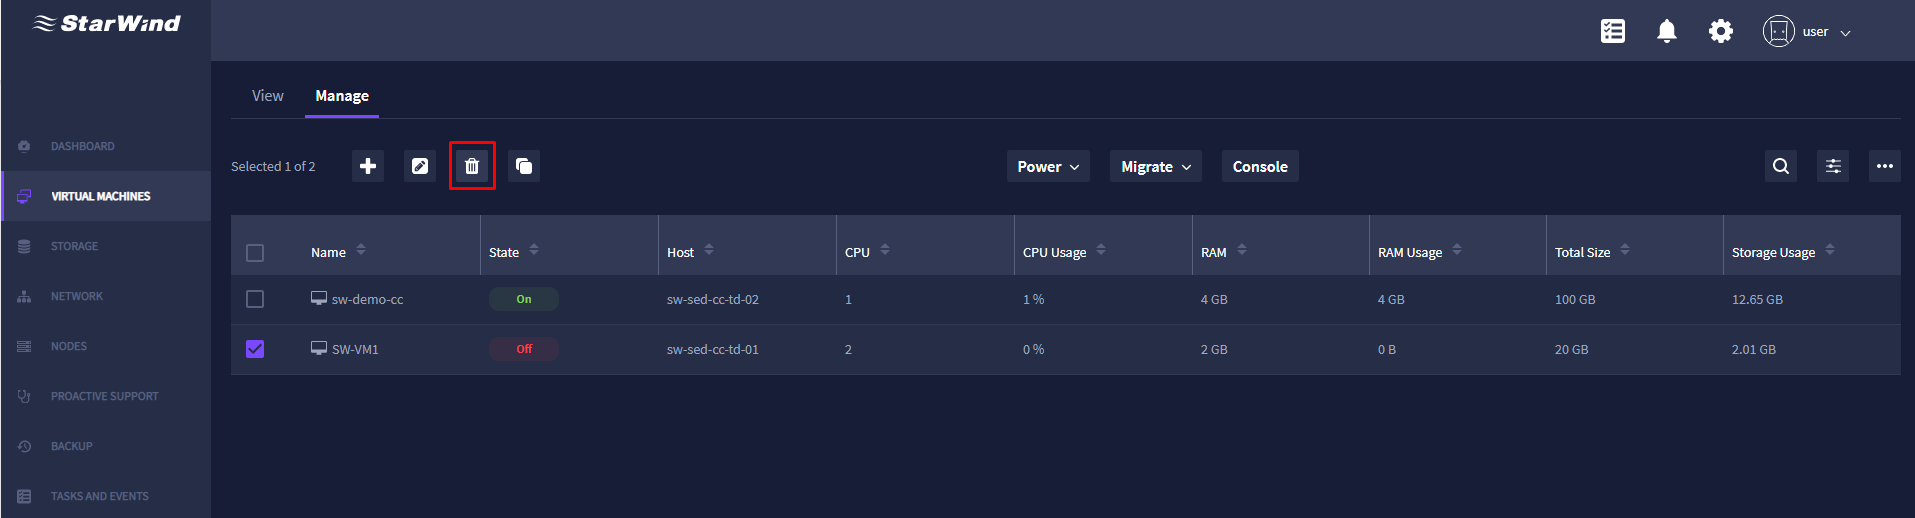
NOTE: StarWind Command Center does not allow deleting running VMs.
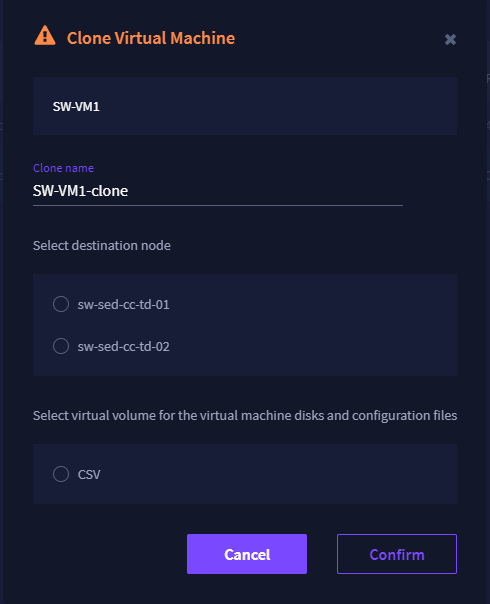
Cloning a VM
1. To clone a VM, select the required instance, shut it down, and click the Clone icon.
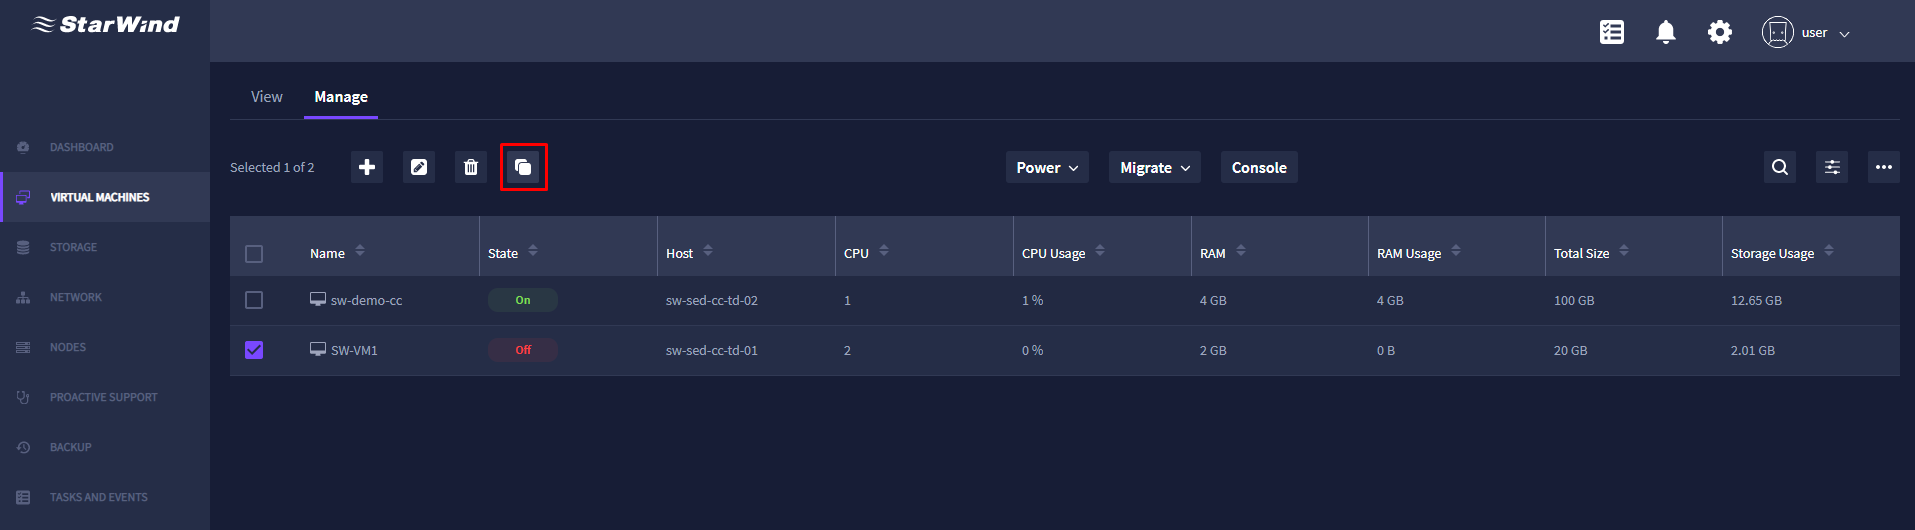
NOTE: StarWind Command Center does not allow cloning running VMs.
2. Specify the clone VM name if needed, select the destination node and a virtual volume that will store disks and configuration files of a cloned VM. Click Confirm.
Migrate VM from the Hyper-V host out of the cluster
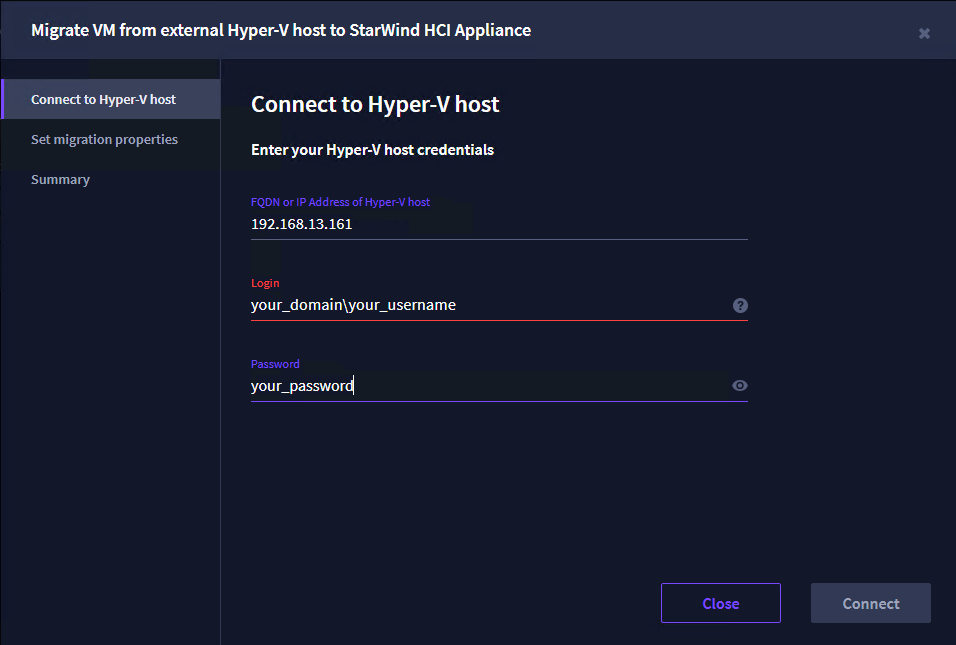
1. Press the Import (migrate) icon to migrate VM from external Hyper-V host.
2. Enter IP address and user credentials to connect to the Hyper-V host out of the cluster and press Connect.
3. Specify migration properties and press Validate.
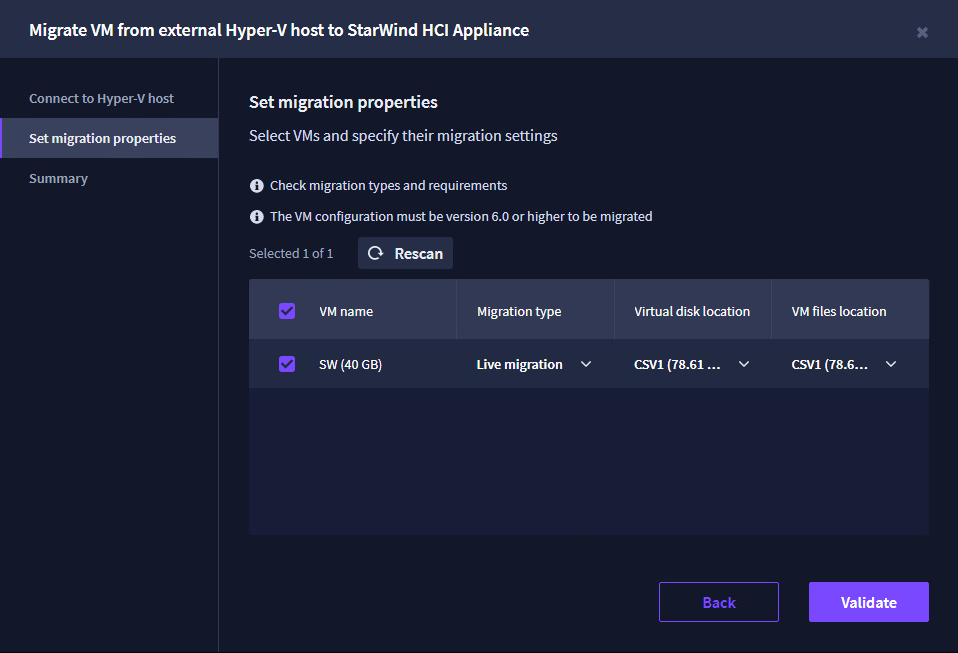
NOTE: Quick migration involves downtime for VMs and workloads running in them. To perform the Quick Migration, please shut down the VM and merge all its active checkpoints.
4. To perform the Live Migration, the following conditions must be met:
- Hyper-V hosts (or the existing Hyper-V host and target Failover Cluster) have the same CPU generation or the VMs have processor compatibility enabled. Double-check the “Migration to a physical computer with a different process version” feature to be enabled. Please note that enabling this feature requires VM downtime.
- Failover Cluster has sufficient CPU, RAM, and storage resources for VMs.
- VMs are connected to virtual switches with the same name and the Protected Network setting is enabled.
- VMs have no checkpoints to merge.
- The amount of time it takes to migrate a virtual machine to a target cluster depends on the amount of RAM, storage resources set in the virtual machine, and the connection speed to the storage and network bandwidth between the Hyper-V host and the target Failover Cluster.
5. Review the migration properties and confirm the selected VMs to have backups. Make sure that none of the selected VMs contain the Active Directory role installed. Press Migrate.

Check backup jobs of the VM
1. Press the icon of the Backup jobs to check the backup jobs for a selected VM or role.
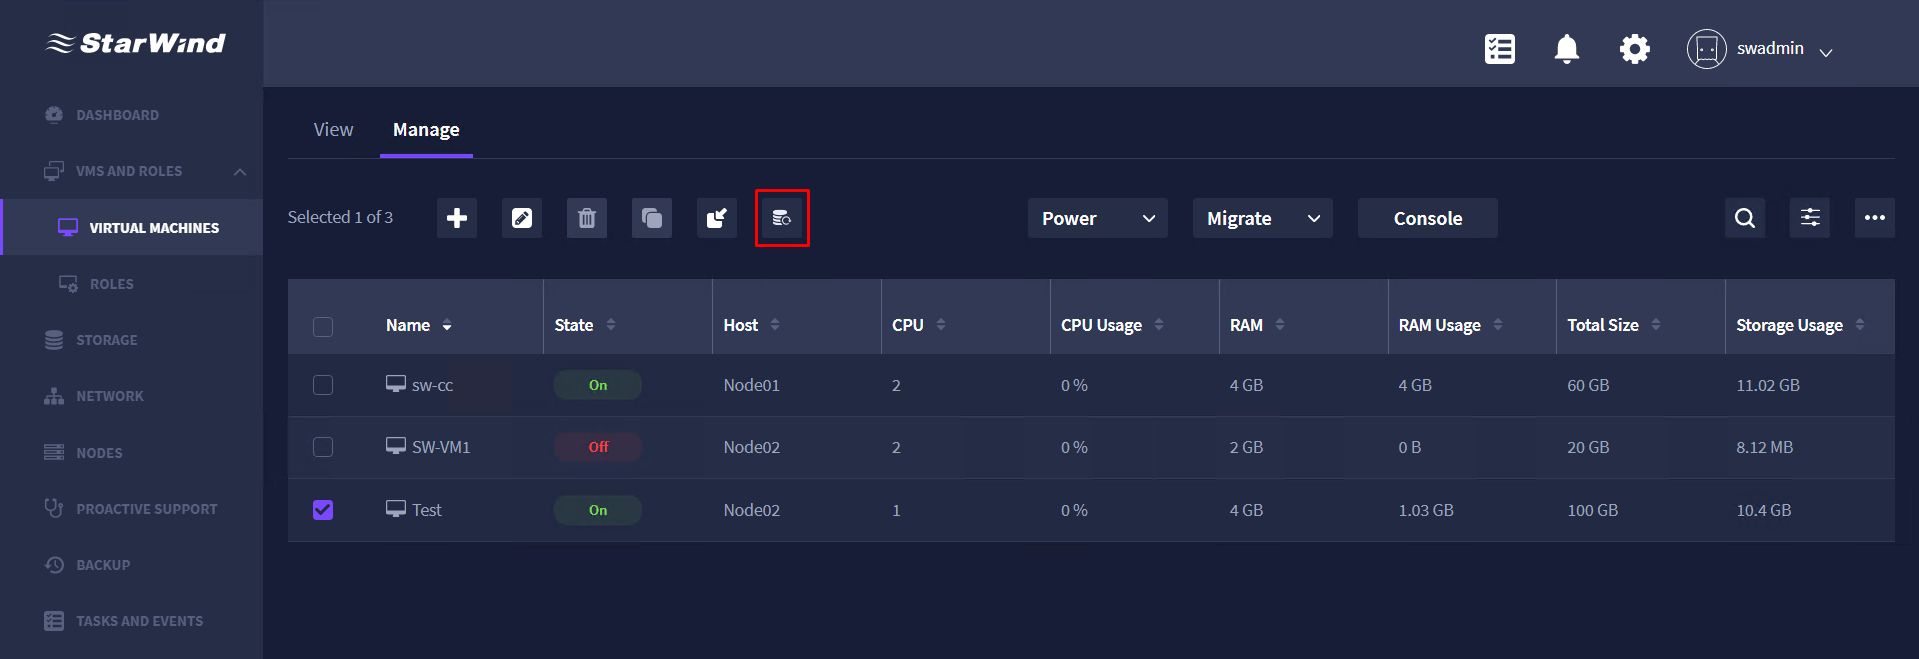
2. Include the VM to a backup job by ticking the corresponding checkbox or removing it from the job by unchecking the checkbox. Press Next.
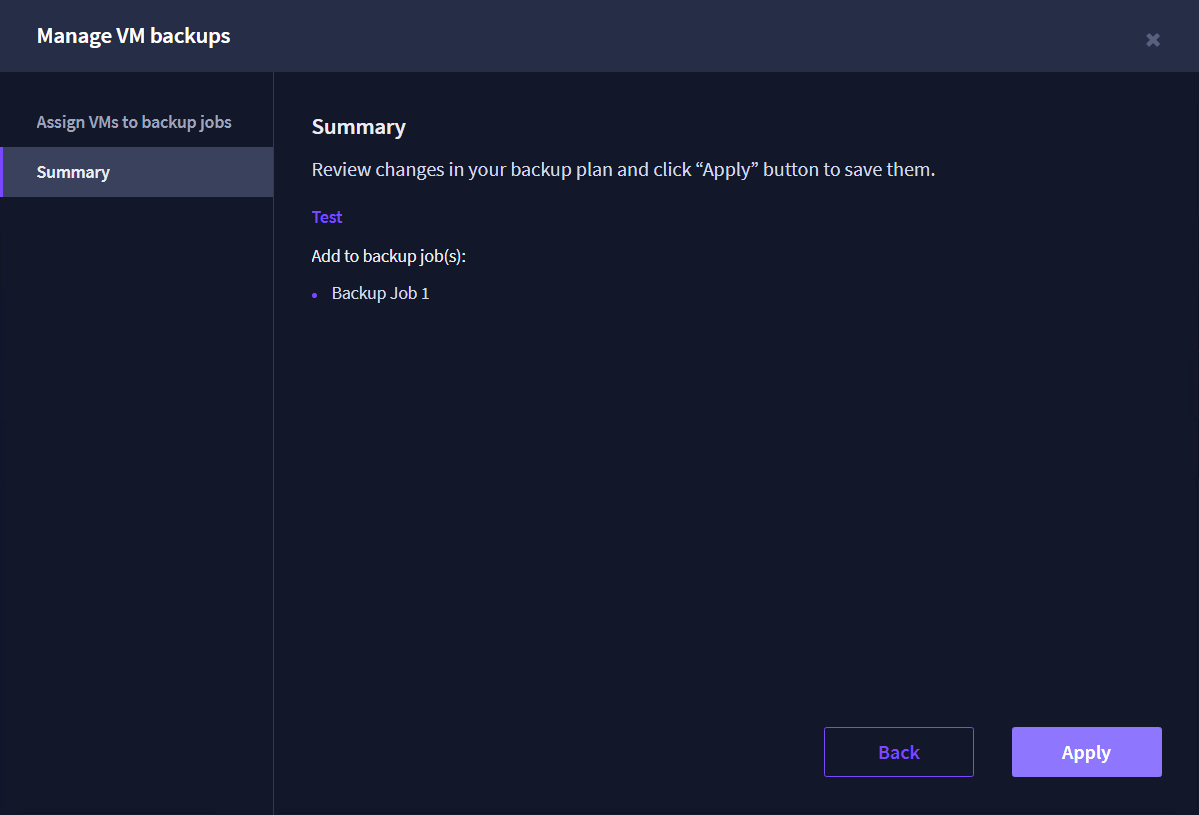
3. Review the backup plan changes and press Apply to save them.
ROLES section consists of one tab with a cluster roles list.
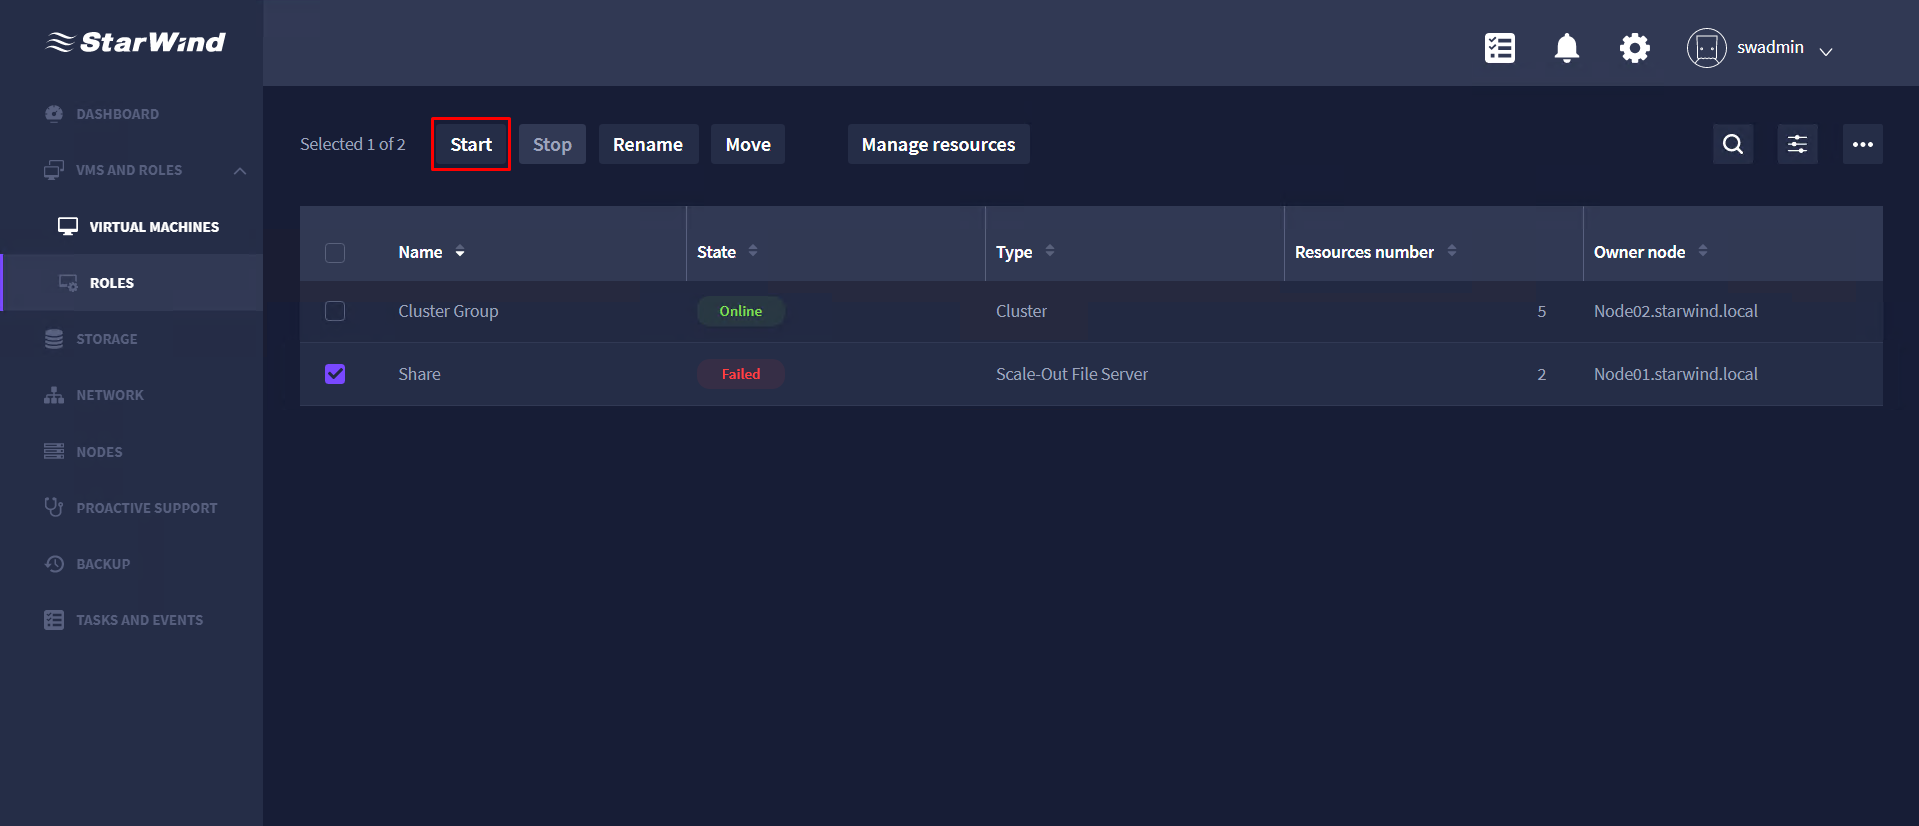
To perform operations on a cluster role, select the required role and press the icon with the required action: start, stop, rename, move, or manage resources.
Starting a cluster role
1. Select a role from the cluster role list and press Start.
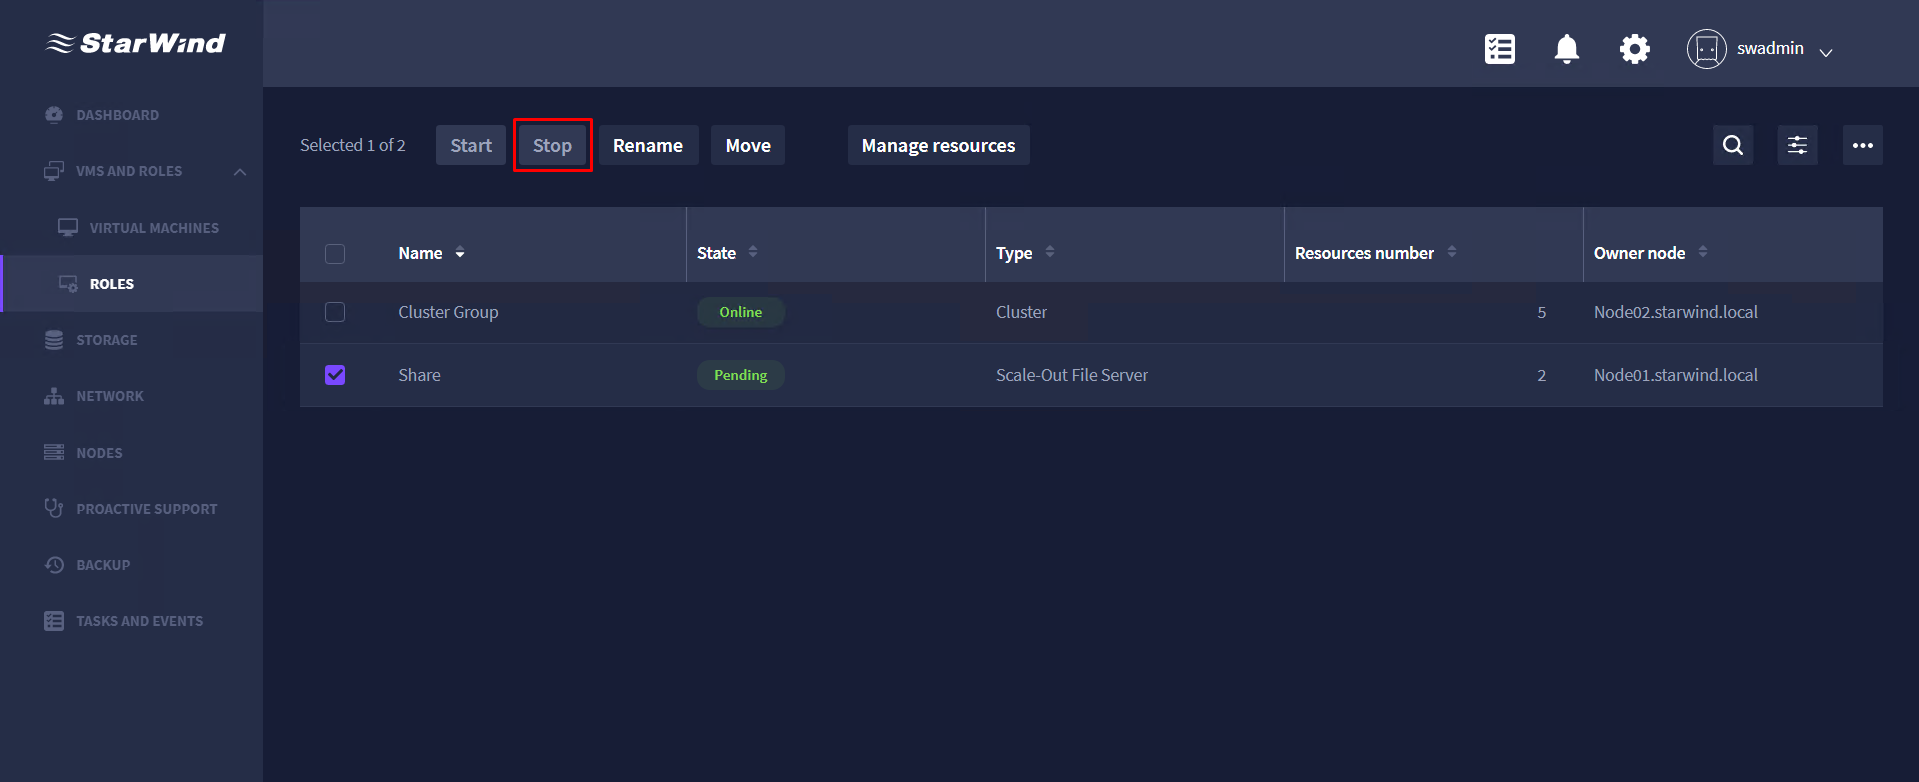
Stopping a cluster role
1. Select a role from the cluster role list and press Stop.
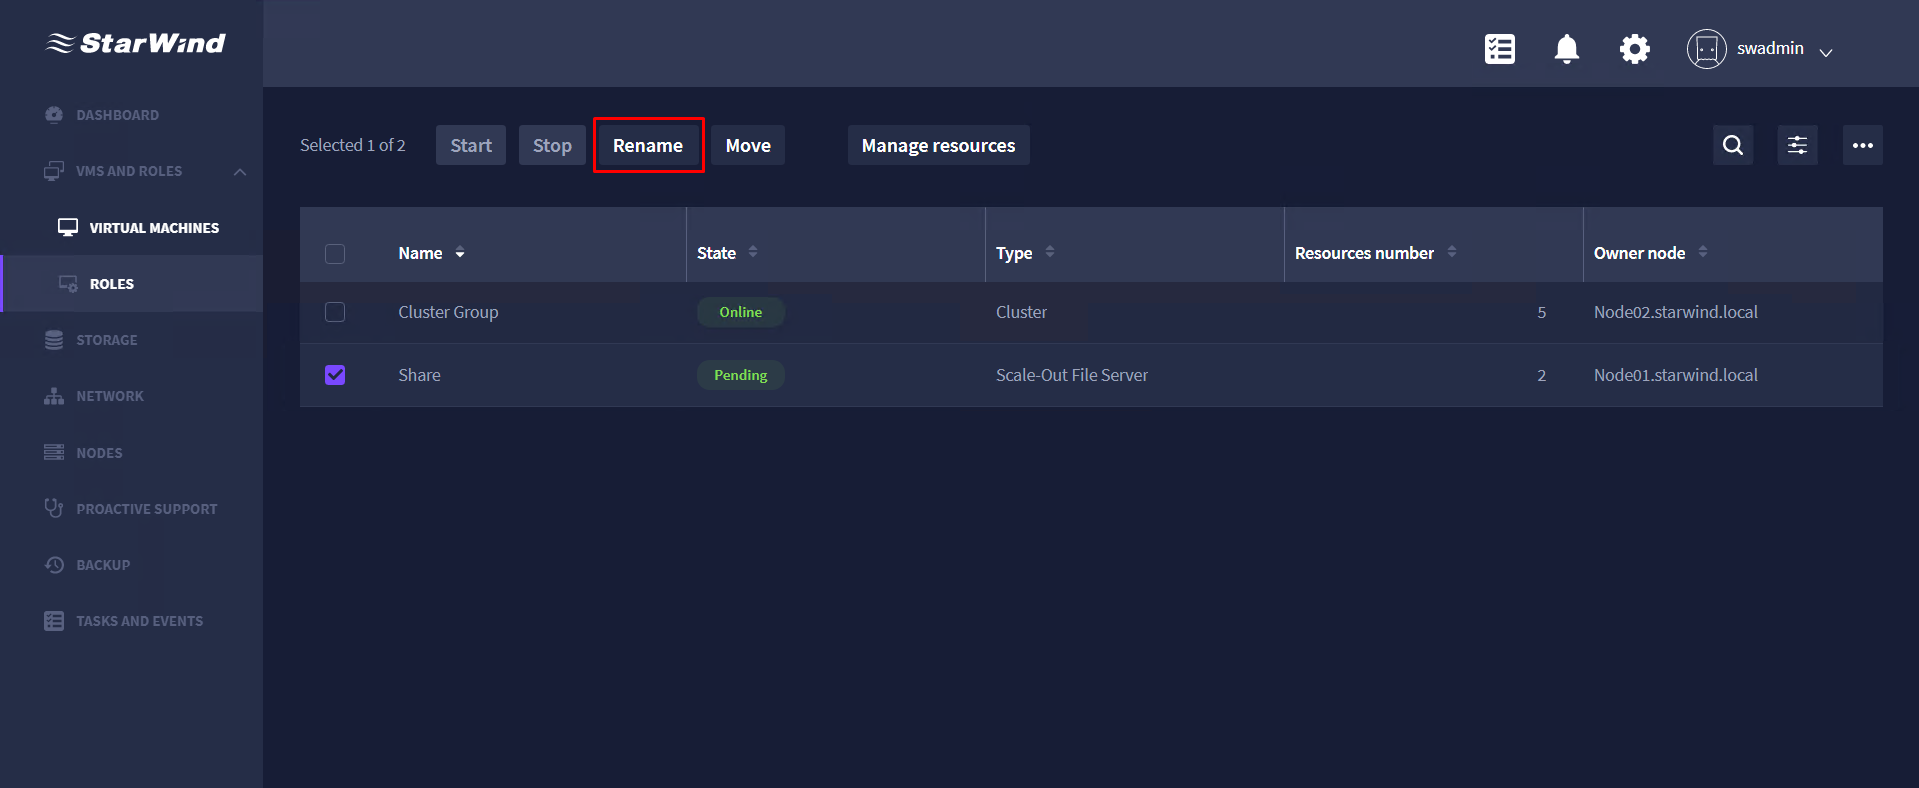
Renaming a cluster role
1. Select a cluster role from the cluster role list and press Rename.
Moving a cluster role
1. Select a role in the cluster role list and press Move.

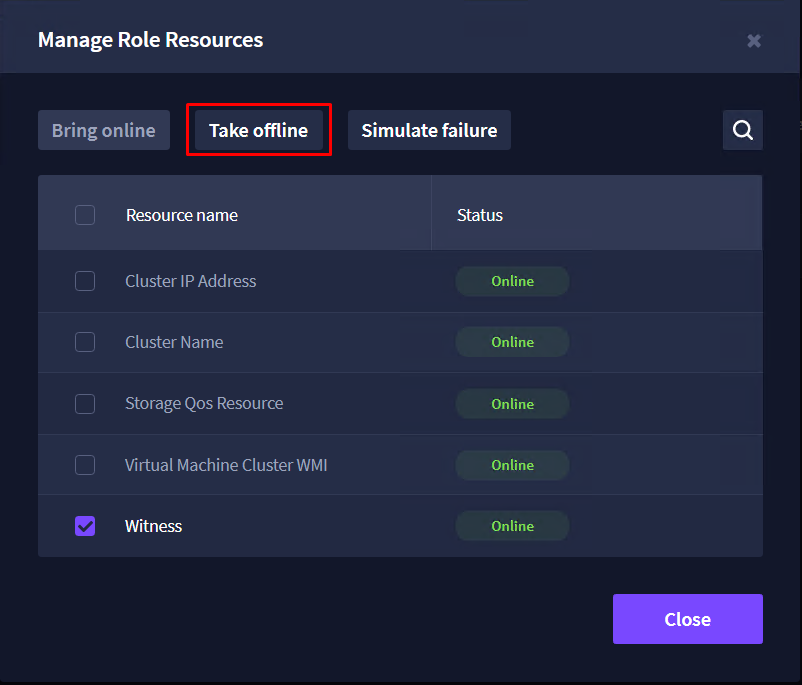
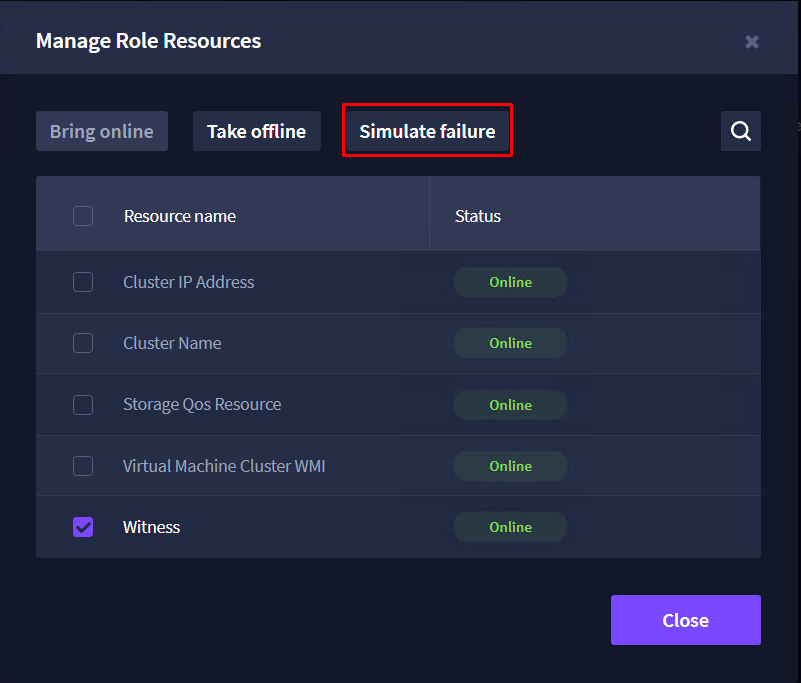
Manage resource action allows bringing a resource online, offline, or simulating its failure.
Bringing a cluster role resource online
1. Select a cluster role and press Manage resource.
2. Select a required resource from the drop-down list and press Bring online.

Taking a cluster role resource offline
1. Select a cluster role and press Manage resource.
2. Select a resource and press Take offline.
Simulating a cluster role resource failure
1. Select a cluster role and press Manage resource.
2. Select a resource from the drop-down list press Simulate failure.
STORAGE
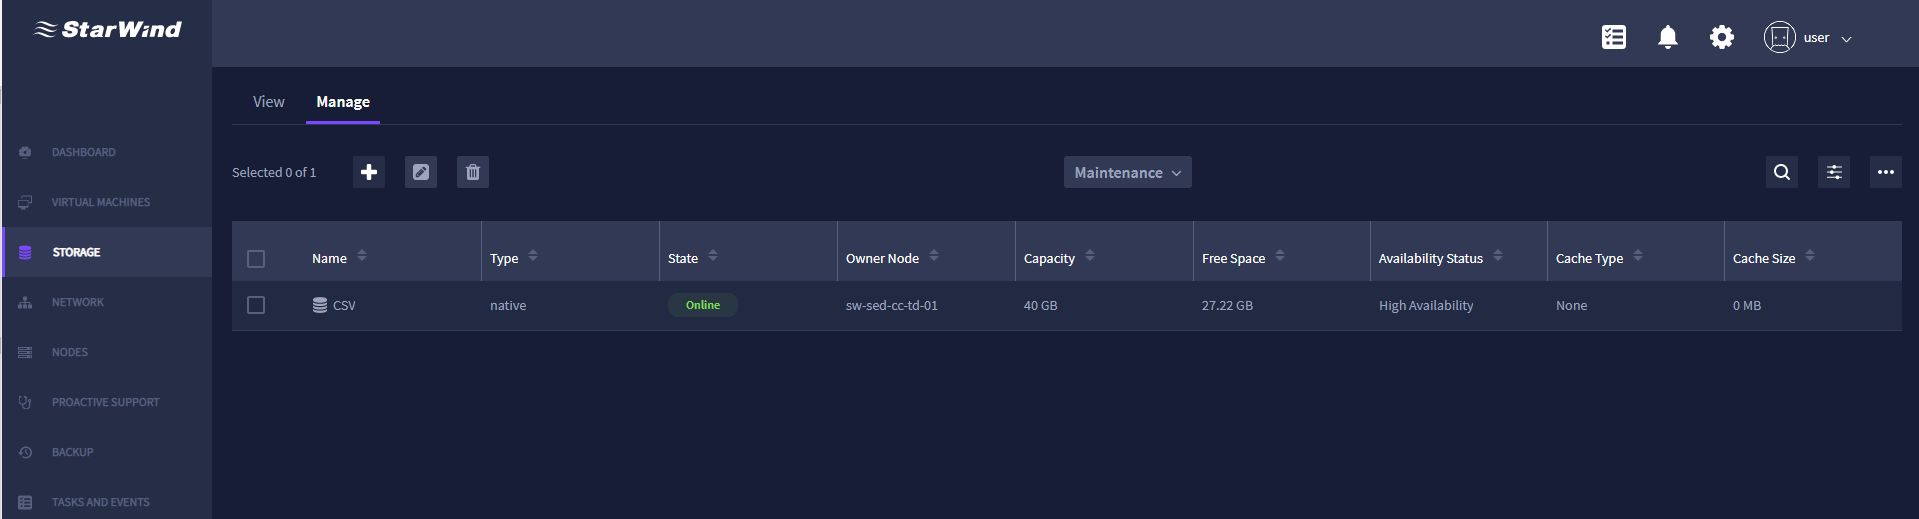
The STORAGE item provides View and Manage tabs.
View
This tab consists of the following widgets.
1. Virtual Volume(s) Availability – provides information on the availability of the virtual volumes.
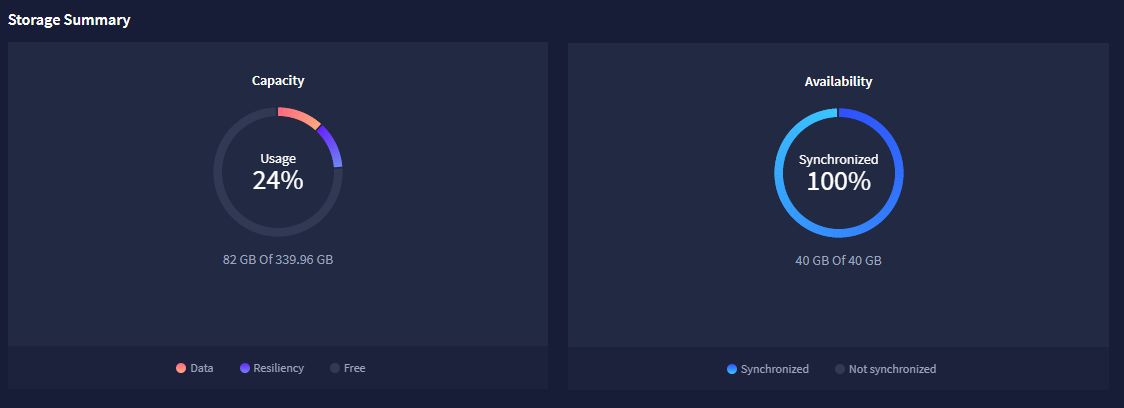
2. Storage Summary – provides information on storage availability and available capacity.
3. Performance – provides information on the following metrics: IOPS, Disk Throughput, and Cluster-Wide Controller Latency.

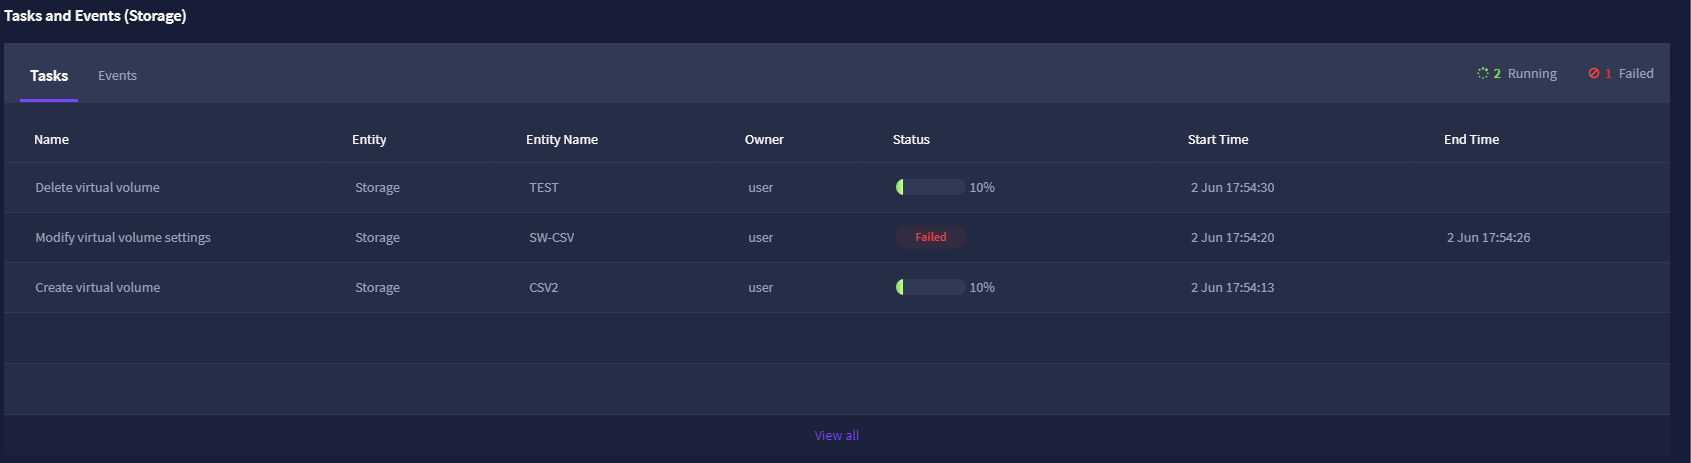
4. Tasks and Events (Storage) – provides information on the running and finished tasks and events related to virtual volumes.
Manage
Manage tab delivers the ability to create new virtual volumes, remove them, or modify the settings of the existing ones.
Creating a new virtual volume
1. To create a new volume, click the Add icon.
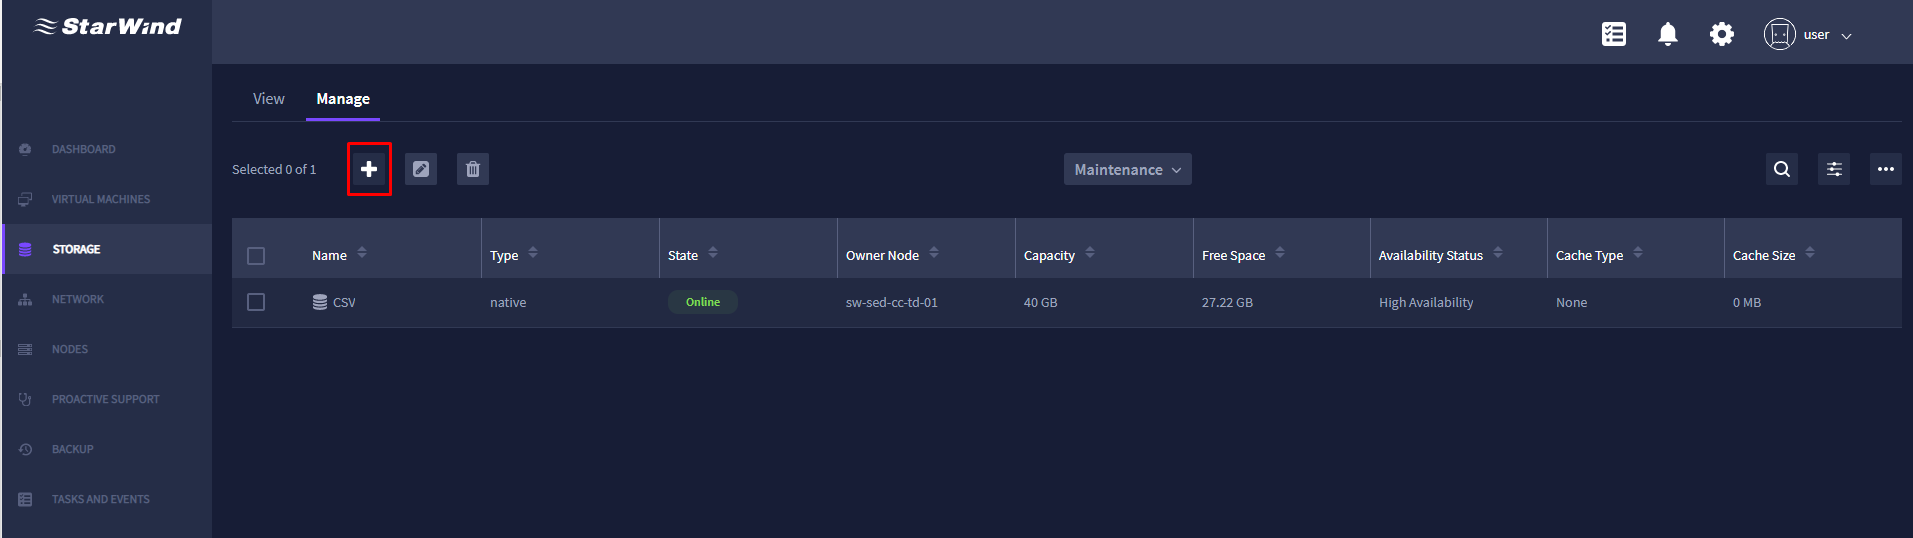
2. Specify the disk name, size in GB, and replication factor.
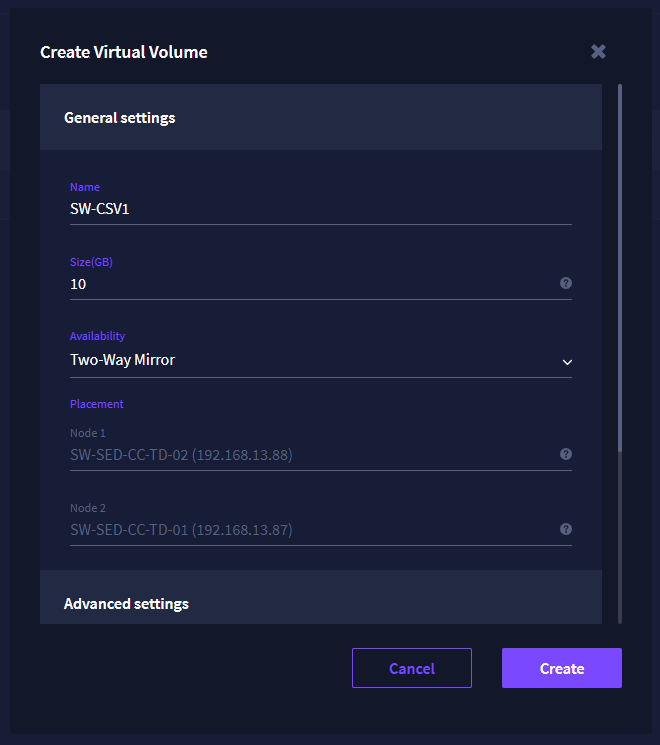
Availability can be set to the following values:
Simple – StarWind virtual volume which is not replicated
Two-Way mirror – 2-way replicated StarWind HA virtual volume
Three-Way mirror – 3-way replicated StarWind HA virtual volume
NOTE: The availability of the options depends on the number of StarWind nodes.
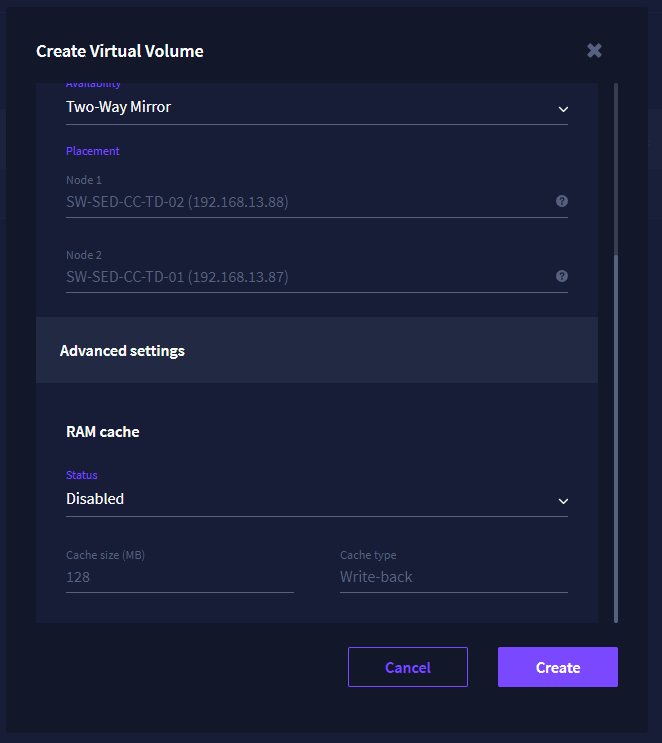
3. If required, enable the RAM cache under the Advanced settings section, specify the size in MB and cache type, and click Create.
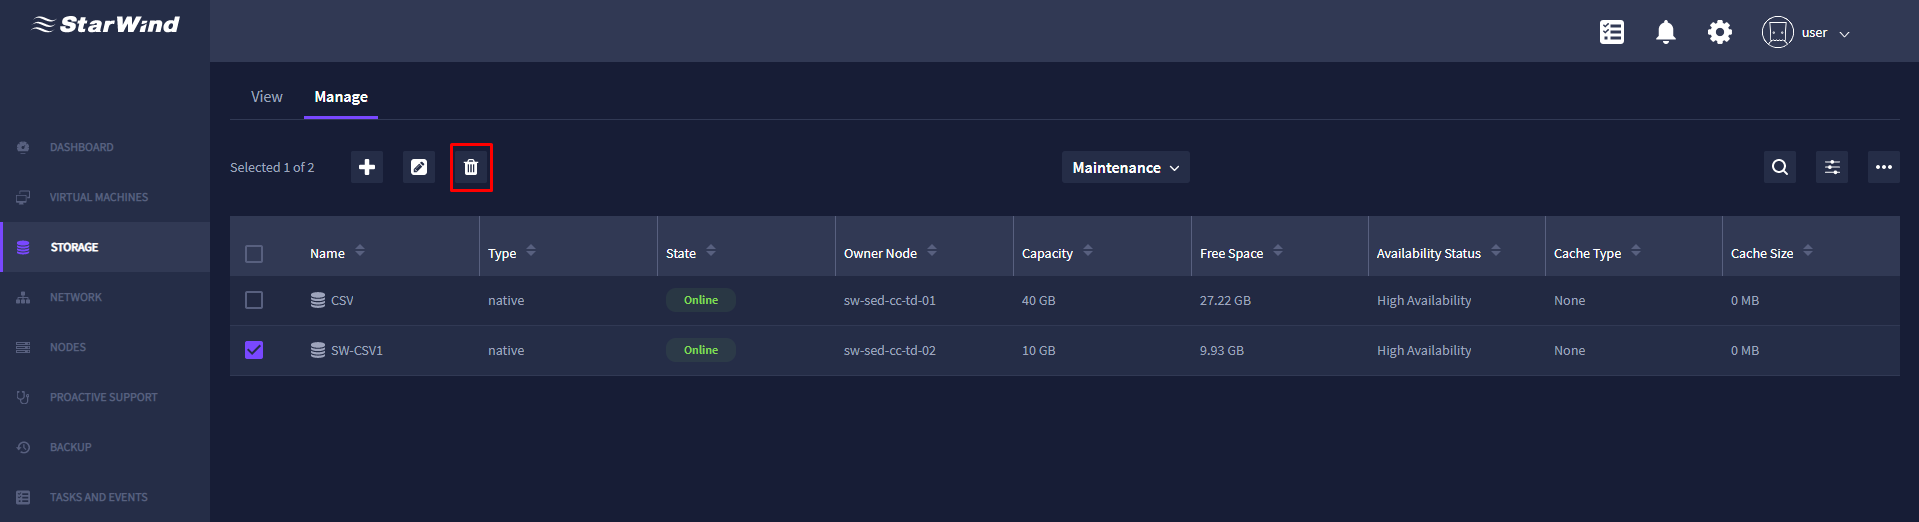
Deleting a virtual volume
1. To remove the existing virtual volume, select the required volume and click the Deletion icon.
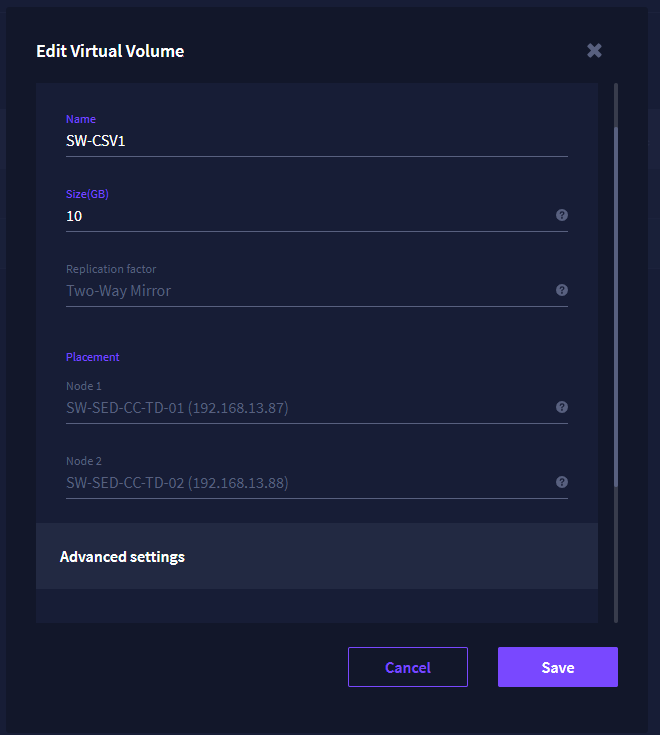
Modifying the virtual volume settings
1. Select a virtual volume and press Edit.
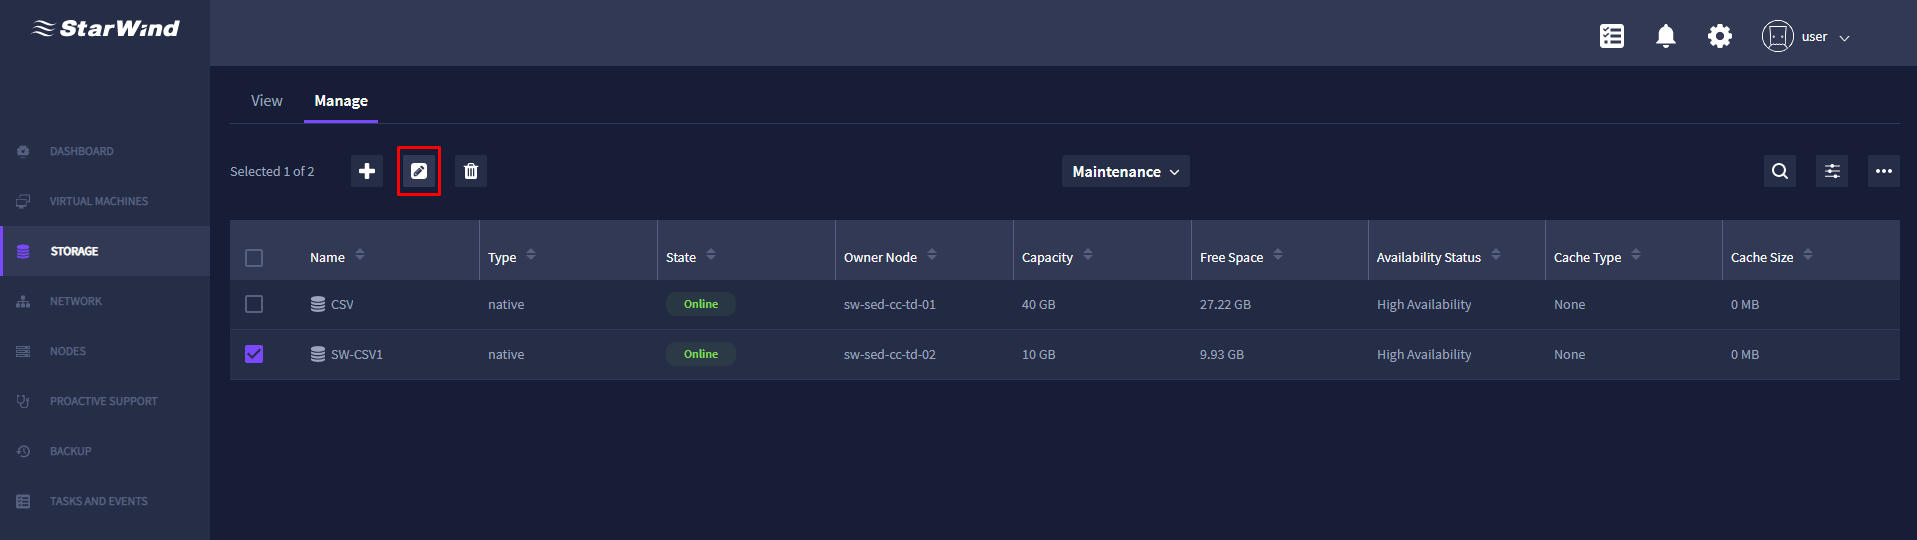
2. Specify the required settings and click Save.
Performing maintenance on a virtual volume
1. Select a virtual volume and press Maintenance.
2. In the drop-down list, select the required option: Bring Online, Take Offline, Move, Turn on Maintenance Mode, and Turn off Maintenance Mode.

NETWORK
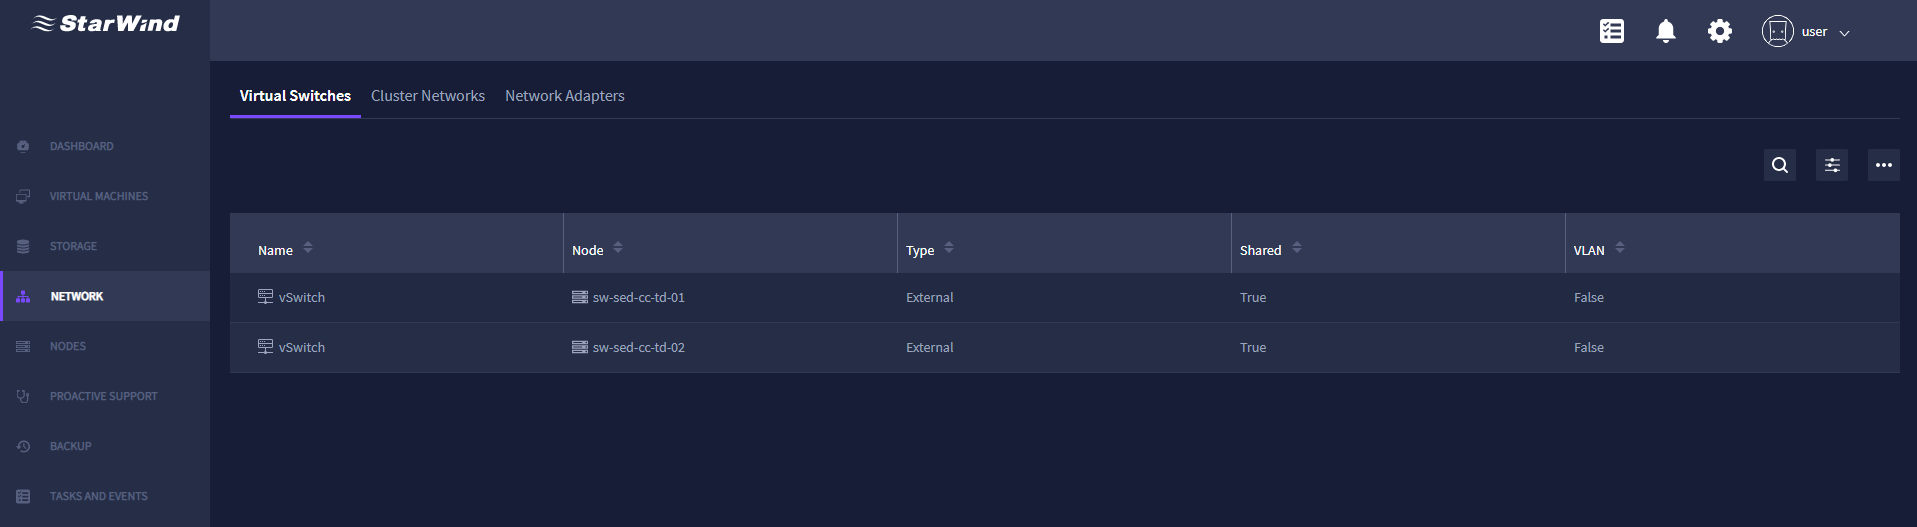
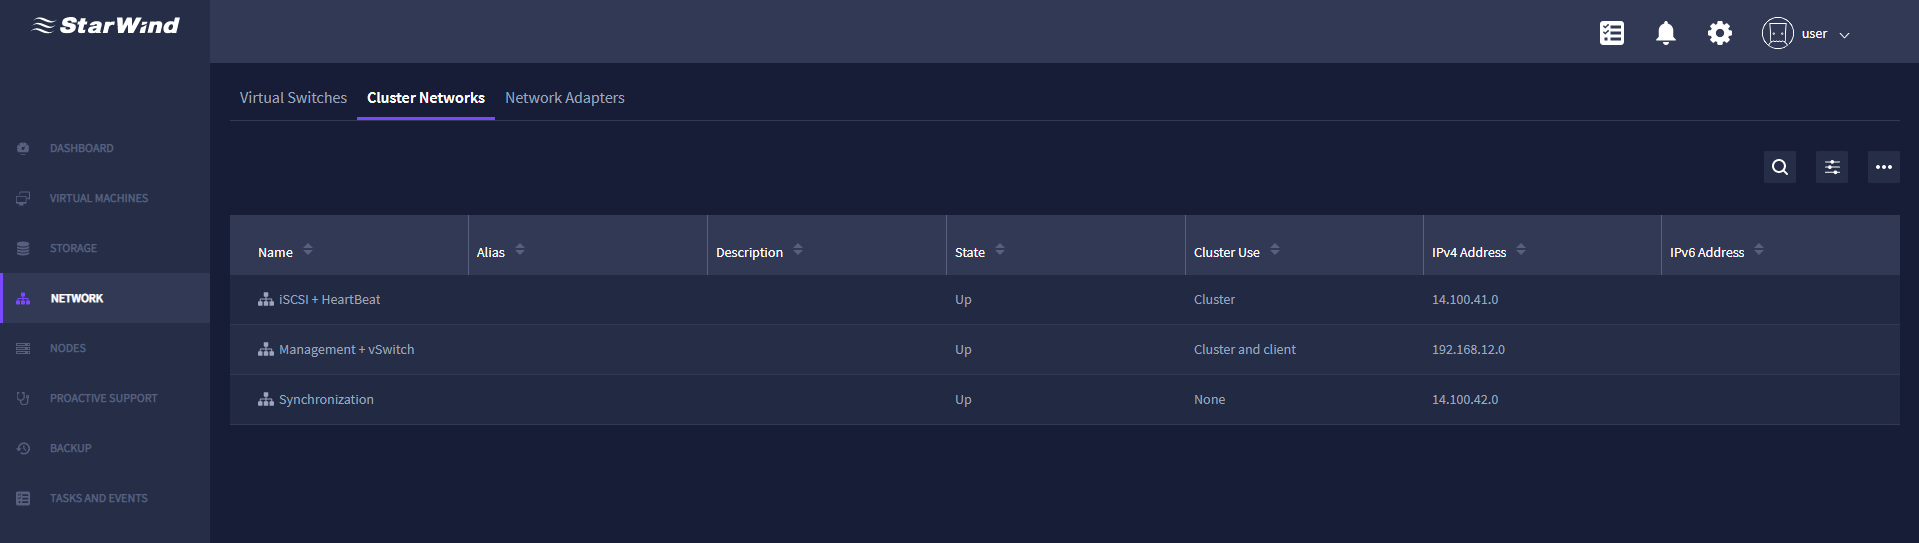
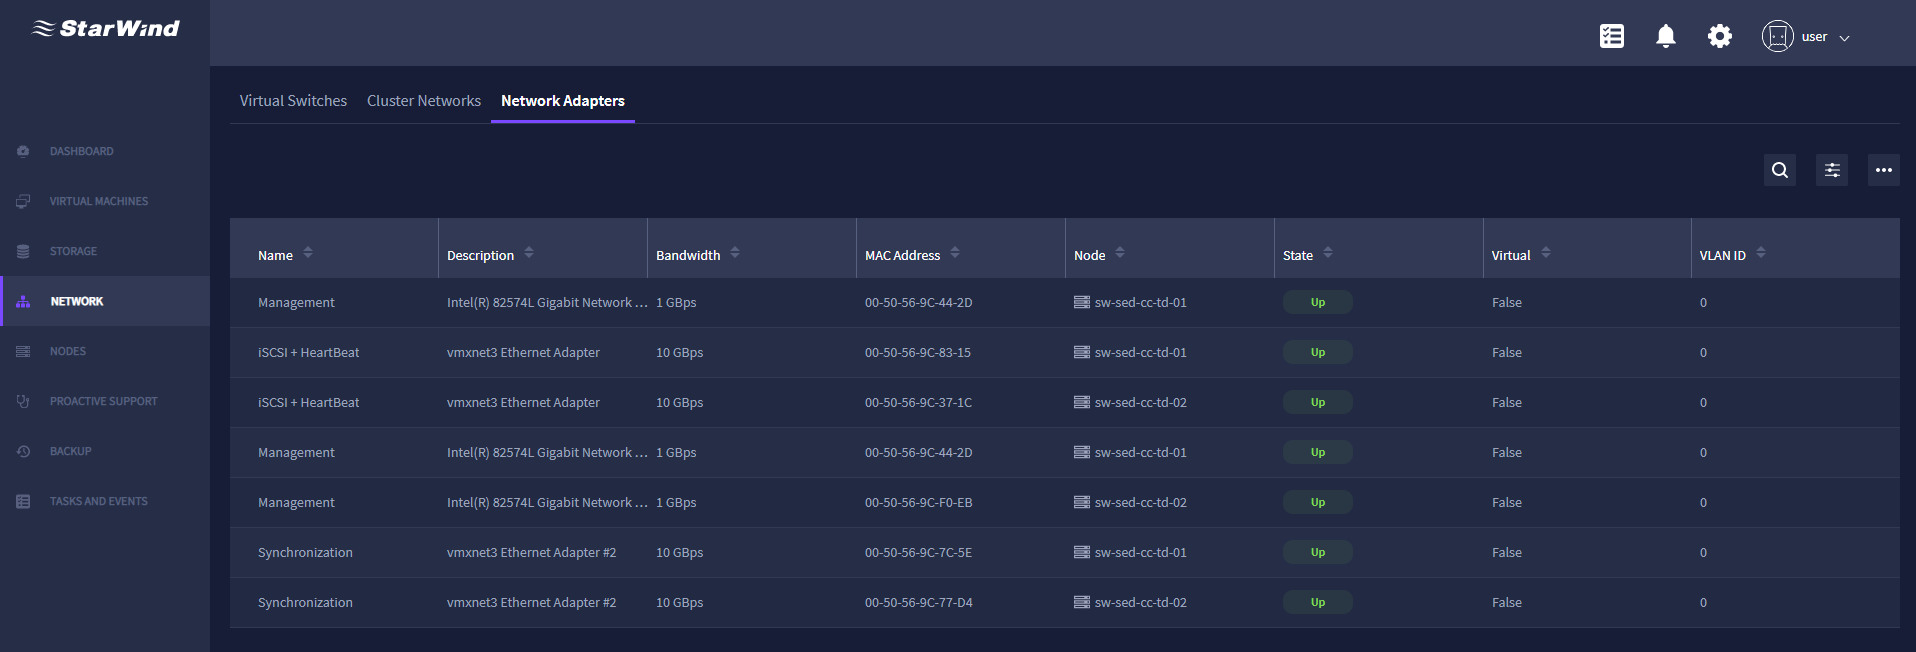
The NETWORK item provides 3 additional tabs:
Virtual Switches – delivers information about virtual switches.
Cluster Networks – delivers information about the networks used and their roles in the cluster.
Network Adapters – provides information about the network adapters.
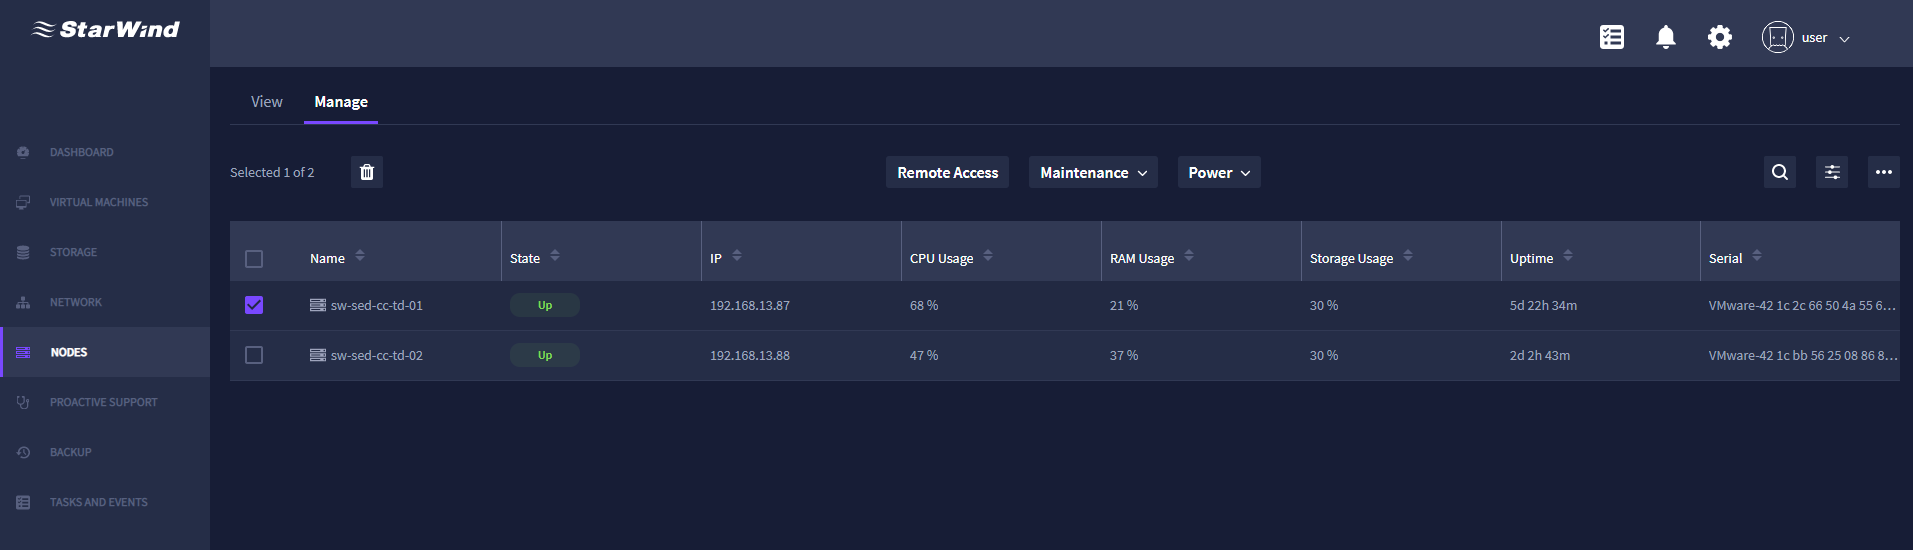
NODES
The NODES item provides View and Manage tabs.
View
This tab consists of the following widgets:
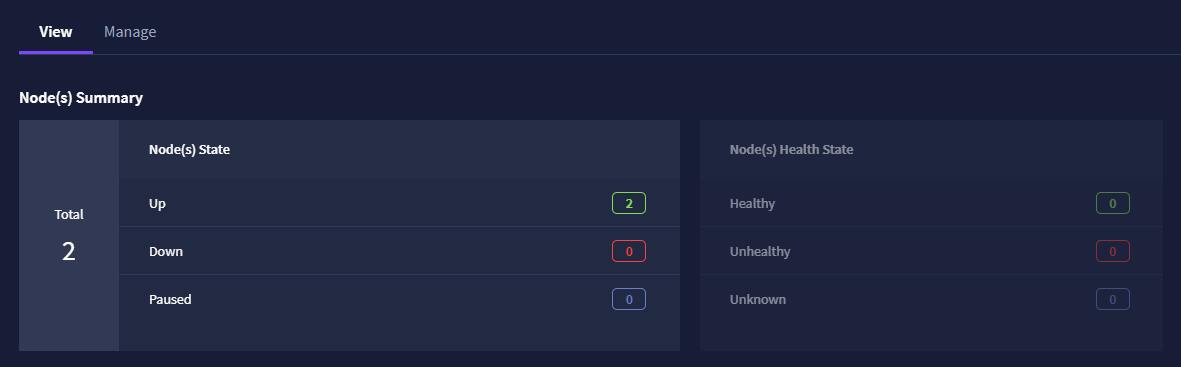
1. Node(s) Summary – provides information on the overall state of the nodes and their health status.
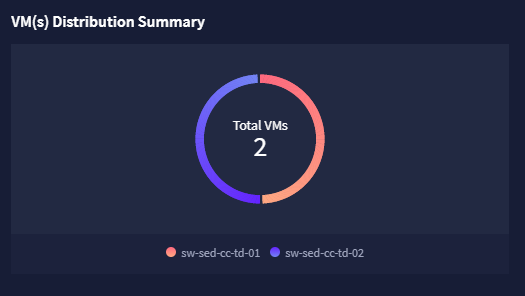
2. VM(s) Distribution Summary – provides information on the VM distribution across cluster nodes.
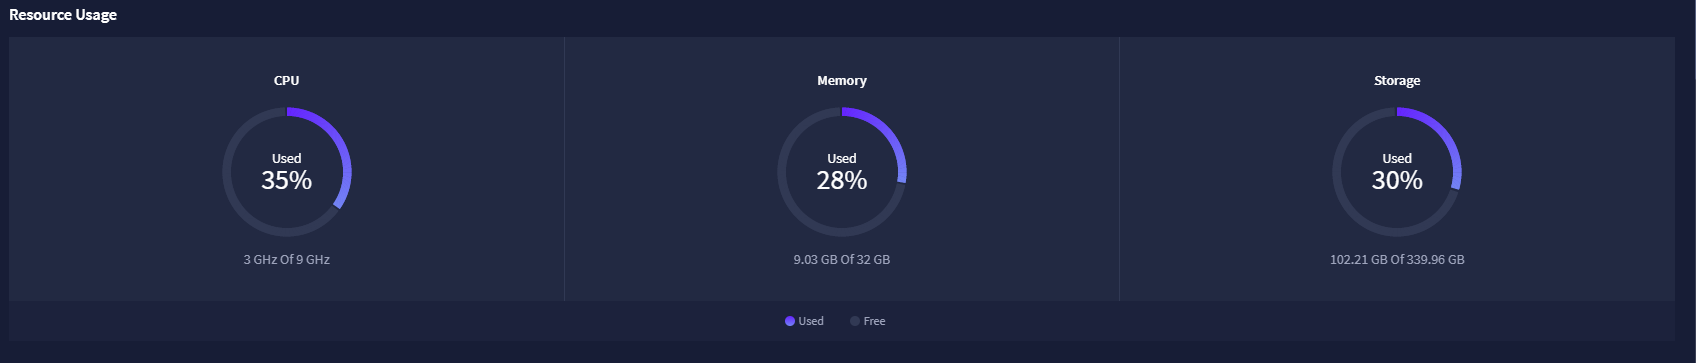
3. Resource Usage – provides information on CPU, memory, and storage utilization.
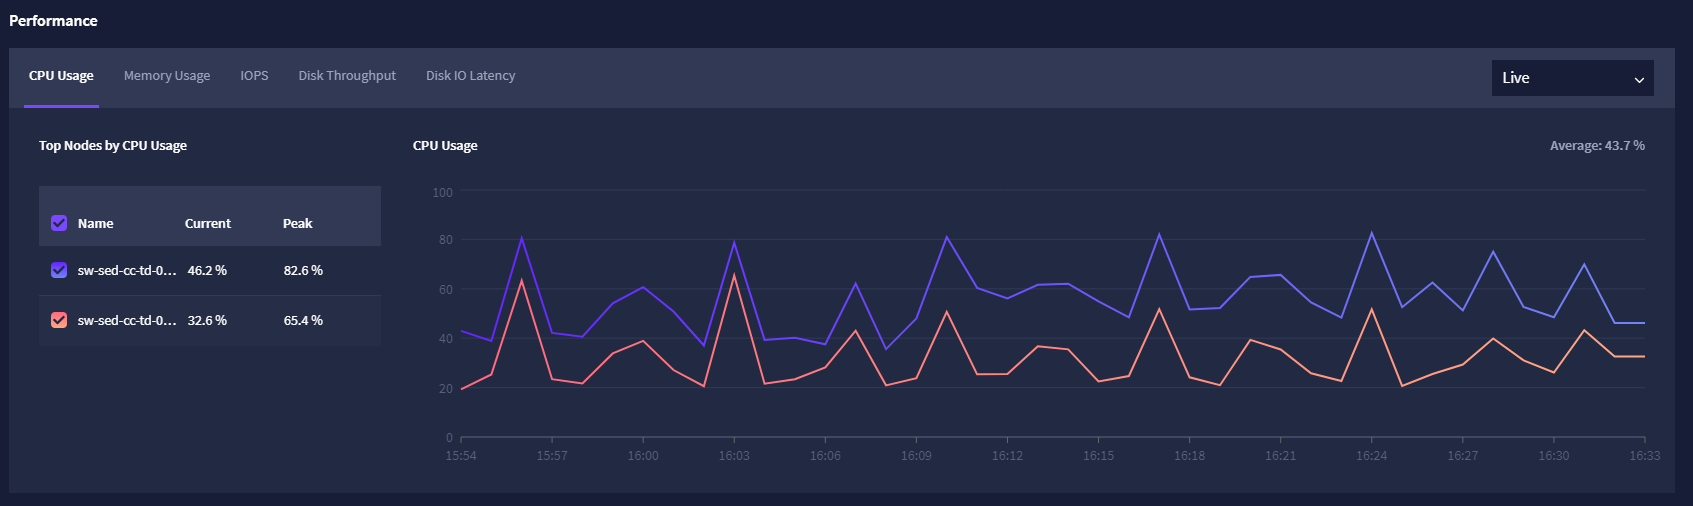
4. Performance – provides information on CPU and memory usage, IOPS, disk throughput, and disk IO latency of the selected nodes.
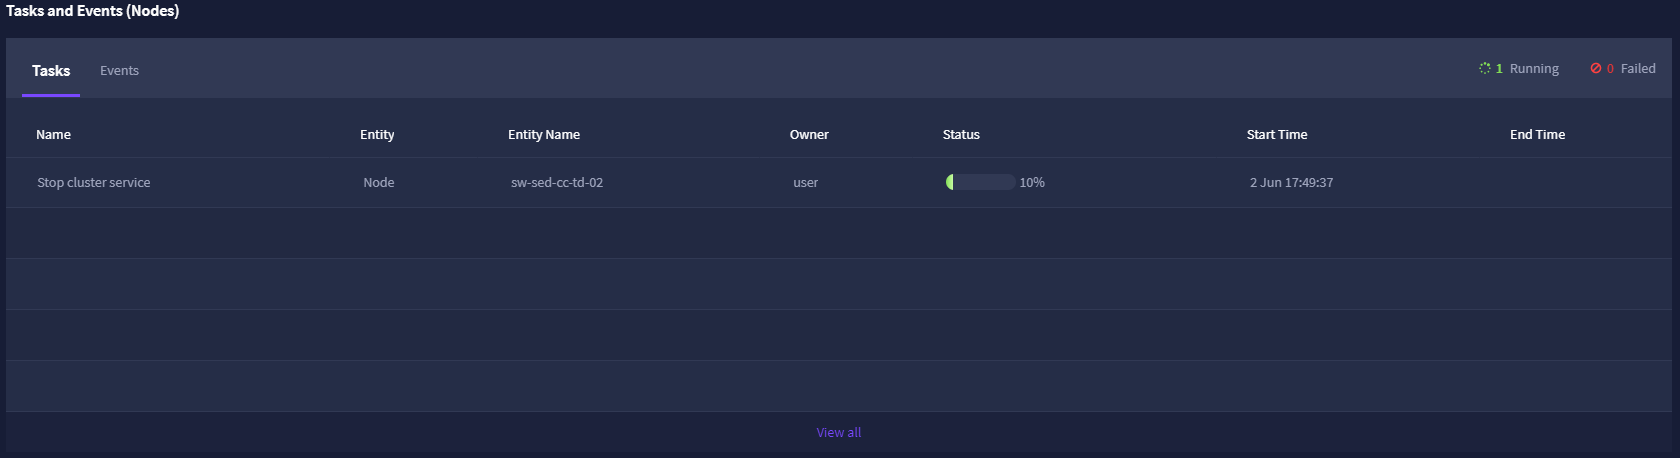
5. Tasks and Events (Nodes) – provides information on the running and finished tasks and events on the cluster nodes.
Manage
Manage tab delivers the ability to remove the existing nodes and perform maintenance and power management.
Accessing the node console
To open the node console, select the required node and click the Remote Access button.

Performing maintenance operations on the nodes
1. To perform the maintenance operations on the nodes, select the required node and click the Maintenance button.

2. From the drop-down list, select the required operation: Pause, Resume, Start Cluster Service, or Stop Cluster Service.
Performing power management operations on the nodes
1. To perform power management operation on a node, select the required one and navigate to the Power tab.
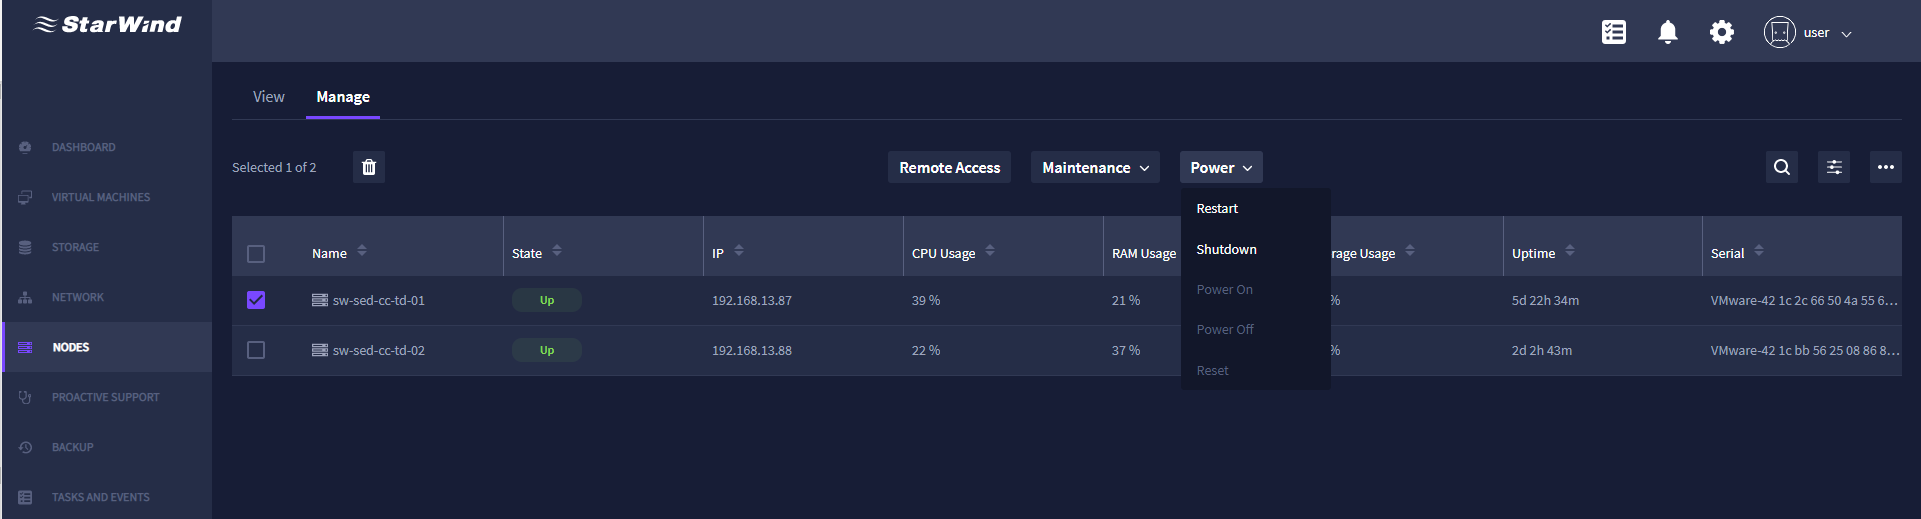
2. From the drop-down list, select the required action: Restart, Shutdown, Power On, Power Off, or Reset.
NOTE: To activate Power on, Power off, and Reset options, click the gear icon, navigate to the NODES tab and configure physical management settings there.
BACKUP
The Backup item provides View and Backup Jobs tabs.
The View tab consists of the following widgets:
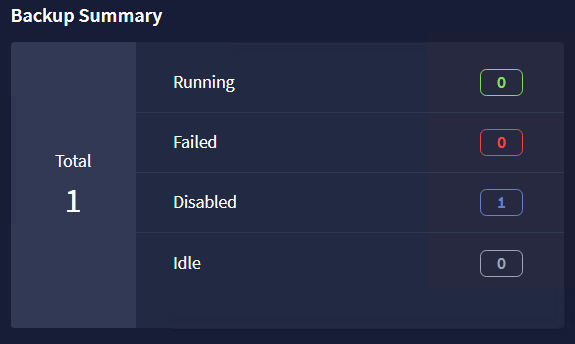
1. Backup Summary – provides information about the status of backup jobs.
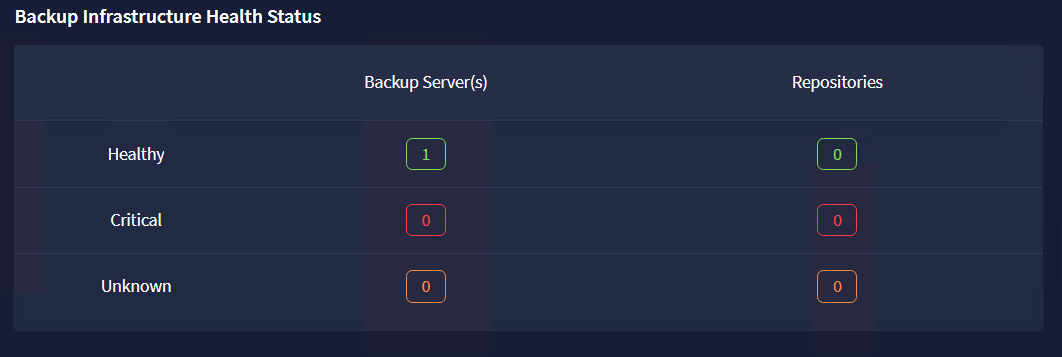
2. Backup Infrastructure Health Status – provides information about the health status of backup server(s) and repositories.
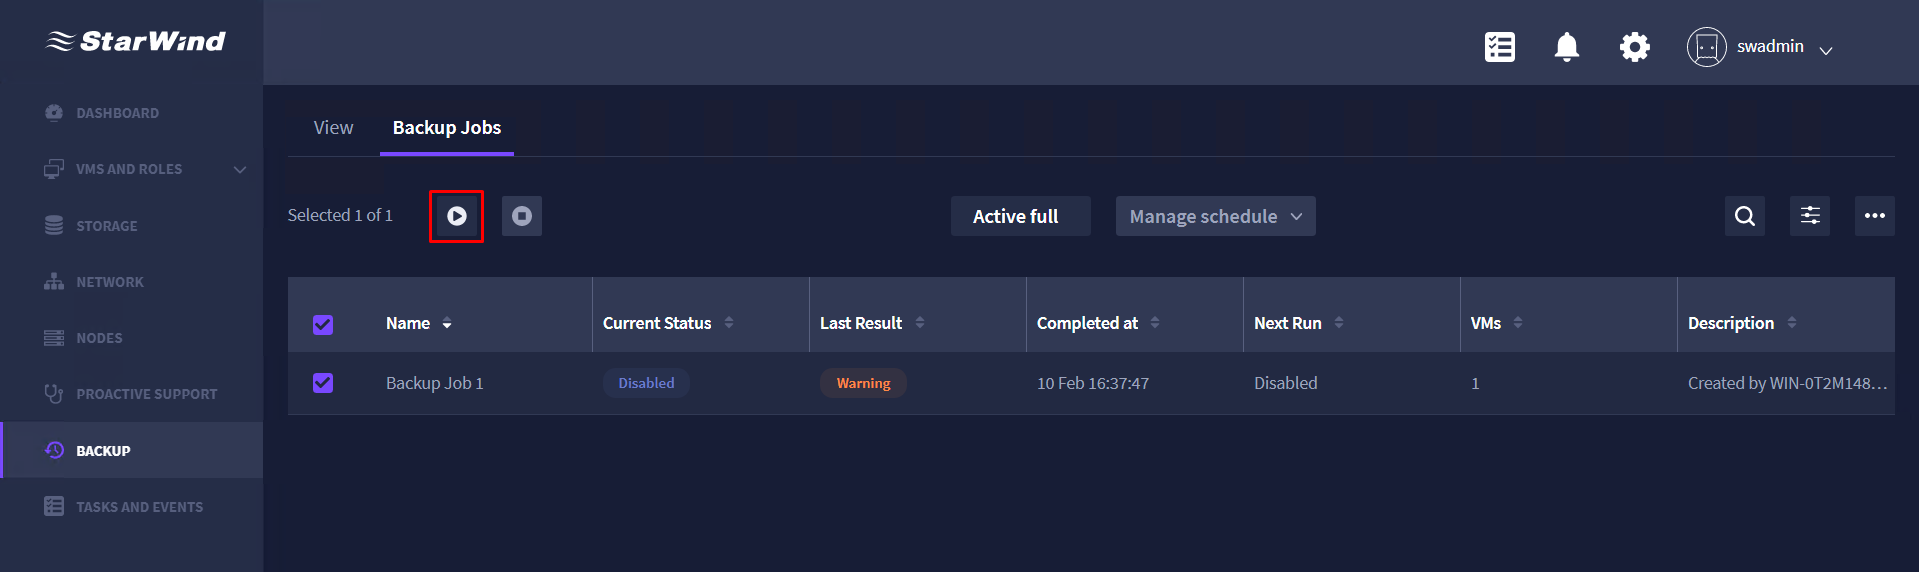
The Backup Jobs tab consists of the list with backup jobs.
It is possible to perform one of the following actions: start, stop, active full(to start full backup), manage schedule.
Starting a backup job
1. Select a backup job and press Start.
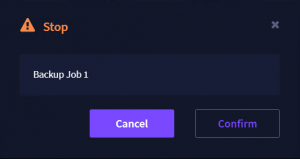
Stopping a backup job
1. Select a backup job and press Stop.
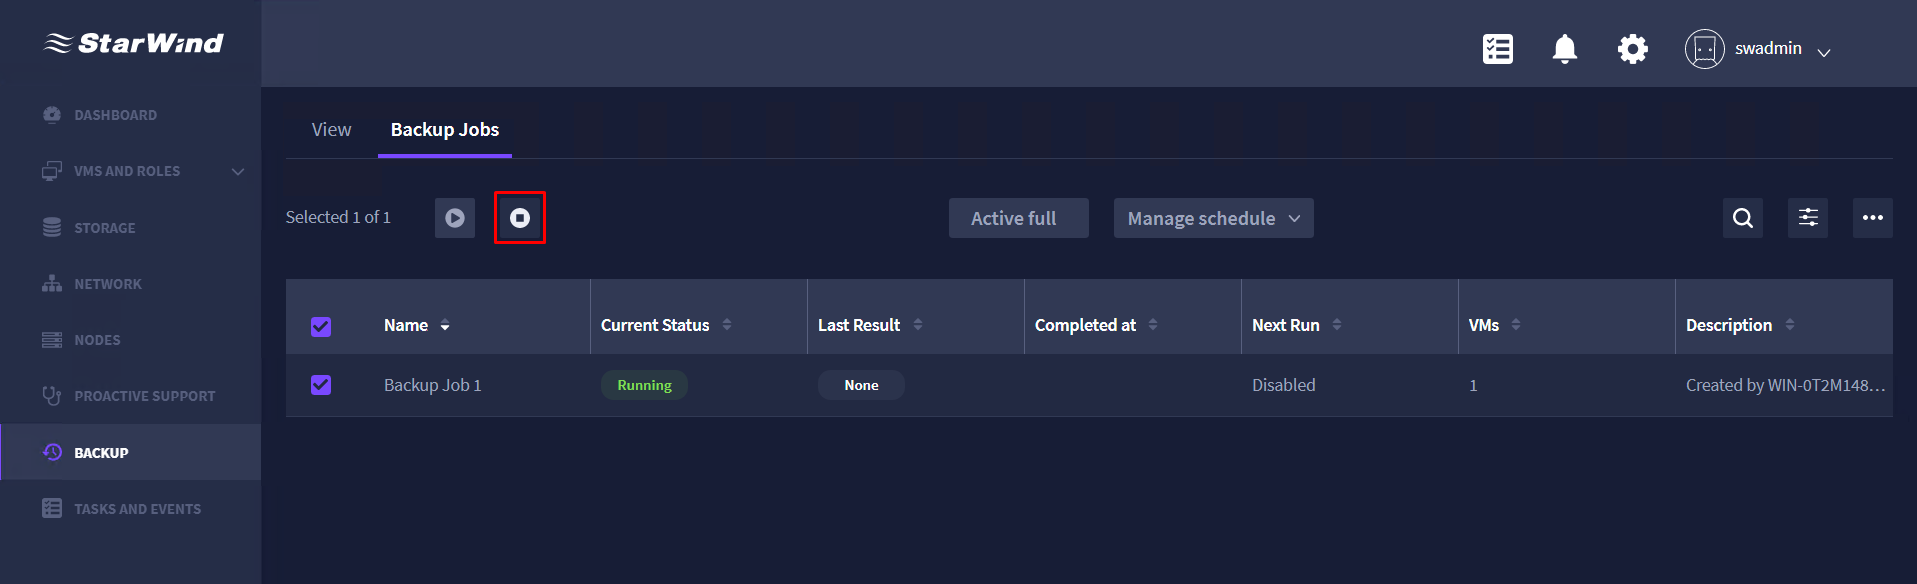
2. Press Confirm.
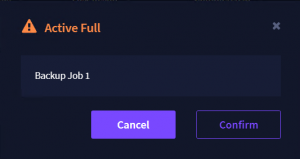
Forcing a full backup job
1. Select a backup job and press Active full.
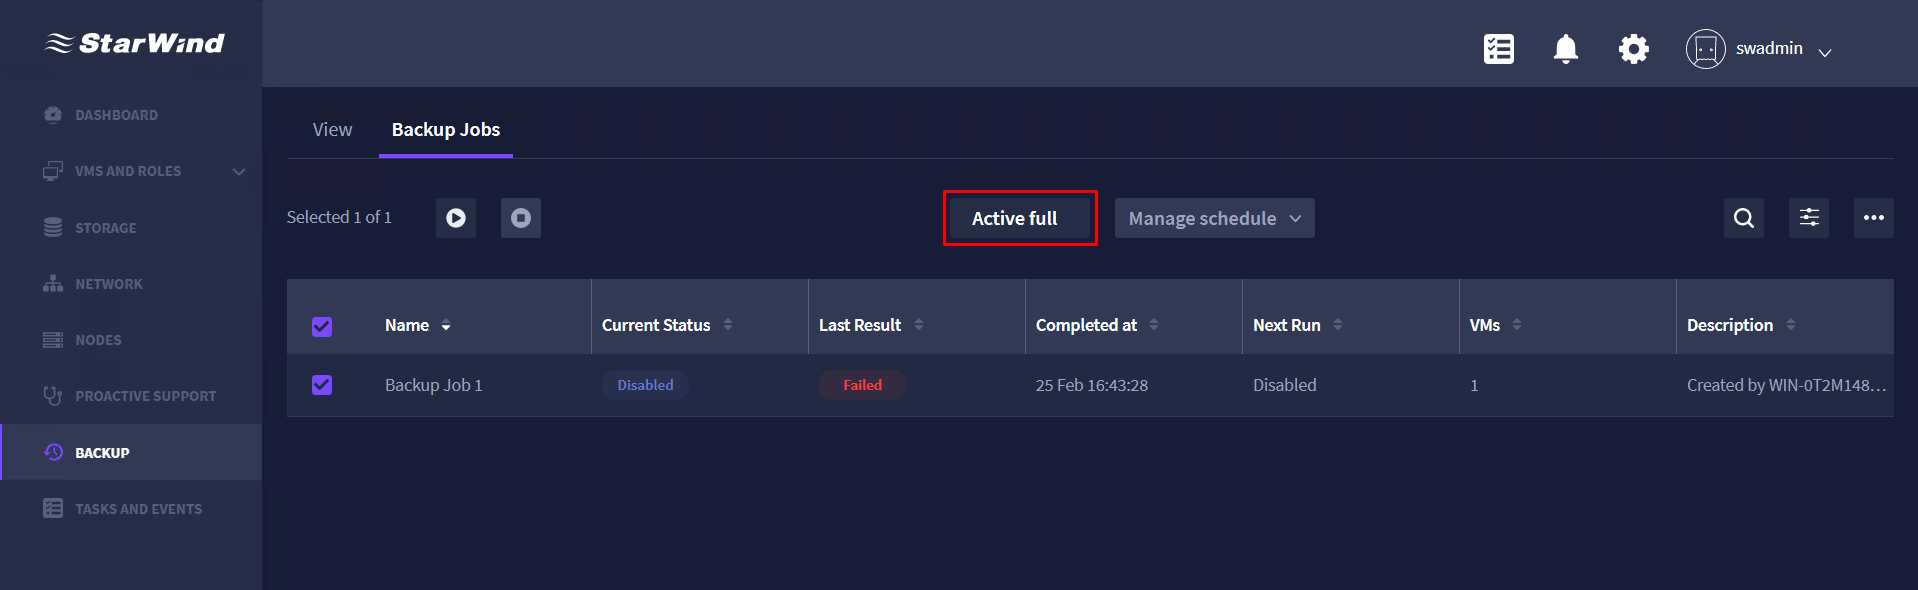
2. Press Confirm.
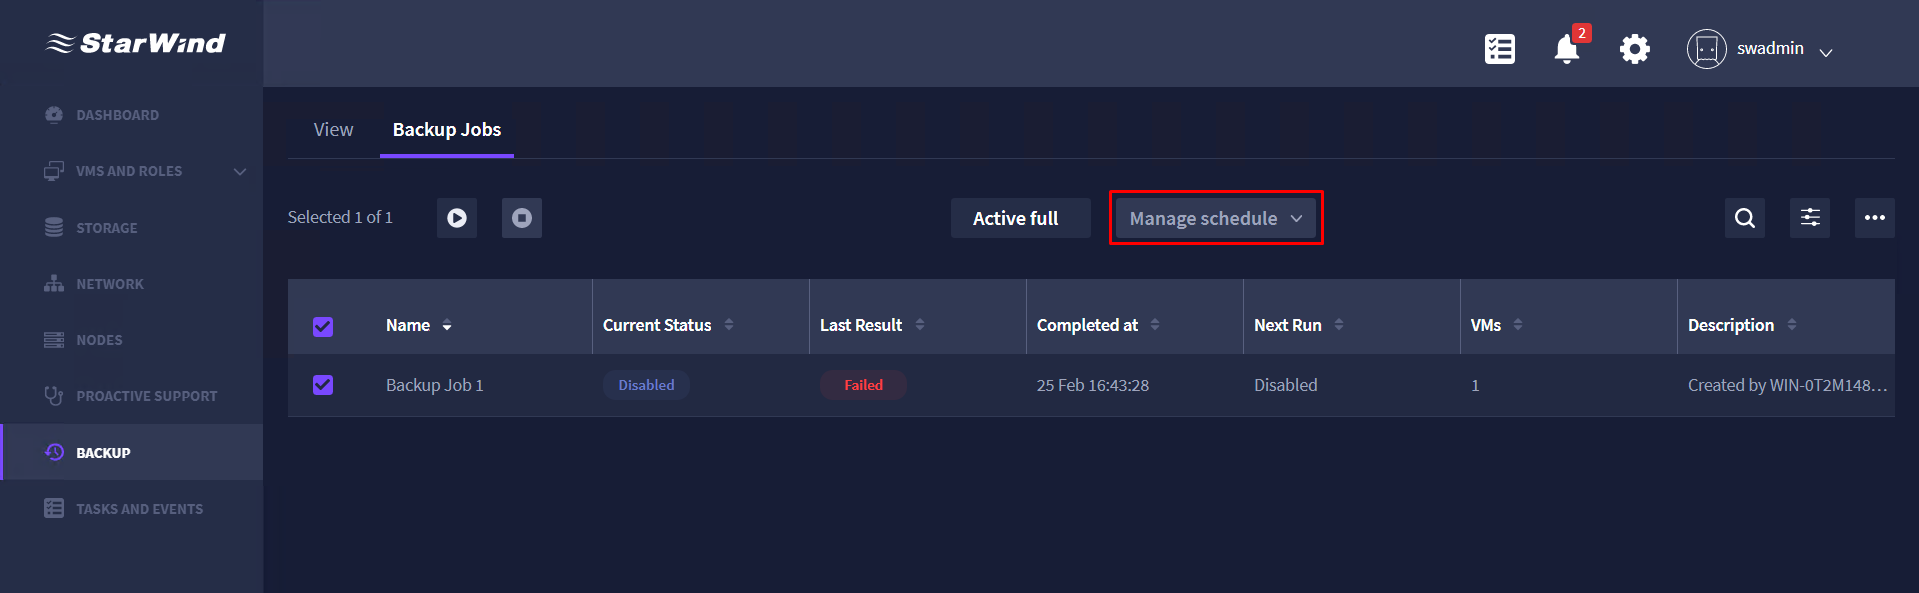
Managing schedule for a backup job
1. Select a backup job and press Manage schedule.
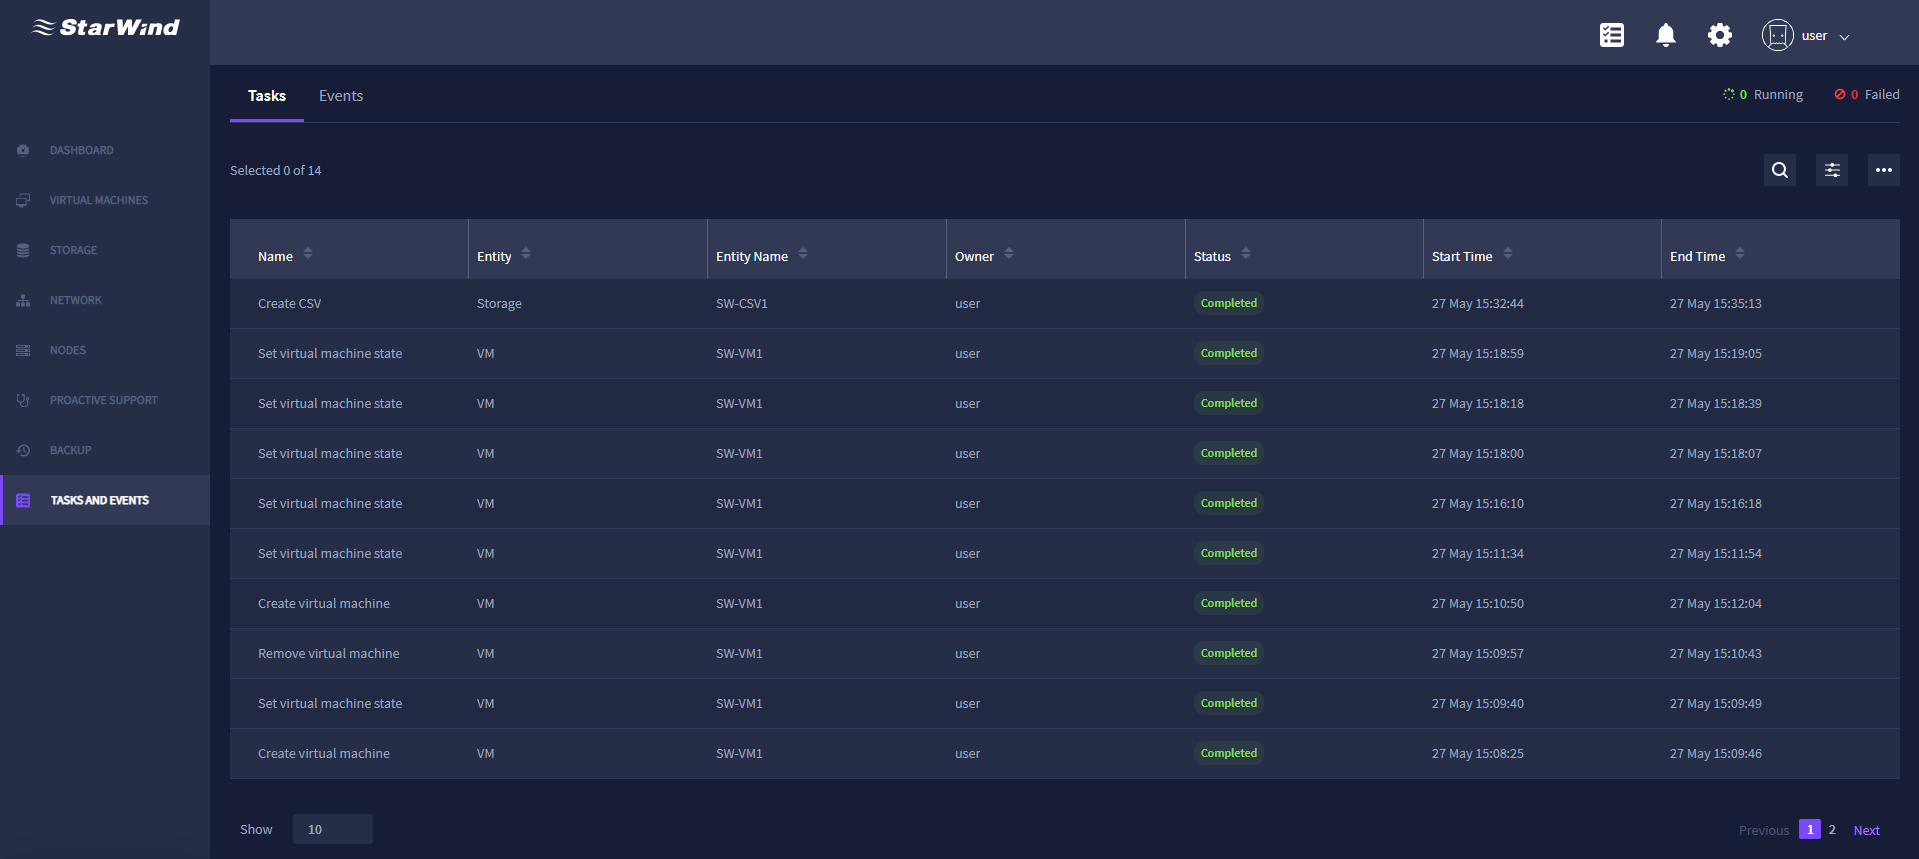
TASKS AND EVENTS
This item delivers information on the tasks and events running in StarWind Command Center.
Tasks
The Tasks tab provides information on tasks performed in StarWind Command Center. The Tasks tab displays the task name, Command Center entity type where this task has been performed, entity name, owner of the task, its status, and timestamp.
Events
The Events tab contains information on the events that occurred in StarWind Command Center. The Events tab displays the event severity level, event source, time of the event, its description, entity type where the event has occurred, entity name, number of occurrences, and the current event status.
1. To check the events in the StarWind Command Center, navigate to the Events tab.
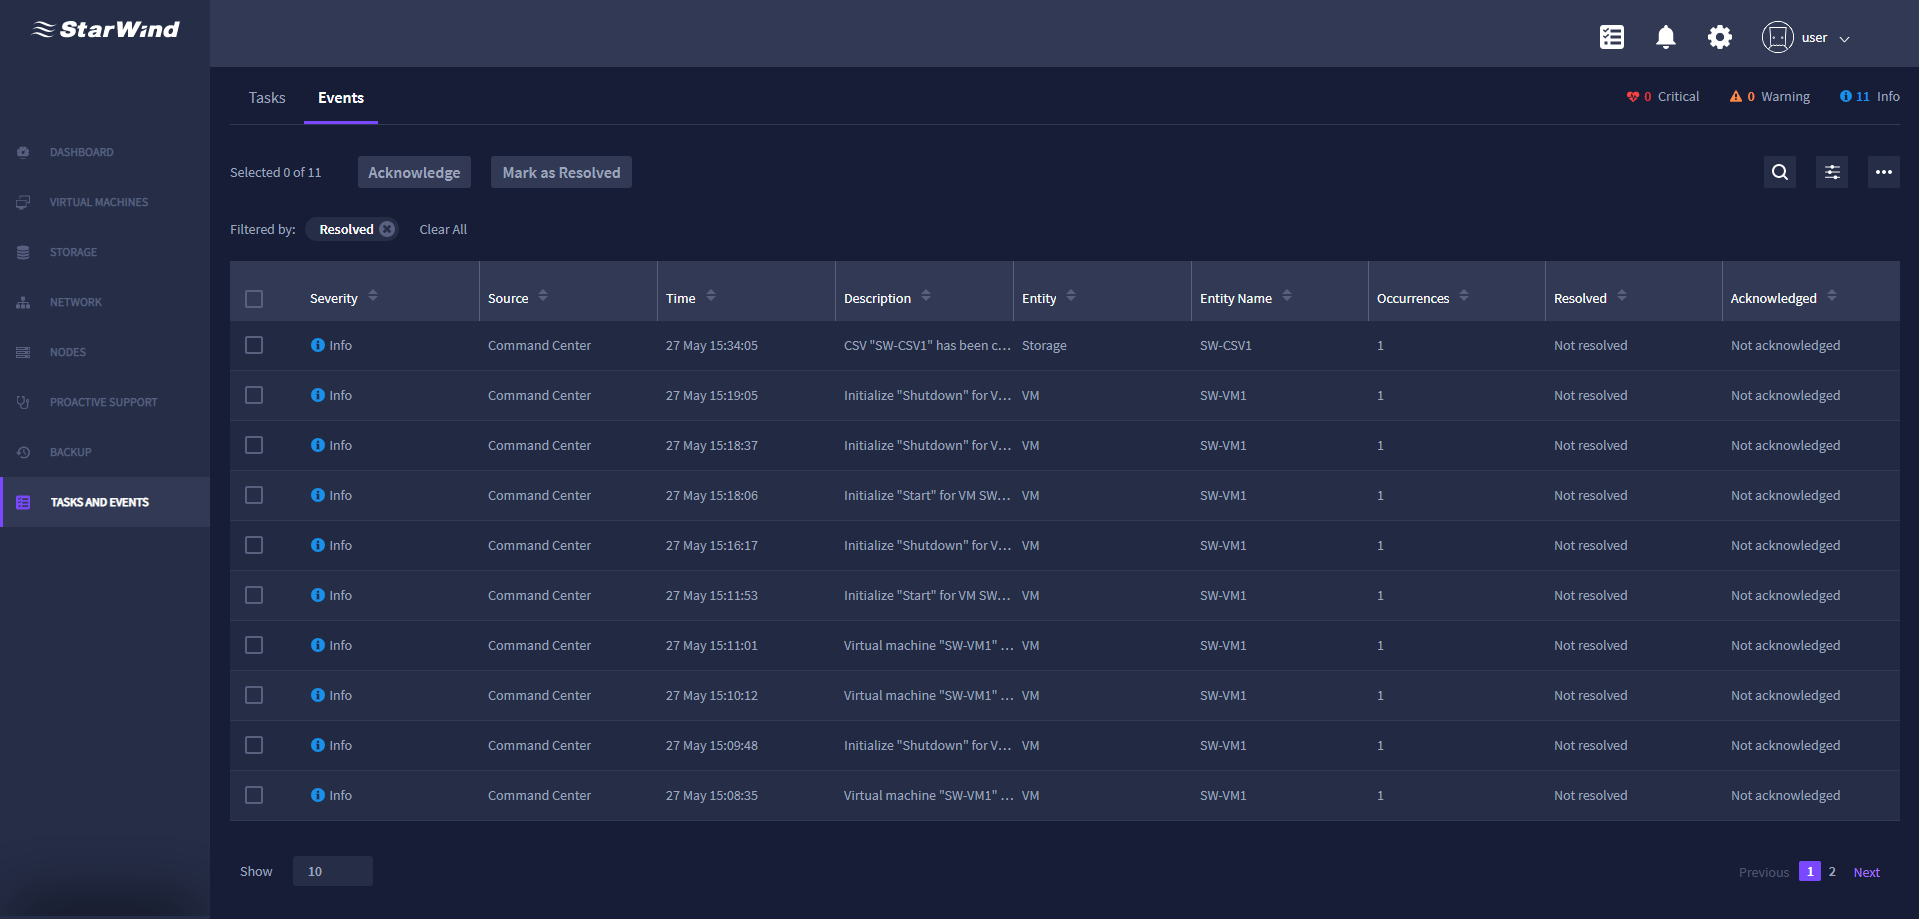
2. To mark the recent event as Acknowledged or Resolved, select the event and select the required option.
General Configuration
Modifying Cluster Settings
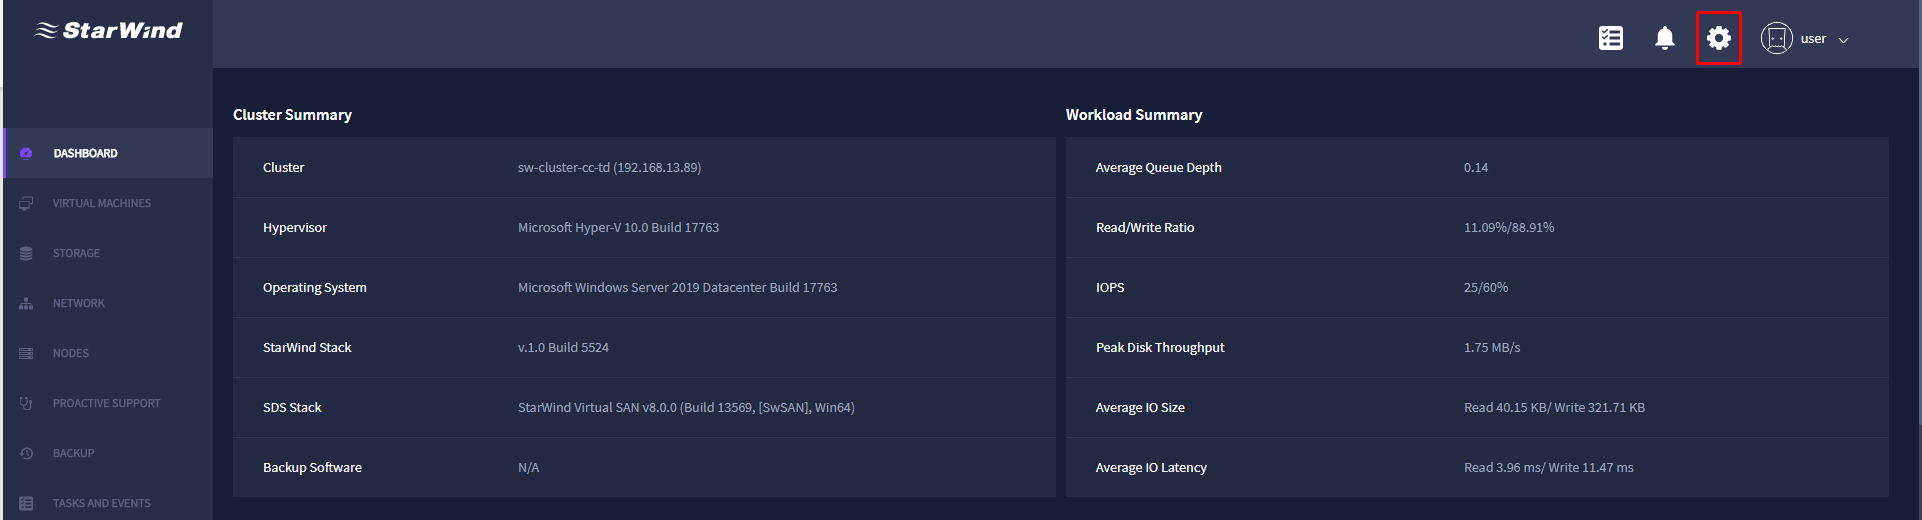
To modify the cluster settings, click the gear icon in the top right corner of the StarWind Command Center interface.
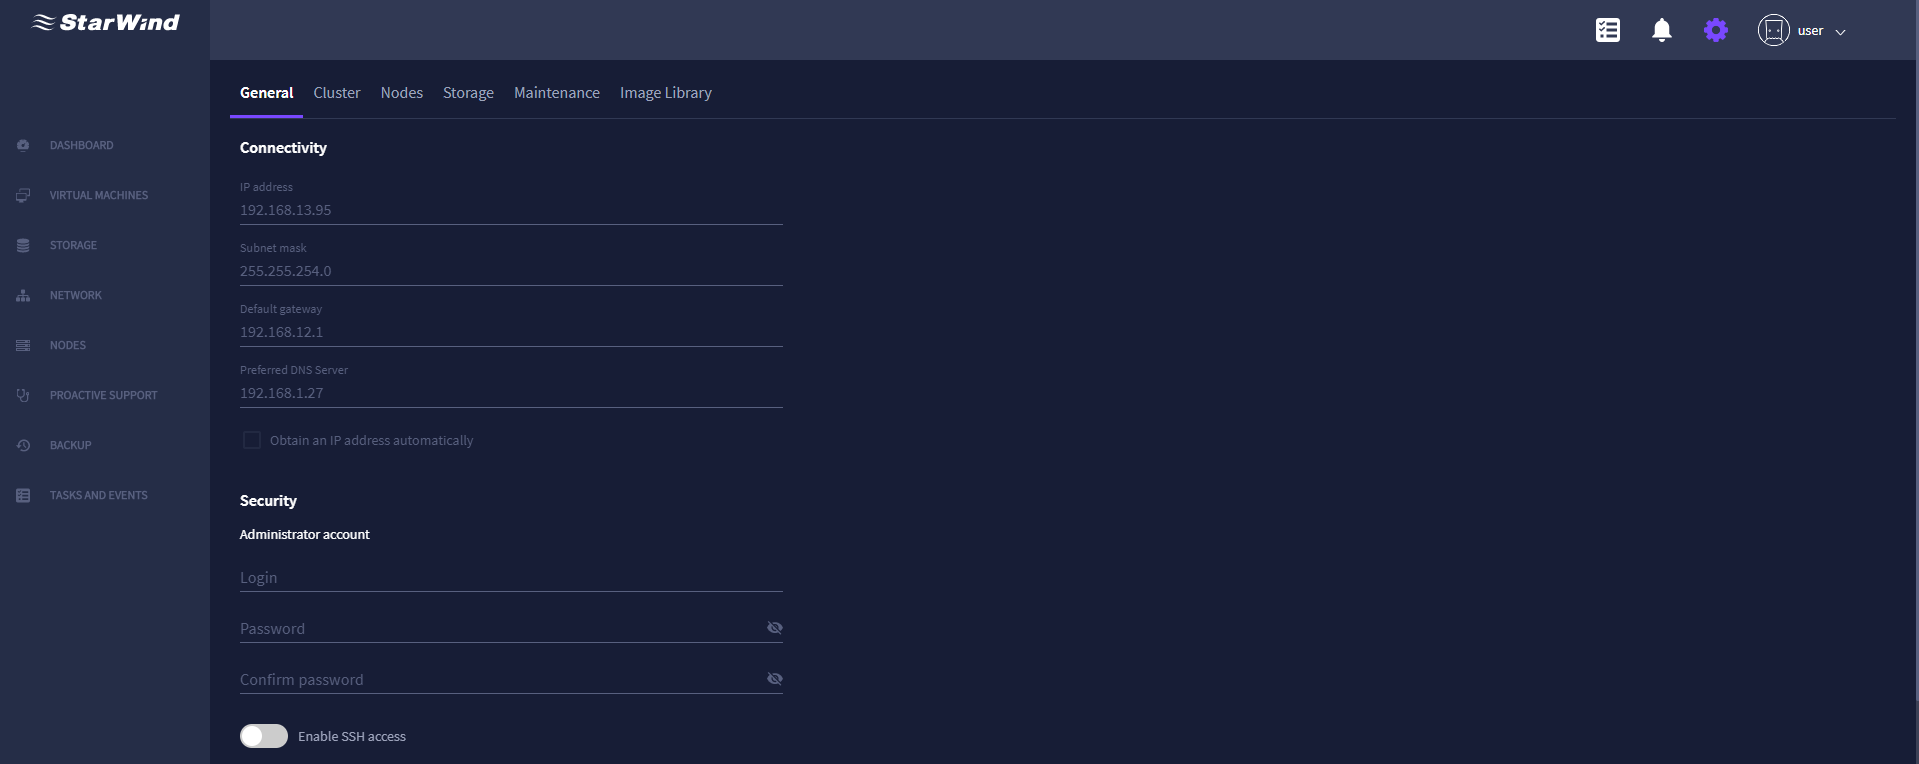
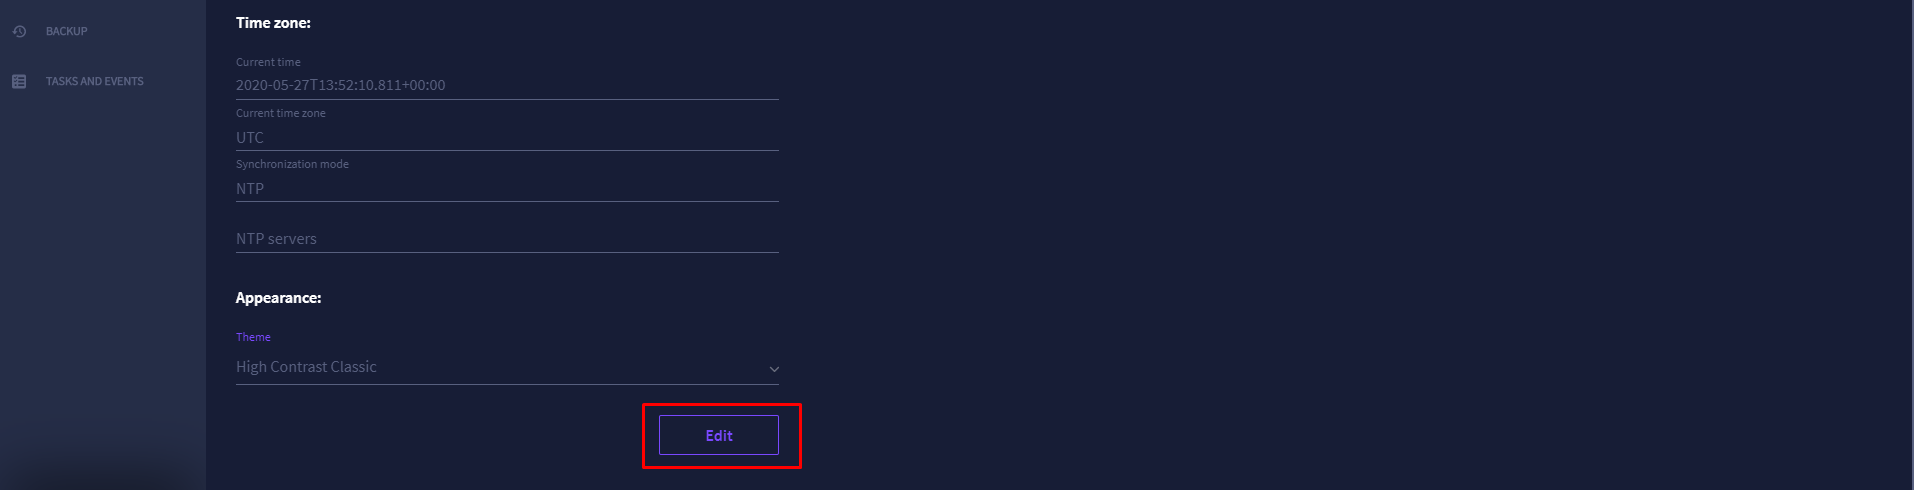
Modifying General Settings
To modify the general StarWind Command Center settings such as IP address, gateway, DNS Server IP address, security settings, time zone, and appearance, click Edit in the General tab.
Modifying the Cluster Network Settings
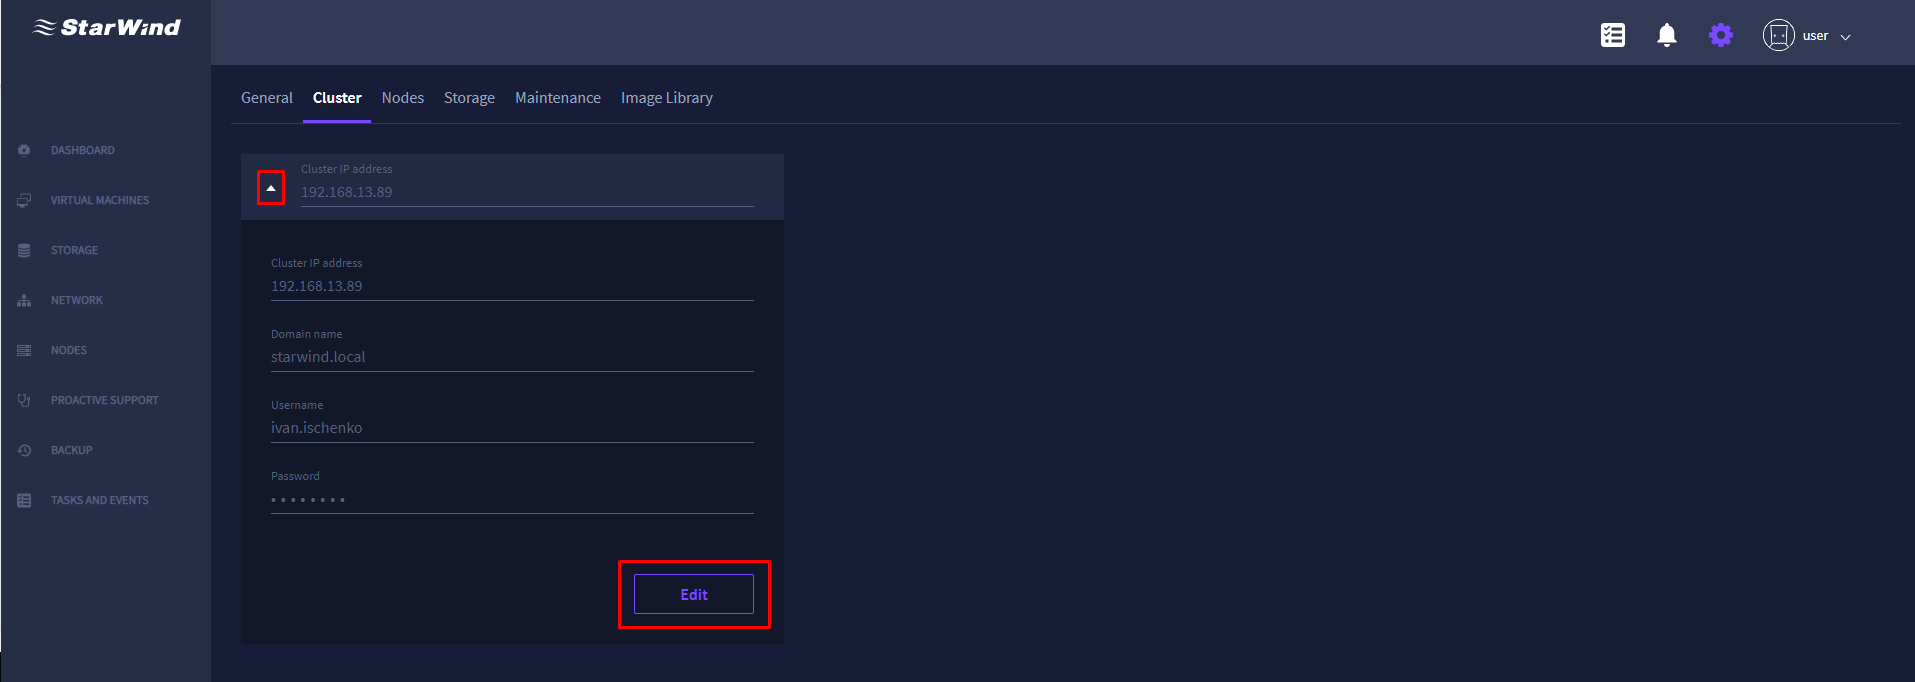
To modify the cluster network settings, navigate to the Cluster tab, expand Cluster IP address, and click Edit.
Modifying the Cluster Node Settings
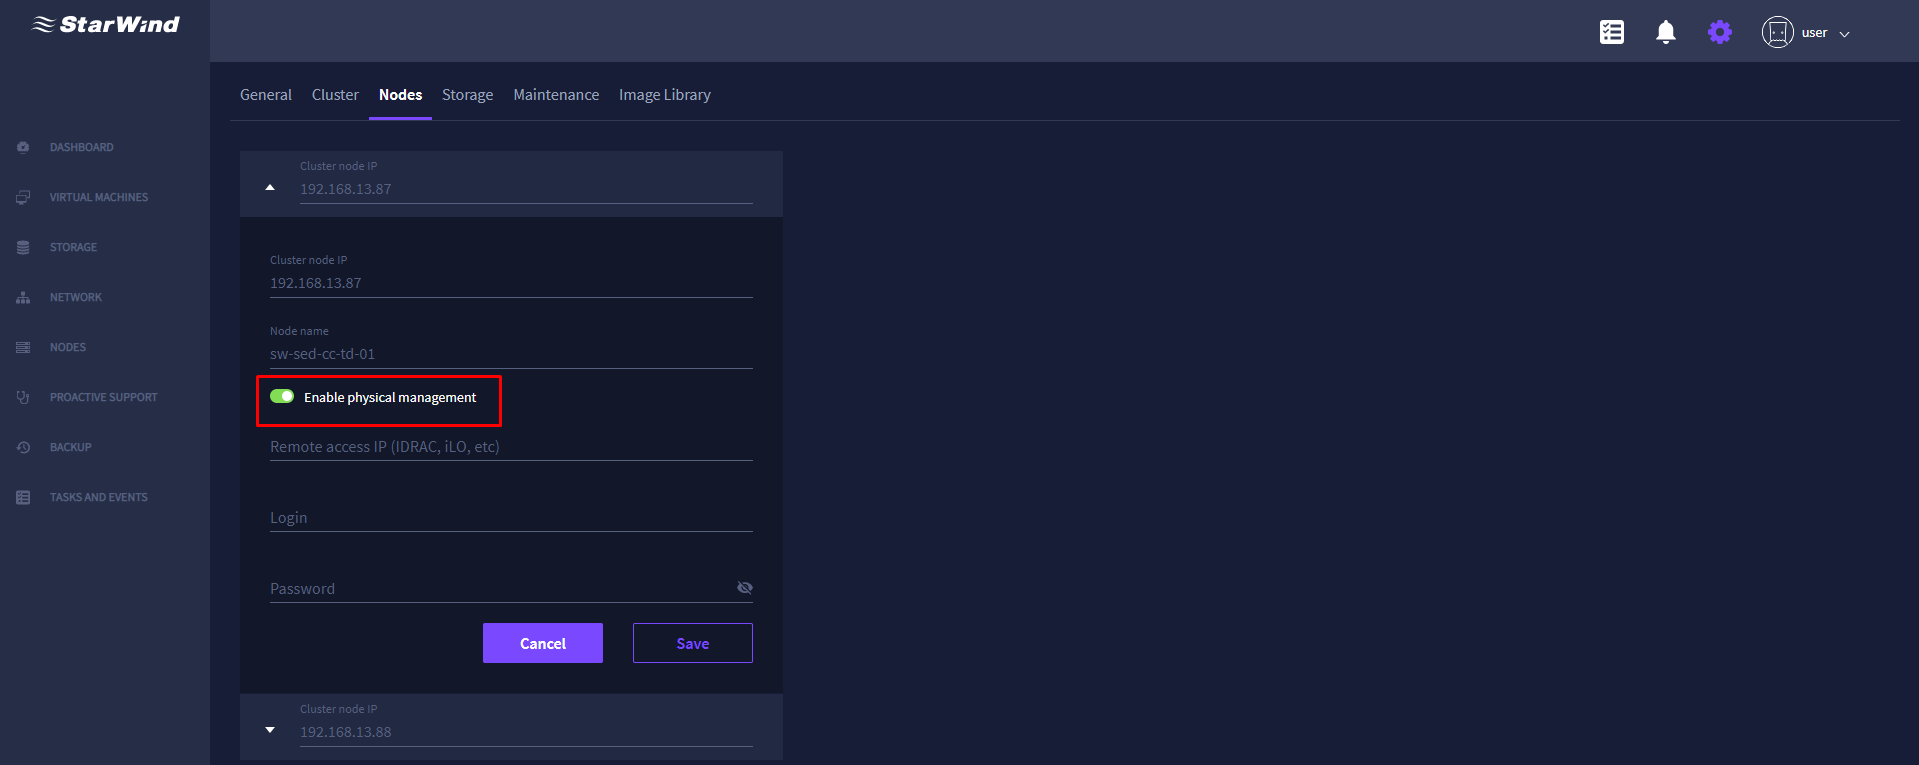
1. To modify the node network settings, navigate to the Nodes tab and expand the Cluster node IP.
2. To allow physical node management via IDRAC or ILO, press Enable physical management, specify the required credentials, and click Save.
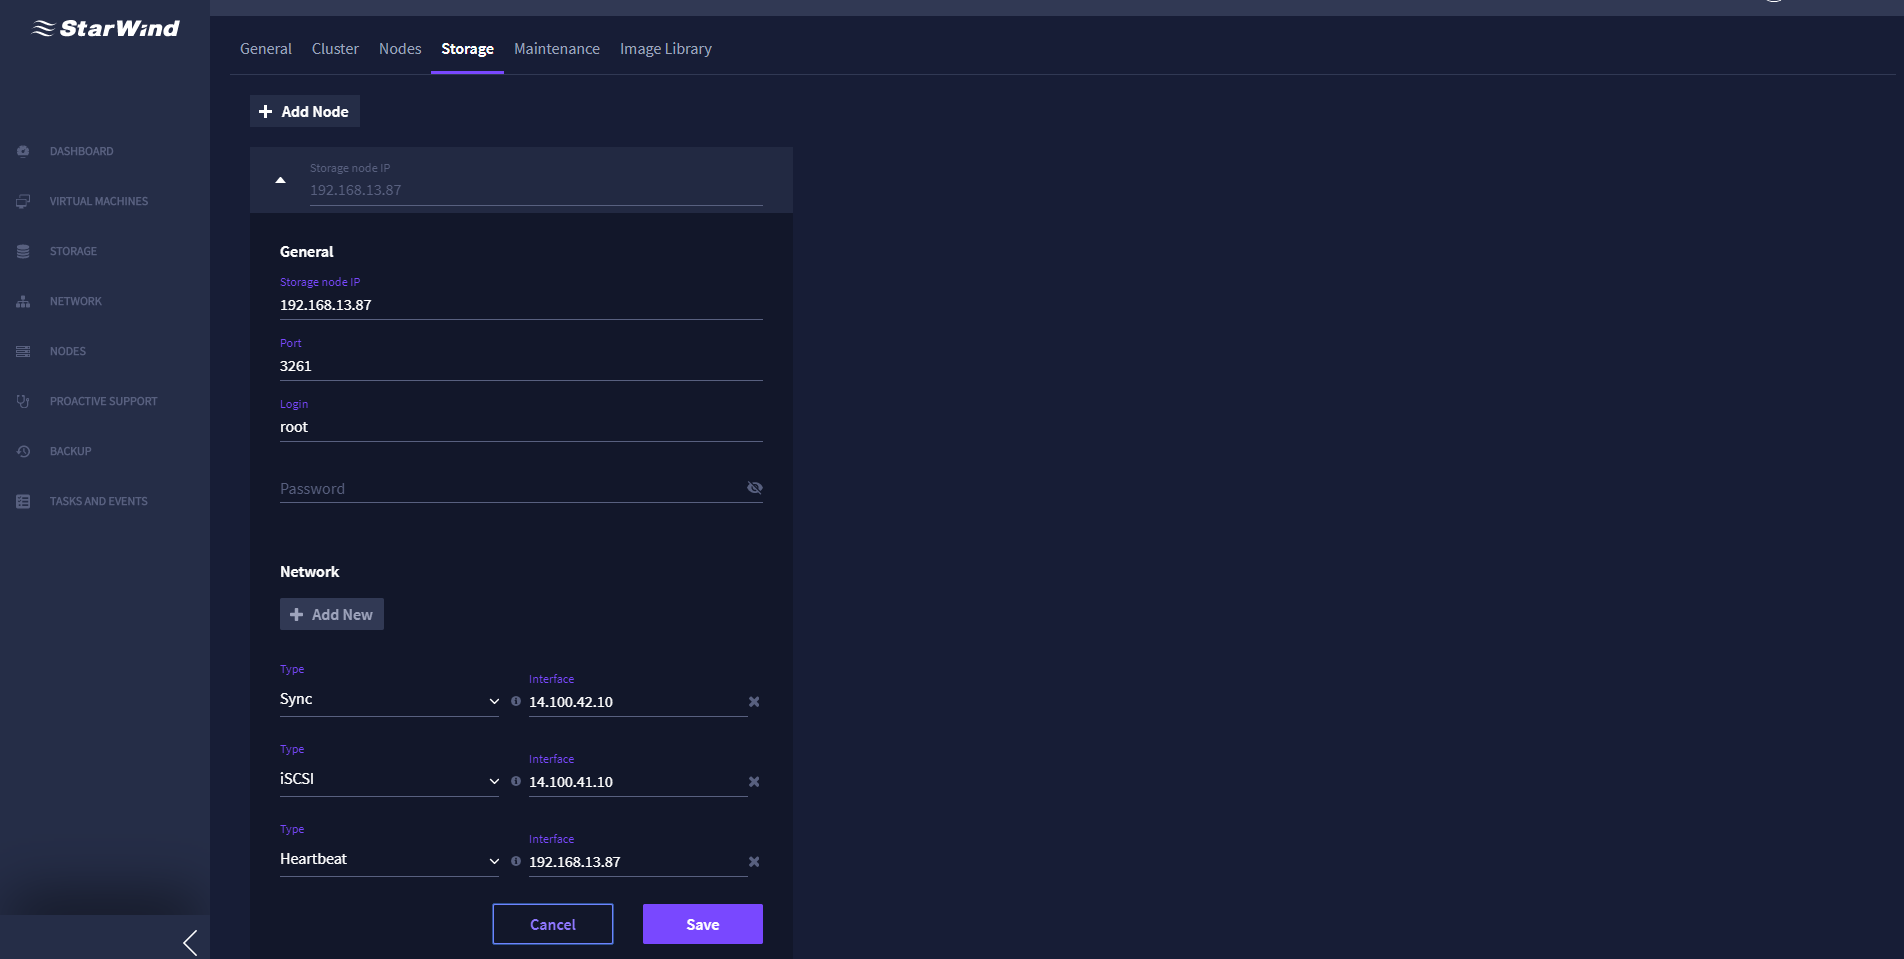
Modifying the Storage Node Settings
1. To manage the storage node settings, navigate to the Storage tab, expand the required node, and press Edit.
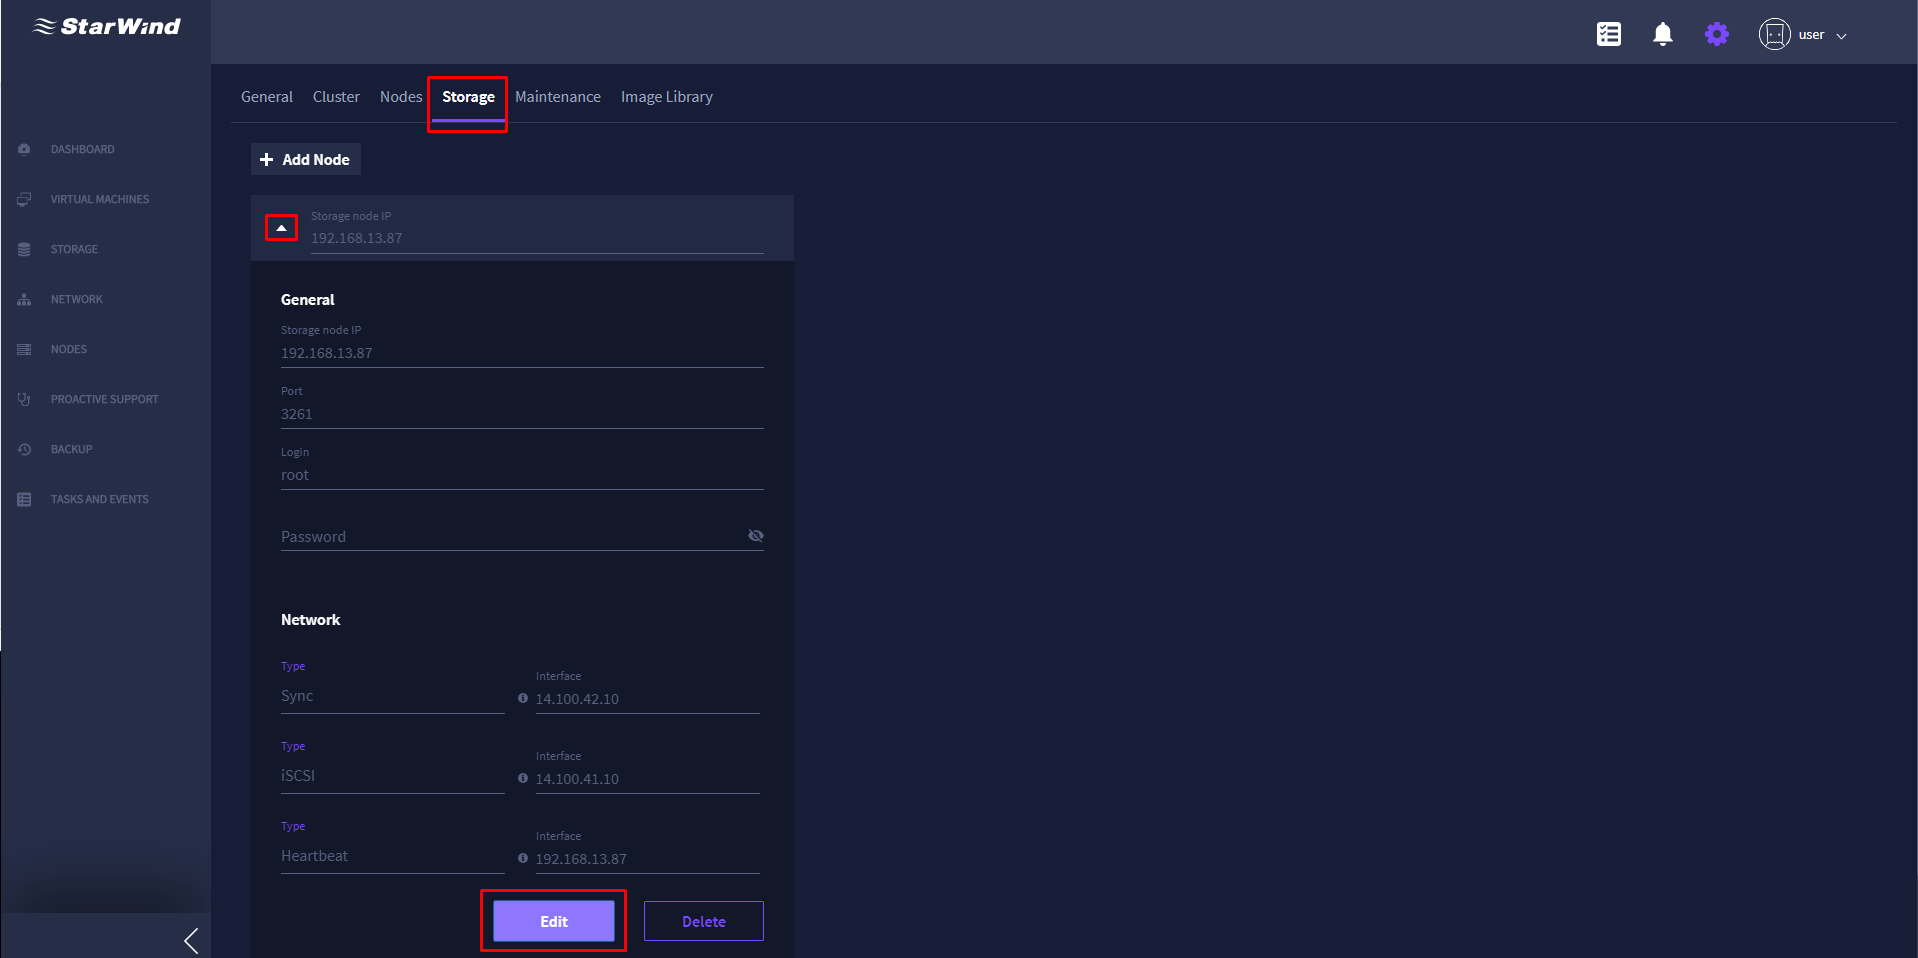
2. Modify the required settings and press Save.
Adding a New Storage Node
1. To add a new storage node, press the + Add Node button in the Storage tab.
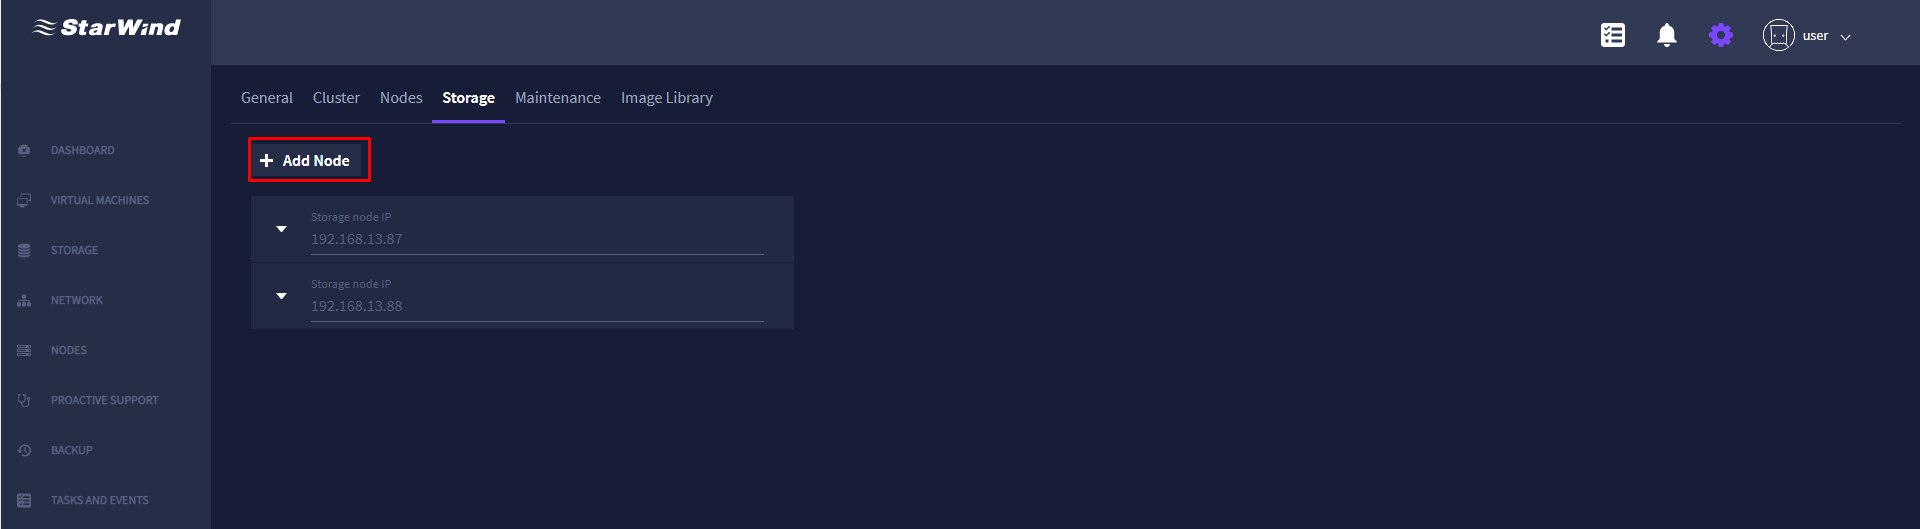
2. Specify the Storage node IP, Port, Login, and Password of the new storage node.
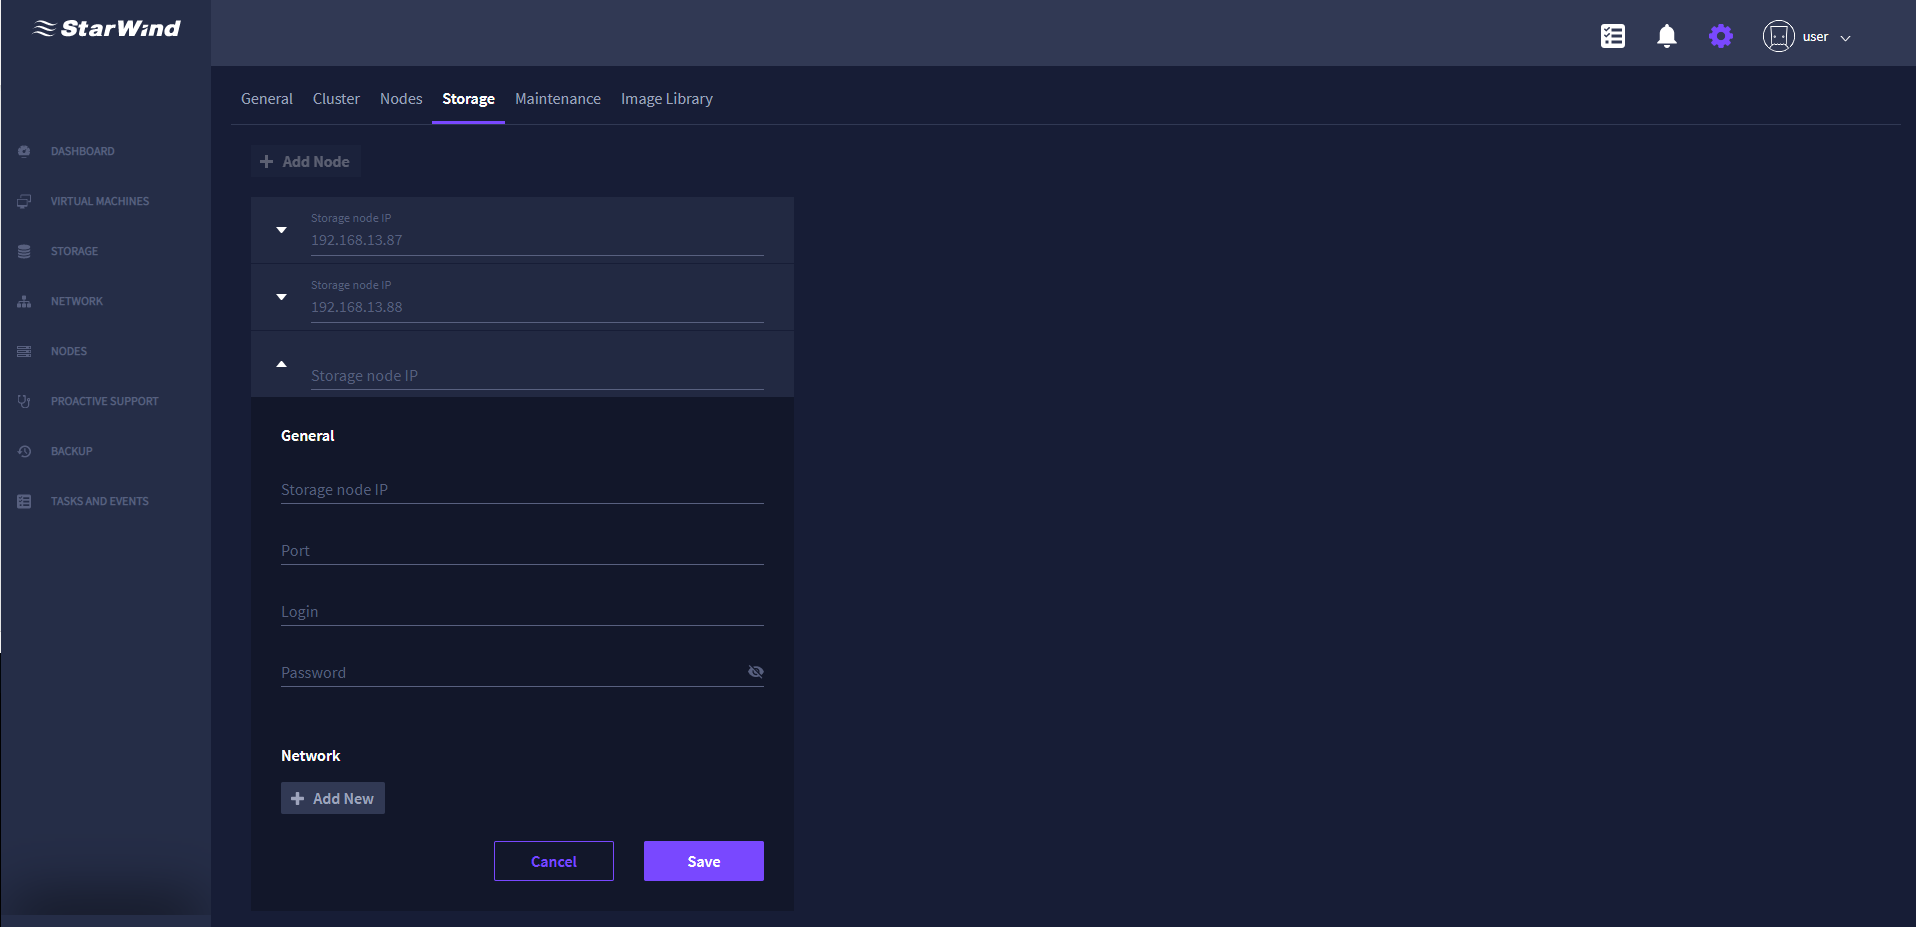
3. Select the network interfaces for synchronization, heartbeat, and iSCSI.
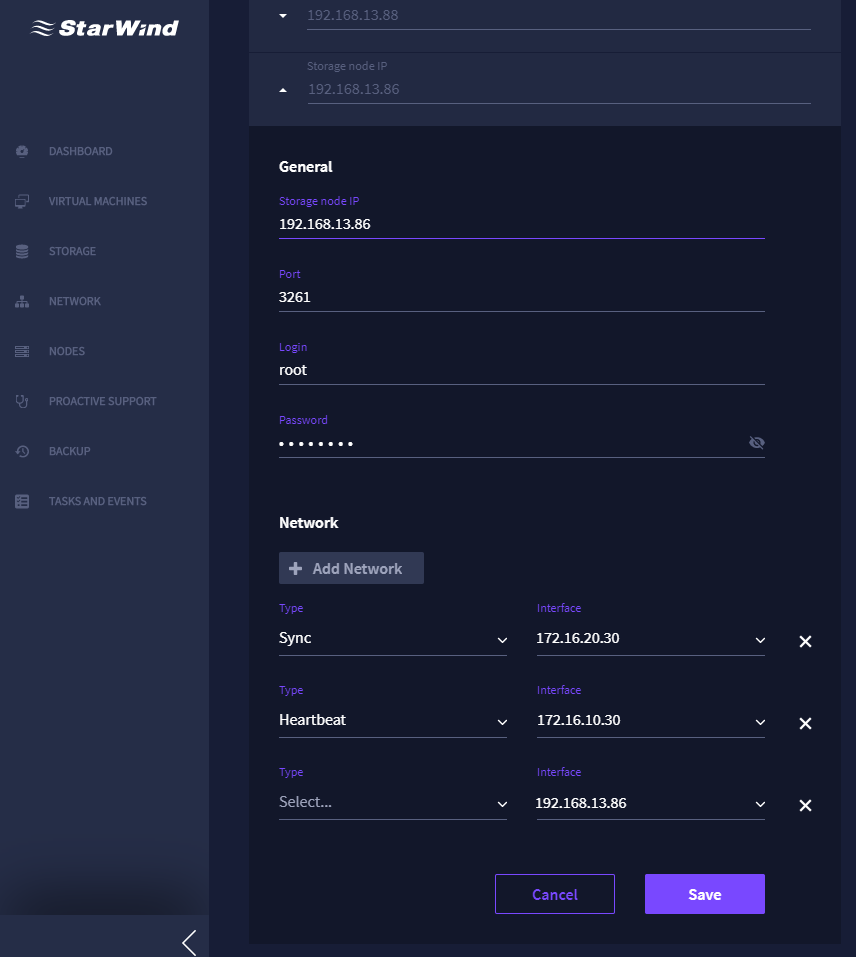
NOTE: The network interfaces used for iSCSI and synchronization come already preconfigured in StarWind HyperConverged Appliance and should not be modified. Same IP addresses cannot be used for different purposes.
NOTE: StarWind Virtual SAN requires dedicated physical channels for iSCSI and synchronization. A redundant heartbeat channel can go over the management link. See StarWind VSAN system requirements for more details here: https://www.starwindsoftware.com/system-requirements
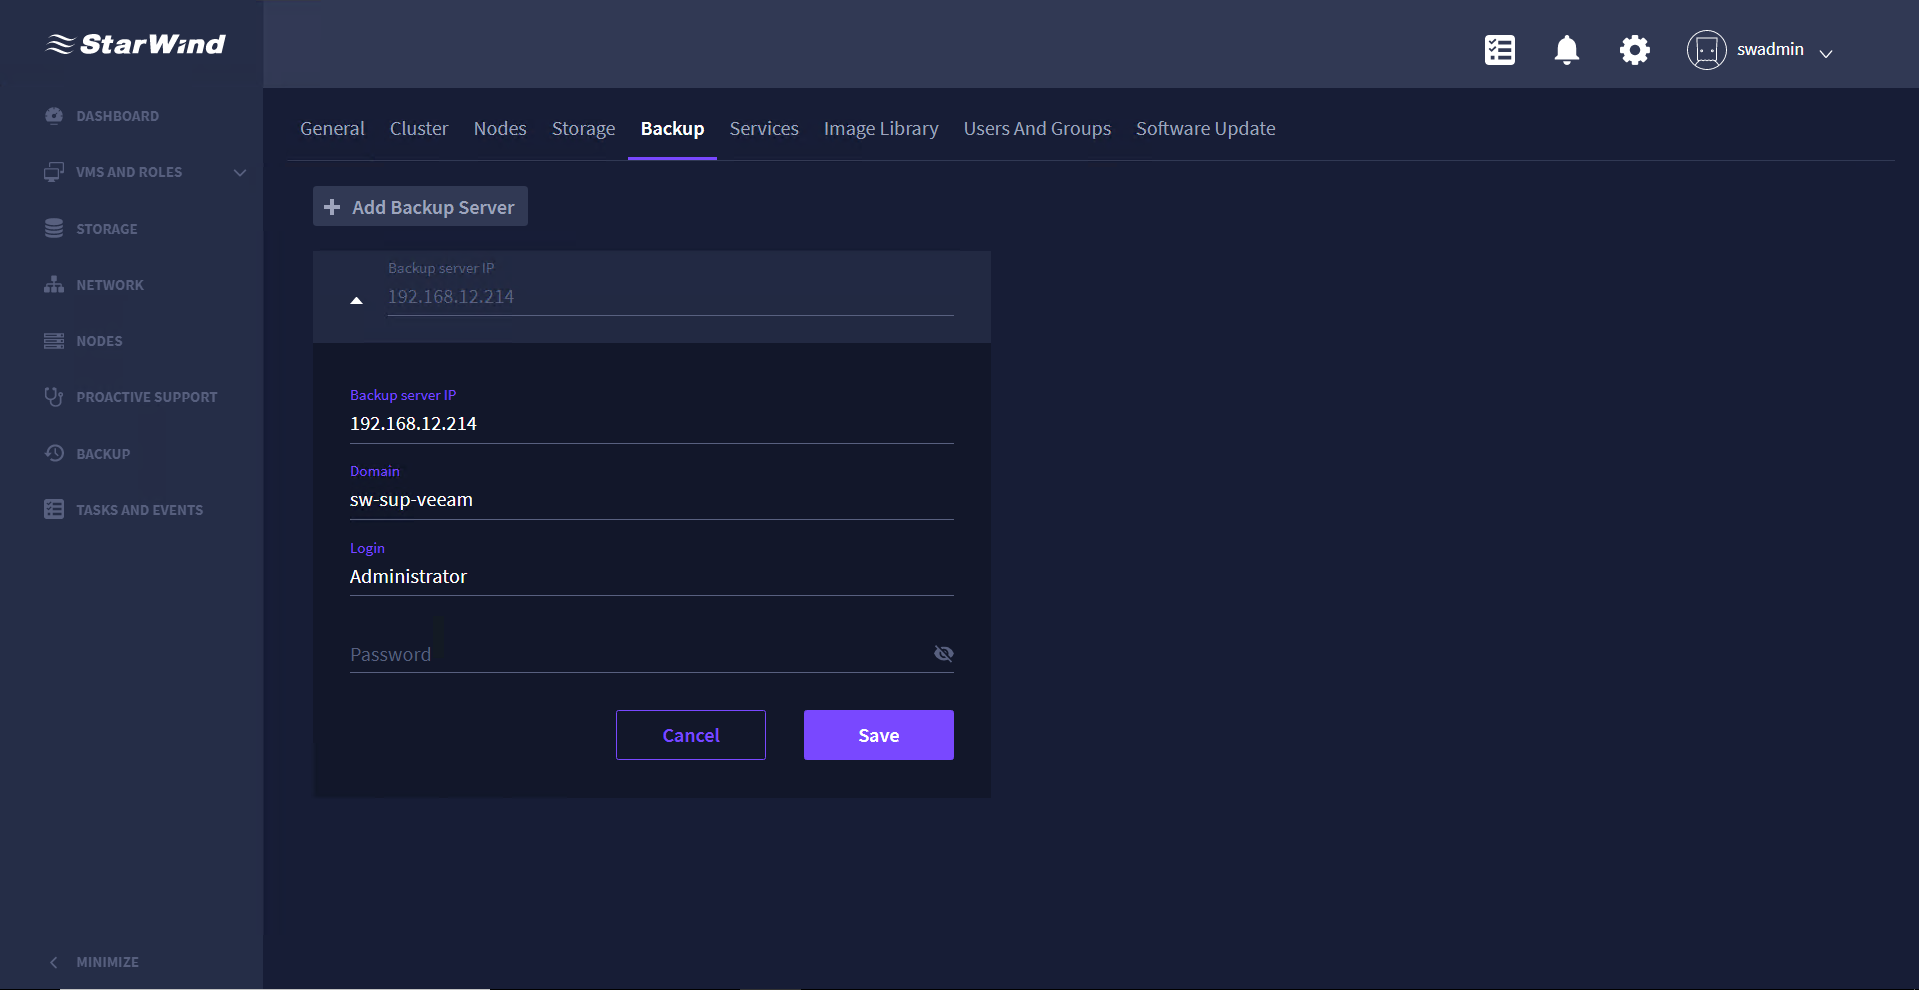
Adding backup server
1. To add a backup server, press the + Add the Backup Server in the Backup tab.
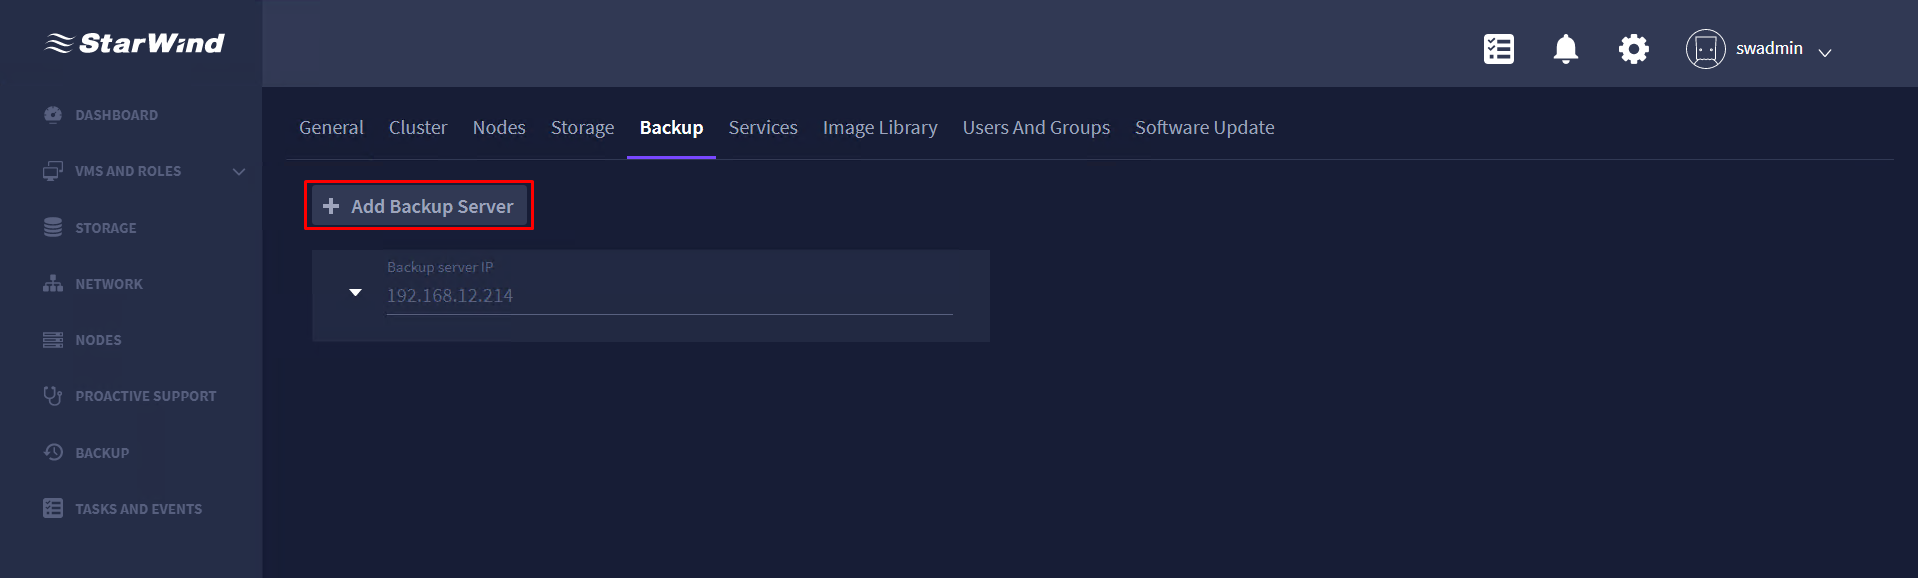
2. Specify the Backup server IP, Domain, Login, Password, and press Save.
Modifying the Backup Server Settings
1. To manage the backup server settings, navigate to the Backup tab, expand the required server, and press Edit.
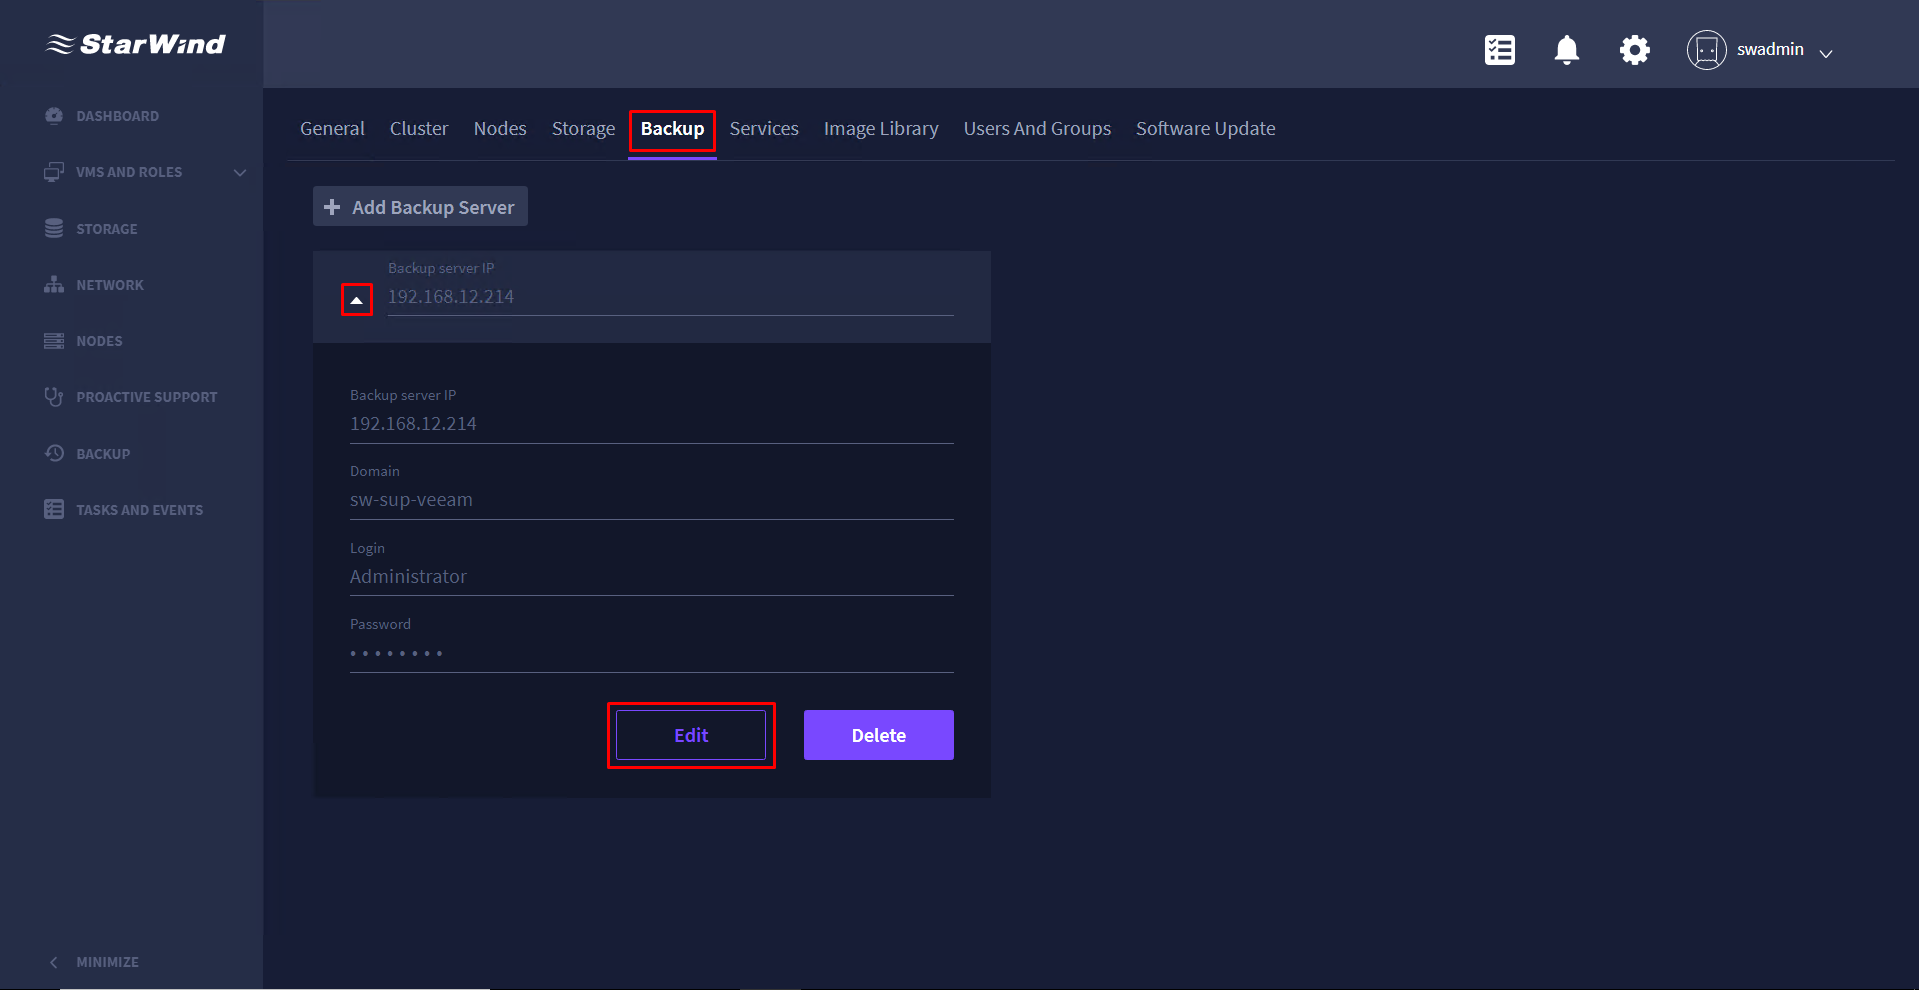
2. Modify the required settings and press Save.

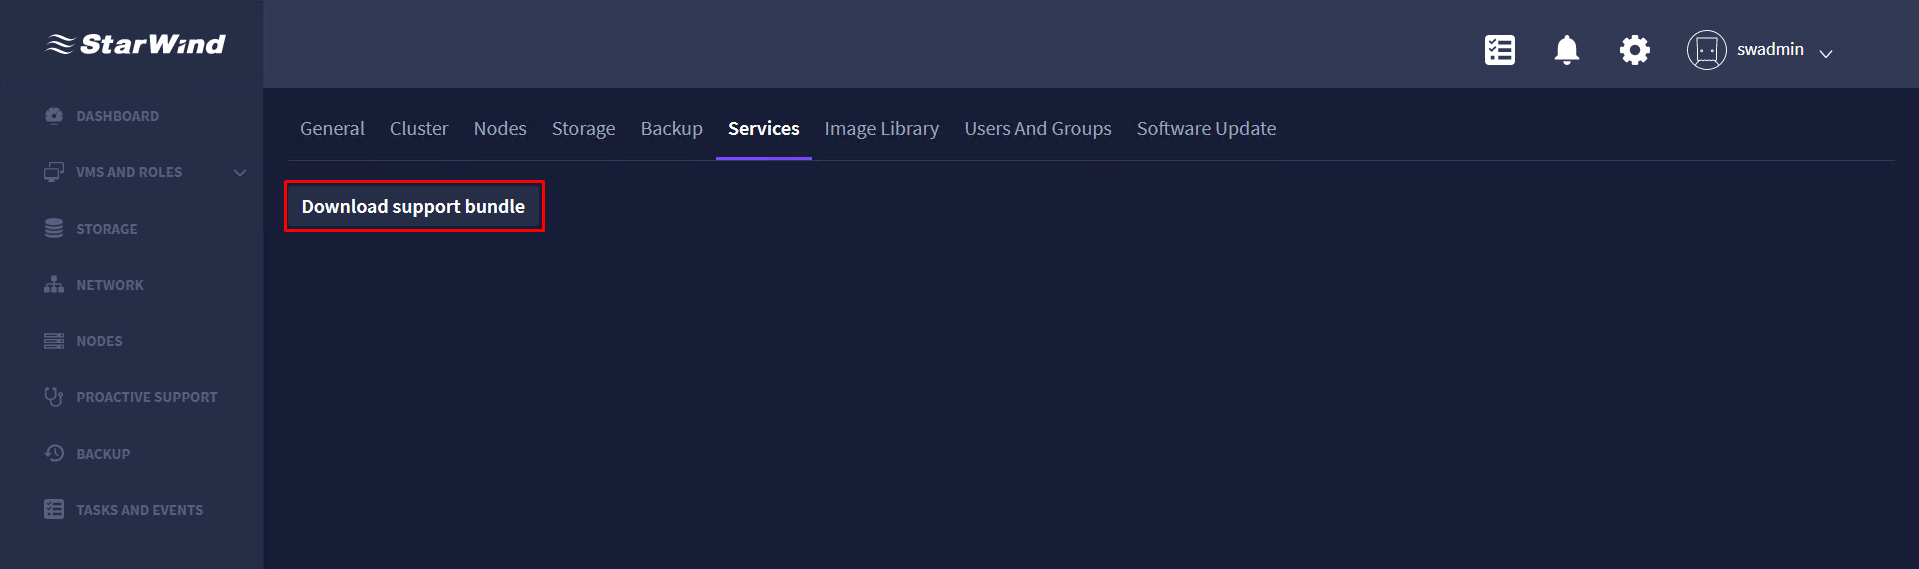
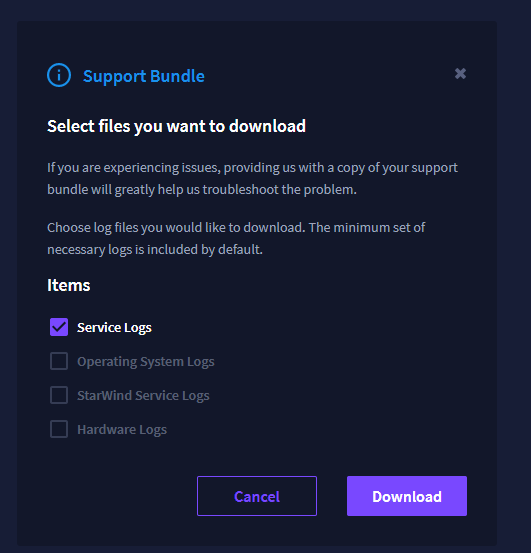
Services and logs collection
1. To provide StarWind Support Team with information on the issues with the virtualized environment, click Download support bundle.
2. Select the logs to provide StarWind Support Team with and click Download.
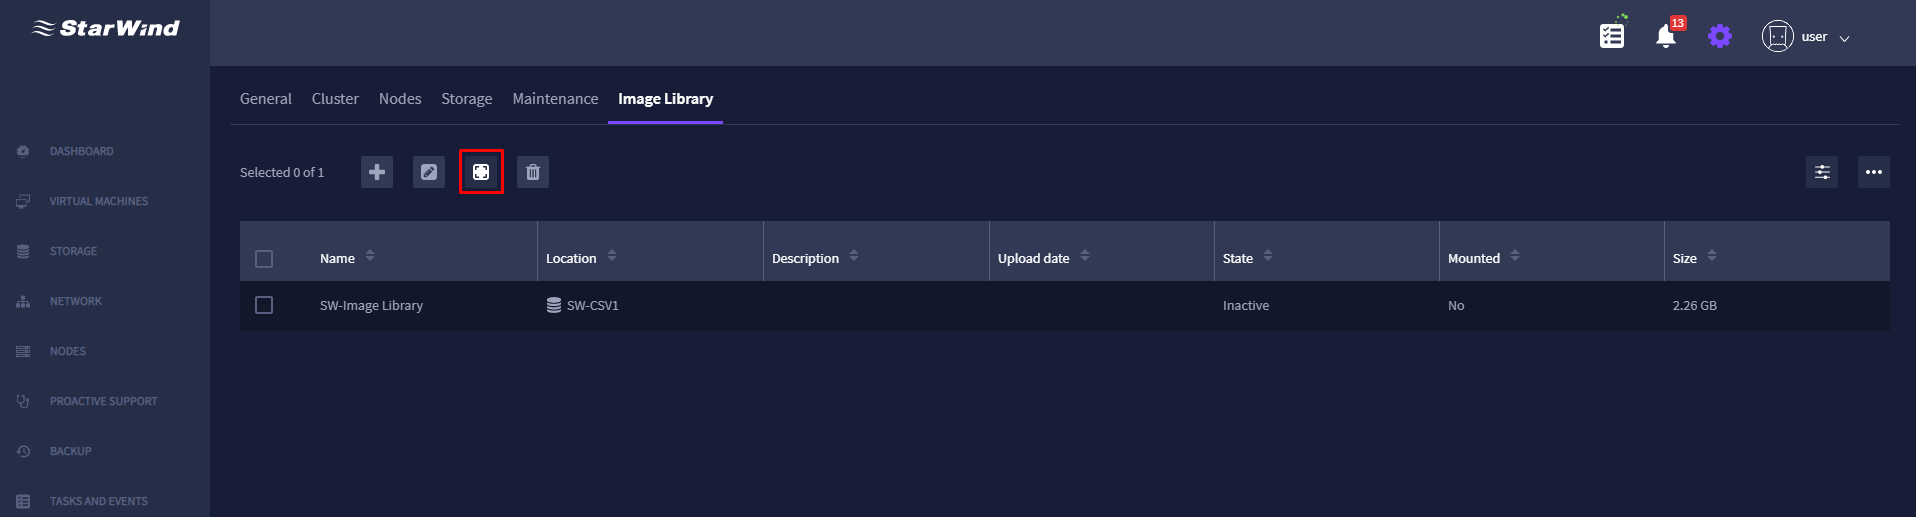
Configuring Image Library
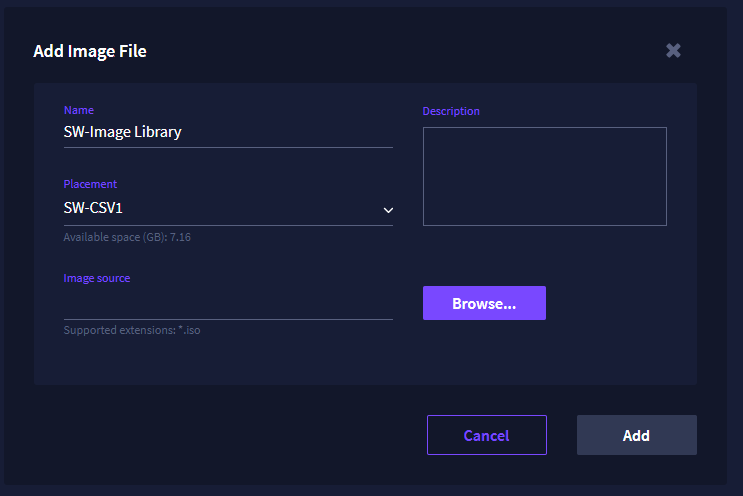
Adding an image file
1. To add an image file, navigate to the Image Library tab and click the Add icon.
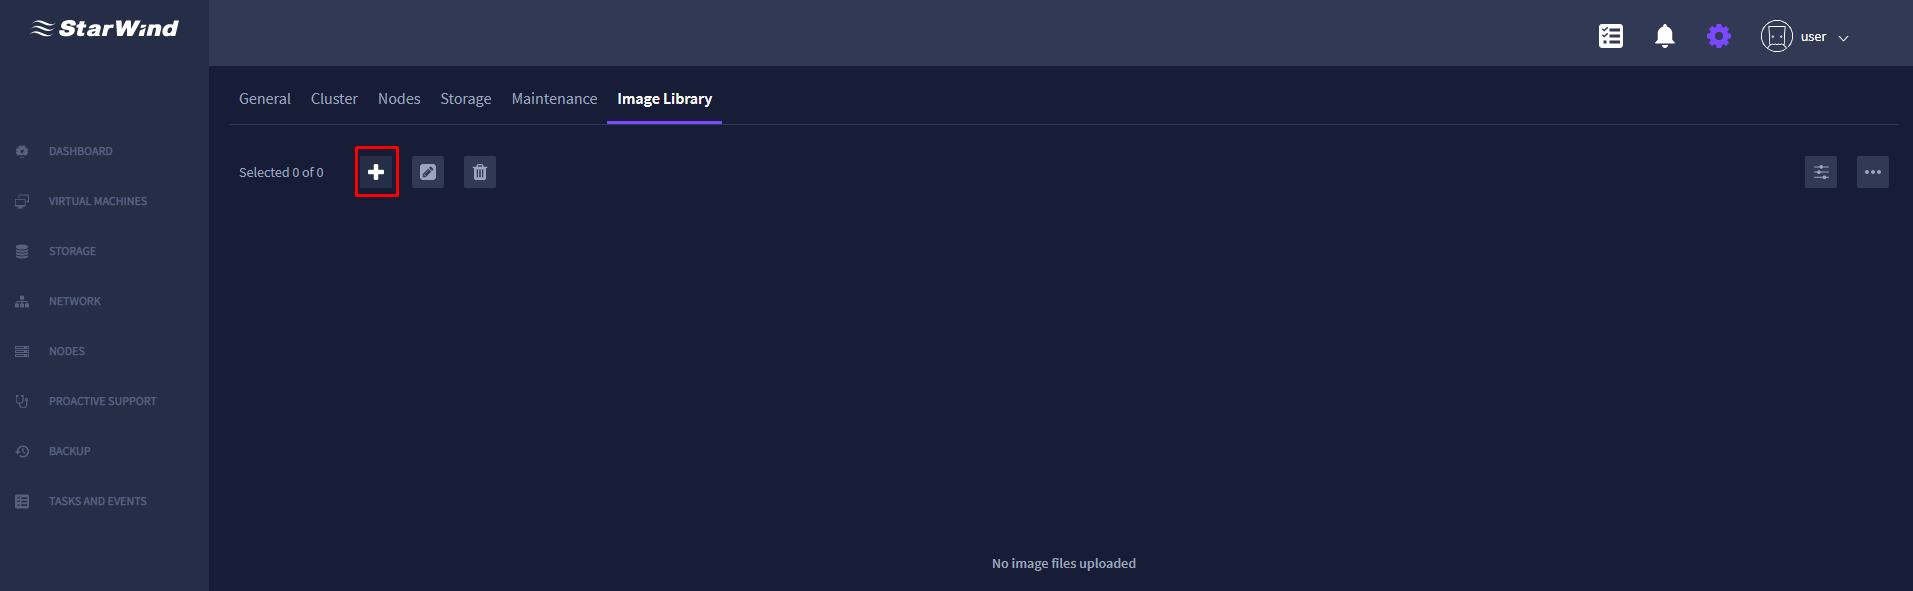
2. Specify the required name, placement, and image source and click Add.
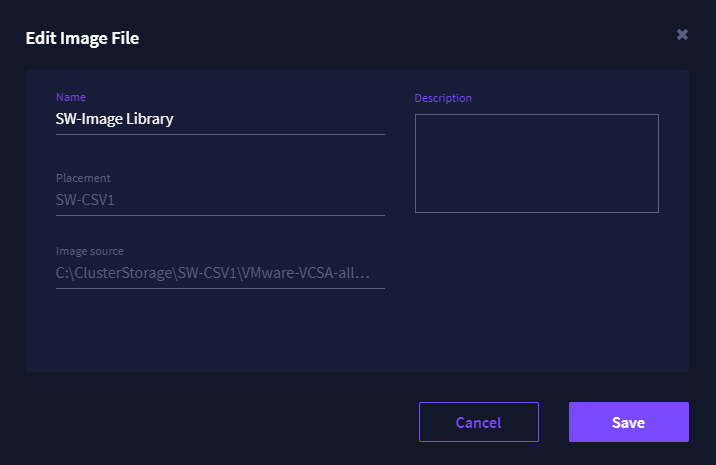
Editing image file settings
1. To edit the existing image file settings, select the required image file and click the Edit icon.
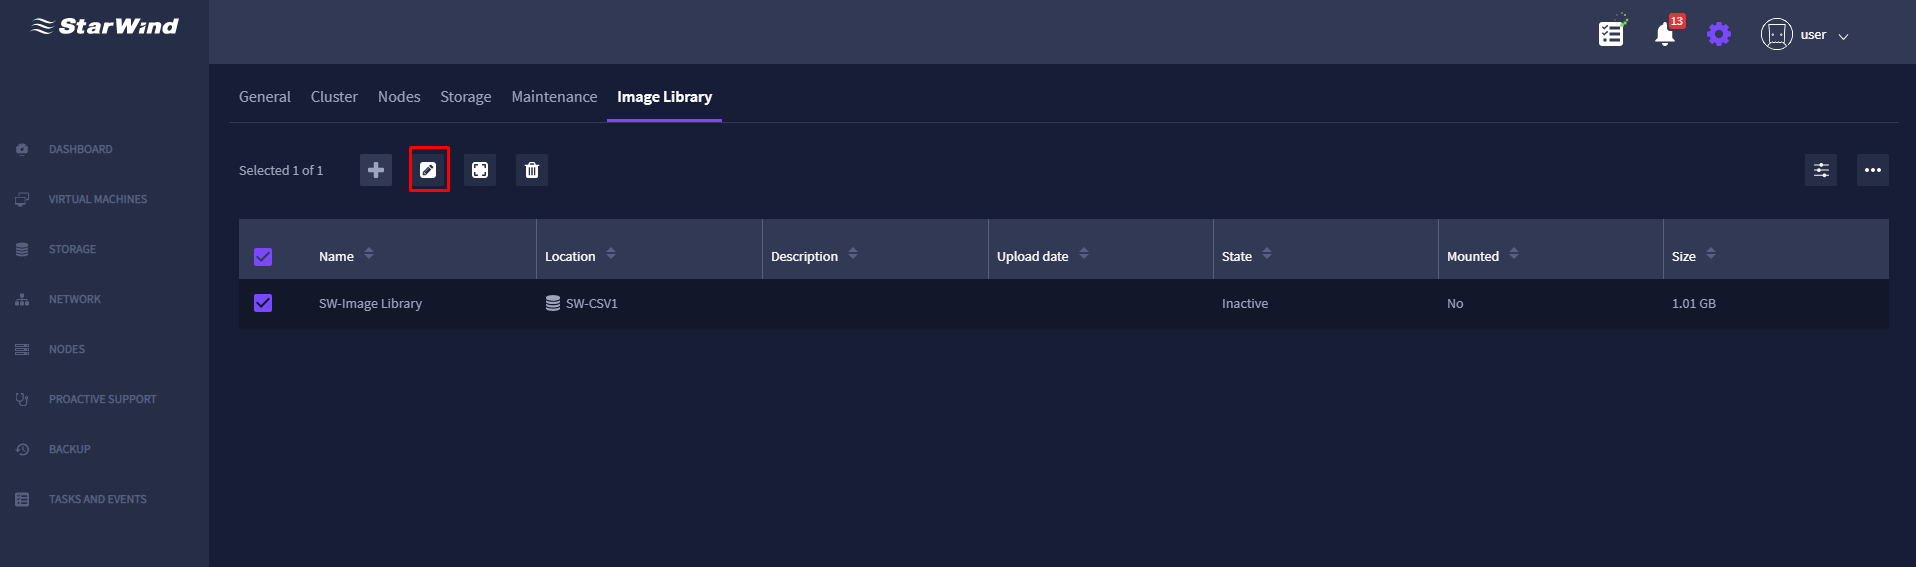
2. Specify the new name if required, add a description and click Save.
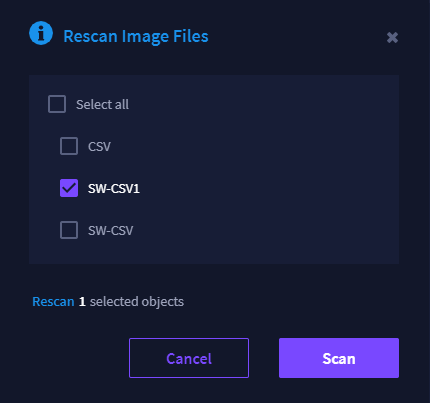
Rescanning image files
1. To rescan the image files, click the Rescan icon.
2. Select the required virtual volume and click Scan.
Deleting an image file
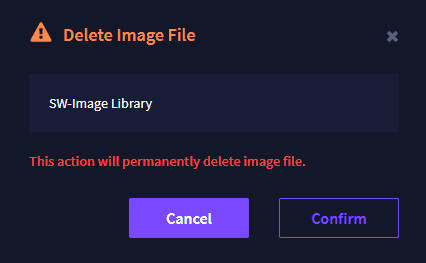
1. To delete the existing image file, select the required one and click the Delete icon.
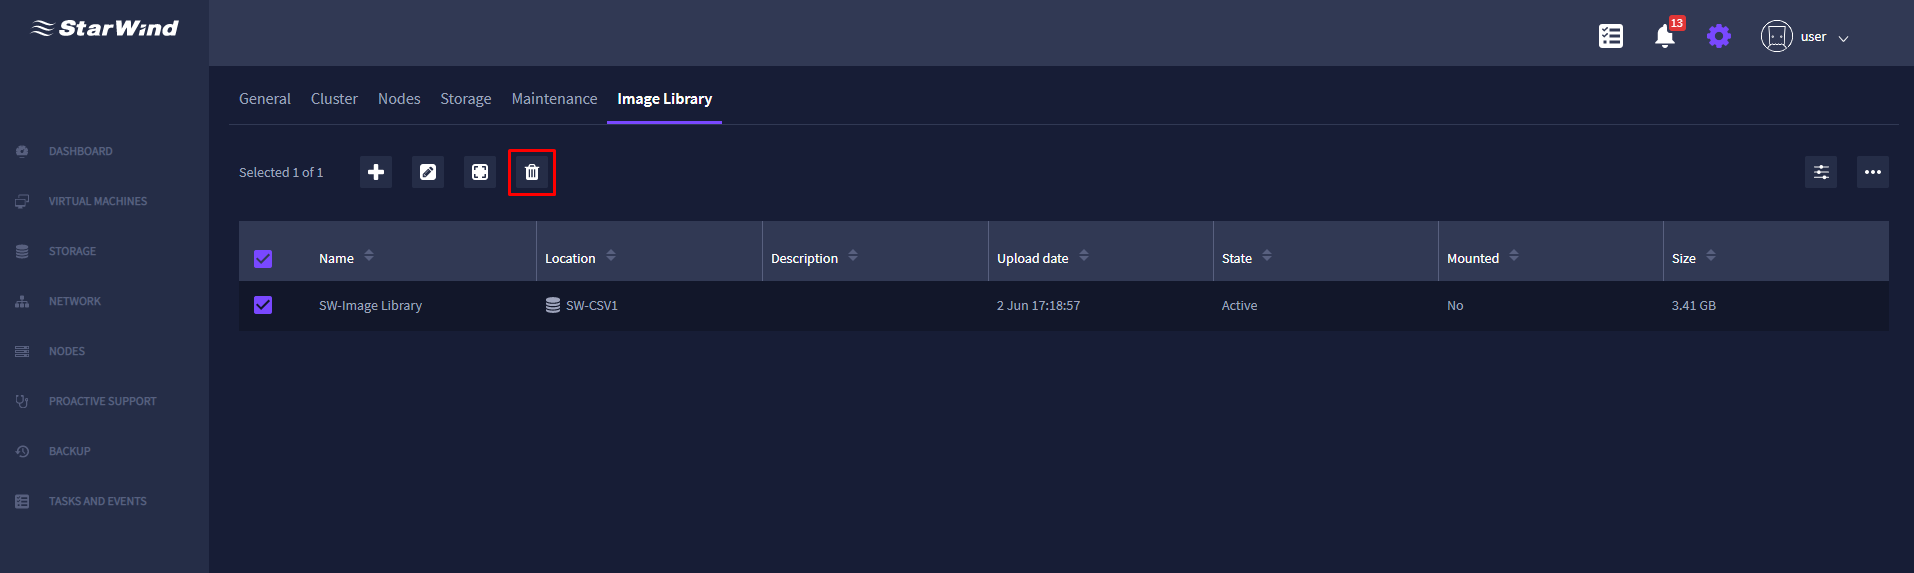
2. Click Confirm.
Configuring Users and Groups
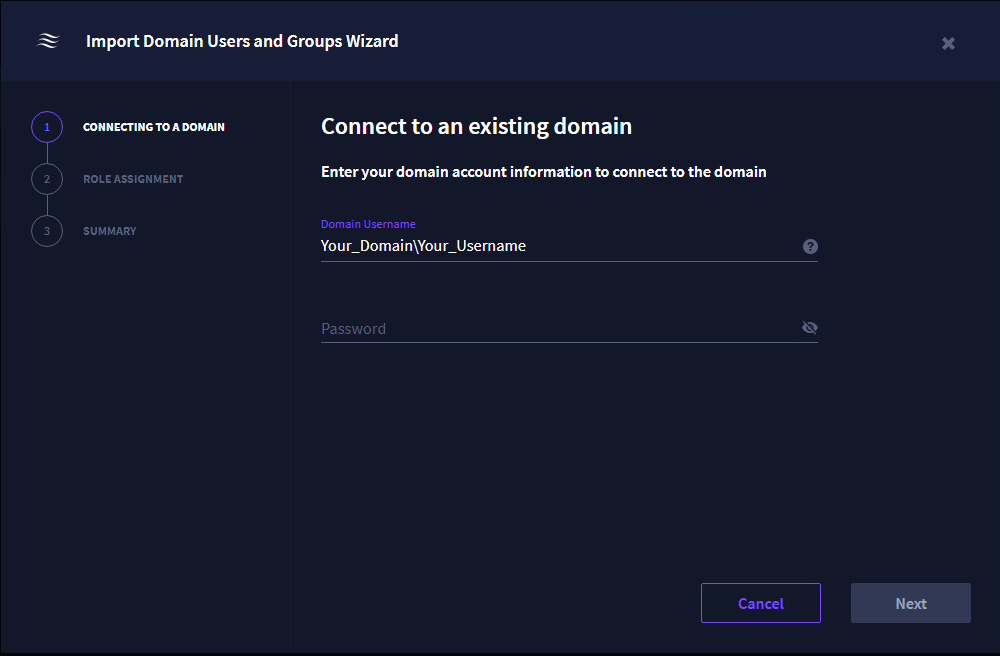
Importing Users and Groups from AD DS (Active Directory Domain Services)
NOTE: Users and Groups can be imported from different domains.
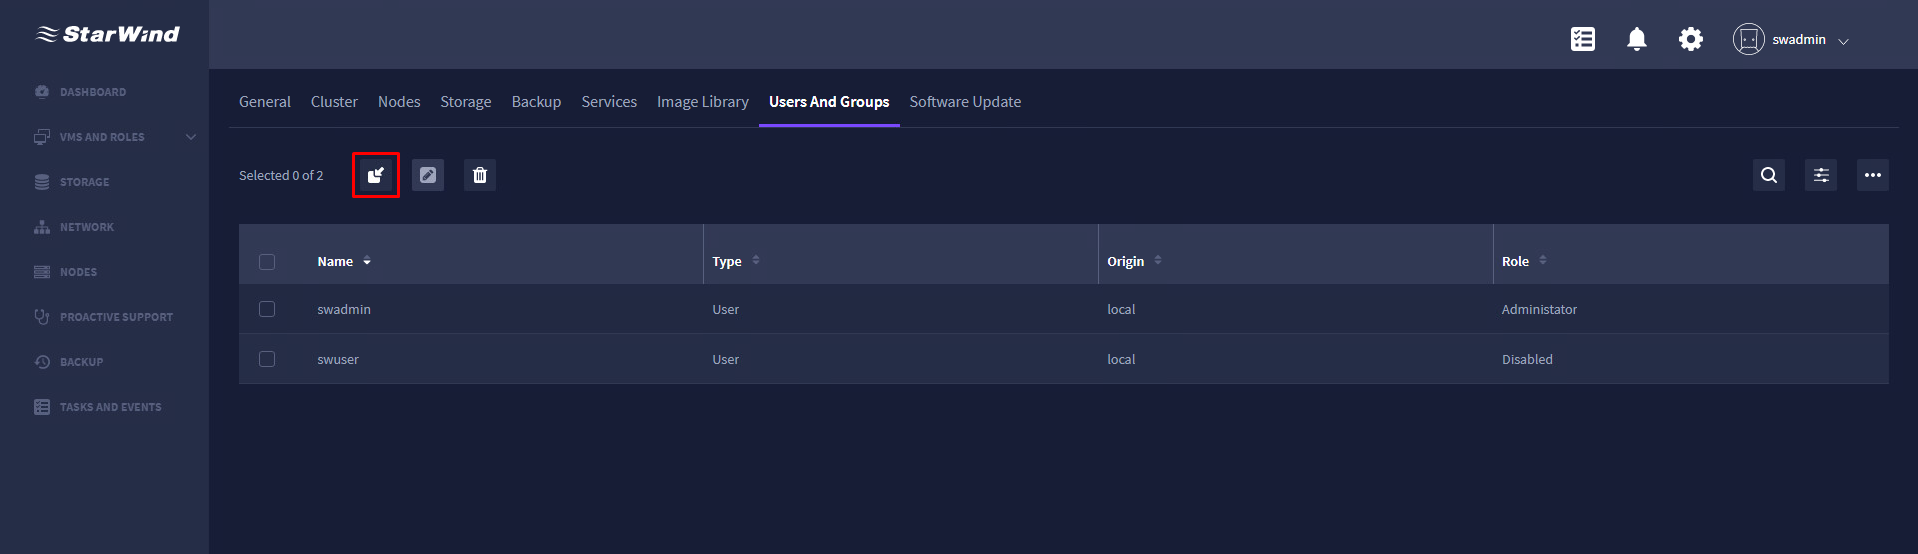
1. Press the Import icon.
2. Specify domain account information (domain username and password) to connect to the domain and press Next.
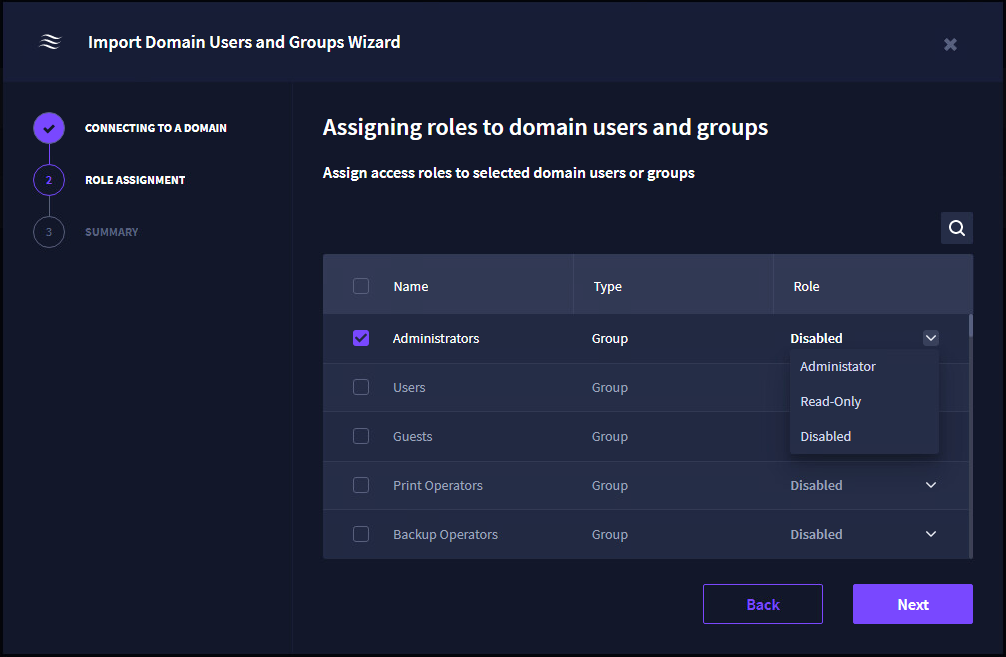
3. Assign access roles to selected domain users or groups and press Next.
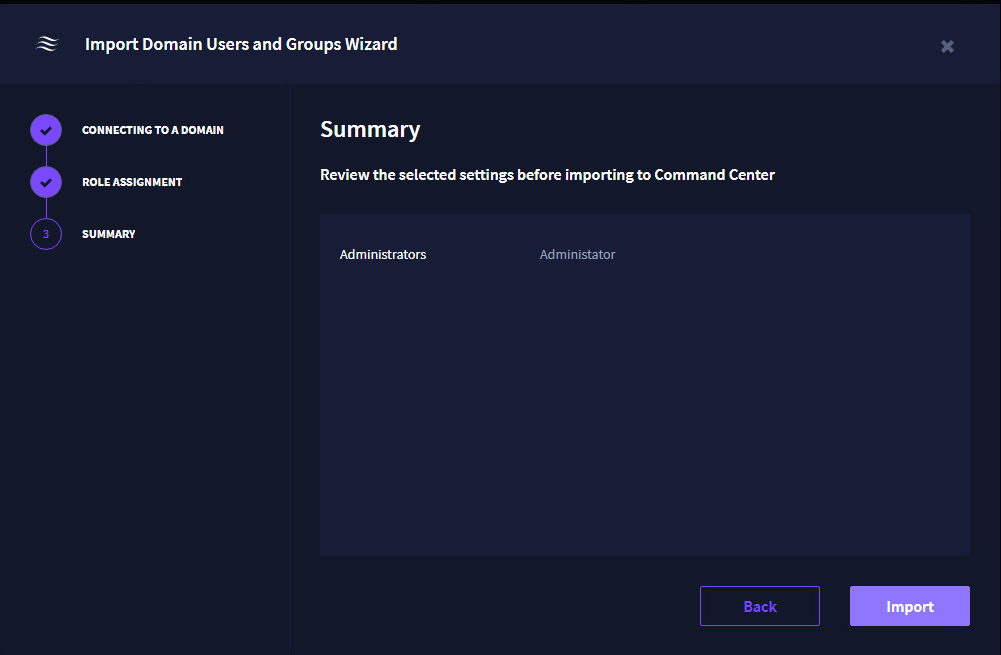
4. Review the selected settings and press Import.
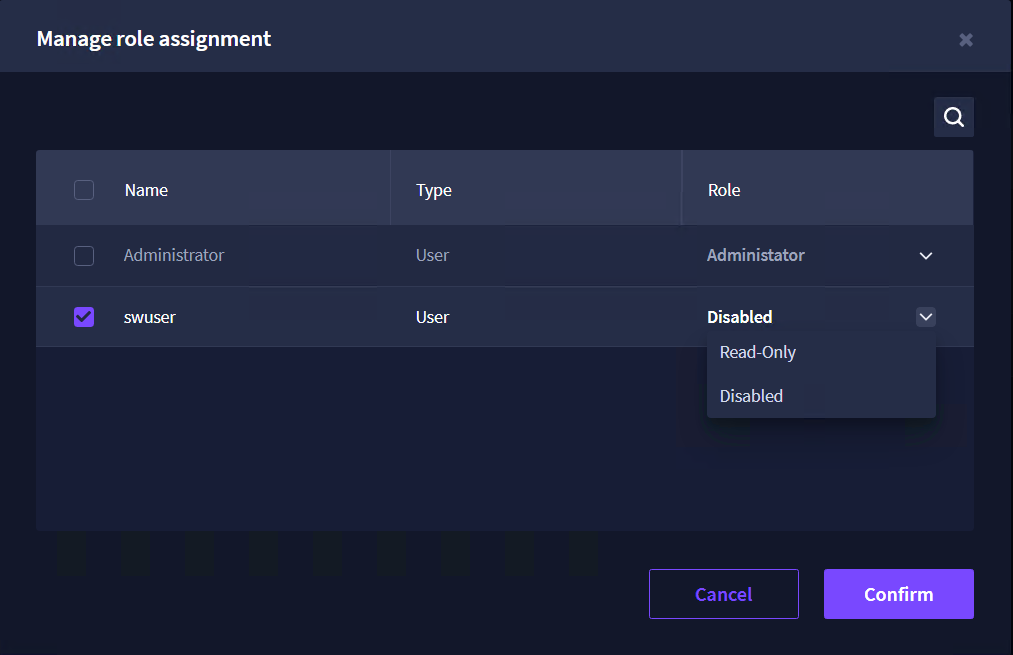
Managing role assignment
1. Press the Manage icon.

2. Specify the selected settings and press Confirm.
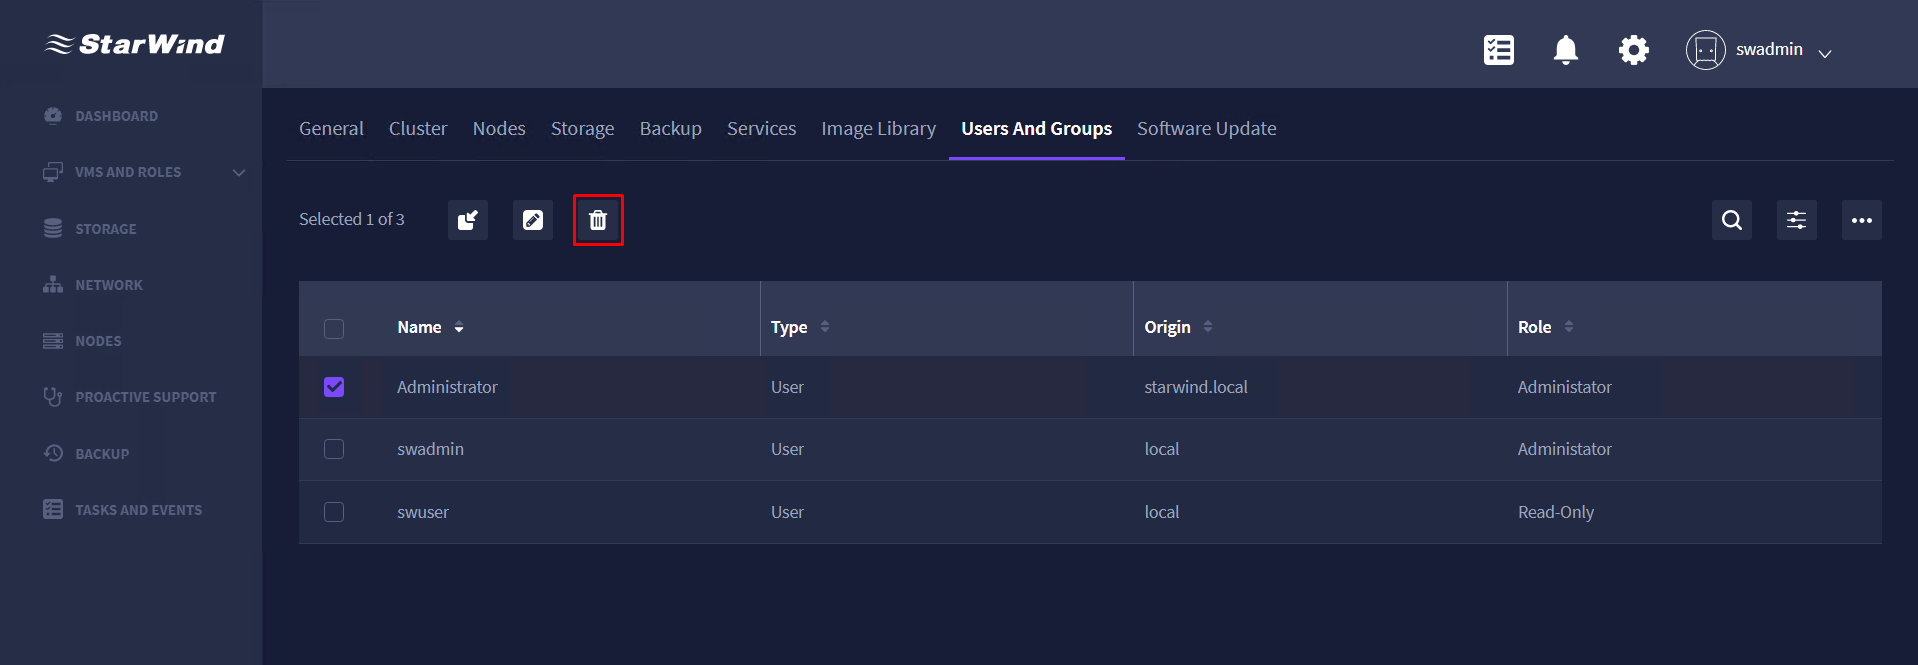
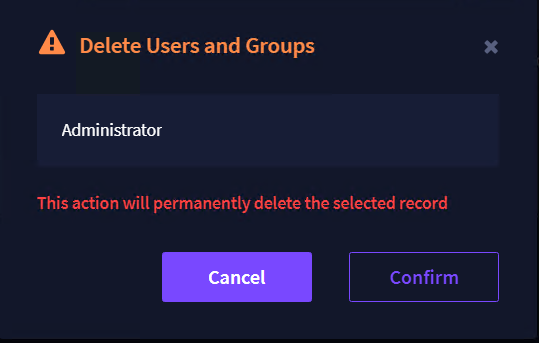
Deleting Users and Groups
1. Press the Delete icon.
2. Press Confirm.
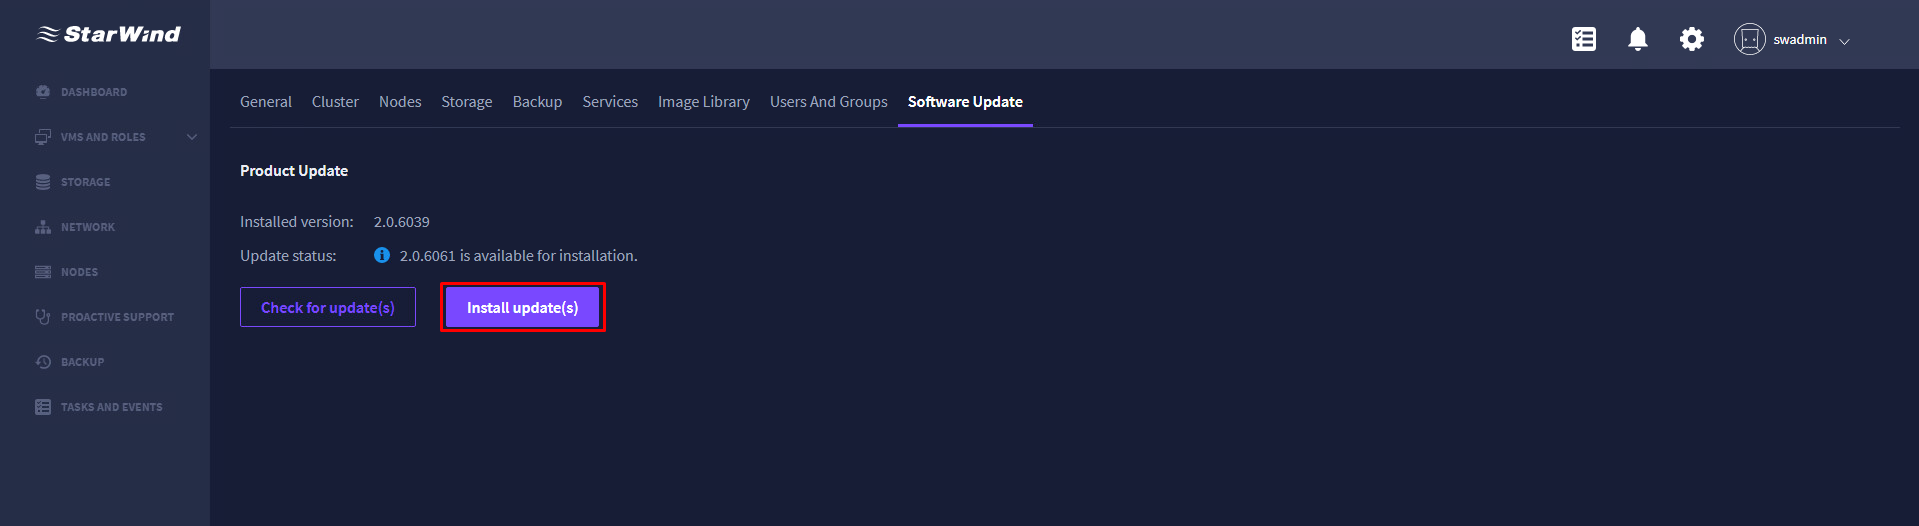
Implementing software updates of StarWind Command Center
1. Press the Check for update(s).
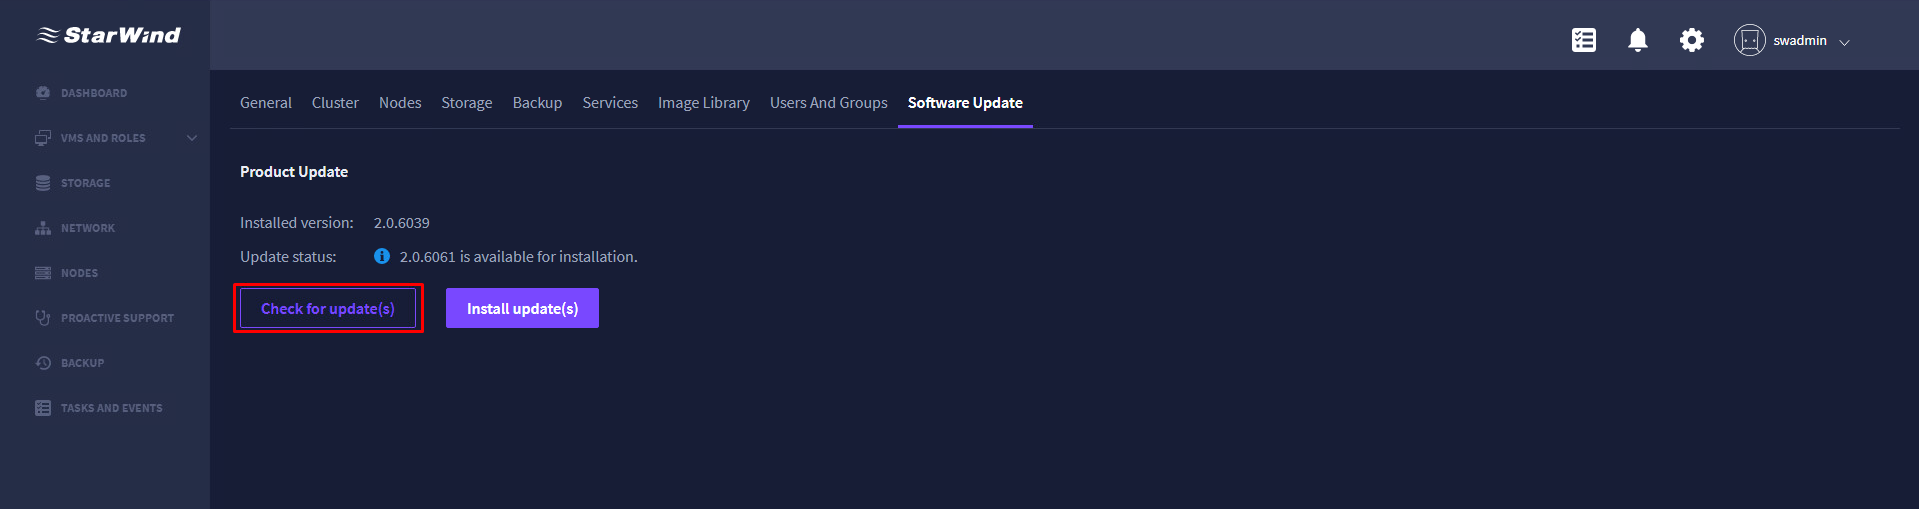
2. Press the Install update(s) to install the available updates.