StarWind Virtual SAN®
Monitoring Environment with Swordfish
- February 19, 2021
- 8 min read
Introduction
The SNIA Swordfish™ specification helps to provide a unified approach for the management of storage and servers in hyperscale and cloud infrastructure environments. The integration of Swordfish API allows configuring StarWind Virtual SAN resources as storage containers for virtual machines and provides more efficient management for the architecture simplifying storage provisioning and consumption.
SNIA Swordfish is an extension of the DMTF Redfish specification, so the same easy-to-use RESTful interface, along with JavaScript Object Notation (JSON) and Open Data Protocol (OData), is used to seamlessly manage storage equipment and storage services in addition to servers.
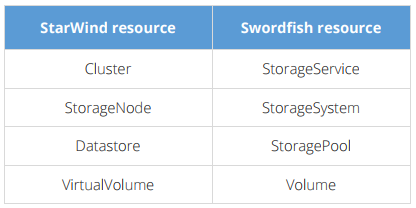
StarWind has integrated the following Swordfish resources to the provider:
- StorageService
A collection of resources that the system can make available to one or more host systems. The collection can contain block, file, or object storage; local system access points through which the collection is made available; hosts or host access points to which the collection is made available.
- StorageSystem
An instance of this resource should reference the set of ComputerSystem resources that is known in the scope of its use and has a HostingRoles entry with a value of ‘StorageServer’.
- StoragePool
A data storage container providing capacity that conforms to one of its supported classes of service. The storage pool does not support IO to its data storage.
- Volume
This resource should be used to represent a volume, virtual disk, logical disk, LUN, or other logical storage for a Redfish implementation.
The table shows resources reference:
StarWind Virtual SAN should be installed on one of the servers to start working with Swordfish Provider.
Installing StarWind Cluster Service and Swordfish API
1. To install StarWind Cluster Service, launch StarWind Virtual SAN setup and choose components specified in the screenshot below. 2. Check if StarWind Cluster Service has started properly.
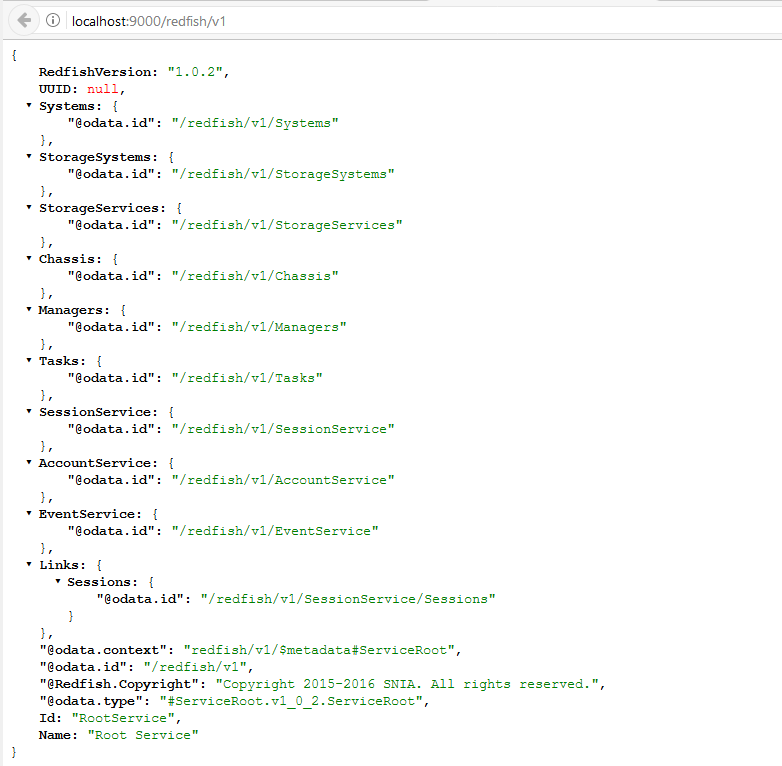
3. To check that Swordfish Provider is running, open the following page in a web browser:
http://localhost:9000/redfish/v1
Creating StarWind Cluster
1. Open PowerShell with administrative rights and run the following cmdlet:
([wmiclass]”root\starwind:STARWIND_ClusterService”).CreateCluster(“Swordfish_cluster”, “root”, “starwind”)
• “Swordfish_cluster”- StarWind Cluster Name (choose preferable name);
• “root”- StarWind default login;
• “starwind” – StarWind default password.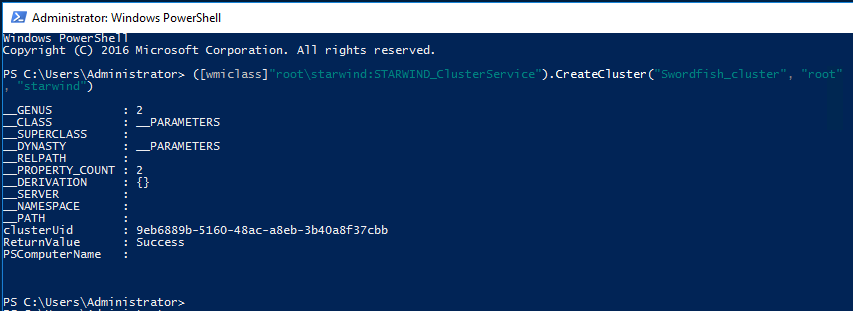 The information about the recently created cluster can be found here:
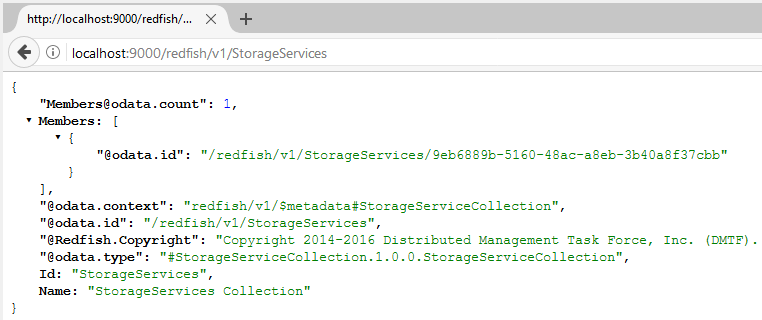
http://localhost:9000/redfish/v1/StorageServices
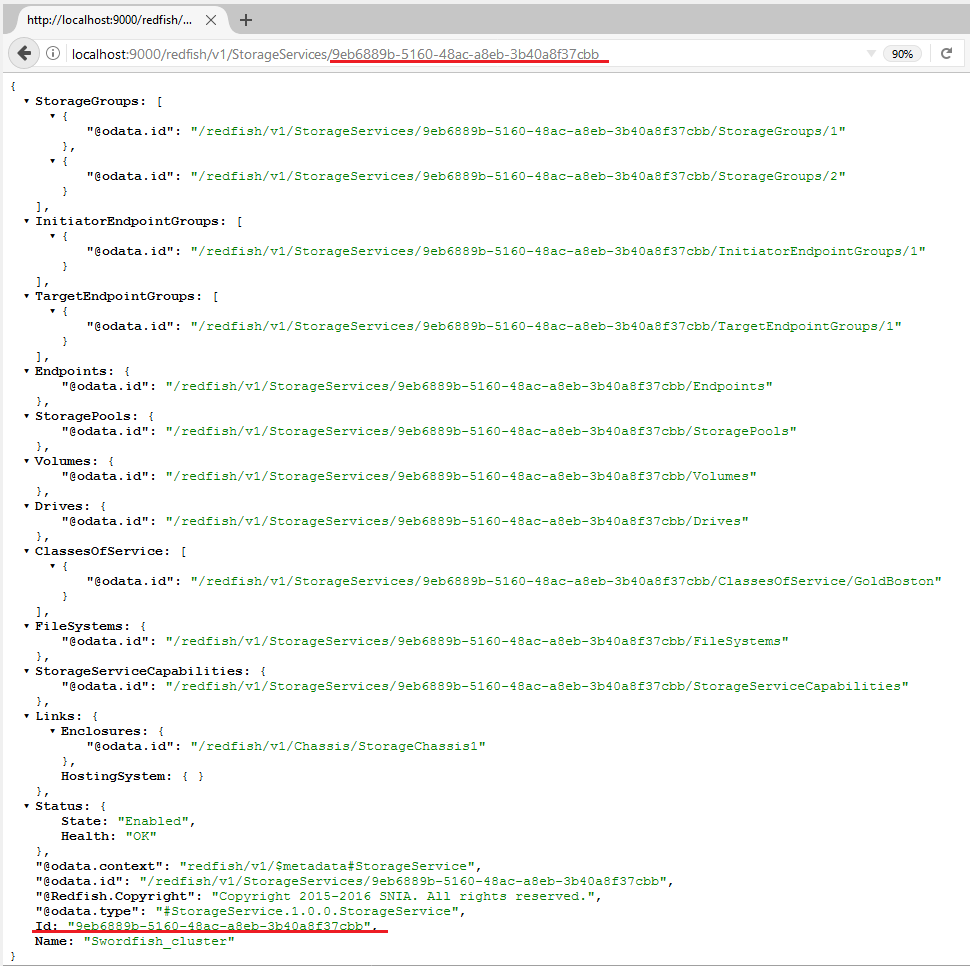
 The detailed information about the сluster can be found by adding “clusterUid” to the previous link:
http://localhost:9000/redfish/v1/StorageServices/clusterUid
 Alternatively, the information about the cluster can be received using the “SwordfishDemoScript.ps1” PowerShell script: http://SwordfishDemoScript.ps1_path. Execute the script one time to register its functions. “Invoke-RestMethod” is used by the script to get the information about the cluster and cluster objects. More detailed information about the script can be found here:
https://blogs.technet.microsoft.com/hectorl/2016/09/20/5-reasons-why-you-will-enjoyusing-the-new-swordfish-api/
2. Run the $discoveryinfo.StorageServices.’clusterUid‘ Powershell cmdlet to get the information about the cluster after SwordfishDemoSctipt.ps1 execution.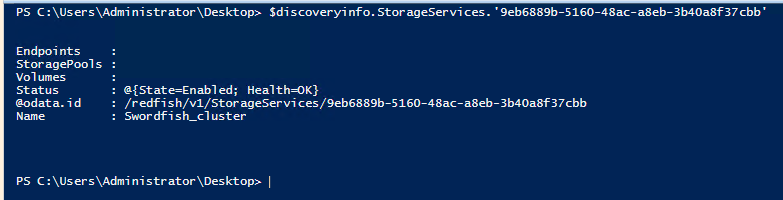
Adding Storage Node to Cluster
1. To add a storage node to the cluster, run the following PowerShell cmdlet:
([wmiclass]”root\starwind:STARWIND_ClusterService”).BindStorageNode(“StarWind Node Alias“, “StarWind Node IP“, “3261”, “root”, “starwind”)
• “StarWind Node Alias”- FQDN of the StarWind node;
• “StarWind Node IP”- IP address of the StarWind node;
• “3261”- StarWind Virtual SAN default port;
• “root”- StarWind default login;
• “starwind” – StarWind default password.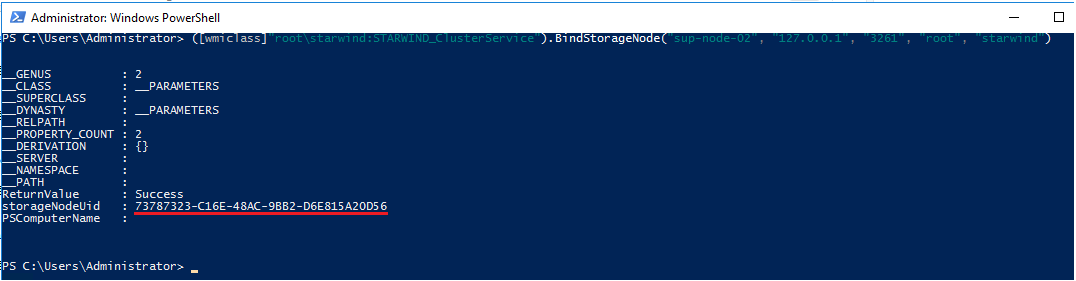 2. To see that the node is added to the cluster, browse the following page:
http://localhost:9000/redfish/v1/StorageSystems
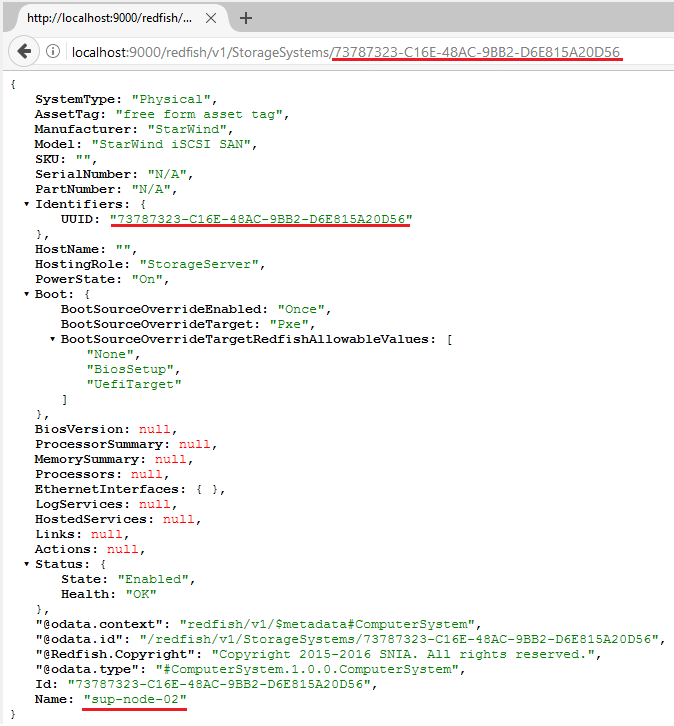
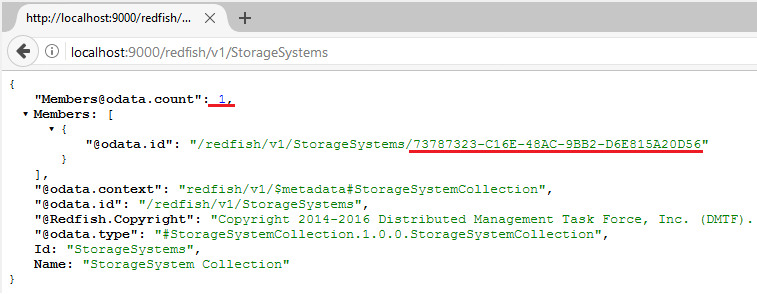 The detailed information about the cluster node can be found by adding “storageNodeUid”:
http://localhost:9000/redfish/v1/StorageSystems/storageNodeUid
 Alternatively, to get the information about the StorageNode, run $discoveryinfo.StorageSystems.’storageNodeUid‘ cmdlet (please execute SwodfishDemoScript.ps1 first).
Creating Storage Node Profile
1. Open StarWind Management Console. Click Add Target and create the VVols type target.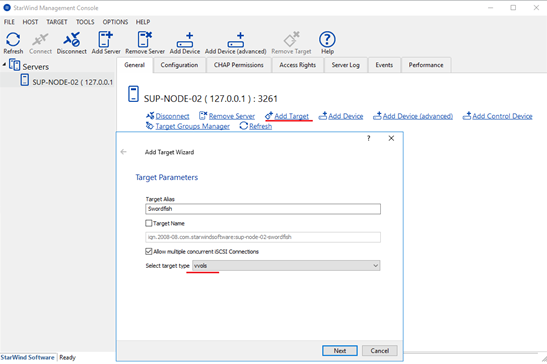 2. To create the Storage Node Profile, run the following PowerShell cmdlet:
([wmiclass]”root\starwind:STARWIND_ClusterService”).CreateStorageNodeProfile(“storageNodeUid”, “LoadAll”)
“storageNodeUid”- storageNode Uid of StarWind Node which is added in the “Add Storage Node to Cluster” part.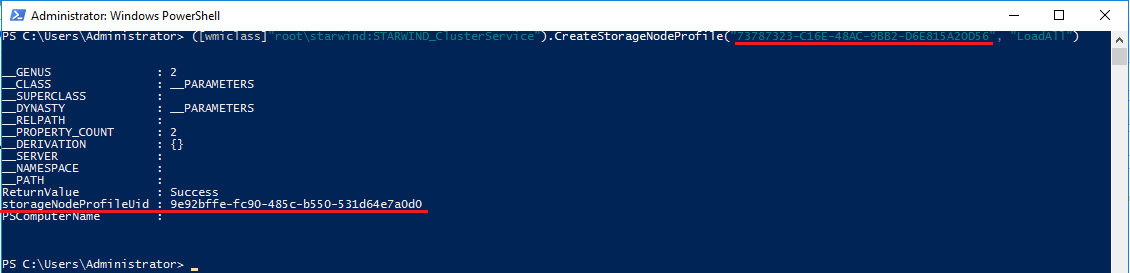
Creating Datastore
1. To create the Datastore, run the following PowerShell cmdlet:
([wmiclass]”root\starwind:STARWIND_ClusterService”).CreateDatastore(“DatastoreName”, “Size”, “storageNodeProfileUid”, “4E19F23A-0A84-486C-A516-DF96140C7000”).
• “DatastoreName”- Datastore Name;
• “Size”- Datastore size in MB;
• “storageNodeProfileUid”- Uid StorageNode Profile, which was created in the “Create Storage Node Profile” part ;
• “4E19F23A-0A84-486C-A516-DF96140C7000”- default capabilityProfileUid.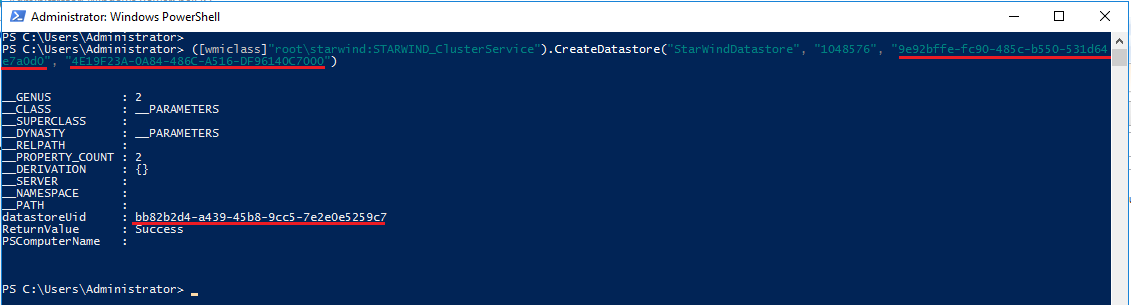 The information about the recently created Datastore can be found on the following page:
http://localhost:9000/redfish/v1/StorageServices/ClusterUid/StoragePools/datastoreUid
• ClusterUid – Cluster Uid, which was created in the “Create StarWind Cluster” part;
• datastoreUid – Datastore Uid, which was created in the “Create Datastore” part.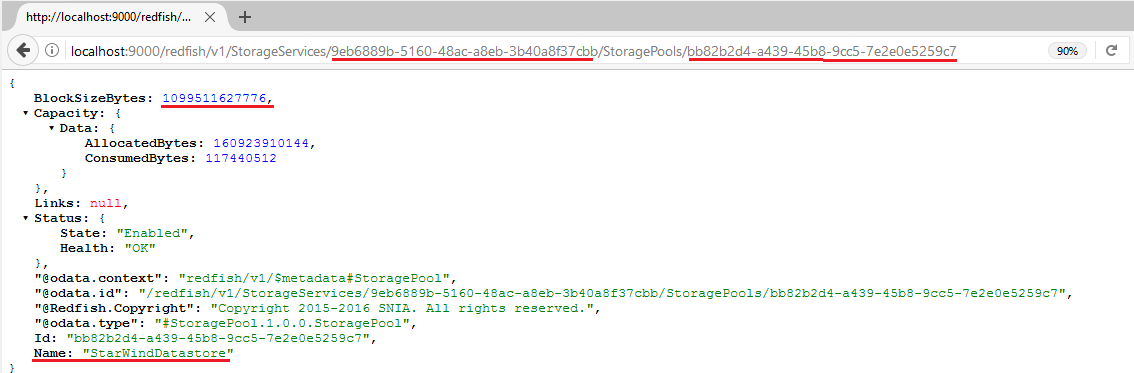 Alternatively, use PowerShell to get information about the Datastore. Run the
$discoveryinfo.StorageServices.‘ClusterUid’.StoragePools.‘datastoreUid’ cmdlet (please execute SwodfishDemoScript.ps1 first).
• ClusterUid – Cluster Uid, which was created in the “Create StarWind Cluster” part;
• datastoreUid – Datastore Uid, which was created in the “Create Datastore” part
Creating VirtualVolume
1. To create the VirtualVolume, run the following PowerShell cmdlet:
([wmiclass]”root\starwind:STARWIND_ClusterService”).CreateVirtualVolume(“VolumeName”, Size, “Config”, “datastoreUid”, “4E19F23A-0A84-486C-A516-DF96140C7000”)
• “VolumeName”- VirtualVolume Name;
• “Size”- VirtualVolume size in Megabytes;
• “Config”- Volume type (currently available types: Config, Data, Swap, Memory)
• “datastoreUid”- Datastore Uid, which was created in the “Create Datastore” part;
• “4E19F23A-0A84-486C-A516-DF96140C7000”- default capabilityProfileUid. The information about the recently created VirtualVolume can be found here:
http://localhost:9000/redfish/v1/StorageServices/datastoreUid/Volumes/volumeUid
• datastoreUid – Datastore Uid, which was created in the “Create Datastore” part
• volumeUid – VirtualVolume Uid.
Alternatively, use PowerShell to get information about the VirtualVolume. Run the
$discoveryinfo.StorageServices.‘datastoreUid‘.Volumes.volumeUid cmdlet (please execute SwodfishDemoScript.ps1 first).
• datastoreUid – Datastore Uid, which was created in “Create Datastore” part
• volumeUid – VirtualVolume Uid.
Deleting VirtualVolume
1. To delete VirtualVolume, run the following PowerShell cmdlet:
([wmiclass]”root\starwind:STARWIND_ClusterService”).DeleteObject(“volumeUid”, “STARWIND_VirtualVolume”)
• volumeUid – VirtualVolume Uid, which was created in the “Create VirtualVolume” part;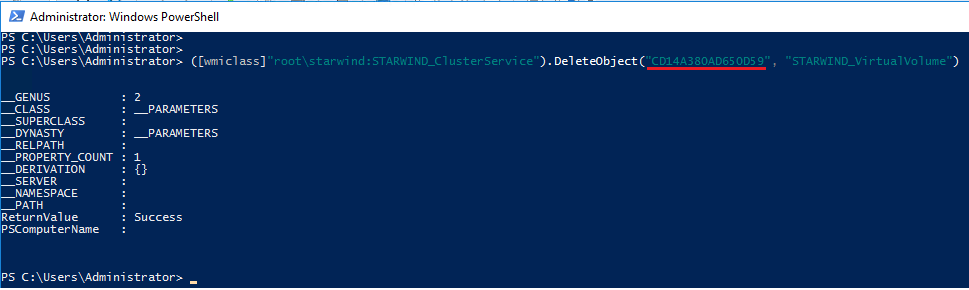
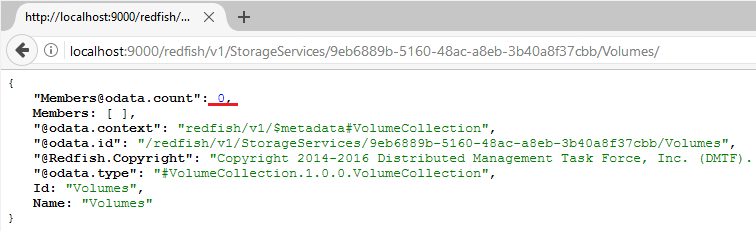
Check that VirtualVolume was deleted on the following page:
http://localhost:9000/redfish/v1/StorageServices/datastoreUid/Volumes/
• datastoreUid – Datastore Uid, which was created in the “Create Datastore” part.