

How to Build a SAN Guide: Convert Any Windows Server Into Shared Storage
- October 30, 2010
- 22 min read
INTRODUCTION
The Essential Guide to How to Build a SAN provides a brief overview to building your own Storage Area Network (SAN) using your existing industry standard x86 or x64 server hardware as well as freely available SAN software that will convert your box into a highly reliable and highly available SAN. Your newly built SAN will work directly on your Ethernet network without any additional investments.
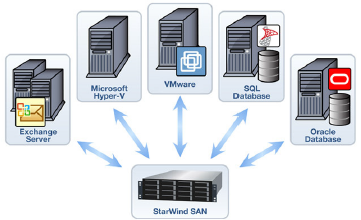
But why should you bother with a SAN at all? A SAN is a centralized, networked storage for your server applications. You can do many common tasks far easier and faster than with conventional file servers and direct attached storage (or hard disks). A SAN gives you “shared storage” on your network, which means that you can centrally manage all of your storage from one device as opposed to managing storage on each application server. Shared storage allows simplified backups and replication between storage devices at a far lower cost than host based replication. Ultimately, you can use a SAN for any server applications as demonstrated in this diagram:
Also, when using virtual machines with VMware, Hyper-V or XenServer, using a SAN greatly simplifies storage management by allowing you to store all your VMs in a central location. Using shared storage makes it significantly easier to manage, provision and protect virtual machines. Further, you need shared storage to use high availability features of virtual machines such as VMware HA, VMotion, VCB and DRS as well as Hyper-V Live Migration.
This whitepaper details how anyone can easily build their own SAN without the need to incur the high costs associated with proprietary SAN vendors’ products. In fact, you can use off-the-shelf server hardware and storage software to build your own custom SAN to significantly reduce the entry cost for your IT department without limiting functionality. After reading this guide, you will be able to start by building a basic storage server or you can also choose to build an enterprise-class fault-tolerant, fail-safe SAN with high availability using synchronous data mirroring with automatic failover and failback. This enterprise-class SAN will also be able to perform remote asynchronous replicate across a WAN thus allowing you to combine a multi-site Disaster Recovery option with inter-site High Availability. And you can do it all by yourself with StarWind iSCSI SAN software which turns any standard Windows server into a SAN.
Before we dive into the details, we’ll review some essential points about SANs and touch on a few key issues surrounding the Internet Small Computer System Interface (iSCSI) vs. Fibre Channel (FC) protocol debate.
What is a SAN?
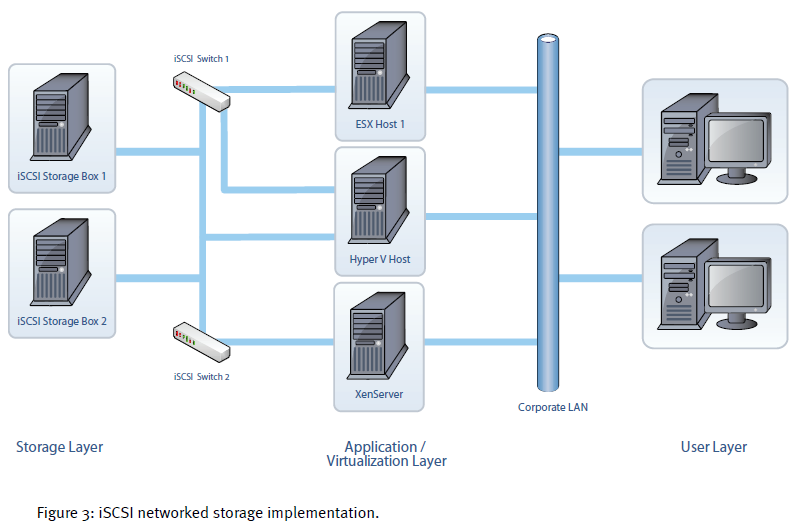
It is essential to have a clear understanding of what a SAN is. SAN is an acronym for storage area network – it is the shared storage box accessible to everything and everyone on your network. The term SAN is commonly used to refer to dedicated storage servers that use either the Fibre Channel (FC) or the iSCSI (Small Computer System Interface )command set, which works over your IP network protocol. By carrying SCSI commands over IP networks, iSCSI is used to facilitate data transfers over intranets and to manage storage over long distances. An iSCSI SAN works over your local area network (LAN) and simplifies the implementation and management of the SAN. Conversely, FC storage requires proprietary, expensive switches and host cards (HBAs), and by design forces you to put your SAN on a completely separate Fibre Channel network that doesn’t communicate with your existing Ethernet network.
With the iSCSI protocol, it is entirely possible to connect iSCSI storage directly into your existing corporate IP network, also known as your LAN. However, your LAN should not be designated for your SAN even though it is possible to use it for that purpose. This design could flood the corporate LAN with storage traffic which may slow everything down. So even with iSCSI storage, you should use separate network interface card (NIC) ports on application servers and separate IP switches to connect to the storage device. This will ensure you get a secure, segmented network for storage traffic that will not adversely affect your LAN and existing network traffic.
Why iSCSI Storage?
The section above hints at why iSCSI storage is advantageous. But prior to getting into additional details, it’s important to mention that iSCSI storage can work in a mixed protocol environment. For example, if you already own a FC SAN and don’t plan to replace it, then iSCSI may be the most rational decision for a) new virtual machine deployments b) application servers that are not SAN attached but have out grown their direct attached disks c) as an iSCSI disk-to-disk backup appliance or d) a pure VTL (virtual tape library).
Now consider why you should implement iSCSI storage when you can also select from NAS (Network Attached Storage), DAS (Direct Attached Storage also known as local hard disks), or a FC SAN (Fibre Channel)?
iSCSI storage is based on the iSCSI protocol, which means the disk drives in your storage appliance are presented over an IP network using the SCSI command set. Don’t confuse this with traditional SCSI disks; in fact, iSCSI storage is typically implemented with affordable Serial Advanced Technology Attachment (SATA) or Serial Attached SCSI (SAS) disks. iSCSI presents block based storage just as you get with your internal disk drives, whereas a NAS is a just a plain file server, which presents storage as file shares. A common scenario is to use a portion of your iSCSI SAN storage as back-end disks for file servers (NAS), consolidating both application data and file shares into one appliance.
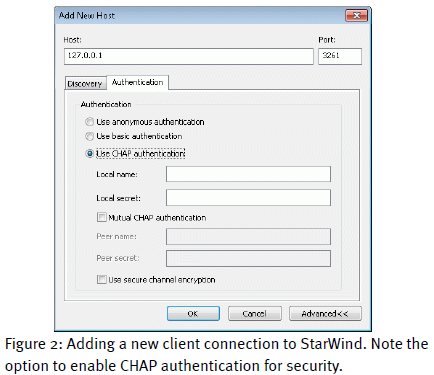
Now a little about iSCSI security, which allows IT administrators to specify which client machines (initiators) are able to connect to the iSCSI storage servers (the iSCSI target). Additionally, Challenge Handshake Authentication Protocol (CHAP) is used to provide authentication with iSCSI storage devices. Because CHAP identifiers are changed frequently and because authentication can be requested by the SAN at any time, CHAP provides a high level of security, even more so than Password Authentication Procedures (PAP).
One of the main advantages of iSCSI is the speed. iSCSI storage is Ethernet-based, so IT Administrators only need basic IP networking knowledge, as opposed to more specialized FC networking skills. There is a common misconception that FC offers better performance than iSCSI, but with correct sizing to determine the speed and number of disks required to achieve the required IOPs (i/o’s per second) to sustain optimal application performance, iSCSI has proven to be more than up to the job of even the most demanding applications. FC storage is significantly more expensive than iSCSI, requiring proprietary FC HBAs (Host Based Adapters) on client machines as well as very expensive FC network switches. Also, managing and maintaining a FC SAN requires administrators to learn new skills in FC networking. While the price is significantly higher for FC, the performance does not justify the increased cost. Ultimately, while Fibre Channel bandwidth is indeed higher (that is, until everyone has 10GigE implemented), the bottleneck is actually the speed of the hard disks and not the network connection.
So iSCSI storage allows you to use existing IP switches and routers and the client machines (your application servers) can use basic software called an “initiator” instead of very expensive FC HBA cards. For older application servers with lower powered CPU’s, you can use an iSCSI HBA, which is still affordable, unlike their FC HBA counterpart. For instance, Microsoft offers a freely downloadable software iSCSI Initiator and all new versions of Microsoft Windows already include the Microsoft iSCSI initiator. Microsoft has eagerly endorsed iSCSI technology for Windows, helping to promote iSCSI awareness. Linux based iSCSI initiators are also freely available.
For organizations that have already invested in FC as their primary storage and require lower cost Tier 2 storage, using iSCSI for the lower cost tiers will provide significant cost savings over FC. It is also a growing trend within the industry to implement iSCSI storage in a mixed environment, where existing FC storage may be legacy but still under warranty or the performance of FC is required for extremely I/O intensive applications such as high transactional databases with many hits per second. In any mixed storage environment, iSCSI can be an ideal choice for many applications from Exchange, SQL Server to VMware or Hyper-V.
In fact, iSCSI storage is already in use by many companies from SMBs to the Fortune 500 companies.
Getting Started
The simplicity of Windows iSCSI storage software allows you to use the Microsoft Windows operating system as the SAN controller and have a fully functional iSCSI SAN with an easy to use and familiar user interface. Any IT administrator familiar with Windows should be able to install and configure a Windows SAN in less than 30 minutes. Microsoft is one of several companies that provide iSCSI storage software for Windows; another is our featured product the StarWind iSCSI SAN.
For our example we are using the Free version of StarWind, which gives you plenty of flexibility for use as primary storage for application servers including virtual machines such as Hyper-V and VMware ESX, for Tier-2 storage for less critical applications and file servers, for pure disk-to-disk backup or even as a dedicated VTL (virtual tape library). The Free edition of StarWind allows you to manage a capacity of up to 2TB.
A few key points are outlined below to make your experience of building your own SAN run smoothly. First, here’s a list of basic ingredients you can adjust to suit your taste:
• Software: StarWind iSCSI SAN software.
• x86 or x64 Server: Any Intel-based or AMD-based server will do that is capable of running any of the Microsoft Windows Server editions. For most storage applications, 2-4GB RAM and a 2GHz CPU (single core) will be good enough. Dual power supplies are recommended for critical applications.
• Windows Operating System: A server class Windows OS is
recommended, although XP and Vista are also supported.
Both 64-bit and 32-bit OS’s are supported.
• Disks: SAS or SATA disks (as long as the Windows OS can
see them you are fine). A minimum of 2 disks will provide basic RAID protection.
• IP Switches: A dedicated 1GigE switch for the SAN fabric.
Budget IP switches are not recommended for performance
reasons. A second switch is optional, although highly recommended if connecting mission critical applications to the SAN.
Jumbo frame support is recommended for optimal throughput.
• NICs: 2 X 1GigE NIC ports – a single NIC port will also work for
applications with low I/O requirements.
• Client Connections: The free StarWind StarPort iSCSI initiator or the free Microsoft iSCSI initiator can be used, as well as various Linux, Unix initiators, iSCSI HBAs and iSCSI TOE NICs.
Building you own SAN. StarWind iSCSI SAN Software
Once you download and install StarWind iSCSI SAN Software, it should take you no more than 15 to 20 minutes to be up and running. StarWind can be installed on any x86 server running 64-bit or 32-bit Microsoft Windows, which allows you to select your preferred hardware vendor (i.e. Dell, HP, IBM, or any whitebox server) or to repurpose any existing server that may have become available after consolidation or implementation of VMware or Hyper-V virtualization environments.
Before installing StarWind, note that you will get the best performance and experience with your iSCSI SAN by selecting your hardware according to the following simple guidelines. In general, the performance required from the physical server where StarWind is installed isn’t as critical as sizing the disks correctly, although it is still important to note that the CPU speed and amount of RAM will affect the system’s performance. A server with 4GB of RAM and a 2GHz single core CPU should be fine for most applications.
Here is a sample server for your custom-built SAN that will offer excellent performance:
• Windows Server 2008 R2 x64
• 2 x Dual Core CPU (Intel)
• 8GB of Memory
• 1 x RAID Controller (SATA and SAS Backplane support)
• 2 x 1GB NICs (Jumbo Frame support)
Sizing disks involves selecting the correct speed drives and the right number of drives to achieve the required IOPs (i/o operations per second) for your application.
StarWind will work with any disk that Windows can see (SAS, SATA), and storage can be expanded by using an expansion bay such as an externally SAS connected bay of drives. Using a server with hot swappable drives provides extra resiliency in the event of a drive failure. How you decide to carve up a RAID group (many LUNs spread across a single RAID group vs. each LUN on a separate RAID group) is a function of the performance your applications require.
To make sure that your IP network is utilized correctly, you should use a dedicated NIC port on your application servers to connect to dedicated IP switches, which are only used for iSCSI traffic. This will ensure that you don’t overwhelm your LAN. This is the cornerstone of a SAN, which is by definition a
separate network for storage. For further redundancy on your SAN network, you can use two separate switches in a crisscross fashion. This requires either dual NICs or two available Ethernet ports on your application server and again on the server running StarWind iSCSI SAN software.
If you are using StarWind as a backup to disk appliance and you only have a single backup server, you can get away with a simpler direct connection and eliminate a switch altogether. Multipathing will provide redundancy or NIC teaming to improve data flow. Multipathing with StarWind is achieved using industry standard MPIO capabilities, and is simple to configure via the MS iSCSI initiator (fully supported with StarWind Software).
In large I/O environments, adding more NIC ports to the StarWind server will allow even more data throughput. Unlike many dedicated SAN vendors, a StarWind SAN allows you to grow NIC ports without purchasing a new SAN.
Also, ensure you are using a 1GigE network for all SAN traffic.Anything slower will lack performance. If you need additional performance, using a 10GigE dedicated IP network for SAN traffic will assure you achieve higher performance at a fraction of the total cost of FC storage and FC switches.
On Windows clients (your application servers), the free Microsoft iSCSI initiator or the free and more advanced StarPort Initiator is used to enable the client machine to connect to your new SAN. StarWind has also been validated with Linux and UNIX iSCSI initiators, iSCSI HBAs from Adaptec and QLogic, and hardware iSCSI accelerators from Alacritech.
Protecting Data With a SAN
Once you have centralized/shared storage in place, one of the first questions you should ask yourself is how will you back up the data that resides on the storage server? With data on a StarWind SAN, you can still use your existing backup application to backup your data, and for VMware users you can also use VCB (Virtual Consolidated Backup). StarWind SAN also allows you to perform live, point-in-time snapshots with the CDP & Snapshots feature for further flexibility in your disaster recovery strategy, including mirroring and replication for remote offsite replication.
StarWind’s Enterprise Class SAN Features
StarWind turns any industry-standard x86 or x64 Windows server into fail-safe, fault-tolerant storage that will be continuously available even in the event of failure. StarWind redefines high availability storage by offering this enterprise-class technology, which was previously only available in high-end storage products, to small and midsize companies at an affordable price. This combination of true active-active high availability and affordable price is unprecedented.
The following is an example of setting up a High Availability configuration with a server cluster and 2 active-active storage nodes that have automatic failover and failback using VMware as an example:
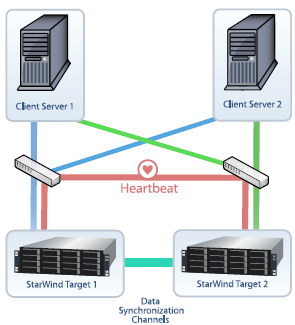
StarWind’s true active-active high availability (HA) architecture provides continuous and non-disruptive access to storage in the event of failure by synchronously mirroring data between two active storage appliances, or nodes, in real time. This technology is important to IT professionals because it eliminates a single point of failure. If a disk, power or even an entire storage node fails, the redundant storage node will take over and will continue actively operating without any disruption, ensuring that storage is available and accessible on the network.
StarWind Key Features
•Synchronous Data Replication: Real-time data replication across a 2 node storage cluster.
•High Availability / Automatic Failover: Fault tolerant active-active technology eliminates a single point of failure.
•Remote Replication across a WAN: replicates data to a remote location allowing multi-site disaster recovery in the event of a disaster at the primary site.
•CDP & Snapshots: captures instant, point-in-time volume images, allowing a user to rollback and recover an entire volume or individual files and folders.
•High Speed Caching: accelerates storage I/O by using the server’s memory.
•Server clustering: supports Windows Server 2008, Hyper-V, VMware ESX and vSphere 4.0 and other applications.
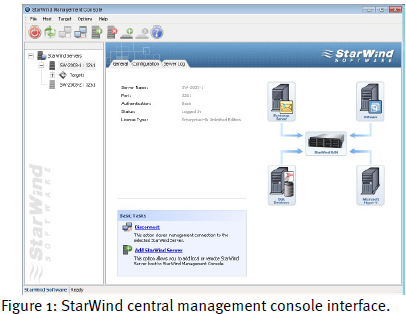
•Central Management Console / User Interface: allows IT professionals to easily manage all storage from a central management console built on the same tree structure used in Microsoft Hyper-V and VMware vSphere.
SUMMARY
There you have it, building a SAN, even a highly available and fault-tolerant enterprise-class SAN, is a fairly straight-forward process that takes less than 30 minutes. While it does take a bit of pre-planning, the small amount of effort required to build your own storage server can result in a significant cost savings and is ideal for VMware, Hyper-V or any other server applications and server clustering. Using StarWind Software to build a SAN is easy and reduces complexity, saves time managing your storage and expands your storage capabilities affordably.
This guide is meant to be a brief introduction to building your own SAN. Please refer to the more in depth “Best Practices Guide” or consult StarWind sales (sales@starwindsoftware.com) for further assistance.
