StarWind Virtual SAN®
for vSphere Configuring Fibre Channel with Qlogic HBAs
Download PDF
Annotation
Relevant products
StarWind Virtual SAN
Purpose
This document guides users in configuring StarWind storage device and VTL device and sharing them as a FC targets, so they can be used in FC infrastructure with minimum latency and the highest performance.
Audience
This guide is intended for experienced system administrators and IT professionals who would like to have StarWind Virtual SAN devices shared via Fibre Channel protocol.
Expected result
The result of following this guide is that users will have StarWind VSAN devices shared via FC protocol.
Introduction
Fibre Channel is a high-speed data transfer protocol that provides reliable and secure delivery of raw block data. It supports point-to-point connection between devices as well as connection via switched fabric (via Fibre Channel switches). Fibre cChannel (FC) is used to build a dedicated network used for storage connectivity between shared storage and servers (SAN).
While FC provides fast and secure connection to block storage, StarWind delivers High Availability by replicating the storage between the nodes. By combining StarWind Virtual SAN for vSphere with FC, users effectively eliminate single points of failures in their storage infrastructure.
This guide is intended for experienced system administrators and IT professionals who would like to have StarWind Virtual SAN Highly Available devices shared via Fibre cChannel protocol..
A full set of up-to-date technical documentation can always be found here, or by pressing the Help button in the StarWind Management Console.
For any technical inquiries please visit our online community, the Frequently Asked Questions page, or use the support form to contact our technical support department
Prerequisites
Make sure that the prerequisites for deploying FC on StarWind Virtual SAN for vSphere are met:
- StarWind Virtual SAN virtual machines are is installed on the ESXi host.
- Networks are configured and the required amount of storage is provisioned to StarWind VMs.
- Qlogic Fibre Channel adapters are installed in storage hosts.
- Fibre Channel adapter is passed through to StarWind Virtual SAN virtual machine.
In order to install StarWind Virtual SAN for vSphere and configure the networks, please refer to the following guide: https://www.starwindsoftware.com/resource-library/starwind-virtual-san-for-vsphere-installation-and-configuration-guide
StarWind Virtual SAN for vSphere system requirements can be found here:
https://www.starwindsoftware.com/system-requirements
Preconfiguration Steps
1. Log in to StarWind Virtual SAN for vSphere using the following default credentials:
Username: user
Password: rds123RDS
2. Navigate to the Terminal tab and list the available disks, run the following command to install Linux mainline kernel:
sudo yum –enablerepo=elrepo-kernel install kernel-ml
3. After successful installation, edit grup grub to boot from the kernel-ml:
sudo vi /etc/default/grub
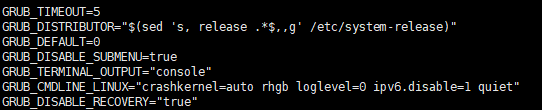
Look for the line containing GRUB_DEFAULT=X, and change it to GRUB_DEFAULT=0
Save the configuration file.
4. Recreate the kernel configuration using the following command:
sudo grub2-mkconfig -o /boot/grub2/grub.cfg
Reboot the VM:
sudo reboot
5. Check kernel version after reboot:
uname -r
![]()
6. By default, FC HBA QLogic starts in the initiator mode., iIt has to be turned to the target mode during the initiation. To do this, create a file /etc/modprobe.d/qla2xxx.conf with the parameter listed below, rebuild initrd and reboot.
cat <<EOF >> /etc/modprobe.d/qla2xxx.conf
options qla2xxx qlini_mode=disabled
EOF
dracut -f; reboot
7. Check HBA mode after restart:
cat /sys/module/qla2xxx/parameters/qlini_mode
8. Install targetcli
sudo yum install targetcli -y
sudo systemctl enable target.service
sudo systemctl start target.service
Configure StarWind Device
9. Create StarWind standalone device. Please refer to the following page:
https://www.starwindsoftware.com/help/CreatingaNewImageFileDevice.html
10. Discover and connect StarWind device via loopback (127.0.0.1)
iscsiadm -m discovery -t st -p 127.0.0.1
iscsiadm -m node -T iqn.2008-08.com.starwindsoftware:sw-sed-vsa-fc-01.starwind.local-vtl -p 127.0.0.1 -l
11. Check that StarWind device was successfully connected:
sudo iscsiadm -m node
![]()
Configure Fibre Channel Target
1. Get HBA Port wwn for target and initiator VM:
cat /sys/class/fc_host/hostX/port_name
![]()
NOTE. X – number of FC HBA.
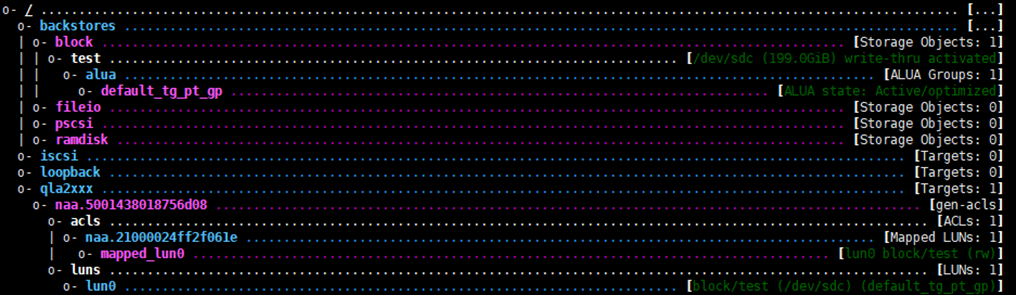
2. Create block backstore for StarWind device:
sudo targetcli
backstores/block create dev=/dev/sdc name=test
3. Create a target with wwn = 5001438018756d08 (FC HBA wwn on the target machine)
/qla2xxx create naa.5001438018756d08
4. Create lun
/qla2xxx/naa.5001438018756d08/luns create /backstores/block/test
5. Create an ACL, with wwn = 21000024ff2f061e FC HBA wwn on the initiator machine)
6. Check the device connection on the initiator side.
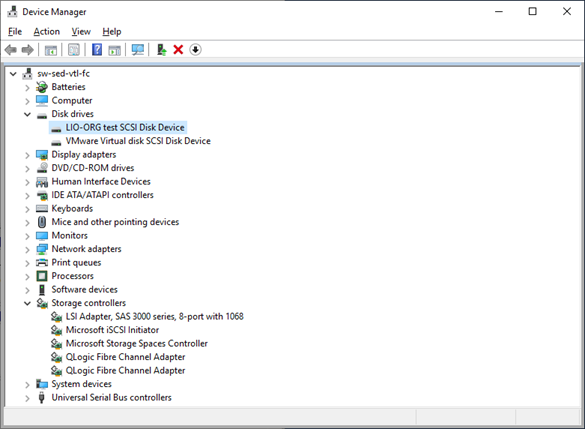
Device can be formatted and used as a raw-block storage.
Configure StarWind VTL Device
1. Create StarWind VTL. Please refer to the following page:
https://www.starwindsoftware.com/help/VirtualTapeDrive.html
2. Discover and connect StarWind VTL device via loopback (127.0.0.1)
iscsiadm -m discovery -t st -p 127.0.0.1
iscsiadm -m node -T iqn.2008-08.com.starwindsoftware:sw-vsa-01-vtl1 -p 127.0.0.1 -l
3. Check that StarWind VTL device was successfully connected:
sudo iscsiadm -m node
![]()
Configure Fibre Channel Target for StarWind VTL Device
4. Get HBA Port wwn for target and initiator VM:
cat /sys/class/fc_host/hostX/port_name
![]()
NOTE: X – number of FC HBA
5. Create pscsi backstores for the changer & drive slotssudo targetcli
mkdir -p /sys/kernel/config/target/core/pscsi_0/changer
uuidgen > /sys/kernel/config/target/core/pscsi_0/changer/wwn/vpd_unit_serial
echo scsi_host_id=34,scsi_channel_id=0,scsi_target_id=0,scsi_lun_id=0 > /sys/kernel/config/target/core/pscsi_0/changer/control
echo /dev/sch0 > /sys/kernel/config/target/core/pscsi_0/changer/udev_path
echo 1 > /sys/kernel/config/target/core/pscsi_0/changer/enable
for i in {1..4}; do \
mkdir -p /sys/kernel/config/target/core/pscsi_0/tape$i; \
uuidgen > /sys/kernel/config/target/core/pscsi_0/tape$i/wwn/vpd_unit_serial; \
echo scsi_host_id=34,scsi_channel_id=0,scsi_target_id=0,scsi_lun_id=$i > /sys/kernel/config/target/core/pscsi_0/tape$i/control; \
let “a=$i-1”; \
echo /dev/st$a > /sys/kernel/config/target/core/pscsi_0/tape$i/udev_path; \
echo 1 > /sys/kernel/config/target/core/pscsi_0/tape$i/enable;
done
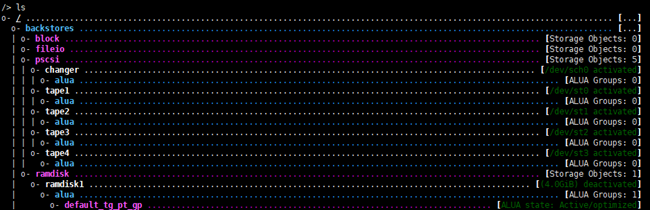
6. Using targetcli check if backstores created successfully:
7. Create a target with wwn = 5001438018756d08 (FC HBA wwn on the target machine):
/qla2xxx create naa.5001438018756d08
8. Create an ACL, with wwn = 21000024ff2f061e FC HBA wwn on the initiator machine):
/qla2xxx/naa.5001438018756d08/acls create 21000024ff2f061e
9. Create luns:
/qla2xxx/naa.21000024ff2f061e/luns create /backstores/pscsi/changer
/qla2xxx/naa.21000024ff2f061e/luns create /backstores/pscsi/tape1
/qla2xxx/naa.21000024ff2f061e/luns create /backstores/pscsi/tape2
/qla2xxx/naa.21000024ff2f061e/luns create /backstores/pscsi/tape3
/qla2xxx/naa.21000024ff2f061e/luns create /backstores/pscsi/tape4
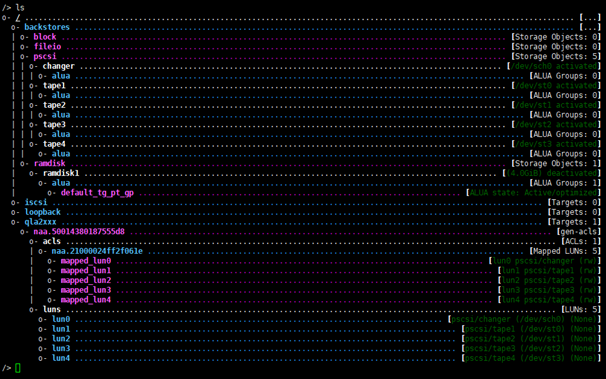
10. Check the device connection on the initiator side.
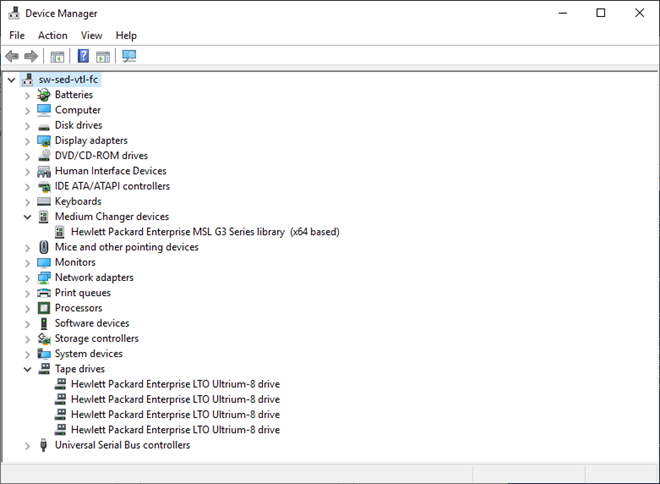
VTL device can be used and used as a backup target.
Conclusion
Following this guide system administrators and IT professionals can get step-by-step instructions on configuring StarWind devices and share them as FC targets via Qlogic HBA, connected to StarWind Controller Virtual Machine. This gives the powerful combination of StarWind Virtual SAN and the Fibre Channel protocol to achieve a rapid data transfer storage infrastructure.
