


Introduction
In the previous article, I have shared a working algorithm on replacing the ESXi SSL certificate with a self-signed one, but, as you know well, there’s always room for perfection. So, I have been practicing with a more universal scenario that could also work with a domain infrastructure and domain certificate services. That’s what I came up with.
First things first, let’s imagine a setup that mirrors our problem in the previous material: there’s an ESXi host with an expired certificate, only this time we’re going to replace it with another, verified by the domain certificate service. Therefore, the new algorithm has a similar, albeit non-identical, structure.
There’s no need to go through basics one more time (it’s all in the previous article and VMware certificate requirements are all here), so I’m just going to remind you that if you don’t particularly care for network security or just comfortable working conditions, you don’t have any real reason to read the following material.
Good news – this time, my method is equally efficient both for small infrastructures with separate ESXi hosts AND large enterprises (and, of course, test environments).
To get it done, follow these steps:
- Configure OpenSSL on your ESXi.
- Create a key and a certificate request file.
- Create a signed certificate using the certificate service.
- Add it to your certificate store on a server or a workstation from which you need secured access.
- Verify the result.
- Create a server record in DNS and check its operation.
Configuring OpenSSl on Your ESXi
What OpenSSL is and why do we want it you probably know already. If not, look it up here. It pretty much covers everything you need to know. It should be present by default on your server, but it does require some tinkering. The purpose is to create a configuration file with “right” parameters for generating the “right” certificate requests on your host:
In further work, you’ll need two more tools:
Putty – free ssh and telnet client;
WinSCP – free SFTP client and FTP client for Microsoft Windows.
Now, you can connect to the host for commands execution and file transfer (in both directions).
Before getting on with it, you should enable certain options in your server console in the “Troubleshooting Option” tab.
Just select what you’re gonna need for work, and click on Enter:
- “Enable ESXi Shell”;
- “Enable SSH”.

This will allow you to connect the host for management. When all the work is done, return all settings to their defaults! Otherwise, your computer won’t stay safe in any public network for long.
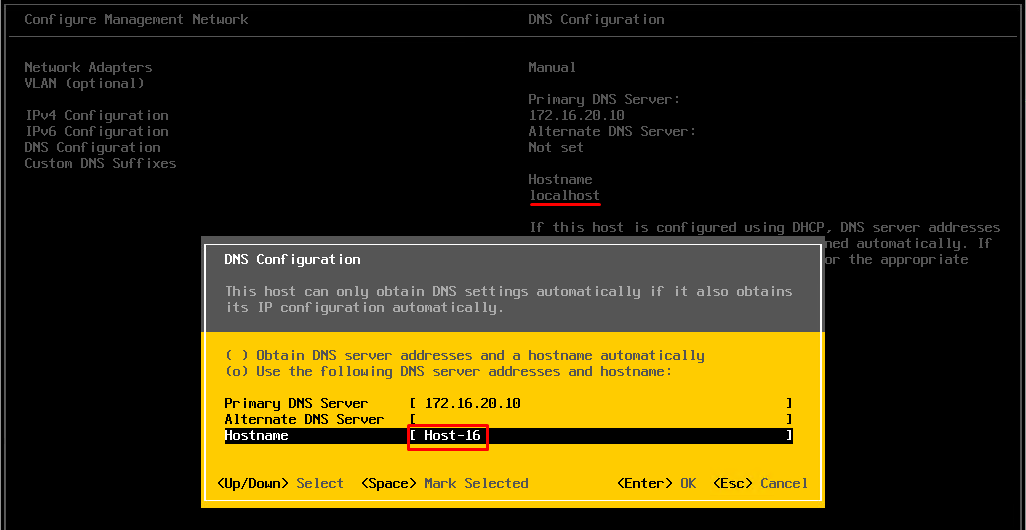
Furthermore, in “Configure Management Network”\“DNS Configuration,” change the hostname from “localhost” to any other than that (mine is “Host-16”).
Creating a Certificate
Connect to the host with the Putty utility, under an account with the root access rights.
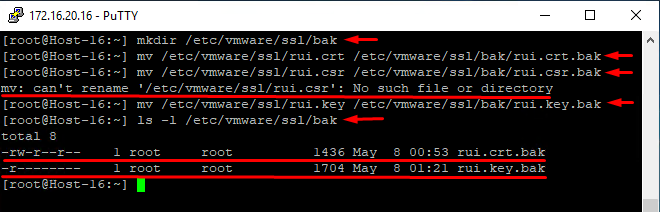
You have to create copies of the current certificate and its key so that they could have been restored later. Use the following commands:
mkdir /etc/vmware/ssl/bak
Create a directory.
mv /etc/vmware/ssl/rui.crt /etc/vmware/ssl/bak/rui.crt.bak
Store the current certificate copy in the new directory;
mv /etc/vmware/ssl/rui.csr /etc/vmware/ssl/bak/rui.csr.bak
Store the current certificate creation request in the directory (you could get an error notification if the request weren’t performed before).
mv /etc/vmware/ssl/rui.key /etc/vmware/ssl/bak/rui.key.bak
Store the current certificate key in the directory;
ls -l /etc/vmware/ssl/bak/
Check whether the files are in the directory.
These copies can come in handy should you ever need to return to default settings (if the process goes south somehow).
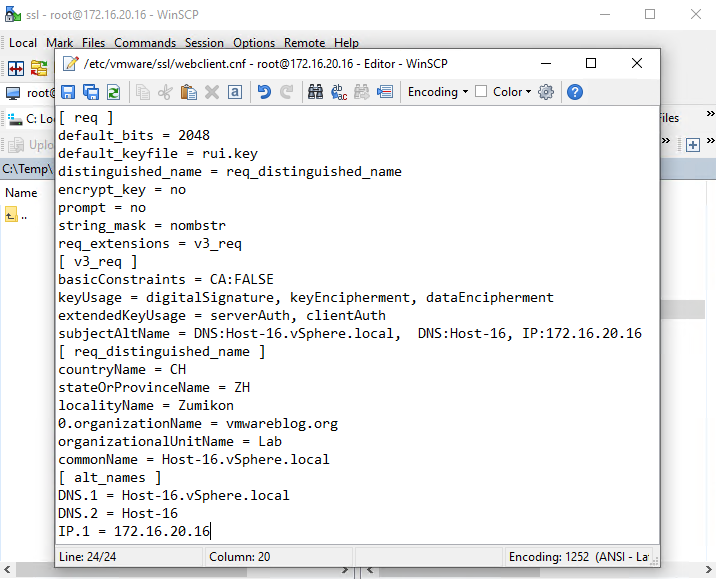
Now, connect to the host with WinSCP, create (Ctrl+F4) a new file with the name “/etc/vmware/ssl/webclient.cnf” (no quotation marks!).
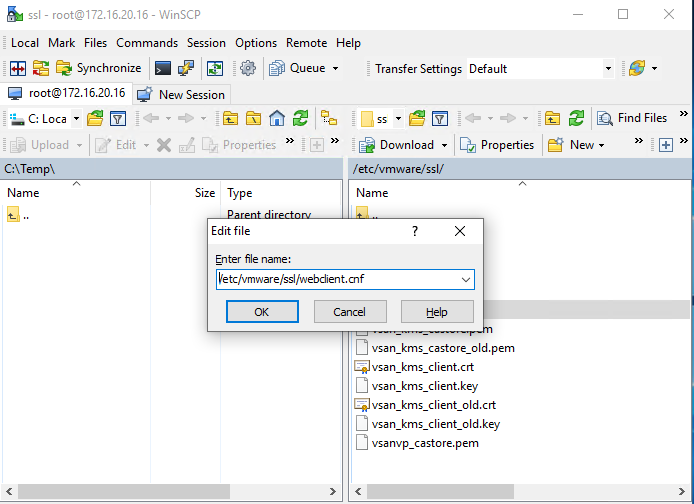
Insert the following:
[ req ]
default_bits = 2048
default_keyfile = rui.key
distinguished_name = req_distinguished_name
encrypt_key = no
prompt = no
string_mask = nombstr
req_extensions = v3_req
[ v3_req ]
basicConstraints = CA:FALSE
keyUsage = digitalSignature, keyEncipherment, dataEncipherment extendedKeyUsage = serverAuth, clientAuth
subjectAltName = DNS:"ServerName.domain.com", DNS:"ServerShortName", IP:"ServerIPAddress"
[ req_distinguished_name ]
countryName = "Country (two-letter code alpha-2)"
stateOrProvinceName = "State (two-letter code)"
localityName = "City"
0.organizationName = "Company Name"
organizationalUnitName = "Company Unit Name"
commonName = "server.domain.com"
[ alt_names ]
DNS.1 = "ServerName.domain.com"
DNS.2 = "ServerShortName"
IP.1 = "ServerIPAddress"
You need to replace values in the quotation marks with the values you require (again, no quotation marks). The values “countryName” and “stateOrProvinceName” should be in the international alpha-2 code. Overall, be very careful with the values related to your host address and domain name because you are risking your certificate’s work.
When you’re done, save the changes.
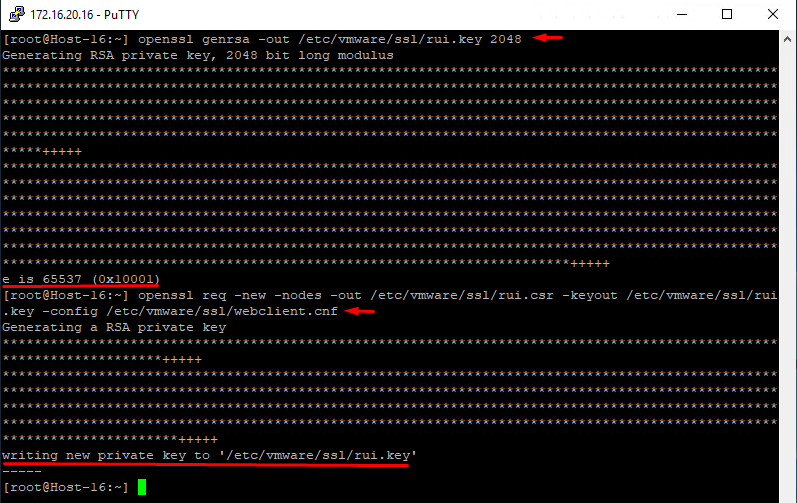
Generate a new encryption key. It will be stored on the host and keep your certificate up and running:
openssl genrsa -out /etc/vmware/ssl/rui.key 2048
Generate a certificate signing request for your certificate. This very request uses data from webclient.cnf, the data you will be adding to the certificate as values:
openssl req -new -nodes -out /etc/vmware/ssl/rui.csr -keyout /etc/vmware/ssl/rui.key -config /etc/vmware/ssl/webclient.cnf
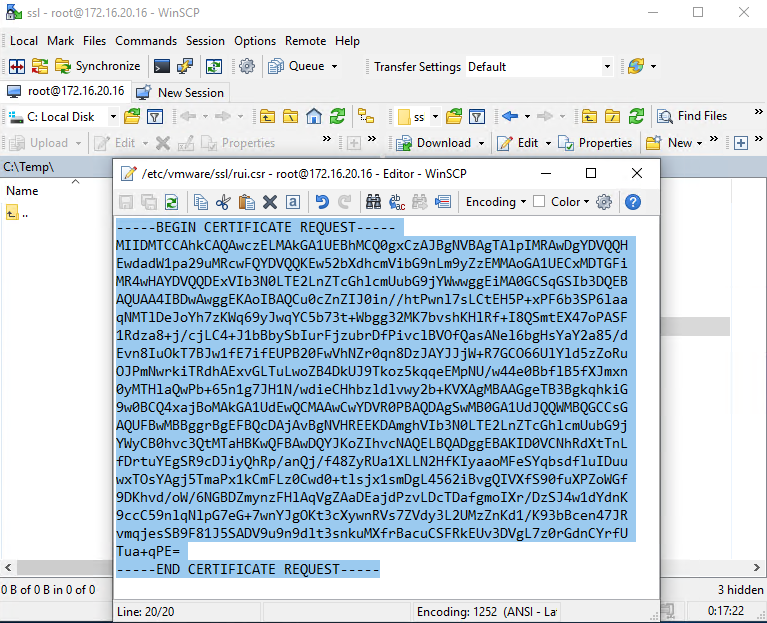
All you have to do now is copy the certificate request file contents to create a verified certificate in Certification Authority. In WinSCP, update (Ctrl+R) its contents, open rui.crt (F4) in /etc/vmware/ssl directory, and copy (Ctrl+C) its contents (including “—–BEGIN CERTIFICATE REQUEST—–“ and “—–END CERTIFICATE REQUEST—–“).
Keep in mind that you should only copy the contents, without covering symbols before “—–BEGIN … ” and after “… REQUEST—–“.
Creating a Verified Certificate with Certificate Services
If your infrastructure lacks a preconfigured certification server role, you can find everything you need to know here.
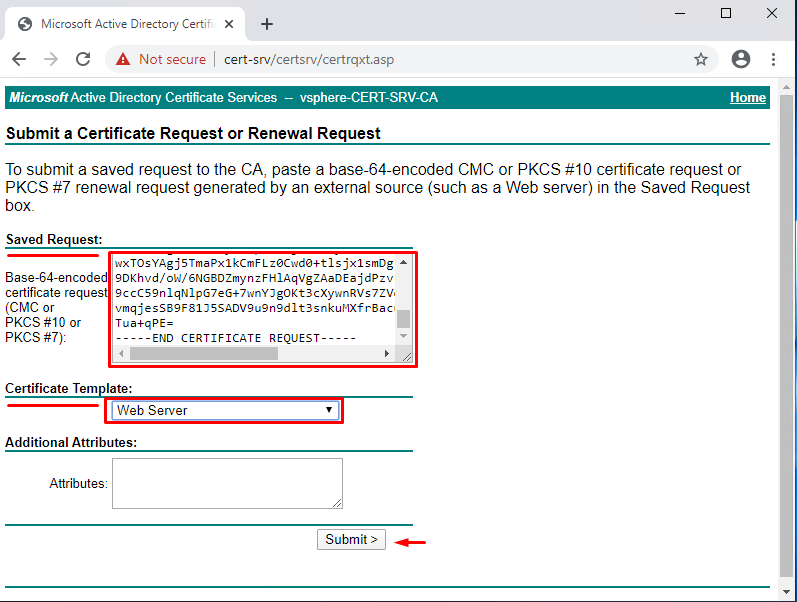
First, enter the server address with CA role (http://<fqdn or IP>/certsrv, in my case – http://Cert-srv/certsrv/) into your browser.
Next, Request a certificate > advanced certificate request.
Then, in the “Saved Request” field, insert the rui.csr file contents.
In the “Certificate Template” popup window, select “Web Server” and click on “Submit.”
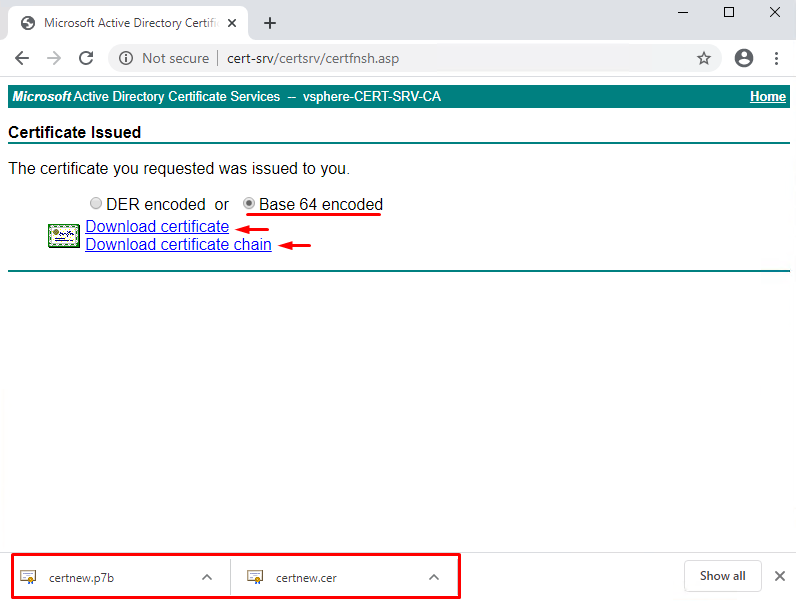
Next, select the “Base 64 encoded” option and click on “Download certificate” link; then, “Download certificate chain”.
The first one contains the host certificate itself, the second one – host certificate and CA certificate that verifies it.
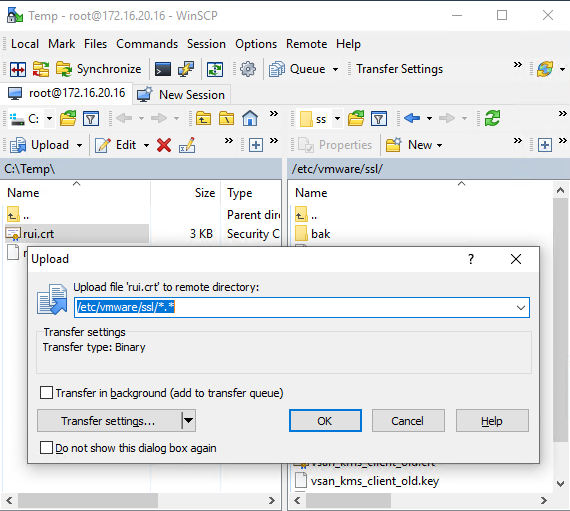
Now, move the (certnew.cer) file to the directory (the machine should have WinSCP installed), which in my case is C:\Temp directory. Rename the certificate from certnew.cer to rui.crt, and move it to the host directory /etc/vmware/ssl/.
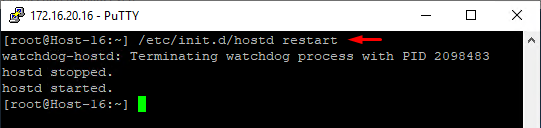
Restart the ESXi host service in Putty; this way, you can utilize the new certificate without restarting the host itself:
/etc/init.d/hostd restart
Don’t forget to return all the settings from the “Troubleshooting Option” tab to their defaults!
Adding a Certificate to The Certificate Store
Move the second file (certnew.p7b) to the directory on the machine needing a secured connection (in my case, it’s C:\Temp\).
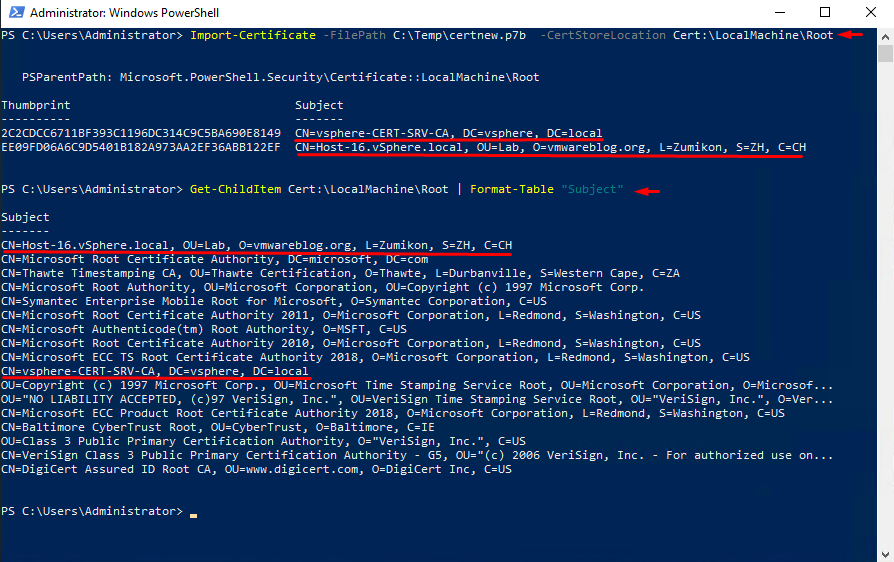
Start PowerShell with admin rights. Import the certificate to the store with the following command:
Import-Certificate -FilePath C:\Temp\certnew.p7b -CertStoreLocation Cert:\LocalMachine\Root
Let’s make sure that you did have import and find it in the store certificate list with the following command:
Get-ChildItem Cert:\LocalMachine\Root | Format-Table "Subject"
It is also possible to share the certificates using domain policies. However, I’m not going to cover this one since it very much depends on a particular infrastructure’s specifics.
Testing the Result
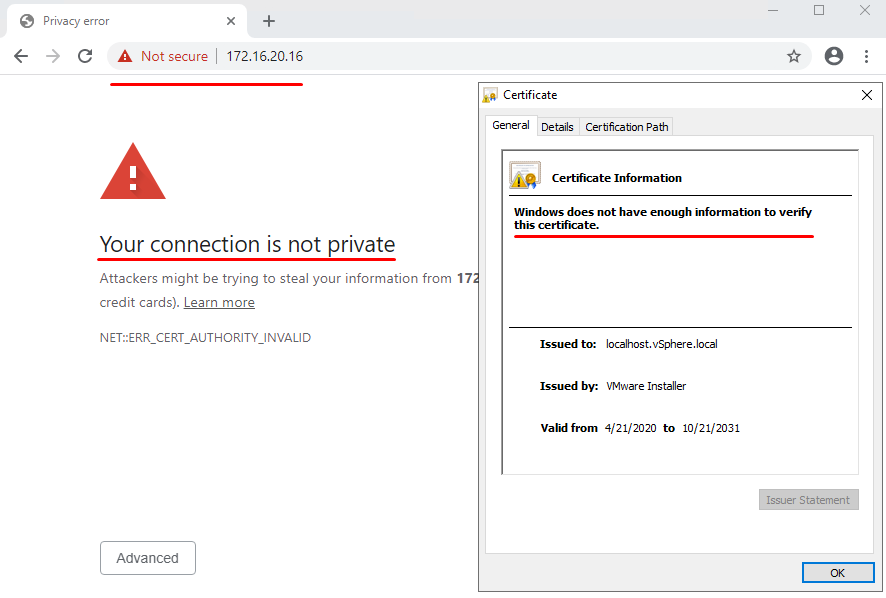
Now, it’s time to (re)start open browser to apply the certificate, enter host address, and enjoy a secured workplace:
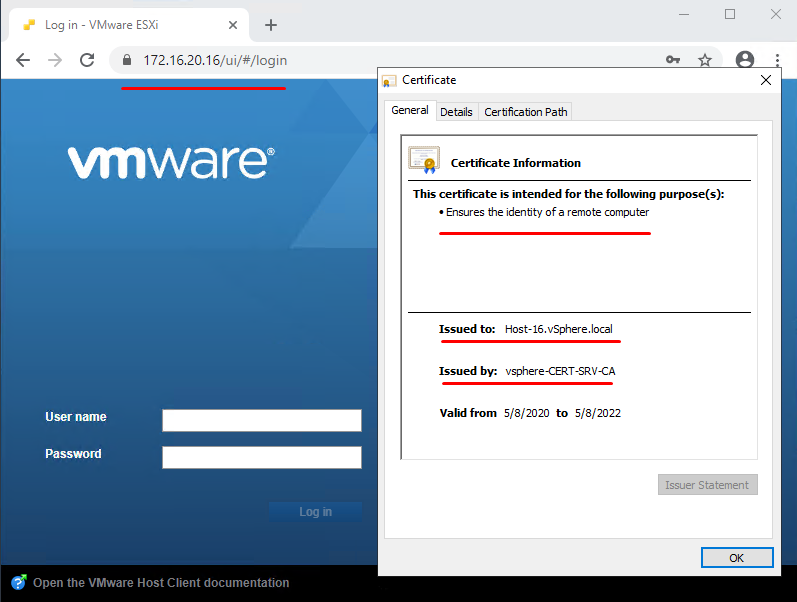
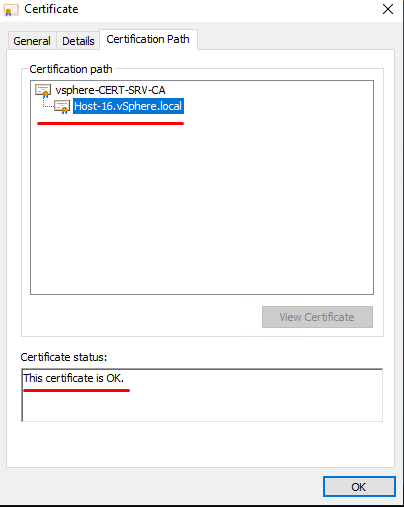
The certificate passes verification successfully (don’t forget it has CA certificate verification).
Creating and Verifying DNS Host Record
This information is going to come in handy if there’s a problem accessing the ESXi host that isn’t a part of the domain (if the host is a part of the domain – skip that).
To deal with this issue, you have to check if there’s an existing DNS host record. If there isn’t, you should add one. It’s very simple, all you are going to need is admin-level access to the DNS service console.
Start PowerShell with admin rights.
Enter the following:
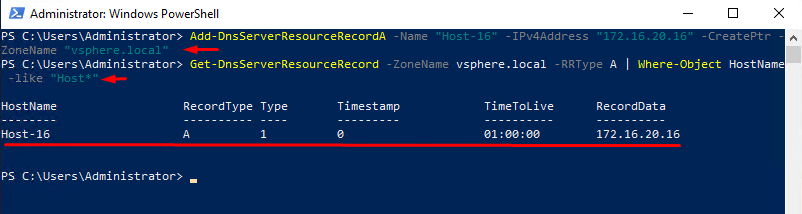
Add-DnsServerResourceRecordA -Name "Host Short Name" -IPv4Address "Host IP Address " -CreatePtr -ZoneName " DNS Zone Name"
Important: you should know the correct DNS zone name and correct current host name.
To check the results, enter the following:
Get-DnsServerResourceRecord -ZoneName "DNS Zone Name" -RRType A | Where-Object HostName -like "Host Name*"
You need to replace values in the quotation marks with the values you require (again, no quotation marks).
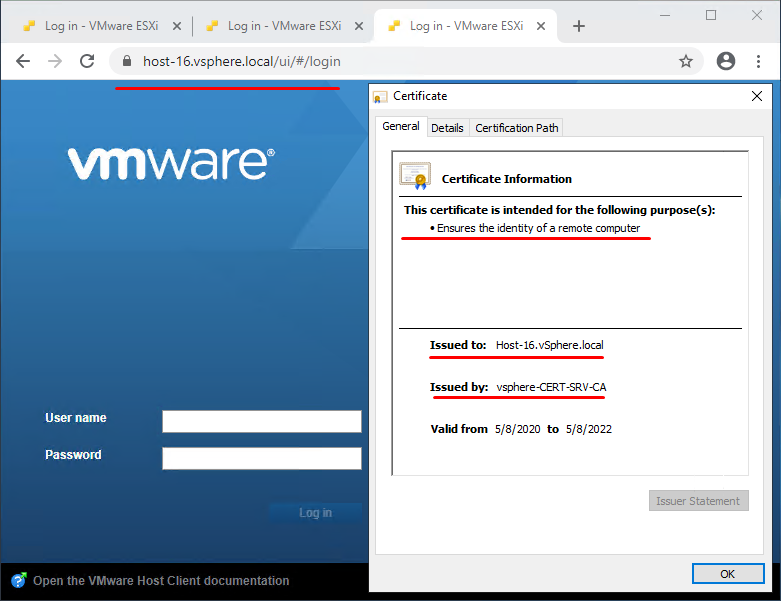
Now you can access the host by its short name!

Also, you can now access it by the full domain name, which is a lot more useful than the IP address (especially when it comes to large environments).
To Sum Up
This one algorithm here is more useful than its predecessor in terms of its utility: that method works for most infrastructures out there, and it doesn’t take too much time, so, as usual, I hope that my experience will make somebody else’s more comfortable.
