

For those of you who haven’t come across Gitlab or maybe even those of you who have but think it’s something that only developers use then I’d like to dispel that because Gitlab is a fantastic repository for scripts of all shapes and sizes. Not only that but from Gitlab 8.8 and up, it is possible to enable the Gitlab docker registry which allows Gitlab to also be a target for images created for docker. Overall, it is quite a powerful tool with more than one trick up its digital sleeve.
Gitlab have certainly improved their installation process and they have provided some great information at https://about.Gitlab.com/installation for various distros. When I hit issues was with enabling HTTPS and the docker registry elements so I thought it would be good to do a full walkthrough of how I setup Gitlab up and to highlight some of its impressive integration features
Installing Gitlab
The actual install for Gitlab is pretty straight forward and it’s just a matter of copying and pasting from the link above, personally, I like CentOS for these types of installs and it’s always a good idea to give such a system its own VM.

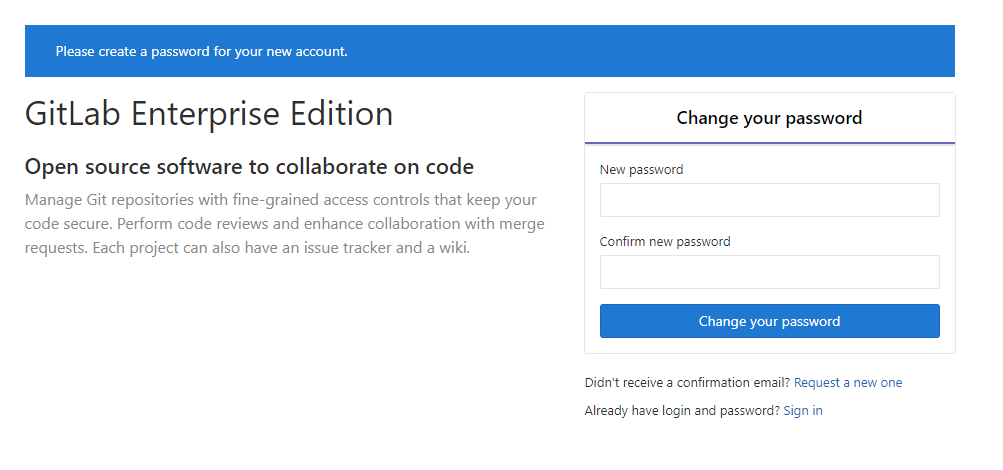
Once Gitlab has been installed, you need to use a web browser to connect to the server name and set up the default user (root) with a suitably strong password.
That is all great and it is a full working installation of Gitlab. At this point, it is available and usable as a source code repository tool but it really should be using HTTPS.
Configuring HTTPS
To install a HTTPS cert on Gitlab is a bit different to other web-based applications because Gitlab using chef to configure everything and so has a runbook file called ‘Gitlab.rb’, that file can be found in /etc/gitab. It is possible to configure items outside of this but if you do that, you will end up causing problems with future updates as those outside changes will be reverted by the runbook file so always change Gitlab in the runbook.
Using Let’s Encrypt for HTTPS
The server I’m setting up will be purely internal and for testing, however, If this was an externally facing site, I would use a cert from lets encrypt and configure Gitlab to handle that cert.
Gitlab uses the aforementioned Gitlab.rb file and in there is a whole section dedicated to using let’s encrypt.
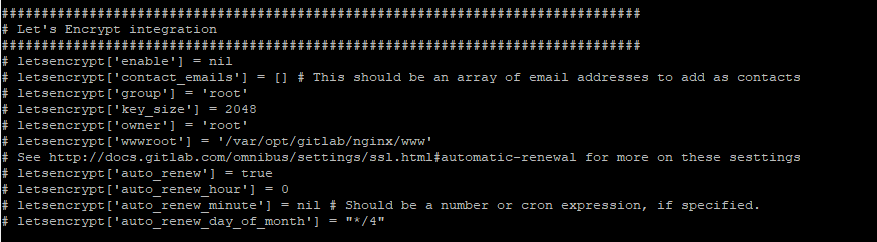
To enable let’s encrypt in Gitlab, just uncomment the lines and setup the renewal schedule and then run a Gitlab-ctl reconfigure and you should be good to go.
Using an Internal CA
Utilising an internal CA requires a couple of things to be modified on the Gitlab the server. The first thing to do is to export the Cert Authority Cert and place it in /etc/gitab/trusted-certs folder
The next thing is to take the cert for the server itself and the private key and place those into the /etc/gitab/ssl folder.
Note that these certs must all be in crt format, which is a plain text format. That means you can edit the files and just copy and paste the contents into the right files on the server. The crt and key files should use the same name as the URL you are running Gitlab under. For example, with my install it’s called “Gitlab02.gdwnet.com” so the files are called “Gitlab02.gdwnet.com.crt and Gitlab02.gdwnet.com.key”
Now, edit the Gitlab.rb file, edit the first line to show HTTPS:

Now find the NGINX section and uncomment the following lines:

Finally, run Gitlab-ctl reconfigure and check for any errors. If you do not see any during the runbook execution, everything should be working and you should have a valid HTTPS cert.
If you have any issues or problems at this stage, it is worth using your local distro’s equivalent of tail -50 /var/log/gitab/nginx/error.log to have a look and see what is going on with the Gitlab integration of nginx.
Configuring the docker registry
Now that Gitlab is up and running on HTTPS there only needs to be one change to enable the docker registry. Once again, edit the Gitlab.rb file and search for “container registry” and then uncomment the “registry_external_url” line:

Port 5005 is the default port and I did not see any reason to change it.
For simplicity, especially around the HTTPS cert I decided to keep the registry name the same but this isn’t a requirement, you can call it something different but remember to generate the necessary certs for that name or it won’t work.
If you are using a different hostname, the certs will need to placed into the /etc/gitab/ssl folder and they should use the same name as the domain that the registry uses.
Once done, do a gitlab-ctl reconfigure and test. If you now login to Gitlab as an administrator and click on “admin area” you should see that “container registry” has a green circle next to it:

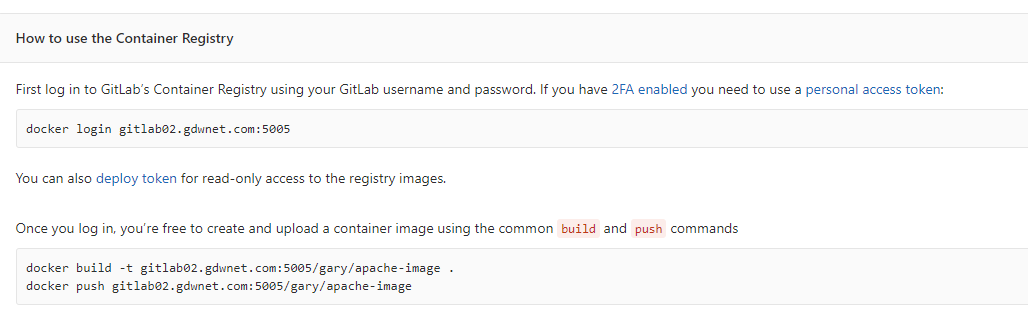
Check that port 5005 is allowed to connect to the Gitlab server and if all is good, create a project in Gitlab. For the lab, I created one called “apache-image”. In that project, I now have an extra line called “Registry”, if I click on that I get all the details I need to login to the registry and push an image to it.
Pushing images in this manner does require the image to be tagged correctly otherwise Gitlab won’t know which project the image needs to be assigned to, fortunately the Gitlab container registry page for the project provides the exact commands that are required:
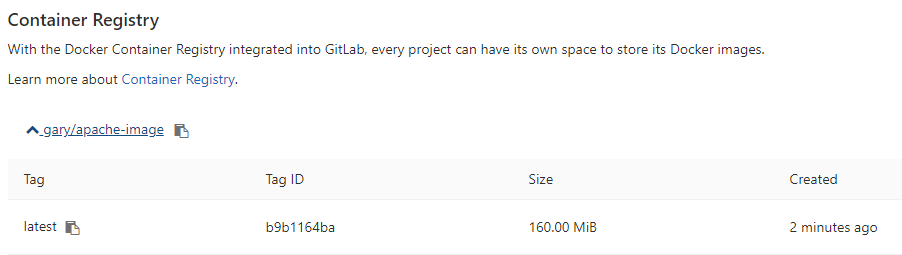
Once the image has been tagged and pushed you’ll see it gitlab under the registry section of the relevant project.
Gitlab is a very powerful piece of software with quite a few configuration options which are all controlled through the chef runtime. It is always worth making a backup of that file and any certs used in case it needs to be rebuilt.
