

With Azure DevTest Labs, all these steps no longer exist because the Dev Team can perform all these tasks without any help from the Ops Team. The only thing to do is to configure Azure DevTest Labs to allow developers to only deploy a specific version of SQL Server which is called a VM image.
With Azure DevTest Labs, you can also manage costs by setting:
- Maximum number of Virtual Machines per lab
- Maximum number of Virtual Machines per user
- Allowed Virtual Machine sizes (CPU limit, Memory limit)
- Virtual Machine auto-startup and auto-shutdown times
- Configure Virtual Machine expiration dates
In this article, I will describe how to create your DevTest Lab, then how to configure the Lab by limiting the resources (VM sizes, VM images, …) and how to use the Lab from the Dev Team point of view.
Create the DevTest Lab
First, open the Azure Portal, and search for « DevTest Labs »:

We will create our first DevTest Lab by clicking “Add” or “Create DevTest Labs”:

In the DevTest Lab pane, fill in the followings fields:
- Type the Lab Name
- Select your Azure subscription
- Select the location where the Lab will be located
- Auto-shutdown: This feature will shut down automatically all the VMs in the lab. This is great for cost saving.
- Tags: You can type a tag based on a “name = value” pair. Here, I create a tag called “Team” with the value “Dev”.
When you are happy with this information, you can click “Create” to build the Lab.

Wait until the DevTest Lab is created…

Once the DevTest Lab has been successfully created, new sections will be available:

Let’s focus on these ten sections:
- Overview: This section will give you information about your DevTest Lab such as: the status, the location, the list of the virtual machines that are available, …
- Getting started: This is the welcome page that will list the documentation guides
- Internal support: You can customize this page to provide information if your Dev Team need help with the Lab. You can indicate a phone number, an email address, or whatever you want.
- My Virtual machines: This section will list the Virtual Machines for which you are the ownership. So when you are the owner of a VM, the VM will appear in this section.
- Claimable virtual machines: Here is the most important thing to understand. When you create a Virtual Machine, the VM can be dedicated to a user, or the VM can be “claimable” by any users. After a user claims a VM, it is moved up into their list of “My virtual machines” and is no longer claimable by any other user. When a user is finished using a claimed VM, it can make it available to someone else. The VM will return to the list of claimable virtual machines. You must consider this section as a “Pool”.
- All virtual machines: This section will list all the VMs that exist in the Lab with their status.
- My Data disks: The Azure DevTest Labs service allows developers to test their application. Sometimes, they will need to test their application using production data. Here, you can attach VHD disks to the Lab VMs.
- Formulas: Formulas can be used as bases for created new VMs. A formula is an image based on a VHD in addition to preconfigured settings – such as VM Size, virtual network, subnet, and artifacts. These pre-configured settings are set up with default values that can be overridden at the time of VM creation.
- My secrets: Saves your secret values (passwords, tokens, keys, etc.) in a secure location (Key Vault) for reuse in formulas and virtual machine creation.
- Configuration and policies: In this section, you will configure all the settings for the Lab. I will describe these settings in the next part.
Configure the DevTest Lab
Let’s start by limiting the Virtual Machine sizes

Next, we can limit the number of VMs per user. We can also limit the number of VMs using the premium OS Disks which are SSD.

Now, I can limit the same settings per lab

Next, you can customize the internal support section. You can provide information for your Dev Team when they need help.

Two important features are Auto-Shutdown and Auto-Start. You can schedule when the VMs will be automatically started and powered off. Interesting features for cost saving.

Next, you can configure repositories that host artifacts, scripts and samples. You can also attach new Virtual networks for specific needs. The following sections will allow you to limit which VM images your Dev Team will be able to select during the deployment process. In my case, I want to allow only SQL Server 2017 Virtual Machines.

I can attach custom images with the “Custom Images” section. And finally, here is the most interesting feature called “Formulas”. Formulas provide a dynamic way to create VMs from the desired configuration/settings.

- Let’s focus on the formulas: You must select the base image that the formula will use. You can notice that only two images are available. These two images have been selected previously in the MarketPlace Images.
- Type a Formula Name. The name must be comprehensible because the name will appear during the deployment wizard.
- Add a description
- Create a default username
- Select the disk type
- Select the VM size (previously limited in the lab settings)
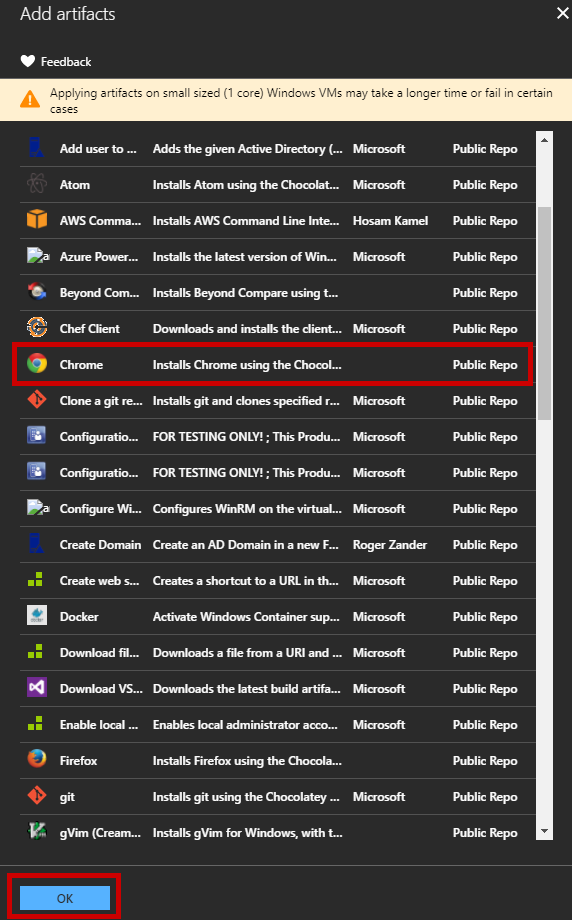
- Select which artifacts will be installed in the VM during the provisioning. Here, I select Google Chrome. There are a lot of artifacts available, for instance, Roger Zander has created an artifact that will create an AD Domain in a new forest. It means that developers can deploy an Active Directory Domain without any help.
 8. To finish, in advanced settings, I can select the IP Address configuration (1), I can delete automatically the VM in the lab (2), I can make the VM claimable (3) and I can limit the number of VM instances to be created.

Using the DevTest Lab
To finish this guide, I will connect to the Azure Portal using a dev user account. Go to the DevTest Labs section:

Then select the Lab

As you can notice, the Lab is empty. Now I will add my first VM by clicking the “Add” button:

In the new blade that appears, I have only three choices:
- The formula created previously (SQL Server 2017 + Google Chrome)
- SQL Server 2017 Enterprise
- SQL Server 2017 Standard

When I select the formula, a new pane appears with all the default settings (User name, VM size, Artifact, …). The Dev Team can modify these settings if needed.

Once the VM has been created, I can claim the VM using the “Claim any” button which will affect randomly a VM to the current user.

Or I can go to the Claimable virtual machine, and right-click to the VM:

The VM appears in my virtual machines list, and I can connect to the VM. Note that Google Chrome is installed by default as expected.


Conclusion
Azure DevTest Labs is a great service. Every SysAdmin knows these tedious steps when you must deploy quickly new Virtual Machines for the Dev Team. You don’t have all the prerequisites so you must contact the Dev Team and you lost a lot of time.
Thanks to the Azure DevTest Labs service, you will save time. You just have to check with the Dev Team which VM images they need, and then you can configure the Lab. When they need a new VM image, you simply add this image to the Lab and it’s over! The Developers are autonomous and they can create their own servers without interaction with the production environment.
If you want to give a feedback about this service, go to https://feedback.azure.com/forums/320373-devtest-labs/filters/top and if you want more information about pricing, read this article: https://azure.microsoft.com/en-au/pricing/details/devtest-lab/
Thanks for reading!
