


VMware worked out a great way to migrate users running vCenter server applications on Windows-based systems into a Linux appliance. This Linux appliance is based on Photon OS, a VMware Linux distribution, optimized for a vCenter server application.
It provides hardened security with security patches released fast when a vulnerability is discovered. Previously, VMware vCenter Server Appliance (VCSA) was based on SUSE Linux Enterprise Server (SLES) where the security patches were released when SUSE released them.
So now when VMware owns the full stack, the VCSA not only has all the features that the Windows-based vCenter server has but even more.
Learn from this video about:
- The advantages of adding VCSA to Microsoft AD
- Requirements for joining VCSA to Microsoft AD domain
- Guidance on how to add VCSA to Microsoft AD
Today we will demonstrate the migration of Windows-based vCenter server to VMware VCSA. The migration is semi-automatic, where you need to perform some manual tasks and follow assistants.
However, the migration is very smooth and very straightforward thanks to those assistants. You don’t need to have any Linux skills in order to migrate your vCenter server into VCSA.
Some guidelines, however, shall be respected. For example, you should make a full backup of your existing vCenter server. In case something goes wrong, you can always revert back to your existing environment.
Supported Migration Paths
You can migrate from vCenter server 6.0 or 6.5 into the VCSA 6.7 U1. You can also have external Platform service controllers (PSC), where v6.0 and 6.5 are supported.
If you have installed vSphere Update Manager (VUM) as a side product within your vCenter server on Windows or if it runs on a separate VM, both ways are supported and you can migrate to VCSA 6.7 U1
In this post, we will use a graphical user interface (GUI) method for the migration process. However, you might also be interested in a CLI method which uses a JSON template.
System Requirements
Source and target systems must meet specific software and hardware requirements before you can migrate a vCenter Server, vCenter Single Sign-On, or Platform Services Controller deployment to a vCenter Server Appliance or Platform Services Controller appliance.
- Clock synchronization of the target machines on the vSphere network before migration starts.
- If you’re using Fully qualified domain name (FQDN), make sure that the management workstation you’re using to launch and monitor the migration process and the destination ESXi or vCenter are on the same DNS server.
- If your vCenter Server service is running in a user account other than the Local System account, verify that the user account, in which the vCenter Server service is running, has the following permissions:
– Member of the Administrators group
– Log on as a service
– Act as part of the operating system (if the user is a domain user)
– Replace a process level token
- Source vCenter server (and PSC, if separated) are not using DHCP.
Migration of Windows-based vCenter to VCSA – The steps
Let’s get started with the migration. At first, connect to your vCenter server on Windows with elevated privileges.
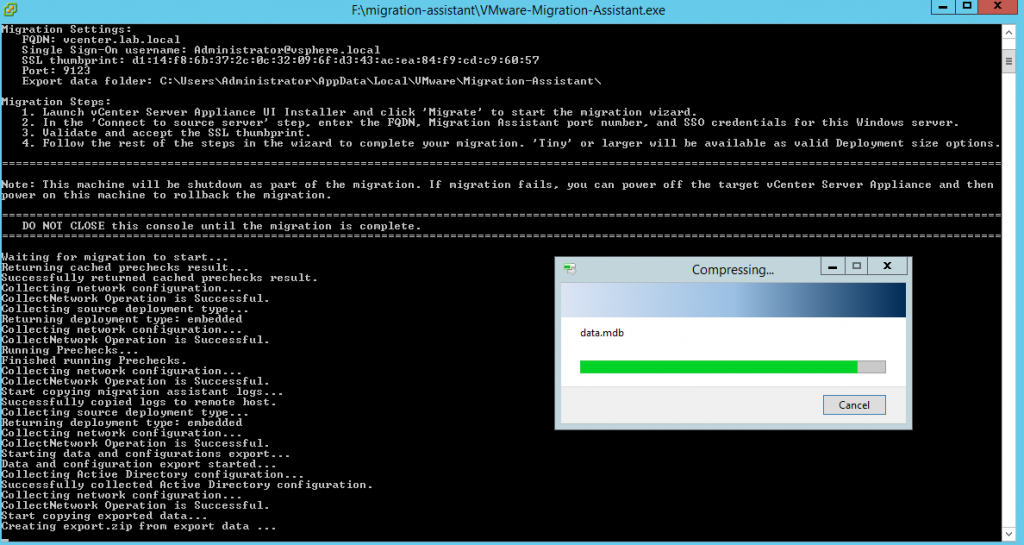
Mount the latest VCSA ISO > Go to a subfolder on the root called Migration-assistant > Execute the VMware-Migration-Assistant.exe.
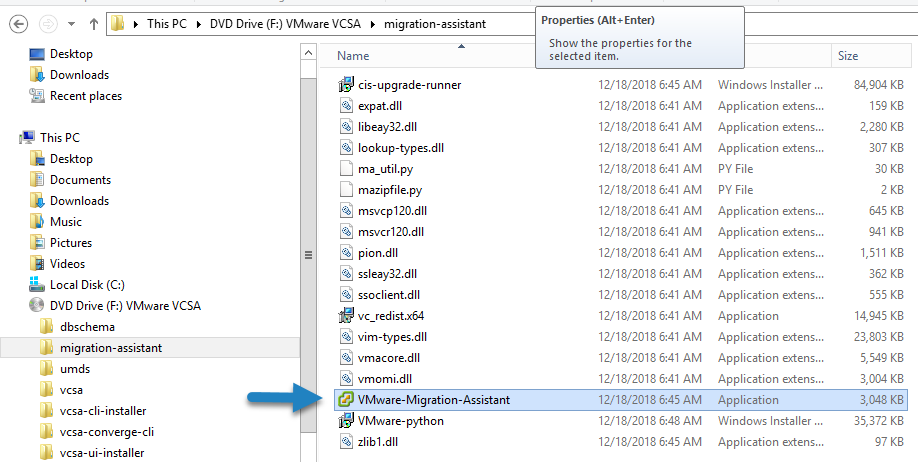
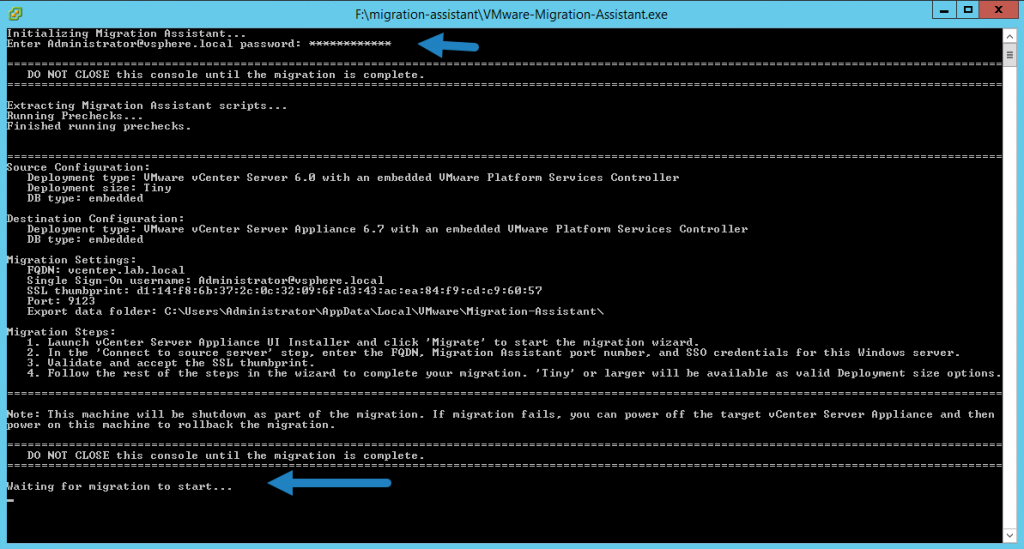
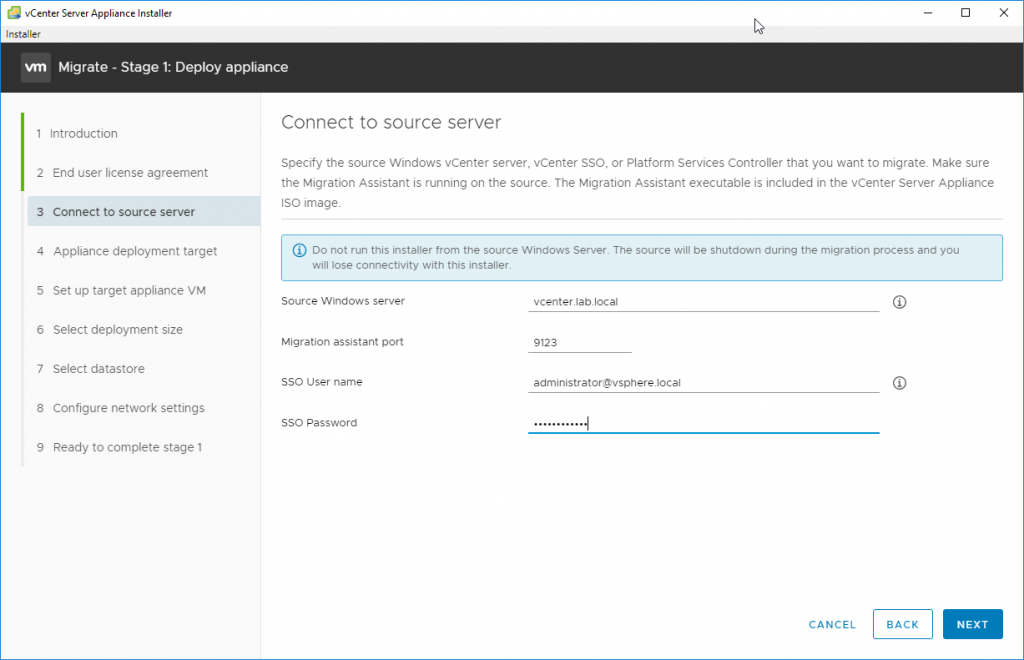
You’ll need to provide an administrator@vsphere.local (or whatever name you had set up for SSO domain).
The assistant will do several checks of the whole environment before showing a message “Waiting for migration to start”.
The pre-migration-checker verifies that:
- vCenter Server or Platform Services Controller to verify that migration is supported
- SSL certificates validity and compatibility with system names
- Network connections
- DNS resolution
- Internal and external ports used
- External database connectivity (if any external DB is configured)
- Administrator privileges on the Windows machine
- Required disk space for exporting configuration data
- NTP server validation
- Any credentials that you enter
The pre-migration checker performs also checks for the target environment:
- Minimum processor requirements
- Minimum memory requirements
- Minimum disk space requirements
- Administrator privileges on the target host
- Any credentials that you enter
So after seeing the “Waiting for migration to start” you can leave the Windows VM as is and go to your management workstation.
The management workstation can run Windows, Linux or macOS as a system. Both 3 are supported for launching the migration from.
In our case, we’ll be using a Windows machine.
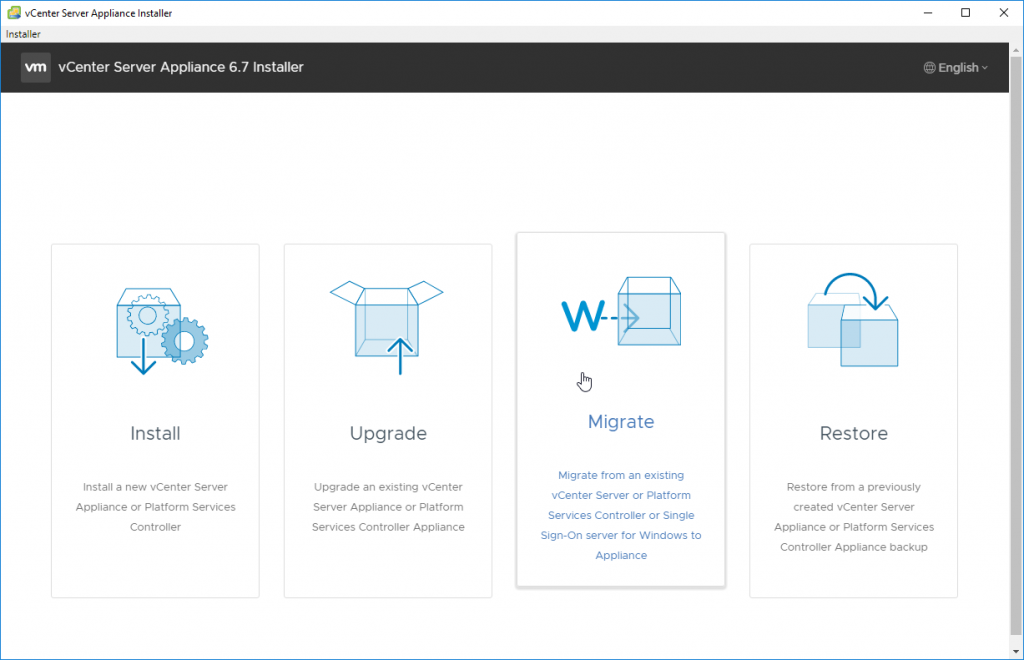
Mount the VCSA ISO and launch the installer.exe file, which you can find in the “vcsa-ui-installer” folder, where there is a subfolder called win32.
As being said, if you’re using Linux or Mac, you’ll choose either “lin64” or “mac” as a folder and look for the installer there.
Launch the “install.exe” and click the large “Migrate” button to start a new assistant.
Accept the End user licensing agreement (EULA) and enter the source server. Example from the lab is below.
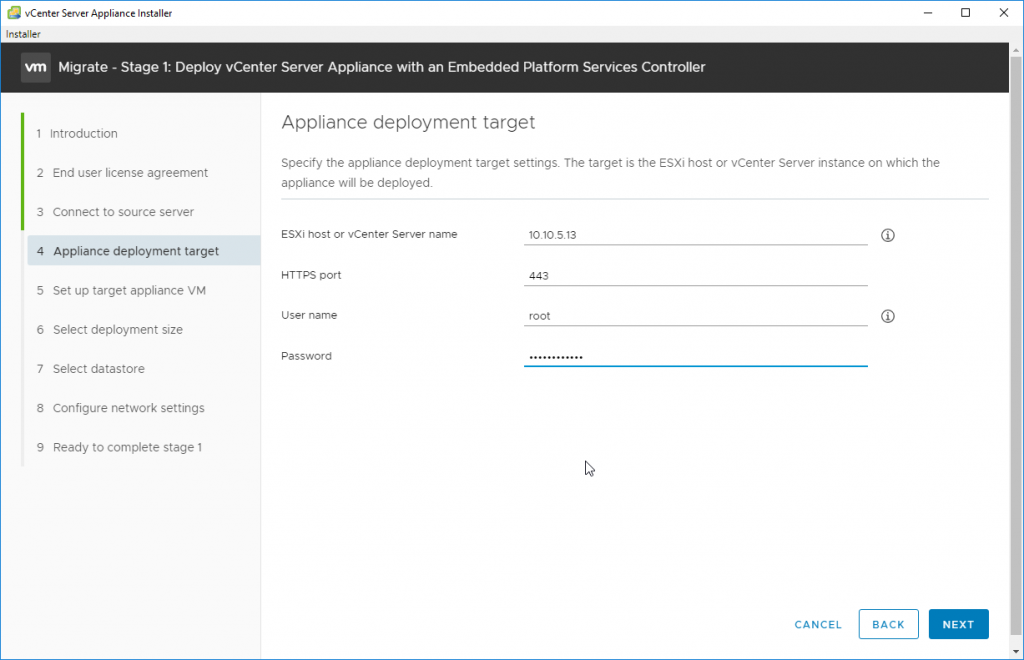
Then after clicking Next, enter the ESXi host or vCenter server. This is the destination where you’ll be deploying the new VCSA appliance.
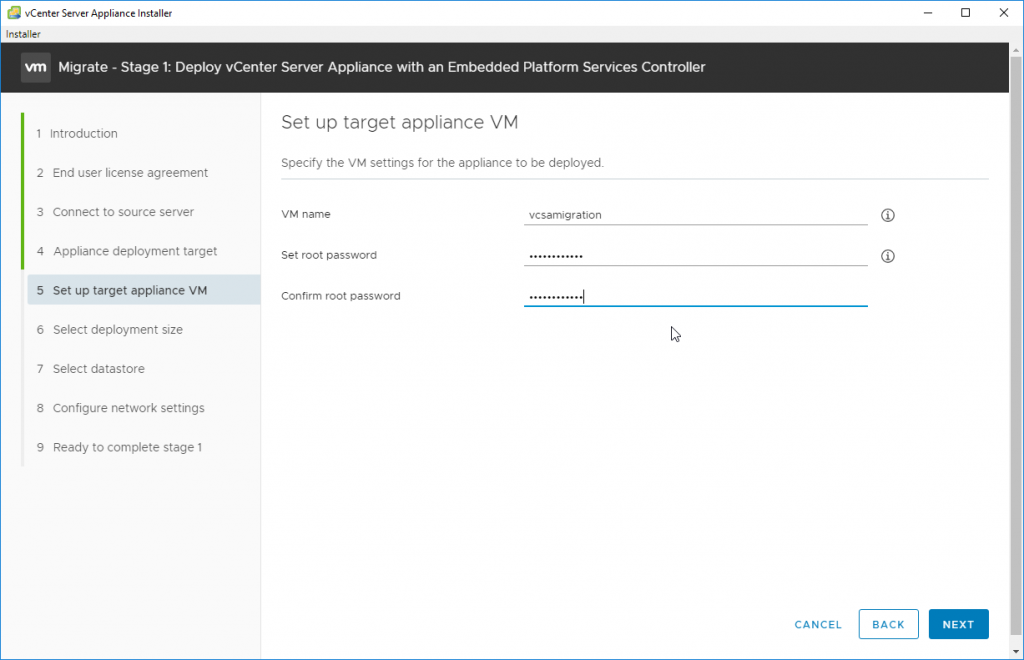
After clicking Next, specify the VM name and set a root password. Don’t forget the root password as it is used when you connect directly to the VCSA appliance and for monitoring or patching and (or) upgrades.
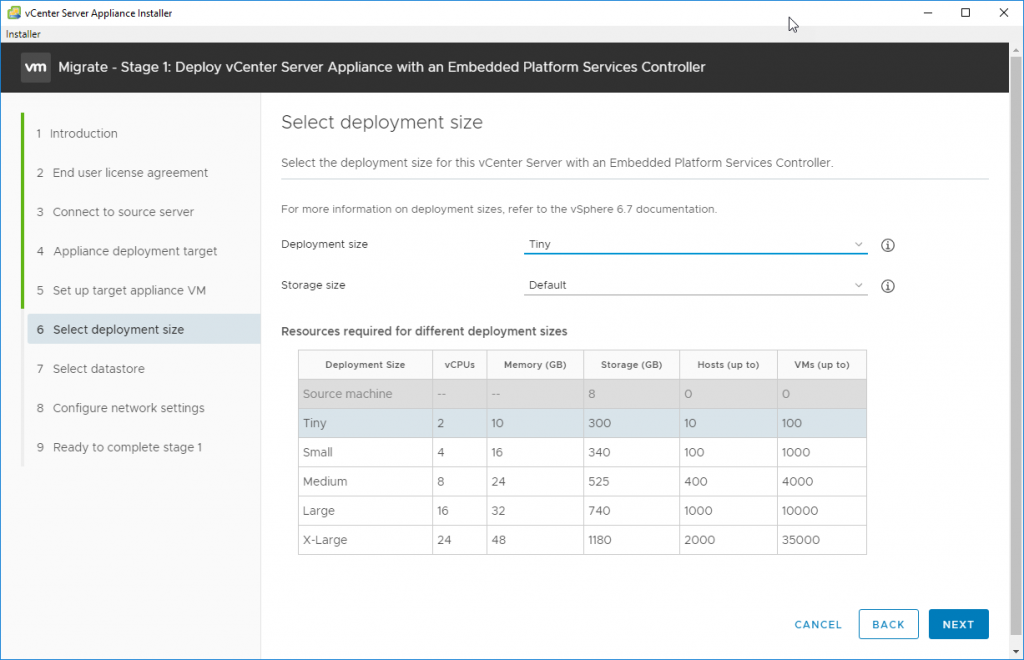
On the next page, we’ll have to choose the size of our environment. VMware covers all environments, you can use the drop-down menu to pick the one which fits your environment.
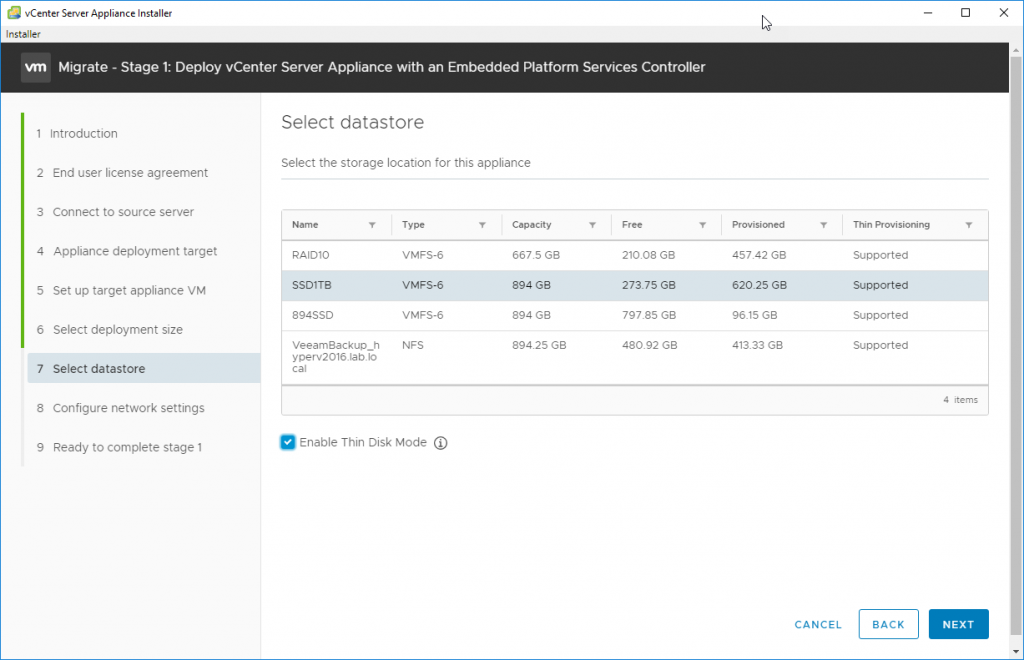
After, on the next page, you’ll need to pick storage where the VM will be created and stored. You have the possibility to use thin disks to save disk space.
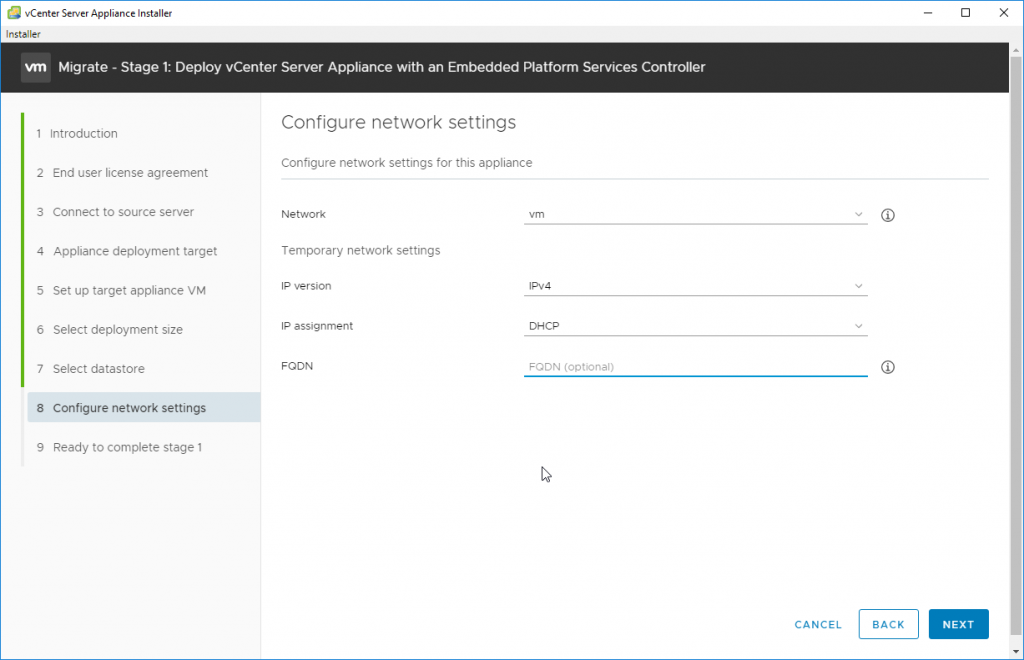
On the next screen, choose network settings.
Note that those settings are not the final settings as the final network settings will be copied from the original vCenter server.
Like this, the migration will be completely transparent to the network and no other reconfiguration of your satellite products is necessary (this can be backup/monitoring software etc).
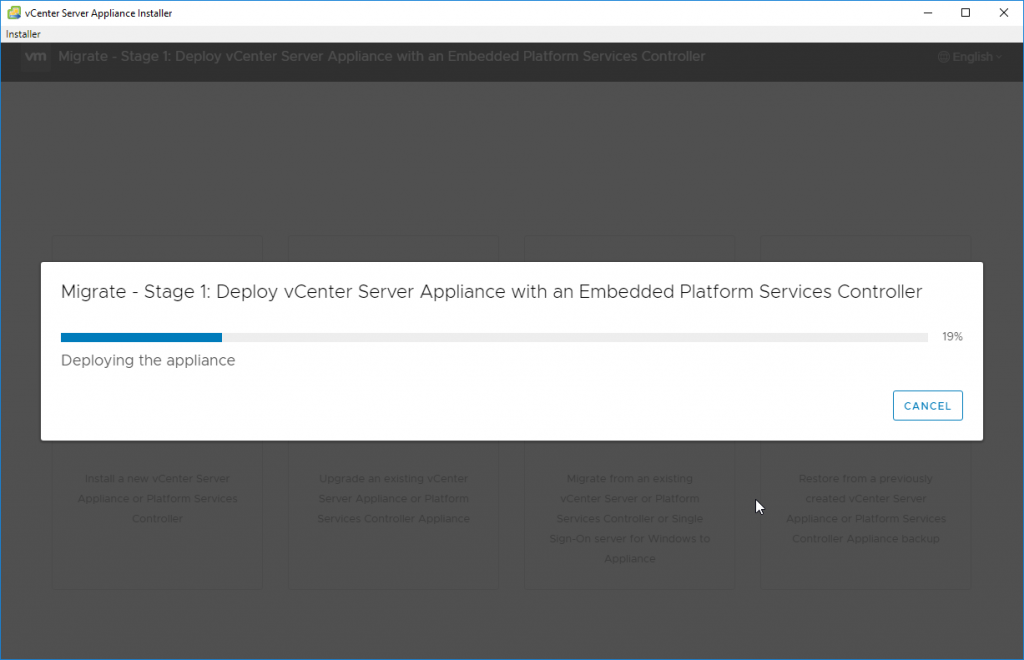
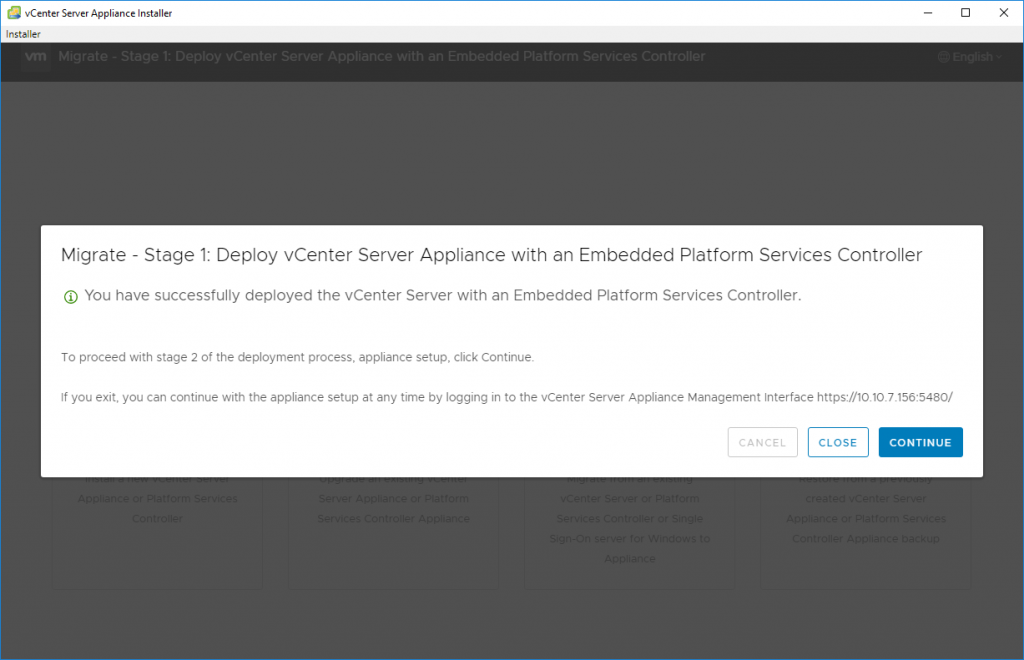
The first phase will start where a new clean VCSA is deployed and started.
After the first phase is done, the second phase will copy over all the necessary data from your old vCenter server.
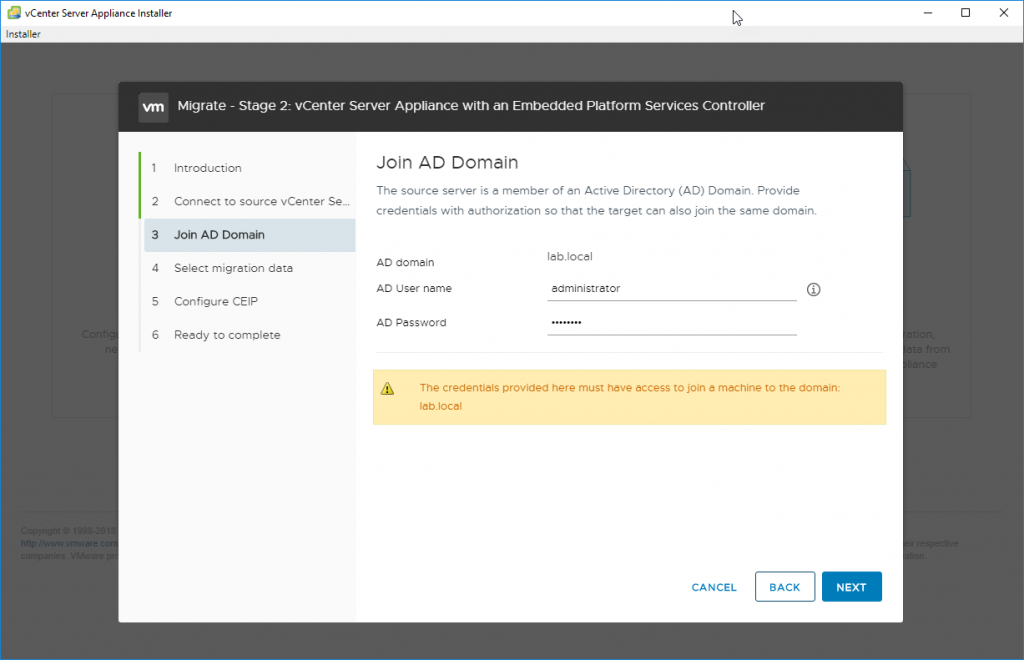
If your vCenter on Windows is part of Microsoft Active Directory, you’ll have to specify your Microsoft Active Directory (AD) domain, administrator user name, and password.
And you can also select what you want to copy to the VCSA. There might be old data you do not want to copy or you do not care to copy.
It will also speed up the migration process.

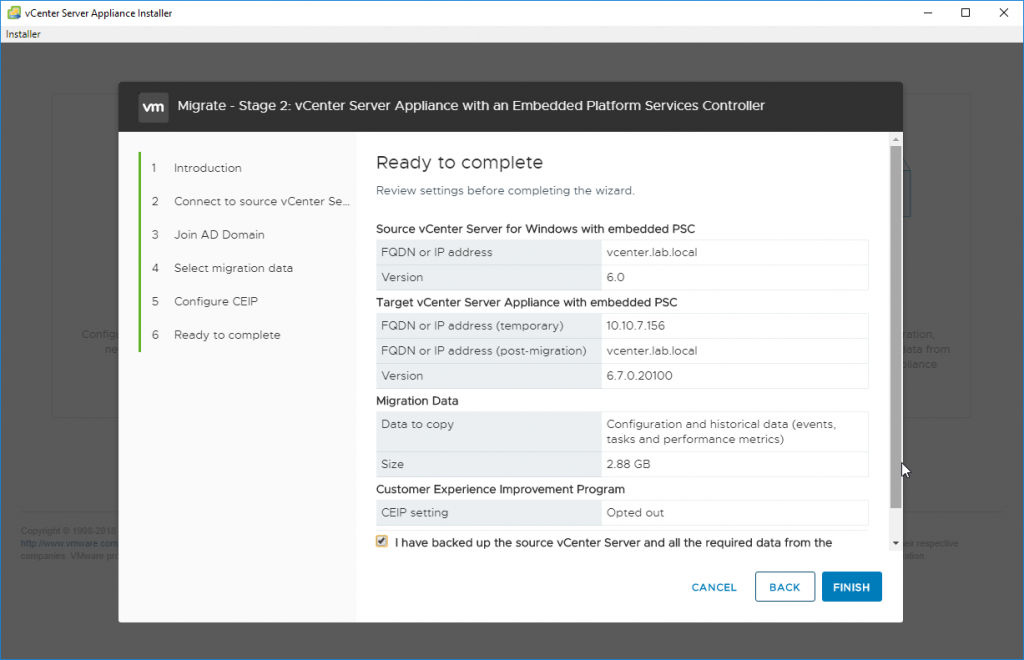
The final recapitulation screen shows all the parameters we have just entered.
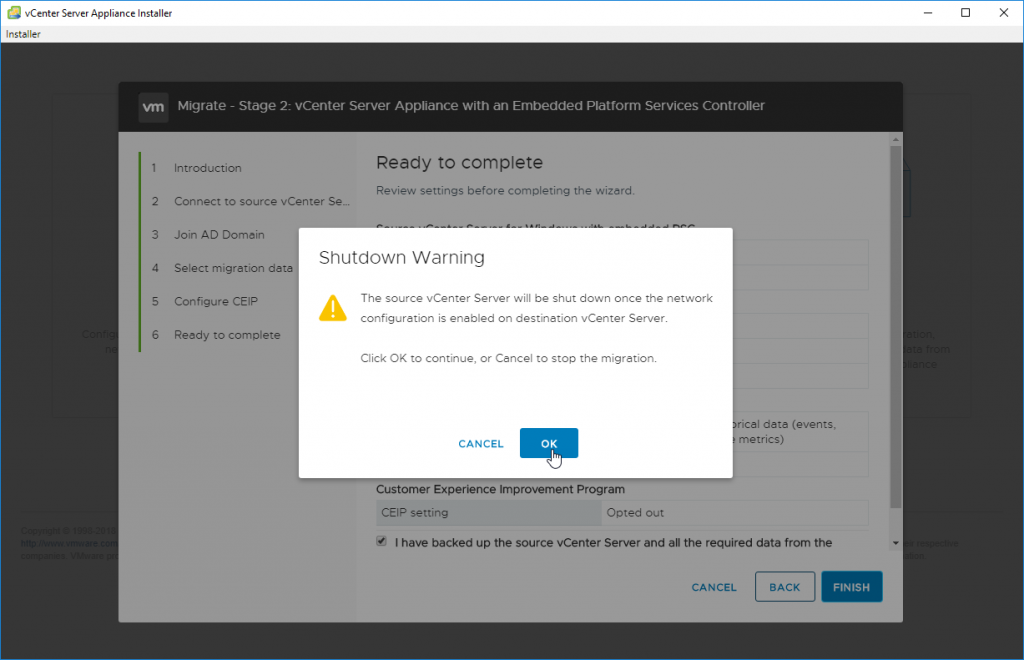
You’ll receive a warning that the original vCenter server will be shut down after the copy is finished. In case if you cannot migrate during business hours, this allows you to prepare those steps ahead and do the final step when you have time.
If you click OK, you can also have a look at the Windows vCenter server VM where in the background, you’ll see some copy operations going along other migrations steps.
And the final screen should show no errors and successful migration.
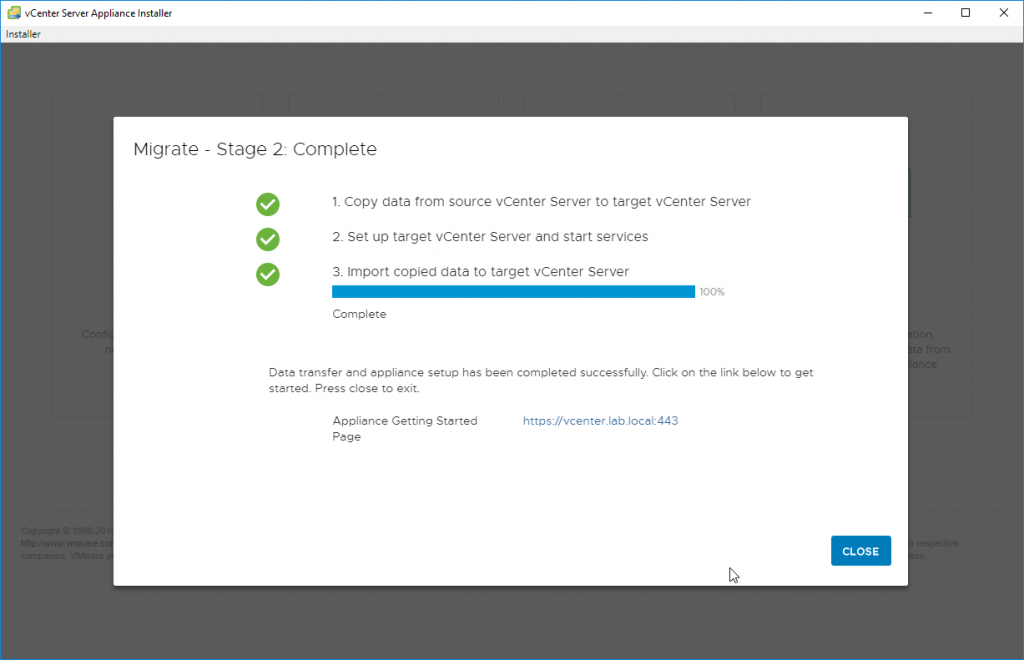
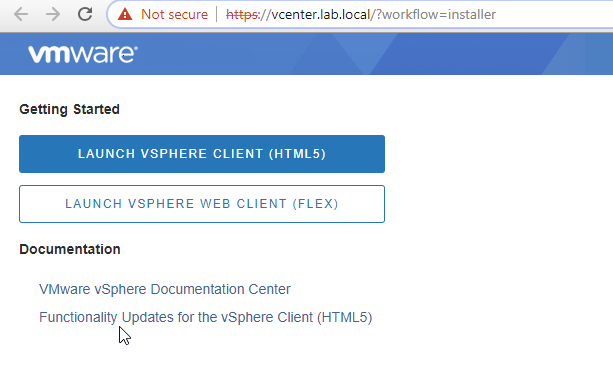
After clicking the Close button, you’re automatically redirected to the connection page where you (still) can connect via the vSphere Web Client (Flex) or choose the new and modern HTML 5 web-based client.
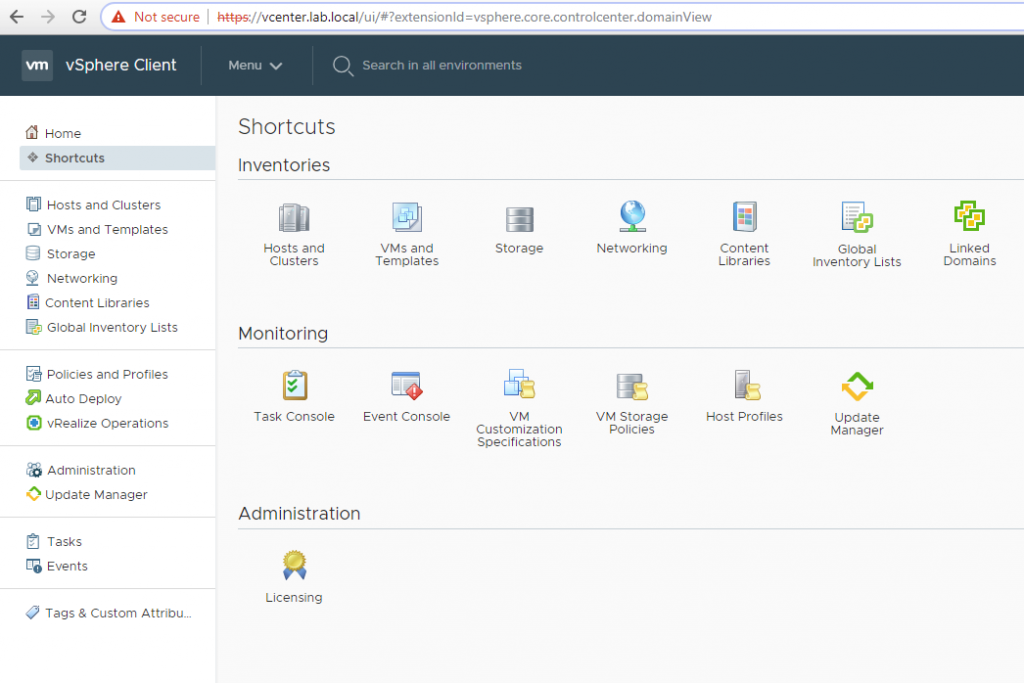
And you’re now connected to VCSA, where vCenter has a nice web-based user interface.
Final Words
VMware has done a good job by creating this migration assistant with its workload. It really simplifies the migration to VCSA. If you’re still running your vCenter server on Windows, you do not have to worry about the migration. It is pretty easy.
You should know that the next big release of VMware vSphere will not be available on Windows any longer. VMware is clearly stepping out of the dependency on Windows and privileges the VCSA.
While in the past, the VCSA did not have features parity, the VCSA 6.7 U1 has even more features than Windows-based vCenter server.
