

Docker Datacenter on Azure and AWS has been announced on Tuesday 21st, June 2016 at the DockerCon.
 Docker Datacenter, what it is?
Docker Datacenter will give you the possibility to have, in your datacenter or in the Cloud, your own Docker environment, like the official release, like management interfaces, repository, etc.
The architecture that will be deployed on is the following:
Installation
Before starting, be sure to have a license for Docker Datacenter: https://www.docker.com/products/docker-datacenter
On Azure, it’s very simple to deploy this solution, with an ARM template. To do this, connect on https://portal.azure.com et click on New. Search Docker in the Marketplace and select Docker Datacenter:

Choose a username, a password or an SSH key that will be used for each VM and a resource group:

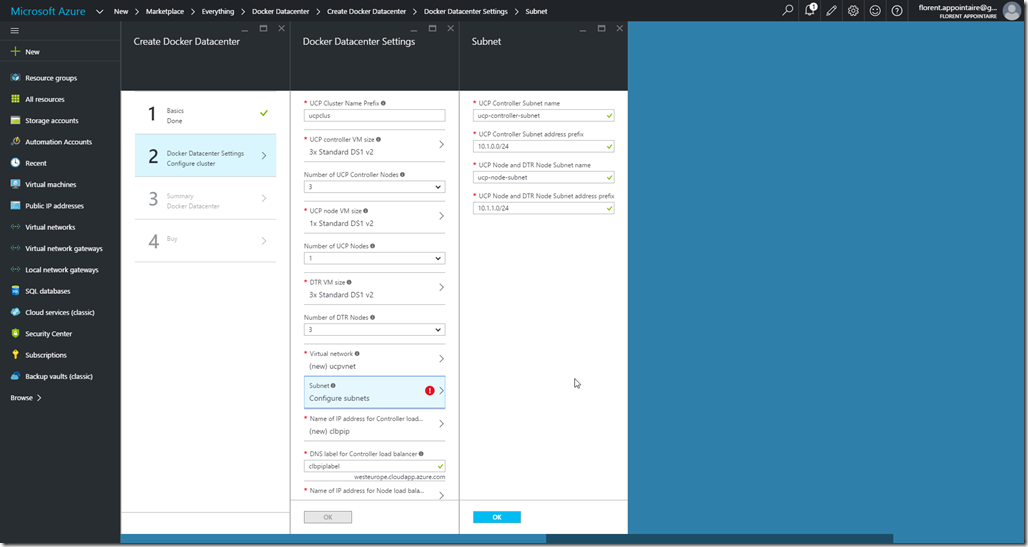
Choose a prefix name for each resource and after, select the VM size for VM that will be created. Create a new network with 2 subnets, one for controllers and node and one other for Docker Trusted Registry (DTR):
Create a public IP for the node load-balancer and another one for the DTR. Associate a public DNS name to each. Finally, choose a password for the Universal Control Plane (UCP) administrator and select the key that you get before:

Verify that all information is correct:

By clicking on Purchase, you accept licenses and the deployment is starting:

The deployment took 20 minutes for me:

Discover and configuration
Open a browser and navigate to the UCP URL, in my case “https://dockerucp.florentappointaire.cloud”

Connect with the username admin and use the password that you chose during the deployment. If the authentication is good, you will see the dashboard:

On this interface, you will be able to:
- Manage applications
- Manage containers
- Manage nodes
- Manage volumes
- Manage network
- Manage images
And manage users and some parameters.
Security of the registry
Before starting the publishing in the registry and deploying containers, we need to secure the environment to secure communication between UCP and DTR.
To start, connect in SSH to your UCP node:


Execute the following command:
|
1 |
sudo docker run --rm --name ucp -v /var/run/docker.sock:/var/run/docker.sock docker/ucp dump-certs --cluster --ca |
After downloading the uc-dump-certs image and created a new container, you will normally see a result like this:

Copy the result in a file on your desktop and name it ucp-cluster-ca.pem. Connect to your DTR, for me it’s https://dockerdatacenter.florentappointaire.cloud:

Connect with the username admin and the same password that for the UCP (the database is the same). Go to Settings and in the Domain part, click on Show TLS Settings. Copy the contents of the TLS CA part in a file on your desktop named dtr-ca.pem:

Go to your UCP interface, in Settings > DTR and provide the URL of your registry. Select the dtr-ca.pem certificate and click on Update Registry:

Now, you need to trust the UCP CA from the DTR. In the DTR interface, in Settings, paste the content of the ucp-cluster-ca.pem certificate, in Auth ByPass TLS Root CA and save:

You need to copy the file dtr-ca.pem on each node in the UCP (7 by default). I used the first server to connect to others, in SSH (otherwise, you can deploy a gateway in the same range with windows server for example). I executed the following command:
|
1 2 3 4 |
sudo su - mkdir /etc/docker/certs.d/ mkdir /etc/docker/certs.d/dlbpiplabel.westeurope.cloudapp.azure.com/ vi /etc/docker/certs.d/dlbpiplabel.westeurope.cloudapp.azure.com/ca.crt |
Paste the result of the file dtr-ca.pem. Restart the Docker service with the following command:
|
1 |
service docker restart |

Storage update to store image in the DTR
To store your images in your Docker repository, you will need a storage account. I will continue in Azure, to create my storage account on it:

Get the storage account name and the primary key:

In the DTR interface, navigate to Settings > Storage and choose Azure. Provide information that you get before:

New image in the DTR
We will now push our first image in the DTR, to be able to deploy containers from this image. Connect to your DTR interface if it’s not already done and click on the New repository to create a new repository:

Fill in each field and click on Save:

We will push an image to this repository. I created an image that will execute a website (running on nginx) with a custom HTML page, with the following Dockerfile (sources are here:https://github.com/Flodu31/Floapp-Cloud):
|
1 2 3 |
FROM nginx MAINTAINER Florent APPOINTAIRE <florent.appointaire@gmail.com> COPY index.html /usr/share/nginx/html/ |
Execute the following command to build your image:
|
1 |
docker build –t floapp-website |

Copy the certificate drt-ca.pem on the server where you would like to connect with Docker commands. On my Debian server, I did this:

We need to connect to this hub to push our image. Here, I will connect with the same account that I used to create my repository, admin:
|
1 |
docker login dlbpiplabel.westeurope.cloudapp.azure.com |
Change the URL to yours.
If you have the following error, do the following workaround:

|
1 2 3 4 5 6 7 |
vi /lib/systemd/system/docker.service #Remplacez ExecStart=/usr/bin/docker daemon -H fd:// par la ligne suivante ExecStart=/usr/bin/docker daemon -H fd:// --insecure-registry dlbpiplabel.westeurope.cloudapp.azure.com #Sauvegardez systemctl daemon-reload service docker restart ps aux | grep docker |

Now, to continue, we need to tag the image. Use the following command:
|
1 |
docker tag floapp-website:latest dlbpiplabel.westeurope.cloudapp.azure.com/admin/floappwebsite:latest |
![]()
We can now push our image to our repository that we previously created:
|
1 |
docker push dlbpiplabel.westeurope.cloudapp.azure.com/admin/floappwebsite:latest |

The sending is done:

Deploy theFloAppWebsite image
We will now create a container from this image. To start, you need to download the image from our account. In the UCP, navigate to Images and click on Pull image:

Provide the name of your image, in my case dlbpiplabel.westeurope.cloudapp.azure.com/admin/floappwebsite, and click on Pull:

After few seconds (depending on your image size), you will be able to see her in the list of available images:

Go now in Containers and click on Deploy Container. Give a name to your image and adapt parameters to your need:


Click on Run Container:

After few seconds, you have your new container:

If you click on the container you will be able to see which port is used, in the Network part:

To test that everything is working fine, I deployed a VM on the same subnet that UCP nodes and I navigated to the IP and port provided before:

This new is perfect if you want a Docker environment and that you can’t run it in your datacenter 🙂
