


Imagine a sudden fire knocks out your primary data center. How long could your business survive? Downtime is expensive – studies show 90% of large enterprises lose $300,000+ per hour of downtime (and 40% can lose $1-5 million hourly). For small businesses, a major outage or cyberattack can be fatal – about 60% close down within six months of a severe incident. These sobering stats underline why a solid disaster recovery plan could be a business lifesaver in an emergency situation.
This is where disaster recovery (DR) solutions like VMware’s Site Recovery Manager (SRM) come in. SRM is an industry-leading DR automation tool that integrates with VMware vCenter to orchestrate failovers between two sites. It offers automated orchestration and non-disruptive testing of recovery plans – meaning you can rehearse a failover in advance, without impacting production. The goal is to keep services running with as little downtime as possible (realistically never zero, but as low as you can get). At failover time, whether an unplanned emergency or a planned migration, SRM executes a predefined recovery plan to gracefully shut down VMs at the primary site, if possible, and bring up VMs on the secondary site in the correct order. In short, SRM acts as the bridge between two vCenter environments, handling all the heavy lifting of a site switchover when disaster strikes.
Note: VMware has rebranded SRM under the Broadcom acquisition – it’s now part of “VMware Live Recovery” with SRM itself renamed to VMware Live Site Recovery (VLSR). However, the core product remains the same, and most admins still refer to it as SRM. The version 9.0 (released in 2024) didn’t introduce major changes in functionality despite the big version jump. It mainly raised some limits (e.g. supporting up to 1500 VMs per protection group) and added integration plugins, so if you’re familiar with SRM 8.x, the setup will feel very similar.
Quick Recap: What Does SRM Do?
VMware vCenter Site Recovery Manager has been around for over a decade, first introduced around 2008 in the vSphere 4.x era. It’s essentially a vCenter extension accessible via the vSphere Client plugin that coordinates and automates disaster recovery workflows between two sites. You install an SRM server at your primary site and another at your recovery site, then pair them – this pairing lets SRM mirror the protected VMs and resources from Site A to Site B. When something bad happens at Site A (or during a planned failover test), SRM automates the failover to Site B according to your configured recovery plan.

Key use cases:
- Disaster Recovery (DR): If your primary site goes offline unexpectedly (power loss, natural disaster, etc.), you can “fail over” to the secondary site. Some data loss may occur depending on replication RPO, but SRM will bring up your VMs on the DR side to restore services as quickly as possible.
- Planned Migration / Data Center Switchover: If both sites are up, for example, you want to conduct maintenance or relocate workloads, you can migrate workloads to the secondary site gracefully with zero data loss. SRM will sync any last changes and shut down VMs cleanly before cutover, minimizing downtime to just the reboot time on the other side.
In both scenarios, SRM drastically simplifies and scripts the failover process. Without SRM, you’d be manually executing many steps under pressure; with SRM, it’s a one-button execution of a pre-tested plan. You can also perform non-disruptive DR tests – SRM can bring up copies of your VMs in an isolated network at the DR site to verify your recovery plan, all while production stays online. This gives confidence that if a real disaster hits, the plan will work.
How SRM works under the hood: It relies on some form of data replication between the two sites. There are a few approaches to replicate VM data that SRM can manage:
- vSphere Replication (VR): A hypervisor-based replication built into VMware. This replicates VM disk changes at the virtual machine level, without requiring specialized storage hardware. It’s asynchronous and allows a configurable Recovery Point Objective (RPO) per VM from as low as 5 minutes up to 24 hours. vSphere Replication is storage-independent and included with vSphere at no extra cost, making it a popular choice for many SRM deployments. It uses a pair of virtual appliances – one per site – to handle the replication traffic and management.
- Array-Based Replication (ABR): Most enterprise storage arrays (Dell, NetApp, HPE, etc.) offer their own replication technologies at the LUN/datastore level. SRM can integrate with those via Storage Replication Adapters. In this model, the storage array mirrors entire datastores from Site A to Site B, often asynchronously, though some high-end arrays do synchronous mirroring for zero data loss. VMs are grouped by the datastores they reside on, often called Datastore Groups. The advantage of array replication is usually performance and possibly leveraging existing storage investments, but it requires homogeneous storage on both sites. Note: SRM supports both asynchronous and synchronous replication, depending on what the array hardware and SRA support.
- Storage Policy-Based Protection: This is a newer approach using VMware vVols or specific storage policies. Essentially, you tag VMs or VMDKs with a replication policy, and the underlying storage, through vSphere APIs, handles replicating those according to policy. SRM can recognize these policies and treat those VMs as protected. This approach is often used in software-defined storage or vSAN environments and gives fine-grained control via policies.
Additionally, if you have a stretched cluster (active-active data center with shared storage), SRM can be used for disaster avoidance and orchestrated site migration workflows, but that’s a niche scenario. The majority of SRM setups use one, or a mix of the three methods above for replication. In summary, SRM doesn’t do the replication itself – it orchestrates the failover, working in tandem with either vSphere Replication or your storage array’s replication. The diagram below illustrates a simple SRM scenario with vSphere Replication: the protected VMs at Site A are asynchronously copied to Site B. If Site A fails, the replicas at Site B are powered on and assume the workloads.
What You’ll Need to Set Up SRM 9.0
Before diving into the installation, ensure you have the following in place:
- Two vCenter Server instances – one for each site (Primary and Recovery). SRM requires a vCenter at each site to coordinate the protected and recovery resources. The vCenter versions should be compatible with SRM 9.0 (it supports vSphere 7.0 Update 3 and later). Ideally both sites run similar vSphere versions/patch levels. Make sure connectivity exists between the two vCenters.
- vSphere Replication Appliance(s) – if you plan to use vSphere Replication, download the latest vSphere Replication 9.0 OVA package from VMware. You’ll need to deploy at least one VR appliance per site. (Even if using array replication, VMware vSphere Replication can be a nice add-on for VMs that reside on non-replicated storage.)
- Site Recovery Manager 9.0 software – this is the main SRM server component. VMware now provides SRM in two formats: a Photon OS–based virtual appliance and a traditional Windows installer. In SRM 9.0, the appliance is the recommended deployment (VMware’s FAQ notes that SRM is now delivered as a Photon OS appliance). However, SRM 9.0 still offers the Windows installation option for those who prefer it or need it for consistency. You will install the SRM service on both sites and connect each to its local vCenter. (The instructions below cover the Windows-based install, which was the classic method. If you use the appliance OVA, the configuration steps will be slightly different but accomplish the same pairing of SRM with vCenter.)
- Storage Replication Adapter (SRA) – this is optional, only needed if you use array-based replication. It’s a plugin/driver provided by your storage vendor that allows SRM to communicate with the storage array to orchestrate replication actions (failover, failback, etc.). For example, if you use NetApp storage replication, you’d install the NetApp SRA; for Dell/EMC arrays, install the Dell EMC SRA, etc. You’ll install the SRA on the same servers where SRM is installed (both sites). Each SRA is vendor-specific, and VMware maintains a compatibility matrix of supported storage arrays and SRA versions. Skip this if you’re only using vSphere Replication and not leveraging any storage array replication. We’ll cover SRA installation after the main SRM setup steps.
Tip: Before proceeding, ensure you have adequate resources in your vSphere environment. The SRM server (Windows or appliance) doesn’t consume a lot of CPU/RAM (a few vCPUs and ~4-8GB RAM is typical), but you should allocate at least a 40 GB disk (Thick Provisioned) for it, as log files and databases can grow. The vSphere Replication appliance requires about 18 GB of disk and 4 vCPUs, 16 GB RAM by default, and it will hold all the replication state info. Also, double-check time synchronization (NTP) on all components (vCenter, ESXi hosts, SRM servers, etc.) – consistent time is important for certificate validation and replication consistency.
Deploying the vSphere Replication Appliance
First, let’s set up vSphere Replication (VR) 9.0, as it’s the foundation for VM-level replication. You’ll be deploying an appliance on each site. The process below is for one site – repeat it for your second site as well.
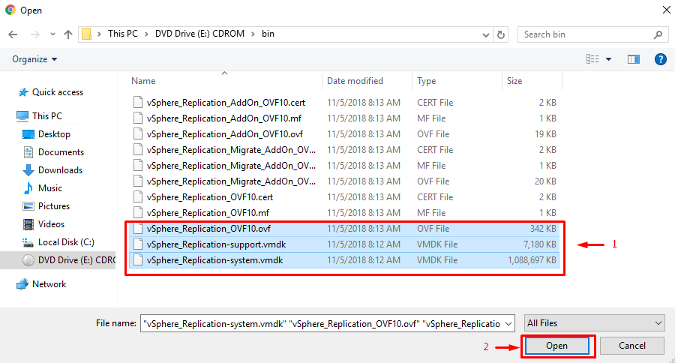
1. Download the vSphere Replication OVA – Log in to VMware’s Customer Connect portal and download the vSphere Replication 9.0 appliance (it may be provided as an OVA or as an ISO containing an OVA and VMDKs). Ensure you have the correct version that matches your vCenter/SRM version.
2. Deploy the OVF/OVA template – In the vSphere Client, navigate to your cluster/host and choose Deploy OVF Template. Select the VR OVA file you downloaded. Go through the wizard to specify the appliance name, target datastore, and compute resource. When prompted for configuration settings, choose the appropriate size (the default deployment size is usually fine for most environments) and select the network that the appliance should use, ideally a management or replication VLAN reachable by the vCenter and ESXi hosts.

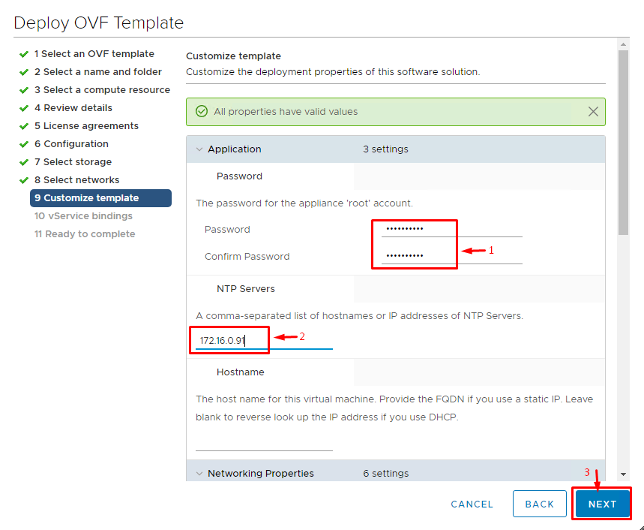
3. Set appliance credentials and networking – During deployment, you’ll be asked to set a root password for the appliance and provide networking details. Configure NTP servers here as well (this is critical – if the appliance time is off, it can cause certificate or replication issues). Double-check the IP, subnet, gateway, DNS, etc., and ensure they’re correct for the site. (If using DHCP, you can select that, but static IP is recommended for infrastructure appliances.) Remember: inconsistent time between VR and vCenter can make certificate validation fail, so NTP is a must.
4. Power on and initial access – After finishing the wizard, vCenter will deploy the appliance. Once the vSphere Replication Appliance VM is powered on, note its IP address (you may have set it manually or obtained via DHCP). The appliance runs a Photon OS and hosts a management web UI on a specific port. Open a web browser and navigate to https://<VR_appliance_IP>:5480 (5480 is the default management port for VMware appliances like vCenter and VR). You should reach the vSphere Replication Appliance Management interface. Log in with the username root and the password you set in step 3.
5. Register VR with vCenter – Once logged in to the VR appliance’s management UI, you’ll be guided through an initial setup. You need to connect the appliance to vCenter Server. The interface will likely prompt for the vCenter’s address and credentials (use an administrator or a vSphere role that permits VR registration; often the administrator@vsphere.local SSO account is used). Enter the info and proceed. The appliance will register itself as an extension to vCenter.
6. Accept or replace certificates – During the registration, you might be prompted about certificates (e.g., if using self-signed certs in vCenter). Accept the thumbprint to establish trust, or if you have a company CA, you could replace the VR appliance certificate with one signed by your CA (this is optional and can be done later via VAMI settings).
7. Finalize configuration – After registration, the VR service will start. In vCenter’s HTML5 client, you should now see a “Site Recovery” plugin on the main menu (or in the home dashboard). Clicking it will show an “Open Site Recovery” button which leads to the Site Recovery (SRM) interface. At this stage, since SRM isn’t installed yet, you may not see much – but the presence of the plugin means vSphere Replication is successfully registered.
8. (Repeat for the secondary site) – Perform the same OVA deployment and setup on your second site’s vCenter. You will then have a VR appliance running at Site B and paired with the Site B vCenter.
Scaling Tip: One vSphere Replication appliance can handle up to about 2000 VM replications (with a 15 min or higher RPO). VMware allows deploying multiple VR Server instances if needed – up to 10 replication appliances per vCenter for very large environments. In most cases, a single appliance per site is sufficient (it includes both the VR Management Server and a VR Server for replication traffic). But if you plan to protect thousands of VMs or need load balancing, you can deploy additional vSphere Replication Server appliances and register them with the primary VR appliance to distribute the load.
Installing Site Recovery Manager 9.0 (SRM Server Installation)
With vSphere Replication in place, we can install the Site Recovery Manager 9.0 service on both sites. As mentioned, you have a choice of deployment methods. Here we’ll outline the traditional Windows-based installation. (If you opt for the Photon OS–based SRM Appliance, the workflow is different – you import an OVA and configure it via a setup wizard in a web interface. The end result is the same: an SRM server registered to vCenter. Refer to VMware’s documentation if using the appliance, as the UI and steps will differ slightly.)
Perform these steps on both the protected site and recovery site (each needs its own SRM instance connected to its local vCenter):
- Download the SRM 9.0 installer – Grab the installer from VMware’s download page (it will be an .exe for Windows, or an OVA if you chose the appliance route). The file might be named like VMware-srm-9.0.x-build#.exe. Ensure the version/build is compatible with your vCenter (SRM 9.0 supports vCenter 7.0 U3+ and vCenter 8.x). If your vCenter is older (6.x), you’ll need to update it first to use SRM 9.0.
- Prepare a Windows Server – If using the Windows install, set up a clean Windows Server (2019 or later is supported for SRM 9.0). This server will host the SRM service. It can be a VM (commonly it is a small management VM). Don’t install other heavy applications on this VM; dedicate it to SRM for stability. Join it to the domain if required by your policies. Make sure it has network connectivity to the vCenter Server and the ESXi hosts (at least the management networks). Allocate enough disk space – 40 GB is recommended, and use an Eager Zeroed Thick disk if on VMware storage to avoid any performance lags. Also, ensure Windows is patched and has .NET installed if required (the SRM installer usually includes necessary runtime components).
- Run the installer – Launch the SRM installer EXE on the Windows server. If you have UAC enabled, run it as Administrator. Choose the installation language and proceed through the wizard. You’ll need to accept the EULA and choose an installation directory (default is fine, typically C:\Program Files\VMware\VMware vCenter Site Recovery Manager).
- vCenter Single Sign-On details – The installer will prompt for the vCenter Single Sign-On (SSO) address (this is essentially the URL of the Platform Services Controller/SSO service for your vCenter). Since in vSphere 7.0+ the PSC is embedded, this will be your vCenter’s address. Enter the FQDN of your vCenter Server and the SSO administrator credentials (e.g. administrator@vsphere.local and its password). The installer uses this to register SRM as an extension to vCenter.
- Certificate acceptance – When you connect to vCenter, a certificate prompt will appear (unless you already have the VMware certificate authority in the Windows trusted store). Verify the thumbprint and accept the vCenter certificate to allow the registration. This ensures the SRM server trusts the vCenter it’s pairing with.
- vCenter instance selection – If your SSO domain has multiple vCenter instances, you’ll be asked which vCenter this SRM should register with. Choose the local site’s vCenter from the drop-down list. (In most cases there’s just one option.) Essentially, you are tying this SRM installation to that specific vCenter – it will then appear in that vCenter’s Site Recovery plugin.
- Site name and administrator email – Next, provide a Site Recovery Manager site name and optional description/contact. The site name is an identifier for this SRM instance (for example, “New York Primary Site SRM” or “SiteA-SRM”). If you don’t enter one, it may default to the vCenter’s name. If you plan to do bi-directional protection (both sites protect VMs to each other), it’s useful to name them clearly. Also enter an email for the site administrator (this is just metadata, but can be used for notifications).
- SRM Plugin ID – The wizard will show a Plugin identifier (usually derived from the site name). The default format is fine for most cases. This ID only needs to be unique if you ever intend to have multiple SRM servers connected to the same vCenter (an uncommon scenario, but could happen in complex topologies). For a standard one-to-one pairing, you can leave the default plugin ID.
- Certificate for SRM – Choose how to handle SRM’s own certificate. You have two options:
- Generate a self-signed certificate (the installer will create one automatically).
- Use a custom certificate (you’d need to have a CA-signed certificate in PFX format ready).
If you have a corporate CA and want that trust, go ahead and install your own cert. Otherwise, the self-signed cert is fine – it will be used when pairing the two SRM sites (you’ll just need to accept each other’s cert during pairing). The certificate is used for SRM-to-SRM secure communication between Site A and Site B.
- Database configuration – SRM requires a database to store its configuration and state (recovery plans, inventory mappings, etc.). In SRM 9.0, an embedded PostgreSQL database is bundled and is the simplest choice. You can let the installer deploy the embedded DB and just provide a database username and password for it (e.g. create an srm_db user and password – take note of these for troubleshooting). Alternatively, if you have an external database (SQL Server or Oracle) and want to use that, you can select ODBC and point SRM to that database. For most deployments, the embedded PostgreSQL is perfectly fine and is now the VMware-recommended path. Provide the needed DB credentials as prompted.
- Service account – Specify which Windows user account the SRM service will run as. You can use the default “Local System” or specify a domain account. Using Local System is simplest (no special permissions needed). If you use a domain account, ensure it has local admin rights on the server. (In many cases, sticking with Local System is sufficient, unless your organization has specific service account policies.)
- Finish installation and verify – Complete the wizard and let it install. It will register the SRM service and start it. After installation, open the vSphere Client and navigate to Site Recovery. You should see your site listed there. (If you installed SRM on Site A’s vCenter, you’ll see Site A in the plugin; Site B will show up after you pair them.) At this point, the SRM service is up and running on this site. Repeat the installer on your secondary site’s Windows server, following the same steps (with that site’s specific info). Once both sites have their respective SRM servers installed, you’re ready to pair them.
After both instances are installed, the Site Recovery section in vSphere Client will show two sites (each identified by the names you gave). Typically, the next step is to pair the sites (establish a connection between the two SRM servers) and then configure protection groups and recovery plans. Site pairing is initiated from the Site Recovery UI – you’d choose “Connect or Pair Sites” and follow the prompts to connect Site A’s SRM to Site B’s SRM (you’ll need to provide the Platform Service Controller/SSO admin of the opposite site and accept the cert). Once paired, the two sites can start coordinating. (Site pairing and creating recovery plans will be covered in Part 2 of this series.)
Photon OS Appliance Option: If instead of Windows you deployed the SRM 9.0 appliance (Photon OS based), the setup is done through a web-based configuration wizard. You would import the SRM OVA, power it on, then browse to https://:5480 to complete a similar set of steps (connecting to vCenter, setting site name, etc.). The end result is the same – SRM registered to vCenter. The VMware documentation and prompts will guide you, and you won’t need an external database as the appliance uses an internal DB. VMware is moving in this direction for simplicity, so expect the Windows installer to be phased out in future releases. (As of 9.0, VMware’s official line is that SRM is available as an appliance only, though the Windows install was still provided in 9.0 for continuity.)
Installing the Storage Replication Adapter (Optional, for Array-Based Replication)
If you plan to use array-based replication with SRM, you’ll need to install the appropriate Storage Replication Adapter (SRA) for your storage platform. The SRA acts as a translation layer between SRM and your storage array’s replication APIs. In other words, SRM itself doesn’t know the nitty-gritty of each vendor’s replication, so it outsources those tasks to the SRA. The SRA allows SRM to, for example, query replicated LUNs, initiate a storage failover, or reverse replication direction on your array, using vendor-specific commands under the hood.
To install an SRA:
- Download the SRA from your vendor. Go to your storage vendor’s support site and find the VMware SRM SRA download that matches SRM 9.0 and your array model. (Most major storage vendors release updated SRAs quickly when new SRM versions come out. The SRA is typically a small install package, often a ZIP or EXE for Windows SRM, or a bundle for the appliance.) For example, if you use Dell PowerStore, download the Dell SRA for SRM 9.0; if you use NetApp ONTAP, get the NetApp SRA for SRM, etc. Be sure to get the exact version that corresponds to SRM 9.0 – an SRA built for SRM 8.x may not work unless the vendor explicitly states compatibility. (VMware often applies “SRA compatibility equivalency” for minor SRM updates, meaning an SRA that worked on 8.8 might still work on 9.0, but it’s best to use a version the vendor officially supports for 9.0.)
- Install the SRA on the SRM server host. If you installed SRM on Windows, the SRA will usually come as an installer (EXE or MSI). Run it on the same machine where SRM is installed (and do this on both sites if you have replication in both directions or arrays at both ends). The installation is typically just a next-next-finish process. It will copy the SRA plugin files into the SRM program directory. (For the SRM appliance, the process is to upload the SRA package via the appliance’s management UI – the SRM appliance has a section to manage SRAs. You’d upload the provided .tar.gz or bundle file and it will install it internally.)
- Restart SRM service (if required). Some SRA installations might require restarting the SRM service to pick up the new adapter. On Windows, you can restart the VMware Site Recovery Manager service from services.msc after installing the SRA. On the appliance, SRM service restart can be done via the CLI or the VAMI. Check the vendor’s readme – many SRAs prompt you to reboot or restart SRM as the final step.
- Verify in SRM UI. After installation, go to the Site Recovery UI in vSphere Client. Under the Array Managers section, try to add a new array manager. If the SRA is installed correctly, you should see your array’s replication adapter available to choose. For example, you might see “Dell EMC SRA” or “NetApp SRA” in the list of adapter types when adding an array manager. If it’s not showing up, double-check that the SRA was installed in the correct location (and that the version is compatible). Also, consult the SRA documentation for any array-side preparation needed (some arrays require enabling certain ports, credentials, or consistency group setups for SRM to use).
The specifics from here will depend on your storage platform. Generally, you’ll need to add array manager entries for each site in SRM, provide storage credentials, and then SRM can discover the replicated datastores. Once detected, those datastores and their VMs can be grouped into Protection Groups in SRM. The SRA documentation will outline any special requirements. For instance, it might specify minimum firmware versions on the storage or particular license features that must be enabled for replication. Always review the vendor’s guide included with the SRA.
Note: You can install multiple SRAs on the same SRM server if you have different storage arrays in play (e.g., a Dell array and a NetApp array in the same environment). SRM supports managing multiple replication types simultaneously. Just be aware that a single VM’s disks must all reside on the same replication source – you can’t have one VM with disks spread across two arrays and protect it with SRM. Also, an SRA needs to be installed on both sites’ SRM servers if you expect to failover and failback (even if the array at the secondary site is just a replication target, SRM typically expects the SRA on both ends).
Wrapping Up
At this point, we have the core SRM 9.0 infrastructure set up: vSphere Replication appliances are running and registered to each vCenter, and the Site Recovery Manager service is installed on both sites with any needed SRA plugins in place. In the vSphere Client, you should see the Site Recovery plugin and your two sites listed. The SRM servers themselves should also show as “paired” or at least available to be paired (if you haven’t paired them yet, that’s the next step when configuring SRM).
The environment is now ready to start configuring disaster recovery plans. In Part 2 of this deep dive, we’ll cover pairing the sites within the SRM interface, setting up inventory mappings (to map networks, resource pools, folders between sites), creating Protection Groups (grouping VMs or datastores to fail over), and building out a Recovery Plan. We’ll also go through a test failover to validate that everything works as expected – without impacting production. Testing is a critical, and actually enjoyable (!), part of SRM, as it gives you confidence in your DR setup.
Disaster recovery is often seen as complex, but with SRM’s automation and a bit of upfront effort, you can dramatically simplify your organization’s ability to withstand failures. You’ve now laid the groundwork: the “plumbing” is in place. In the next installment, we’ll use this setup to orchestrate a full failover and failback scenario. Stay tuned for Part 2, where the real fun begins – intentionally “pulling the plug” and watching SRM save the day!
