

The global lockdown has skyrocketed VDIs and remote client access through the roof. Ensuring that the remote working process is both performant and secure is key. Horizon 7 is one such tool, which relies on encrypted connections and different authentication protocols, assuring safe and controlled access to physical computers at the office.
In the situation where employees need to access their work computers remotely, VMware Horizon can be configured to allow the access to physical machines located at office.
To avoid tricky and unsecure solutions to access corporate computers from home, VMware Horizon provides safe and controlled accesses to physical computers located at office with a limited load of the IT staff in terms of deployment and management.
The concept is to have a working Horizon Connection Server located in the corporate LAN reachable via VPN or via Internet through the Unified Access Gateway component. If the Horizon infrastructure is not already implemented, it is a matter of minutes to setup the required components for this purpose.

Relying on encrypted connections, Horizon supports different authentication protocols such as Active Directory, Radius, certificates and so on, offering secure connections.
This procedure allows the administrators to make physical machines located in the corporate LAN reachable by remote users and assign the access to specific users.
Prerequisites
To implement Horizon as solution to connect physical machines, you need the following components:
- A Windows Server joined to an Active Directory domain with Horizon Connection Server installed.
- A remote connection solution (VPN or Unified Access Gateway).
- The Horizon Agent installed in the physical machines to connect.
Although Windows 7 SP1 and Windows 10 clients use RDP protocol to connect, starting from Horizon 7.7, Windows 10 Enterprise clients (builds 1803-1809 and 1903-1909) can take benefit also of the Blast Extreme protocol that provides better performance. Check out the compatibility matrix to ensure if the Blast Extreme protocol is supported in your clients with the Horizon version used.
Install Horizon Agent to physical machines
All physical machines located in the working place that need to be reachable by Horizon require the Horizon Agent installed.
From VMware website download the Horizon Agent and run the installer on each physical machine.

Click Next to proceed with Horizon Agent installation.

Accept the EULA and click Next.

Select Desktop Mode option and click Next.

Specify the protocol to be used for establishing the connection then click Next.

Leave default program features to install and click Next.

Click Install to install Horizon Agent to the physical machine.

The Horizon Agent is being installed.

When the installation has been completed, click Finish to exit the installation wizard.

Click Yes to reboot the system to complete the installation.

Configure VMware Horizon 7 to access physical machines
Once the Agents have been installed, access the Horizon Connection Server Admin page by entering the correct credentials and click Sign in. To connect physical machines only it is not necessary to specify a vCenter Server in the Horizon configuration.

Go to the Desktops section under Inventory and click Add to configure a new Desktop Pool.

Select Manual Desktop Pool option and click Next.

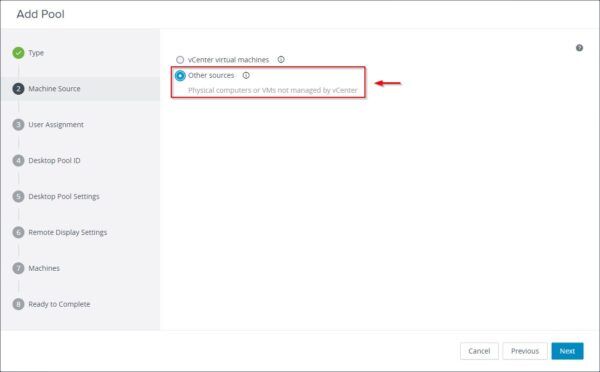
Since the machines are not virtual, select Other sources option and click Next.
Since we need to specify which users have access to which physical machines, select Dedicated item leaving other options unchecked.

Specify an ID and a Display Name for the Desktop Pool to create and optionally a Description. Click Next to continue.

From the Automatically Logoff After Disconnect drop-down menu, specify how the Logoff should take place. Enable the Display Assigned Machine Name option to display the machine name instead of the Desktop Pool name in the Horizon Client. Click Next.

Specify the Default Display Protocol and if users are allowed to choose the protocol to use. Enable the HTML Access option (it requires Blast protocol) to allow the access to physical machines through the preferred browser. With HTML access you don’t need to install the Horizon Client to connect the remote machine. Click Next.

Additional info about the HTML Access option.

Select the machines to add to the Desktop Pool (only the machines with the Horizon Agent installed are displayed) and click Next.

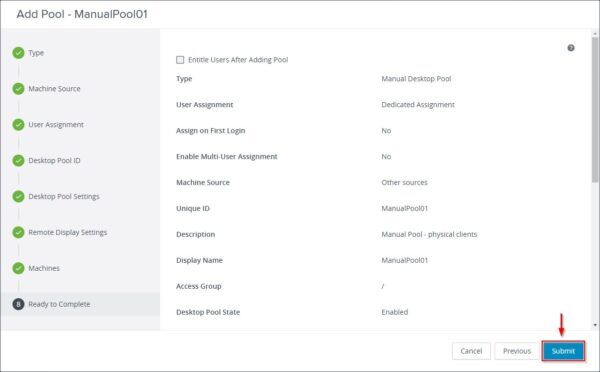
Click Submit to create the Desktop Pool.
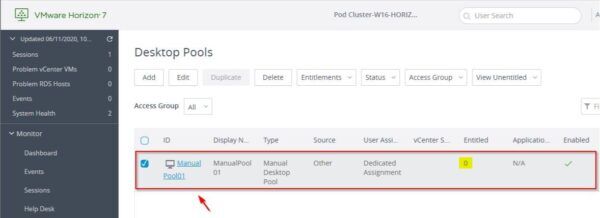
The Desktop Pool has been created successfully. Note that Entitled column reports a value of 0.
Add entitlements
To assign users to the created Desktop Pool (who can actually use the selected pool), click Entitlements and select Add Entitlements.

Click Add.

Specify the Domain and the filter Name/User Name to quickly identify the correct group/user to use then click Find. User names or Group names that contain the entered string are displayed. Select the User/Group to use and click OK.

Click OK to confirm the selected User/Group.

Now click the Pool ID name link to check the assigned entitlements.

Go to Entitlements tab and check if the specified User/Group has been set.

Assign users to machines
Next step is the assignment of users to specific machines. Go to Machines tab and select the physical machine to assign. From the More Command drop-down menu select Assign User.

If you receive this warning, just click OK to continue.

Enter the correct Domain and specify the Name/User Name to find then click Find. Select the user and click OK.

The selected user has been assigned to the chosen machine.

The Horizon Connection Server configuration is now complete.
Test the connection
To test the connection, you may need to establish a VPN connection to your office first if the Unified Access Gateway is not available.
Open your preferred browser and enter the address https://<dns_horizon_server>/portal. If the Blast Extreme protocol is supported, select VMware Horizon HTML Access.

If you receive such error message, you need to tweak your Horizon Connection Server configuration.

Login to your Horizon Connection Server and create a new file in the C:\ProgramFile>VMware>VMware View>Server>sslgateway>conf folder with the following name:
locked.properties

Add the following line in the locked.properties file then save the file.
checkOrigin=false

From Services, restart the VMware Horizon View Connection Server service.

Now the connection to the Horizon server can be established successfully. Enter the username and password then click Login.

From the Horizon Dashboard, click the assigned machine to connect.

The login screen of the physical machine is displayed. Enter the credentials and press Enter.

The user is now connected to the physical computer located at the office and he/she is now able to do his/her duties.

In case of unpredictable events such as the COVID-19 pandemic, this solution allows the companies to save a lot of money since the purchase of expensive computers for employees working from home is not necessary. A simple and cheap computer may suffice for the user to connect the working place and become productive again.
