


Introduction
Windows Admin Center (WAC) is a locally deployed, browser-based management tool for administering Windows Servers. One advantage of WAC is that it does not require Azure or any other cloud services – you get full control over your Windows Server environment on-premises. This makes WAC especially suitable even if your organization isn’t ready to integrate with the public cloud.
What is WAC?
Before Windows Admin Center, Windows admins primarily used built-in tools like Server Manager (introduced with Windows Server 2003) for everyday tasks. However, traditional Server Manager wasn’t truly cross-platform or remotely accessible. By contrast, other platforms like VMware vCenter Server (as of version 5) enabled remote management from anywhere, even via a smartphone.
Windows Server 2019 brought the first release of Windows Admin Center – a full-featured, browser-based management solution intended to complement (not replace) Server Manager. WAC allows you to manage Windows servers and workstations from any modern web browser, on any device or OS. It provides a unified web console where you can perform a wide range of administrative tasks, from configuring roles and features to managing Hyper-V VMs, without needing to RDP into each server. Importantly, WAC can manage servers entirely on-premises with no cloud dependency, though it also has optional Azure integration features. In summary, Windows Admin Center is a versatile management hub that simplifies Windows infrastructure administration in a modern way.
How to install WAC in a Failover Cluster
Now that we understand what WAC is, let’s jump into how to install it in a failover cluster for high availability. We will skip the basics like installing Windows Server or setting up an Active Directory domain, and focus solely on deploying WAC in a clustered environment. In this guide, we use Windows Server 2022 for the cluster nodes.
We will configure WAC in an active-passive high availability mode. This means only one instance of the WAC gateway service runs at any time on one cluster node (the active node). If that node fails, the service will fail over to another node, minimizing downtime for the management tool. This provides a non-interrupted management experience for your servers.
For this example, we have a 2-node failover cluster (you can use more nodes if available) running Windows Server 2022. The cluster is configured with a Cluster Shared Volume (CSV) accessible by all nodes – at least 10 GB of space is recommended for WAC data. (In our case, the CSV is 10+ GB, which is sufficient).
WAC deployment in a cluster is straightforward. The high-level steps are:
- Download the software: Get the latest Windows Admin Center installer (MSI package) from Microsoft. You can download it directly from Microsoft’s website – for example, via the Windows Admin Center download link (this is often provided as an aka.ms short URL for the latest version). Make sure you have the MSI saved on one of the cluster nodes (or accessible via a shared location). For convenience, rename it to something like WindowsAdminCenter.msi if it has a version number in the filename.
- Download the cluster deployment script: Microsoft provides a PowerShell script to install WAC in a failover cluster for high availability. Download the Windows Admin Center HA installation script. Extract the script (e.g., Install-WindowsAdminCenterHA.ps1) and copy it to one of the cluster nodes.
- Prepare a certificate: It’s recommended to have an SSL certificate for the WAC gateway. If you have a trusted .pfx certificate (with its private key) for the WAC gateway’s DNS name, copy that to the node as well (not mandatory to pre-install it; the script can install it during setup). If you don’t have a certificate, the script can generate a self-signed certificate (but note that a self-signed cert will expire in 60 days and may trigger browser warnings).
- Run the installation script: Log on to one of the cluster nodes (via RDP or console) with an account that has local administrator rights and permissions to create cluster roles. Then run the PowerShell script to install WAC as a clustered role, providing the necessary parameters (detailed below).
Before running the script, let’s break down the key parameters it accepts:
- -clusterStorage – The local path to the folder on the Cluster Shared Volume that WAC will use for storing its data. For example: C:\ClusterStorage\Volume1\WAC (ensure that path exists on the CSV and is accessible by all nodes).
- -clientAccessPoint – The network name for the clustered WAC service. This will be the DNS name you use to access WAC in a browser. For example, if you specify -clientAccessPoint “contoso-wac”, you would later connect to WAC at https://contoso-wac.yourdomain.com (or appropriate DNS suffix). This name will be registered in your AD DNS and a corresponding computer object will be created in Active Directory for the cluster role.
- -staticAddress – Optional. One or more static IP addresses for the WAC service. If your cluster nodes span different subnets or you want to ensure a specific IP (or set of IPs) is used for the WAC cluster role, you can specify them here (comma-separated for multiple). If not provided, the cluster will attempt to use an IP from the cluster’s networks (or you can rely on DHCP if available).
- -msiPath – The path to the WAC installer MSI file that you downloaded. For example: C:\Installers\WindowsAdminCenter.msi.
- -certPath – Optional. The path to the .pfx certificate file to use for HTTPS. Provide this if you have a certificate for the WAC service name.
- -certPassword – Optional. The password for the .pfx certificate (if it’s password-protected). It’s recommended to supply this as a SecureString for security. (In the example below, we’ll use Read-Host -AsSecureString to prompt for it.)
- -generateSslCert – Optional. Include this switch if you do not have a certificate and want the script to generate a self-signed SSL certificate for you. (Ignore this if you provided -certPath and -certPassword.)
- -portNumber – Optional. The port on which WAC will listen. By default, if not specified, it uses 443 (HTTPS). If you prefer to run WAC on a different port (for example, 8443), specify it here. Note that if you choose a custom port, you’ll need to include “:<port>” in the URL when accessing WAC (e.g., https://contoso-wac.yourdomain.com:8443).
With those parameters in mind, you can now execute the installation. Below are example commands for two scenarios: one using a provided certificate, and one using a self-signed certificate.
Install WAC with an existing certificate:
First, store the certificate’s password in a secure string (it will prompt you to enter the password):
$certPassword = Read-Host -AsSecureString
Then run the installation script with the certificate parameters:
C:\Scripts\Install-WindowsAdminCenterHA.ps1 -clusterStorage "C:\ClusterStorage\Volume1\WAC" `

-clientAccessPoint "contoso-wac" -staticAddress 192.168.1.50 `

-msiPath "C:\Installers\WindowsAdminCenter.msi" -certPath "C:\Installers\wac_certificate.pfx" `

-certPassword $certPassword -Verbose
In the above example:
- WAC data will be stored on C:\ClusterStorage\Volume1\WAC (CSV).
- The service will be accessible at https://contoso-wac.yourdomain.com.
- It will use the static IP 192.168.1.50 for the clustered service.
- It installs using the MSI located at C:\Installers\WindowsAdminCenter.msi.
- It imports the certificate wac_certificate.pfx for SSL (using the provided password).
Install WAC with a self-signed certificate:
If you don’t have a valid SSL certificate, you can let the script create a self-signed cert by using the -generateSslCert flag. For example:
C:\Scripts\Install-WindowsAdminCenterHA.ps1 -clusterStorage "C:\ClusterStorage\Volume1\WAC" `

-clientAccessPoint "contoso-wac" -msiPath "C:\Installers\WindowsAdminCenter.msi" `

-generateSslCert -Verbose

This will install WAC on the cluster using a self-signed certificate (and the default port 443). You can also include -staticAddress here if needed (just like the previous example) to specify an IP.
To give a concrete example from our scenario, here is the actual command used to install WAC in our test cluster:
C:\Users\AdminCL\Desktop\Install-WindowsAdminCenterHA.ps1 -clusterStorage "C:\ClusterStorage\Volume1" `
-clientAccessPoint "TestWAC" -staticAddress 172.16.10.47 `
-msiPath “C:\Users\AdminCL\Desktop\WindowsAdminCenter.msi” -generateSslCert -Verbose
In this case, the cluster shared volume is Volume1, the client access point (network name) is TestWAC, a static IP 172.16.10.47 is assigned, and a self-signed cert is generated for HTTPS.
After you run the script, it will take a few minutes to complete the installation and set up the WAC service as a clustered role. You should see the PowerShell output indicating that the WAC gateway service was installed and the cluster role creation was successful.
Once the script finishes without errors, you can verify that Windows Admin Center is installed as a highly-available workload:
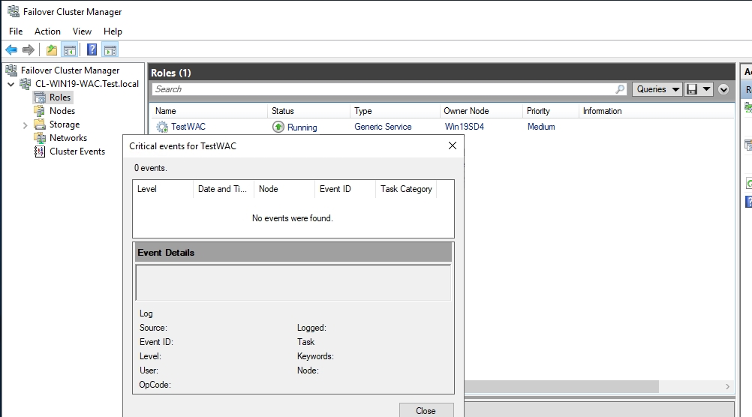
Failover Cluster Manager showing the Windows Admin Center cluster role (“TestWAC”) running as a Generic Service.
Open Failover Cluster Manager and navigate to Roles. You should see a role listed (in our example, named TestWAC) with the status Running, type Generic Service, and owner node showing which node is currently hosting the WAC service. The presence of this clustered role indicates that WAC is successfully deployed in HA mode on your cluster. At this point, the WAC service is active on one node and will fail over to another node if needed.
Now it’s time to access the Windows Admin Center web interface. On a system with connectivity to the cluster (this could be one of the nodes or any machine that can resolve the WAC cluster name), open a web browser. Navigate to the URL using the client access point name you specified. For example, in our case we would go to https://TestWAC.test.local/ (replace test.local with your AD domain name, and add the port if you set a custom -portNumber). If DNS is set up correctly and the cluster role is running, your browser should reach the Windows Admin Center gateway.
Note: The first time you access WAC (especially if using a self-signed certificate), you may need to bypass a security warning in the browser because the certificate is not trusted. If you used a self-signed cert, consider installing that cert in your Trusted Root store or, better yet, replace it with a valid certificate from a trusted CA to avoid these warnings. Also, ensure the account you use to log in has the necessary admin privileges on the managed servers.
When you hit the WAC URL, you will be prompted to sign in with your credentials (use a domain account with administrative rights). After a successful login, you should see the WAC interface load.

Windows Admin Center welcome screen on first launch, indicating the WAC gateway is up and running.
After dismissing the welcome tour, you can start managing your servers through the Windows Admin Center dashboard. Because we set up WAC in a failover cluster, this web interface will remain accessible even if the current host node goes down (the cluster will bring it up on another node automatically).
At this stage, you’ve deployed a highly available Windows Admin Center instance! You can proceed to add connections (servers, clusters, etc.) in WAC and manage them as needed.
(Microsoft updates WAC regularly; if a new version is released, you can upgrade your HA deployment by obtaining the new MSI and rerunning the installation script with the -msiPath parameter pointing to the new file. This will upgrade the WAC service across the cluster without losing your settings or connections.)
“What could go wrong?”
In a perfect world, the installation completes and you can access WAC immediately. However, what if something doesn’t work as expected? For example, you might encounter a situation where the WAC clustered role appears to be running fine in Failover Cluster Manager, but you cannot access the WAC web interface in your browser. Or perhaps the clustered role itself shows an error state. One common culprit in such scenarios is permissions related to the Active Directory computer object for the WAC service.
When WAC is installed as a clustered role, it uses a Client Access Point (network name) which corresponds to a computer object in Active Directory. The failover cluster needs the right to create and update this object. In many cases, the cluster’s Cluster Name Object (CNO) will automatically create the new computer object for the WAC service (called a Virtual Computer Object, VCO). If the cluster nodes or CNO lack proper permissions in AD, the creation of the WAC object might fail or it may not have the needed permissions, leading to access issues.
To fix this, you should ensure that the cluster’s computer account has permission to create and manage the computer object for the WAC service. Here’s one way to resolve this issue:
- Open Active Directory Users and Computers (ADUC). Make sure Advanced Features is enabled in the View menu so that you can see the Security tabs on objects.
- Locate the WAC cluster computer object. This object will have the name you chose as the -clientAccessPoint (for example, contoso-wac or TestWAC). By default, new computer objects might be in the Computers container or in the same OU as your cluster nodes/CNO, depending on your AD setup. Find that object (it should have been created when you ran the script; if not, you may create one manually).
- Right-click the WAC computer object and go to Properties > Security > Advanced. This opens the Advanced Security Settings for that object.
- Click Add to add a permission entry. In the permission entry window, click “Select a principal.”
- Select the cluster’s computer account as the principal. By default, the cluster itself has a computer account (the CNO, which is the name of the cluster). That’s the account that needs permissions to the WAC object. Click “Object Types” and ensure Computers is checked, then find and select your cluster’s name (the CNO). It will appear as something like CLUSTERNAME$ in the permission dialog.
- Set the permission for “Create computer objects”. In the permissions list, find Create computer objects and check Allow for that permission. You can also allow “Delete computer objects” if recommended, but at minimum creation is needed. The permission should apply to “This object and all descendant objects” (the default scope).
- Apply the changes. Click OK to save the new permission entry, and OK again to exit the security settings.
Now, try accessing the Windows Admin Center URL again. With the proper permissions in place, the cluster should be able to register and update the WAC service’s AD computer object, and you should be able to log into WAC successfully.
If the WAC clustered role had been failing to come online at all, you can also try taking the cluster role offline and then bringing it online again (or simply rerun the installation script) after fixing the permissions. In most cases, adjusting the AD permissions as above and ensuring DNS is correctly resolving the name will solve the access issue.
Conclusion
Installing Windows Admin Center in a Windows Server 2022 failover cluster provides a highly available, convenient way to manage your infrastructure. By following the steps outlined – preparing your cluster, using Microsoft’s provided script, and configuring the necessary parameters – the deployment is fairly straightforward. Always use the latest WAC version for the best experience and security updates. With WAC in an HA configuration, you gain a reliable web-based management portal that will be there when you need it, even if one of your cluster nodes is down. Happy managing!
