


Entering the world of VMware virtualization for the first time can feel overwhelming. VMware’s ecosystem has many products, and it’s not immediately obvious how they all fit together. For example, you might wonder: what’s the difference between ESXi and vSphere, and where does vCenter come in? Don’t worry –- even seasoned VMware pros were beginners once, and it’s normal to be a bit confused at first. The key is to learn the fundamentals and build from there.
This guide will walk you through six essential things every VMware beginner should know. Along the way, we’ll share some insights (including recent changes as of 2024-2025) and best practices to make your virtualization journey smoother and more successful. Let’s dive in!
Understand VMware’s Products and Terminology (vSphere, ESXi, vCenter, etc.)
Before getting hands-on, it helps to clarify a few key terms in the VMware universe. Here’s a simple glossary of the core components:
- VMware – This is the company name (the folks who make all the vSphere products). VMware is a leader in virtualization technology and its tools are widely adopted across the IT industry.
- VMware vSphere – vSphere is the suite or platform of VMware’s server virtualization products. Think of it like Microsoft Office: vSphere includes multiple components (ESXi, vCenter, etc.) that together provide a complete virtualization solution. It’s the foundation for creating and managing virtualized IT environments (data centers, clouds, etc.) with features for resource management, high availability, and more.
- VMware ESXi – ESXi is the bare-metal hypervisor that you install on a physical server to run virtual machines (VMs). It’s essentially the operating system that runs directly on your hardware and allows you to create and host VMs. ESXi is lightweight and optimized solely for running VMs; it has a basic web interface and a command line, but for advanced management you’ll use vCenter.
- VMware vCenter Server – vCenter is the centralized management server for vSphere. It lets you manage multiple ESXi hosts and all the VMs on those hosts from one console. vCenter is the “brains” of a VMware environment – with it, you can monitor performance, migrate VMs between hosts, set up high availability clusters, and more. In a production environment with several ESXi hosts, you’ll almost always use vCenter to simplify administration.
- VMware vSphere Client – This is the administration interface you use to interact with vCenter/ESXi. In modern versions of vSphere, the client is a web-based application (an HTML5 web UI you access via browser). In older versions there was a Windows desktop client or a Flash-based client, but today it’s unified as a web client. The vSphere Client is how you, as an admin, log in and configure VMs, networks, storage, and all other settings in vCenter or on an ESXi host.
How these pieces fit together:
Imagine you have a few physical servers running ESXi (the hypervisor). You install vCenter Server (either on a VM or as an appliance) to manage those hosts. From your laptop, you open a web browser and connect to vCenter via the vSphere Client. Now you have a single pane of glass to create VMs on any ESXi host, adjust network or storage settings, set permissions, etc., across your whole environment. Essentially, vCenter is the brains, ESXi hosts are the brawn, and the vSphere Client is the control panel. This setup is what people refer to when they talk about a “vSphere environment.” (If you’re running just one ESXi host as a standalone, you can manage it directly with the web client, but as your environment grows, vCenter becomes crucial.)
VMware ESXi Used to Be Free, But Watch for Licensing Changes
If you’ve read older tutorials or forum posts, you might have heard that VMware offered a free version of ESXi (often used for labs or small setups). Indeed, for many years VMware provided a vSphere Hypervisor (Free Edition) license for ESXi – it had some limitations but was great for learning and testing. However, in early 2024 this changed dramatically. After Broadcom acquired VMware, they announced the end of perpetual licenses and moved toward subscription-only licensing for VMware products. As part of this shift, the free ESXi hypervisor was officially discontinued in February 2024. VMware removed the ability to download or license ESXi for free from their website. This meant new users could no longer get a free ESXi license for lab use or small deployments – any new installation would require a paid subscription (or a time-limited trial license). Even entry-level bundles like the old vSphere Essentials Kit were phased out.
This was a big deal because it affected hobbyists and IT professionals who relied on the free hypervisor to practice VMware at home or run non-critical services. The free version only supported limited cores and memory and lacked centralized management, but it was popular for tinkering and skill-building. With its removal, many worried VMware was pushing away newcomers and small users, potentially driving them to free alternatives like Proxmox or Hyper-V (which had also discontinued its free edition).
However, the story doesn’t end there. Broadcom/VMware heard the community feedback, and by April 2025, they reintroduced a free version of ESXi (vSphere Hypervisor 8) as an “entry-level hypervisor”. The free ESXi download became available again via Broadcom’s customer portal, though now you must register for an account to get it. This reversal was discovered in the release notes of vSphere 8.0 Update 3 and was welcome news for home lab users. In short, as of mid-2025, you can once again obtain ESXi for free, but it requires going through Broadcom’s site and it’s clear VMware’s focus is on subscriptions going forward. Also, note that certain limitations or requirements might apply (for example, early 2024 plans to raise minimum core counts for licenses were reportedly rolled back to more reasonable levels).
What should a beginner do? Keep an eye on VMware’s licensing announcements. If you just need ESXi for non-production use (like learning), the free vSphere Hypervisor 8 is an option as of 2025. For any serious or commercial deployment, you’ll need to plan for at least a vSphere subscription license. And remember, trial versions are available – VMware typically offers 60-day trials of vSphere Enterprise features, which can be useful while you learn the ropes. The licensing landscape can change, so always check VMware’s official site for the latest on what’s available for free vs. paid.
Use Shared Storage if You Have Multiple Hosts (Local vs. Shared Storage)
When setting up VMware hosts, one critical design decision is where to put your VMs’ storage. You have two basic approaches: local storage (disks inside or directly attached to one server) or shared storage (a storage system accessible by multiple servers). Many beginners start with local disks because it’s simple, but it’s important to understand the limitations. If you plan to use VMware’s advanced features like vMotion, High Availability (HA), or Distributed Resource Scheduler (DRS), shared storage is practically a must. Let’s break down why shared storage is so important in VMware environments:
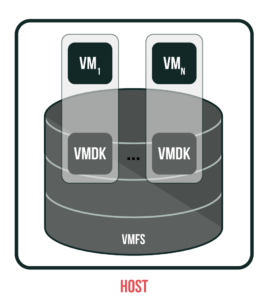
- Local Storage: This means the VM’s virtual disks (VMDK files) reside on storage local to the ESXi host. For example, an ESXi server might have its own RAID array of SSDs or HDDs, formatted with VMFS, acting as a datastore for VMs on that host. The setup is straightforward and works fine for a single-host environment or a small test lab. But there are major limitations: The VMs on local storage are tied to that one host. If the host goes down, those VMs go down and cannot restart on another host, because no other host can access that local disk. In VMware, features like vMotion (live migrating a VM to another host) or HA (automatically restarting VMs on another host if one fails) require that both hosts see the same storage. With purely local disks, each host is an island – you can’t migrate running VMs between hosts, and you can’t have an HA cluster, because there’s no shared datastore between the hosts. Local storage also lacks redundancy across hosts: if the disk or the host itself fails, any VMs on it are offline until that host is repaired. In summary, local storage might save hardware cost initially, but you lose the resilience and flexibility that VMware is famous for. As the saying goes in VMware circles: “If it’s not on shared storage, it’s not highly available.”
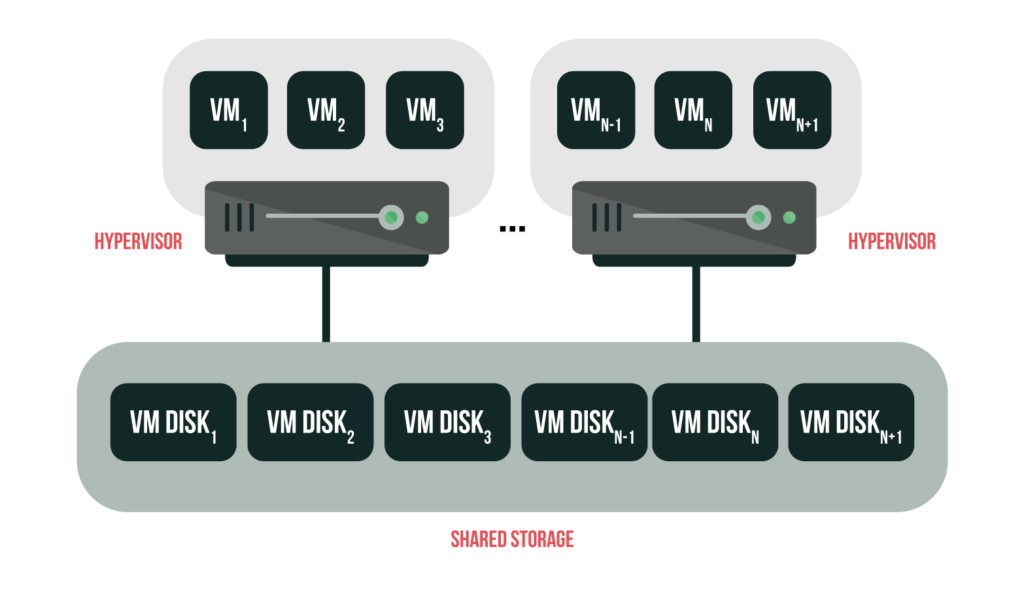
- Shared Storage: This refers to a storage resource (SAN or NAS, etc.) that multiple ESXi hosts can access simultaneously. Traditional shared storage could be a SAN array accessed via iSCSI or Fibre Channel, or a NAS device serving NFS. In a shared storage setup, all hosts connect to the same datastore on the network. Now any host can run any VM because the VM’s files are centrally located. This unlocks all the cool vSphere features: you can vMotion VMs between hosts at will, enable HA clustering (where if Host A dies, Host B can restart Host A’s VMs using the same disks), and use DRS to load-balance VMs across hosts. Shared storage is the backbone of VMware clusters – without it, each host is basically stuck with only the VMs on its own disks, with no smooth failover or migration. Shared storage also often allows multiple network paths (for redundancy and performance) and advanced capabilities like snapshots or replication at the storage level. The downside is that traditional SAN/NAS appliances can be expensive and add complexity (you need to manage a storage network in addition to your compute network).
Given the cost of physical SANs, VMware and others have developed Software-Defined Storage (SDS) solutions to make shared storage more accessible. VMware’s built-in SDS technology is vSAN (VMware Virtual SAN). With vSAN, you don’t need an external storage box – instead, each ESXi host contributes some of its local disks to form a distributed datastore that is shared across the cluster. The vSAN software ensures that data is replicated between hosts for fault tolerance, so if one host fails, the data is still available on another. This effectively turns your cluster’s local disks into a shared storage pool. The benefit is huge: you get rid of the single point of failure of one host’s local disk, and you leverage the disks you already have in your hosts to create a resilient shared datastore. It’s also often cheaper than a dedicated SAN, and easier to scale (just add another host with more disks). There are also third-party SDS products – for example, StarWind Virtual SAN can do a similar thing by mirroring local disks between two or more servers, creating a virtual shared storage accessible by all nodes. In any case, the goal is to have a shared datastore for your ESXi hosts – whether via a physical SAN or a virtual SAN approach – if you want high availability and VM mobility.

To visualize it: with shared storage, you might have two ESXi hosts both connected to the same storage array or vSAN datastore. If Host A is running a VM and Host A goes down, Host B can start that VM because Host B sees the same disk files. Or with vMotion, you can live-migrate the VM from Host A to Host B with no downtime, since both hosts can read/write the VM’s disk on shared storage. In contrast, with only local storage, Host B would have no access to Host A’s VMs at all.
In summary, if you are building a VMware environment with more than one host, plan for shared storage from the start. You can begin with something simple (even a networked NAS, or a vSAN trial, etc.) to learn. For a single-host setup (like a home lab on one machine), local storage is fine, but know its limits. Many beginners try to enable vMotion or HA on two standalone hosts with only internal disks and get frustrated when it doesn’t work – now you know why! Shared storage is what ties hosts together into a true cluster.
Thick vs. Thin Provisioning
When creating a virtual machine, you’ll allocate virtual disk space for it. VMware gives you a choice of Thick Provisioning or Thin Provisioning for each virtual disk (VMDK). This setting affects how space is allocated on the datastore and has implications for performance and storage efficiency. Understanding the difference will help you decide which to use for different scenarios.
Thick-Provisioned Disks: If you choose thick provisioning, the full size of the virtual disk is allocated on the datastore immediately (at creation time). For example, if you create a 50 GB thick disk for a VM, the system will right away mark off 50 GB of space on the datastore for that VM – even if the VM only has, say, 5 GB of actual data on it initially. Think of thick as carving out a full chunk of storage for the VM, whether it’s used or not. The benefit is that the space is guaranteed for that VM (you won’t run into out-of-space errors for that disk later because it’s already reserved), and thick disks may have slightly better write performance since the space doesn’t need to be allocated on the fly.
VMware actually has two flavors of thick provisioning:
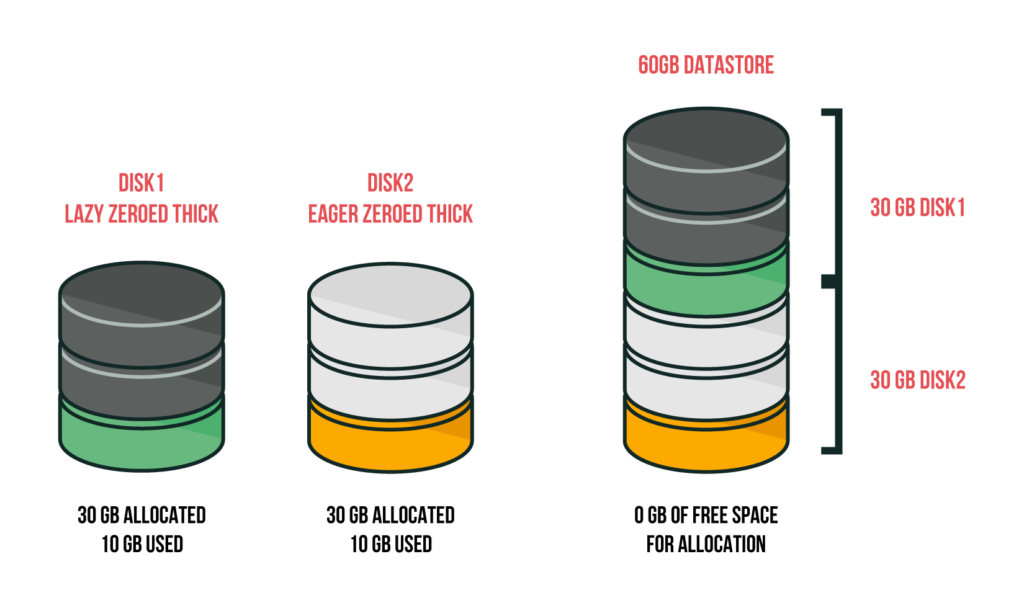
- Lazy-Zeroed Thick: The space is allocated but not zeroed out. This means any blocks on disk that aren’t yet used by the VM might contain old data from previous use. The first time the VM writes to a new block, that block will be zeroed at that moment (hence “lazy” zeroing). Lazy-zeroed thick disks are fast to create since they don’t wipe the blocks in advance. They are fine for many use cases, but note that until a block is written the first time by the VM, it could theoretically contain residual data (which the VM OS won’t see unless it tries to read unused space). In general, the small security concern of residual data makes lazy-zeroed thick less ideal for sensitive environments. Performance-wise, after the first writes, it performs like any thick disk.
- Eager-Zeroed Thick: This type zeroes out all the space at creation time. So if you create a 50 GB eager-zeroed thick disk, VMware will write zeros to all 50 GB, which takes longer initially. The payoff is that the disk is clean (no old data) and ready for optimal performance from the start – every block is pre-zeroed, so writes don’t incur any delay to allocate or clear blocks later. Eager-zeroed thick is required for certain VMware features like Fault Tolerance. It’s the best performing disk type for writes (after the initial creation). Basically, you pay the cost upfront (time to create the disk) for possibly better performance and security.
With either type of thick disk, if you look at your datastore’s usage, you’ll see the full size counted. For example, consider a 60 GB datastore: if you create two thick disks of 30 GB each (even if the VMs inside have only a few GB of data), the datastore will show 60 GB used (30 + 30) because the space is reserved. It’s “thick” in that it’s not flexible – you’ve dedicated that storage to the VM. This guarantees space but can lead to wasted capacity if your VMs don’t actually use all that they’ve been allotted. The figure below (from a VMware diagram) illustrates the concept: one thick disk (Drive E) is fully occupying its 25 GB allocation on the datastore, while a thin disk (Drive F) initially uses 0 GB since nothing is stored yet.
Thick vs Thin Provisioning: With thick provisioning, the entire disk size is occupied on the datastore from the start (e.g., a 25 GB thick disk consumes 25 GB on datastore, even if empty). With thin provisioning, the disk starts small and grows as the VM writes data (e.g., a 25 GB thin disk might initially use only a few MB). In the vSphere UI, a thick disk’s VMDK file shows its full size, whereas a thin disk’s VMDK file shows only the space actually in use.
Thin-Provisioned Disks: If you choose thin provisioning, the idea is allocate on demand. You still specify a maximum size (say 50 GB), but the datastore does not immediately reserve 50 GB. The VMDK file starts very small (just a couple MB for overhead). As the VM inside writes more data, the VMDK grows. If the VM only ever uses 10 GB of its 50 GB disk, the VMDK will only consume ~10 GB on the datastore. This is great for saving space, especially when you have many VMs that won’t all use their full disks. Using thin provisioning, you can often overcommit storage – for example, you could have 10 VMs each with a “100 GB” thin disk on a 500 GB datastore. That’s 1000 GB of virtual capacity on 500 GB physical. It works fine as long as the actual used space across all VMs stays under 500 GB (with some safety margin). Thin provisioning is a form of efficiency: you give VMs room to grow without actually consuming space until needed.

The trade-offs: First, performance. Writing to a thin disk can be slightly slower at times, because if the disk needs to expand, VMware has to find new blocks on the datastore and potentially zero them out before use (similar to lazy-zero delay). On a busy system, if a VM suddenly writes a large amount of data and the VMDK expands, it might experience a bit of latency during that expansion. For most apps this is negligible, but for storage-intensive workloads it could be noticeable. Second, management complexity. Thin disks require monitoring – since you can overcommit, you must keep an eye on actual datastore usage. If the datastore fills up, VMs can pause or crash (a very bad situation) – so you need alerts and discipline to not overcommit too recklessly. VMware has features like datastore space reclamation (UNMAP) to claw back space from thin disks when VMs delete data, but it may not happen automatically in all cases or older OSes. Generally, you might periodically “reclaim” or Storage vMotion VMs to compact thin disks if needed. The key point: thin provisioning is not a set-and-forget tool – you gain flexibility but must manage capacity actively.
Which to use? It depends on your needs:
- If you have plenty of storage and/or need absolute top performance and predictability, you might go with Thick (eager-zeroed) for critical VMs (like a heavy database server). You’ll know the space is allocated and the disk is preinitialized for best write performance.
- If you are constrained on storage or want to maximize utilization, Thin is very useful – especially in dev/test environments or for VMs that won’t use all the space. Many modern deployments default to thin because it’s more efficient and today’s storage (like SSDs) is quite fast to handle expansion. Even some production environments are fine with thin, as long as monitoring is in place.
- A compromise approach some take: use thin provisioning broadly, but for certain high I/O VMs (or those where running out of space would be disastrous) monitor them closely or allocate a bit of headroom. You can even mix: e.g., give a database server a thick disk for its main data and thin disks for less critical volumes.
One more consideration is that thin provisioning can inadvertently lead to fragmentation on the datastore (since the VMDK grows in chunks and might end up non-contiguous). VMware has improved this over the years, but it’s another reason why extremely performance-sensitive workloads sometimes use thick.
In all cases, remember to set up alerts on your datastores. If you thin provision and then forget about it, you might create dozens of VMs and only realize too late that you’re about to run out of physical space. As a best practice, don’t drive your datastores to 100% full – keep some free space (20% or so) to accommodate VM growth, snapshots, etc. If a datastore does fill up, it can be painful to fix (VMs paused, needing to free space urgently).
Lastly, security note: if you have strict policies about data remanence (old data recovery), consider using eager-zeroed thick, because it guarantees that no old data persists on allocated blocks. Thin or lazy-zero thick might briefly have old bits until overwritten (though the guest OS won’t read them normally). In most cases this isn’t a big issue, but it’s worth mentioning for completeness.
VM Snapshots vs. Backups
Beginners often confuse snapshots with backups. After all, both seem to preserve the state of a VM, right? But in VMware (and generally in IT) they serve very different purposes, and using snapshots as backups can be a dangerous mistake.
- VM Snapshots: A snapshot is like a freeze frame of a VM’s state at a given point in time. When you take a snapshot in vSphere, the VM’s disk file is frozen and a new “delta” disk is created to capture changes going forward. Optionally, you can snapshot the VM’s memory and CPU state as well. This allows you to revert the VM to exactly how it was at snapshot time. Snapshots are super handy for short-term use: for example, take a snapshot before applying a patch or upgrading software, so if something goes wrong, you can quickly roll back to the pre-patch state. The key characteristics of snapshots are: (1) They rely on the base VM disks – a snapshot by itself isn’t a full copy of the VM, it’s a delta on top of the original. (2) Snapshots are meant to be temporary (short-lived). VMware even warns that snapshots are not to be kept long term; if left for days or weeks, the delta disks grow and can impact performance or even fill up your datastore. (3) Snapshots reside on the same storage as the VM; they are not a separate backup copy. If the datastore is lost, your snapshots go with it. If you delete the VM (or it gets corrupted), the snapshots are gone too, because they depend on the original files.
- VM Backups: A backup, in contrast, is an independent copy of the VM (or its data) stored elsewhere (often on different storage, e.g. an external NAS, cloud, tape, etc.). Backups are typically taken by specialized software (like Veeam, Commvault, VMware’s own Data Protection or AVV, etc.) that copies the VM’s disk contents to a backup file. You might do full backups, incrementals, etc., and you keep them for a longer period (weeks, months) as part of your disaster recovery strategy. If the original VM or host fails, you can use the backup to restore the VM on any host. The backup exists independently of the source VM – meaning if your entire server room goes up in smoke, your off-site backups are still safe. Backups are for long-term retention and recovery; snapshots are for quick rollback within the same system.
The Golden Rule: Snapshots are not backups. Snapshots do not protect you if the underlying storage dies or if you need to recover the VM to a different environment. They are a convenient operational tool for admins (great for testing changes, etc.), but not a true data protection solution. In fact, using snapshots incorrectly can cause trouble – e.g., running a VM on a snapshot for too long can degrade performance (every read may have to traverse multiple delta files). And if you take many snapshots of a VM and never consolidate them, you risk filling the datastore or encountering very long commit times later.
Best Practices: Use snapshots sparingly and short-term. It’s fine (even recommended) to snapshot a VM before a risky change – and maybe keep it for a day or two until you’re sure the change is stable – but then commit or delete the snapshot. Do not leave snapshots running for weeks. And never assume “oh I have a snapshot, so I don’t need a backup.” They serve different purposes. For backups, set up a proper backup schedule using a tool that integrates with VMware (most modern VM backup tools use the vSphere APIs to snapshot the VM, copy data out, then release the snapshot). This way you get consistent backups without long-running snapshots. Also, test your backups! It’s no use having backups if you can’t restore from them.
In summary, snapshots are for short-term safety net; backups are for disaster recovery. If you mess up something in a VM, a snapshot lets you quickly rewind. But if the storage or VM is gone entirely, only a backup will save you. VMware’s best practices and virtually every expert echo this: “Do not use snapshots as backups”. Instead, implement a real backup regimen and use snapshots only as needed during administrative operations.
Logs and Networking
Two areas that beginners sometimes neglect are logs and networking configuration. These might not be as flashy as vMotion or virtual machines, but they are crucial for a healthy vSphere environment. Let’s tackle them in turn:
Preserve Your Logs (Especially When Booting from USB/SD)
VMware ESXi generates various log files (for the host, VMs, etc.) that are invaluable for troubleshooting. If something goes wrong – say a host crashes or a VM disconnects – the logs are often the only way to diagnose the issue. By default, ESXi will store logs on a scratch partition on disk. But here’s a common scenario: many people install ESXi on a small USB stick or SD card in the server (to save disk bays for data, etc.). When ESXi runs from USB/SD, it often doesn’t have a permanent local disk for scratch, so it uses a RAM disk for logs. This means the logs are in memory, and if the host reboots or powers off, those logs disappear (since RAM is volatile). In other words, if your ESXi is USB-booted and it crashes and reboots, by the time it comes back up, the logs that would show why it crashed are gone – making it much harder to troubleshoot after the fact. This “lost logs” issue has bitten many an admin.
The solution: Configure persistent logging. You have a couple of options:
- Set up a Scratch Location on persistent storage: You can tell ESXi to use a datastore (either local disk or a shared datastore) as its scratch location. This way, logs (and other scratch data like core dumps) get written to real storage that persists across reboots. VMware has a KB and docs guiding how to do this. Essentially, you create a directory on a datastore for each host (often named after the hostname, under a “scratch” folder) and point the host’s ScratchConfig.ConfiguredScratchLocation to it. After a reboot, the host will write logs there instead of to RAM.
- Use a Remote Syslog Server: This is often even easier, especially if you have vCenter. You can configure ESXi to send its logs over the network to a syslog server (for example, vCenter’s built-in syslog, or a third-party syslog server). In vCenter (or in Host Advanced Settings), you set Syslog.global.logHost to a target like udp://<syslog-server-ip>:514 (or TCP/SSL as needed). Once set, the ESXi host will stream logs to that server in real-time. This is great because even if the host crashes, the logs up to the moment of crash are already on another box. Many administrators use vCenter’s built-in log collector or tools like VMware Log Insight (now Aria Operations for Logs) to aggregate logs from all hosts.
Either approach (or both) ensures your logs don’t vanish. Bottom line: don’t ignore logging. Set up persistent logs when installing ESXi, especially if using USB/SD boot. It will save you a lot of headaches when troubleshooting. Also, resist the temptation to disable logging or delete log files to save space – logs don’t typically use much space (unless something’s wrong and they’re spamming, which in itself needs investigation). Keep at least the last few rotations of logs. They’re your black box recorder for the environment.
Lastly, familiarize yourself with where logs are and what they contain (e.g., vmkernel.log for core VMKernel messages, vobd.log for VMware observers like hardware events, hostd.log for management service, and each VM has its own vmware.log, etc.). VMware’s documentation and knowledge base have references on log files. If an issue arises, having logs and knowing which one to inspect can significantly speed up your troubleshooting process.
Plan Your Networking (Segmentation, Redundancy, and the Right Virtual NICs)
Networking in vSphere is just as critical as in the physical world. A common beginner mistake is to set up networking hastily and not realize the impact of certain choices. Here are key points to consider:
Network Segmentation & Design: In a typical VMware cluster, you have different types of network traffic: management (for vCenter/ESXi management interface), vMotion traffic (used when live-migrating VMs between hosts), VM traffic (the networks your VMs use to communicate), possibly storage traffic (if using iSCSI/NFS or vSAN), and maybe Fault Tolerance logging or replication traffic. It’s a best practice to separate these onto different VLANs or even physical NICs. For example, you don’t want your vMotion traffic (which can be high bandwidth and is not encrypted by default) to go over the same network as your VM traffic or management, if you can avoid it. Ideally, management and vMotion are on isolated networks (or VLANs) that regular users can’t access, for both security and performance. vSAN or iSCSI storage traffic usually should be on a dedicated VLAN/subnet as well (with jumbo frames enabled if applicable). By planning this out, you prevent network congestion (e.g., a big vMotion or backup data transfer won’t choke your management network) and reduce security exposure (VMs are on their own VLAN, management on another, etc.).
In practice, this means when you configure your vSwitches or vSphere Distributed Switches, you’ll create multiple port groups (each associated with a VLAN ID or network label). For example: “Management”, “vMotion”, “VM Network 10” (maybe for Prod VMs VLAN 10), “Storage iSCSI” VLAN 20, etc. Each ESXi host should have the same port group names and VLAN IDs configured, so that VMs can move between hosts seamlessly. Consistency is key: if HostA calls it “VM Network 10” on VLAN 10, HostB must have an identical port group name/VLAN, otherwise a VM vMotioned to HostB will disconnect (vCenter will actually prevent the vMotion if it doesn’t find the target network label on the destination). VMware High Availability (HA) also relies on network consistency for VMs after failover. So document your network design and apply it uniformly to all hosts. If using distributed switches (a vCenter-managed switch spanning hosts), it’s a bit easier to maintain consistency, but the planning is still needed up front.
Physical NICs and Redundancy: Most servers have multiple physical NIC ports. You should use them to provide redundancy and bandwidth aggregation. A common setup is to have at least two physical NICs teamed for the management and VM traffic networks, and another two teamed for storage/vMotion networks. If a NIC fails or a switch port goes down, the other NIC in the team can carry on. Additionally, you might use network I/O control or simply separate which NICs carry which types of traffic. For example, dedicate two 10Gb NICs just for vMotion and storage, and another two 10Gb for management + VM traffic (with VLAN separation) – or whatever matches your environment’s needs. The idea is, don’t put everything on a single NIC or single network. If that one link saturates or fails, everything is impacted. By following VMware and general best practices, use at least one dedicated adapter for vMotion (preferably 10Gb for best performance) and similarly isolate iSCSI/vSAN traffic on its own NIC or VLAN. If you have limited NICs, you can share but then use VLANs and maybe network I/O control to prioritize, ensuring (for instance) vMotion doesn’t starve management traffic.
Virtual NIC Types for VMs (VMXNET3 vs E1000): When you create a VM, you also choose the type of virtual network adapter it will use. VMware offers a few, and the choice can affect performance:
- VMXNET3: This is a VMware paravirtualized NIC with no physical counterpart. It requires VMware Tools in the guest OS to provide the driver. VMXNET3 is highly optimized for performance – it supports features like multiqueue, large offloads, etc., and generally has lower overhead and higher throughput than emulated NICs. For any modern OS (Windows 7/Server 2008 or later, modern Linux kernels, etc.), you should use VMXNET3 for the VM’s network adapter to get the best performance. Once you install VMware Tools, the VM will recognize the VMXNET3 device. It can handle very high network speeds (10GbE and beyond) with low CPU usage.
- E1000/E1000e: These emulate an Intel 1 Gbps NIC (the E1000e is a slightly newer chipset than E1000). The big advantage is guest OSes often have built-in drivers (since the Intel PRO/1000 family is very common). So even without VMware Tools, the OS will likely have network connectivity out-of-the-box with an E1000. The downside is that emulation has overhead – every packet has to be processed as if it were real Intel hardware. This uses more CPU, and the throughput isn’t as good as VMXNET3. It’s fine for light workloads or older OS compatibility. A typical use case: when installing an OS from scratch, you might temporarily use an E1000 so it has network during install (if you can’t easily install Tools first), then switch to VMXNET3 after Tools is in. But most of the time, you can just add the VMXNET3 adapter and then install Tools to get it working.
- Others (VLance / PCnet32): VMware also has an emulation of an old 10/100 AMD PCnet NIC (labeled “VLance” in some contexts). This is only used for very old OSes (Windows NT, DOS, etc.) that don’t have drivers for E1000 or VMXNET. It’s rare to use this today. VMware used to have a “Flexible” adapter that would present as VLance until Tools were installed, then morph into VMXNET – but that’s legacy and not needed in vSphere 7/8.
In summary, for nearly all new VMs: choose VMXNET3 as the network adapter type (it’s the default in most cases for modern OS presets in vSphere). This will ensure your VMs can achieve high network throughput with low overhead. Only consider E1000 if you hit a specific compatibility issue or need network before Tools is ready. If you have an OS that for some reason doesn’t support VMXNET3, it might be time to update that OS if possible, because VMXNET3 has been around a long time.
Network Consistency and Troubleshooting: Always double-check your network setup whenever things aren’t communicating. Simple issues like a wrong VLAN tag, a typo in a port group name, or a physical cable plugged in the wrong port can cause big problems (like VMs not being reachable or a host being isolated). Use the vSphere Client’s Networking view to ensure each host has the expected NICs assigned to each switch/port group. If using standard vSwitches, make sure you replicate any changes to all hosts (or use host profiles to enforce consistency). If using distributed switches, maintain the uplinks and port group configs at the dvSwitch level so they propagate to hosts.
One more tip: Label your physical NIC connections and document which NIC (vmnic0, vmnic1, etc.) goes to which physical switch and which network/VLAN. In an outage, you don’t want to be guessing which NIC is which. For example, vmnic0 & vmnic1 might be teamed for MGMT/VM traffic (connecting to Switch A and B on VLAN 10,20), vmnic2 for vMotion (Switch A VLAN 110), vmnic3 for vMotion (Switch B VLAN 110) in failover, etc. It gets complex, but a clear diagram or spreadsheet of your network design will help immensely.
In essence, treat your virtual network with the same care as a physical network. Plan IP ranges, VLANs, subnet masks, and gateway settings for management and VM networks. Isolate critical traffic. Provide redundancy (multiple NICs, multiple switches if possible). And keep things consistent across hosts. This ensures that features like vMotion and HA, which depend on network connectivity, will function reliably when you need them.
Lastly, as you grow, consider using vSphere Distributed Switches (available in Enterprise Plus or vSphere 7 Essentials+, etc.) – they simplify management of networking across hosts. Also, keep security in mind: VMware port groups can enforce policies (like blocking promiscuous mode, forged transmits, etc.) – typically the defaults are fine, but be aware if you have any special VM that might need those (like certain network monitoring VMs). For most beginners, those won’t come into play initially.
Conclusion
Starting out with VMware can be daunting, but it’s a rewarding journey once you get the hang of it. In this guide, we covered six fundamental areas that every VMware beginner should know:
- VMware Components: Understanding vSphere, ESXi, vCenter, and the Client – the building blocks of VMware’s virtualization platform – and how they work together.
- Licensing Changes: The status of the free ESXi hypervisor and VMware’s move to subscriptions in 2024, plus the partial reversal that brought back a free option in 2025. Always keep an eye on licensing for the tools you use.
- Shared vs. Local Storage: Why using shared storage is crucial for unlocking vSphere features like vMotion and HA, and how technologies like vSAN or other SDS solutions can give you shared storage without traditional SAN hardware.
- Disk Provisioning (Thick vs. Thin): How your choice affects storage usage and performance, helping you plan VM disks wisely (thin for efficiency in many cases, thick for absolute performance or predictability when needed).
- Snapshots vs. Backups: Recognizing that snapshots are a short-term safety net, not a true backup solution. Implementing proper backups is non-negotiable for protecting your VMs in the long term.
- Logs and Networking: Setting up persistent logging so you don’t lose vital troubleshooting data, and designing your virtual network with segregation and consistency (and using the right virtual NIC types) to avoid bottlenecks or outages down the road.
By mastering these basics, you’ll avoid many common pitfalls that new VMware users face. Remember, everyone starts somewhere – even the VMware experts. The key is to keep learning and don’t be afraid to ask for help. The VMware community (forums, blogs, user groups) is very active and welcoming to beginners. If you’re ever stuck or curious, a quick search or question to fellow VMware users often goes a long way.
As you grow more comfortable, you can explore advanced topics like distributed switches, resource pools, automation with PowerCLI, and hybrid cloud integration. But none of those make sense without a solid foundation. So focus on getting these fundamentals right. Build one step at a time: maybe start with a single ESXi host, get a VM running, then add vCenter, then experiment with a second host and vMotion, and so on. It’s a hands-on field – the more you practice, the more confident you’ll become.
Good luck on your VMware journey, and happy virtualizing! By understanding the core concepts and following best practices, you’ll be well on your way to building a robust and efficient VMware environment that can support your goals. And most importantly – enjoy the process of learning this powerful technology. VMware has a bit of a learning curve, but the payoff is worth it in the flexibility and capabilities you gain in managing IT infrastructure. Welcome to the world of virtualization!
