StarWind Virtual SAN® Creating VVols HA Datastore with StarWind Cluster
Download PDFIntroduction
This guidance will tell you how to configure HA VVols Datastore registering the StarWind VASA Provider in VMware vCenter Server and thereby facilitating communication between vCenter and the Storage. The paper will walk you through the creation of the HA Datastore using WMI and describe how to create a VVols Datastore to the vCenter.
vSphere Storage APIs for Storage Awareness (VASA) – a set of application program interfaces that supplies information for the VMware ecosystem. This integration allows to configure StarWind Virtual SAN resources as storage containers for virtual machines and provide more efficient management for the architecture simplifying storage provisioning and consumption.
This guide is intended for experienced VMware and Windows system administrators and IT professionals who would like to configure StarWind HA VVols Datastore for vSphere deployments. It also provides a step-by-step guidance describing how to register StarWind VASA Provider in VMware vCenter Server to convert local storage of the ESXi hosts into StarWind HA VVols Datastore for ESXi.
A full set of up-to-date technical documentation can always be found here, or by pressing the Help button in the StarWind Management Console.
For any technical inquiries, please visit our online community, Frequently Asked Questions page, or use the support form to contact our technical support department.
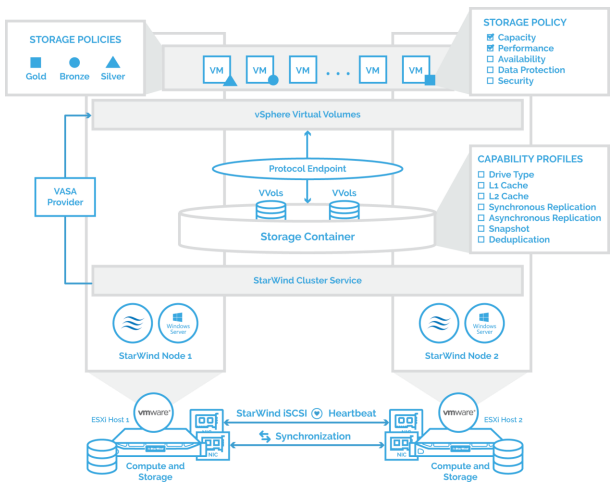
Solution Diagram
The below picture illustrates the interconnection diagram of the feature described in the guidance below.
Installing StarWind Cluster Service and creating targets
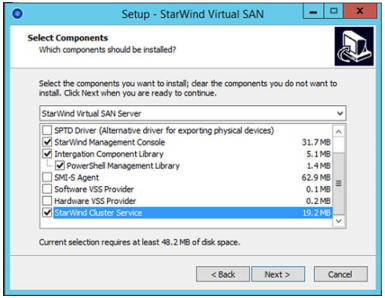
1. To install StarWind Cluster Service, launch StarWind Virtual SAN setup and choose components specified on the screenshot below.
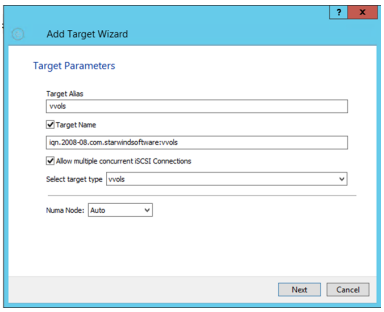
2. Create 2 VVols-type targets on both StarWind nodes.
NOTE: Target aliases have to match on both nodes.
Configuring StarWind HA Datastore
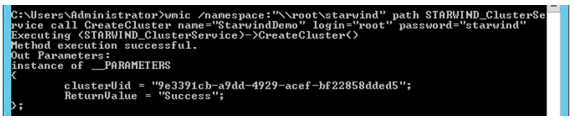
1. Log into StarWind VM Controller under user with administrator rights and open command prompt.
2. To create the cluster, run the following command in the cmd specifying cluster name:
wmic /namespace:”\\root\starwind” path STARWIND_ClusterService call
CreateCluster name=”StarwindDemo” login=”root” password=”starwind”
NOTE: make sure to save the clusterUid value received once the command is executed to a text file, as you will need it further in the guide.
3. To add nodes to the StarWind cluster, use the following commands:
For the first node:
wmic /namespace:”\\root\starwind” path STARWIND_ClusterService call
BindStorageNode name=”HA Node 1″ ipAddress=”192.168.1.211″ login=”root”
password=”starwind” port=”3261″ description=”HA Node 1 Desc”
Specify the IP address of the first node and save the storageNodeUid value to the previously mentioned text file.

For the second node:
wmic /namespace:”\\root\starwind” path STARWIND_ClusterService call
BindStorageNode name=”HA Node 2″ ipAddress=”192.168.0.144″ login=”root” password=”starwind” port=”3261″ description=”HA Node 2 Desc”
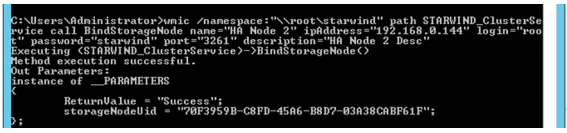
Specify the IP address of the second node and save the storageNodeUid value to the previously mentioned text file.
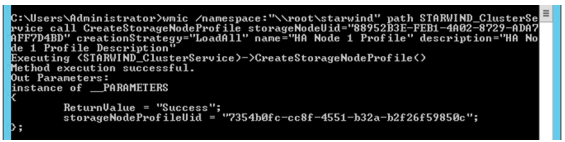
4. Create profiles for the storage nodes. Each node’s profile specifies resources allowed to be used, as well as the purpose of the network interfaces used. Execute the following commands:
For the first node:
wmic /namespace:”\\root\starwind” path STARWIND_ClusterService call
CreateStorageNodeProfile storageNodeUid=”88952B3E-FEB1-4A02-8729-ADA7AFF7D4BD” creationStrategy=”LoadAll” name=”HA Node 1 Profile” description=”HA Node 1 Profile Description”
Specify the storageNodeUid of the first node and save the storageNodeUid value to the previously mentioned text file.
For the second node:
wmic /namespace:”\\root\starwind” path STARWIND_ClusterService call
CreateStorageNodeProfile storageNodeUid=”70F3959B-C8FD-45A6-B8D7-03A38CABF61F” creationStrategy=”LoadAll” name=”HA Node 2 Profile” description=”HA Node 2 Profile Description”
Specify the storageNodeUid of the second node and save the storageNodeUid value to the previously mentioned text file.

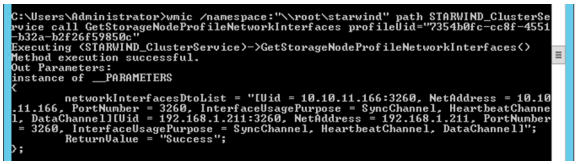
5. Configuring the purposes of the network interfaces.
5.1 Network interfaces can be used for the following purposes: SyncChannel, HeartbeatChannel, DataChannel. The current implementation has a requirement that prohibits creating multiple SyncChannel or HeartbeatChannel network interfaces within a single profile.
NOTE: Network SyncChannel or HeartbeatChannel usages cannot repeat in a single profile.
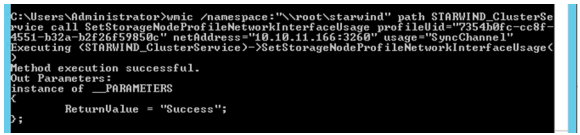
5.2 Run the next command specifying the storageNodeUid to see the current purposes of the network interfaces:
wmic /namespace:”\\root\starwind” path STARWIND_ClusterService call
GetStorageNodeProfileNetworkInterfaces profileUid=”7354b0fc-cc8f-4551-b32ab2f26f59850c”
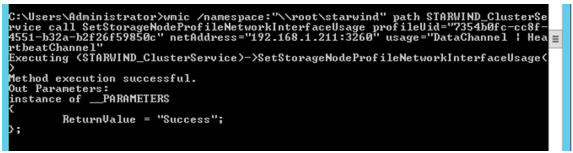
5.3 On the first node configure one interface to be the HeartbeatChannel and Datachannel. Then, configure the second interface to be the Sync Channel.
The first interface:
wmic /namespace:”\\root\starwind” path STARWIND_ClusterService call
SetStorageNodeProfileNetworkInterfaceUsage profileUid=”7354b0fc-cc8f-4551-b32ab2f26f59850c” netAddress=”192.168.1.211:3260″ usage=”DataChannel | HeartbeatChannel”
Specify the necessary profileUid and IP address.
 The second interface:
wmic /namespace:”\\root\starwind” path STARWIND_ClusterService call
SetStorageNodeProfileNetworkInterfaceUsage profileUid=”7354b0fc-cc8f-4551-b32ab2f26f59850c” netAddress=”10.10.11.166:3260″ usage=”SyncChannel”
Specify the necessary profileUid and IP address.
5.4 Repeat step 7.3 on the second node specifying the necessary profileUid and IP address.
Creating Datastore
1. Run the following command to create a datastore:
wmic /namespace:”\\root\starwind” path STARWIND_ClusterService call
CreateDatastore name=”TestDatastore” sizeInMb=”97280″ storageNodeProfileUid=”7354b0fc-cc8f-4551-b32a-b2f26f59850c”
capabilityProfileUid=”4E19F23A-0A84-486C-A516-DF96140C8000″
Specify the datastore name, size in MB, and the storageNodeProfileUid of the first node. Set capabilityProfileUid equal to “4E19F23A-0A84-486C-A516-DF96140C8000” – this is the HA profile.
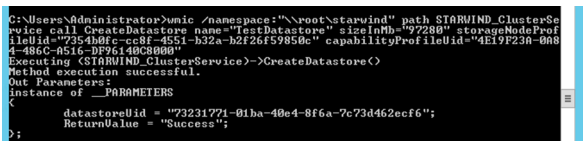
Save the datastoreUid to the previously mentioned text file.
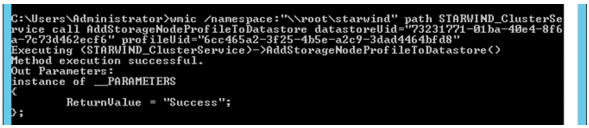
2. Add the second node to the datastore:
wmic /namespace:”\\root\starwind” path STARWIND_ClusterService call
AddStorageNodeProfileToDatastore datastoreUid=”73231771-01ba-40e4-8f6a-7c73d462ecf6″ profileUid=”6cc465a2-3f25-4b5e-a2c9-3dad4464bfd8″
Specify the storageNodeProfileUid of the second node and datastoreUid received in the previous step.
Binding VASA Provider
1. The Vasa Provider can be bound to the MAC address of the network interface card or a Hostname.
NOTE: if using the hostname, the StarWind VM should be joined to a domain.
2. Run the following command to bind Vasa Provider to the MAC address.
wmic -namespace:\\root\starwind path STARWIND_ClusterService call ResetVASA bindToInterfaceMAC=<target MAC>
Specify the NIC MAC address of the StarWind VM that will be used to register with the vCenter.

3. If using the Hostname, run the following command:
wmic -namespace:\\root\starwind path STARWIND_ClusterService call ResetVASA
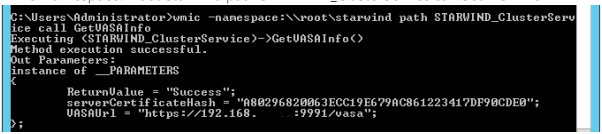
4. Run the following command to get the URL required to register the VASA Provider:
wmic -namespace:\\root\starwind path STARWIND_ClusterService call GetVASAInfo
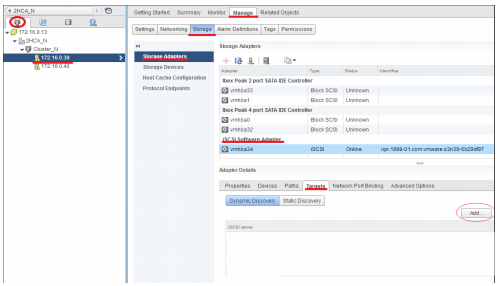
Configuring iSCSI-connections
1. Log into the vCenter Server using the vSphere Web Client.
2. Connect the iSCSI Targets, created in step 2, to the ESXi hosts: add the IP addresses of StarWind nodes on each ESXi host. In our case, they are 192.168.1.211 and 192.168.0.144.
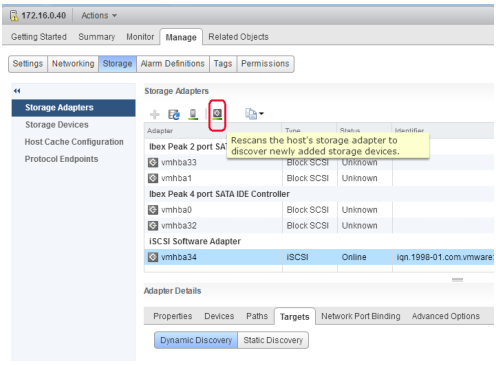
3. Re-scan Storage Adapters.
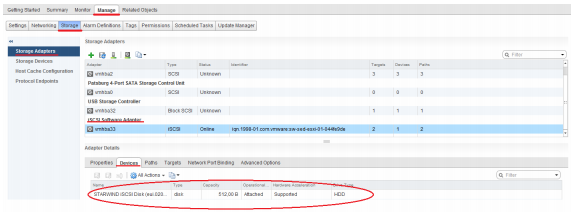
4. Check for STARWIND iSCSI Disks on each ESXi host.
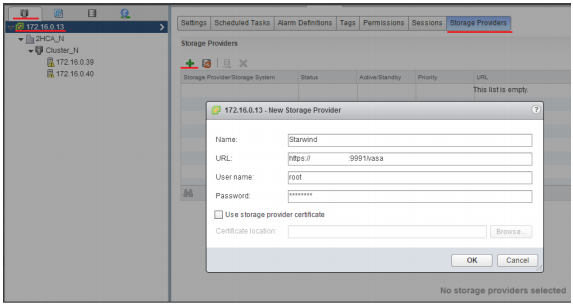
Registering StarWind VASA Provider with VCenter
1. To register StarWind Storage Provider, click Storage Providers and enter VASA URL you received in step 13. To fill the User name and Password fields, enter the data used in step 4, when the cluster was created.
2. Accept the certificate and verify that the Provider has been successfully registered.

Creating VVols Datastore
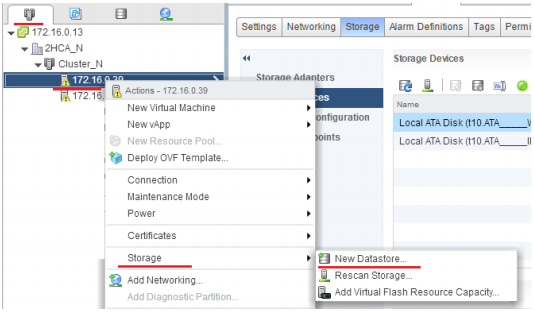
1. Right-click the server and select Storage > New Datastore from the drop-down menu.
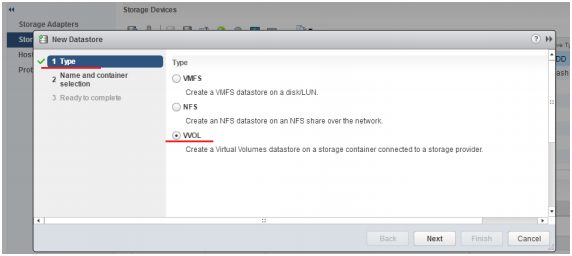
2. Choose the Datastore Type- VVOL. Enter the new VVols Datastore name and click Finish.
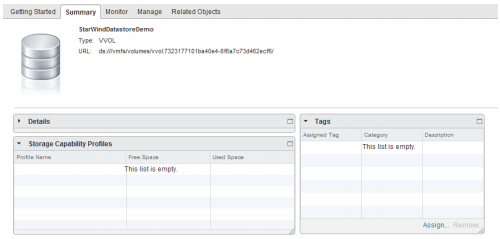
3. The Datastore is successfully created.
Capability profiles
StarWind VVOLs allows you creation of two capability profiles. There are only standalone embedded preconfigured profile and highly available one.
Capability profiles define performance and capacity specifications of the VVols datastores. Such information as type of storage, caching and provisioning method can be found at profiles. For StarWind VVols datastores, these characteristics are based on storage devices. When a virtual volume is created, it is assigned a storage policy profile. The VVols datastore will show as compatible storage in vCenter or the vSphere Web Client if the associated capability profiles meet VMware storage policy requirements.
IMPORTANT NOTE: Capability profiles has to be created before you can create a VVols datastore.
StarWind supports this list of Capabilities:
• Drive Type
• L1 Cache
• L2 Cache
• Synchronous Replication
• Asynchronous Replication
• Snapshot
• Deduplication
Create Storage Policy
1. In the center panel, click the VM Storage Policies icon.
2. In the center panel, review the storage policies created by default and click the Create new VM storage policy icon.
3. In the Create New VM Storage Policy window, click the vCenter Server drop-down menu and select your assigned VMware vCenter Server name.
4. In the Name text box, specify the name for Policy and click Next.
5. On the Rule-Sets page, click Next.
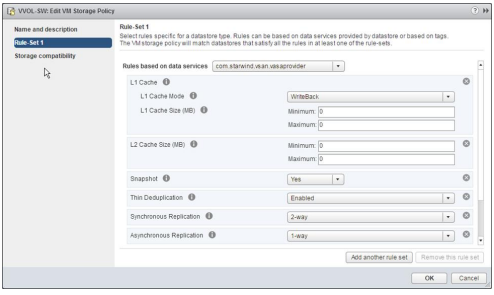
6. Configure the virtual machine storage policy.
7. On the Rule-Set 1 page, click the Rules based on data services drop-down menu and select the assigned virtual volume service provider.
8. Click the Add rule drop-down menu and select capability that you want to use.
9. Repeat if you want to add additional of capabilities.
10. Click Next.
11. Click Finish.
Deploying Virtual Machine with Storage Policy
1. In the center panel, click the VMs and Template icon.
2. In the left panel, right-click your data center and select New Virtual Machine > New Virtual Machine.
3. On the select storage page, click the VM Storage Policy drop-down menu and select the preferred policy configured earlier. The virtual volume datastores are the only compatible storage options.
4. In the datastore list, select StarWind VVOL datastore and click Next.
5. On the Ready to complete page, click Finish.
6. After virtual machine creation task is completed, in the left panel, select earlier configured virtual machine.
7. In the center panel, scroll down to show the VMStoragePolicies panel. The virtual machine is in compliance with its storage policy.
Troubleshooting
To reset StarWind target settings and delete all devices you should run this command in cmd shell with administrator rights inside StarWind VM:
C:\Program Files\StarWind Software\Starwind\starwind_reset.cmd
In order to recreate the VASA Provider and all certificates for it you should use one of these commands. There are two ways how to VASA Provider can be registered – by IP address or by DNS name. Also, it would be needed to register VASA provider at another vCenter.
If you want to use IP address or you don’t have Active Directory service running, you should run this command in cmd shell with administrator rights inside StarWind VM (Before this you need to get know MAC address of management NIC):
wmic -namespace:\\root\starwind path STARWIND_ClusterService call ResetVASA BindToInterfaceMAC=<TargetMAC>
In case if you have Active Directory, service implemented in your infrastructure you should use domain name. Add StarWind VM to Active Directory and use domain name for the Storage Provider registration. To reset VASA Provider by name, you should run this command in cmd shell with administrator rights inside StarWind VM:
wmic -namespace:\\root\starwind path STARWIND_ClusterService call ResetVASA
Also, there is command to get know information of VASA Provider – URL, certificate:
wmic -namespace:\\root\starwind path STARWIND_ClusterService call GetVASAInfo
