Introduction To SQL Server Clustering
Clustering SQL Server provides a very reliable high availability solution which will allow your SQL Server database to survive a server hardware failure or system reboot. While this makes your system much more complex to configure, in the long run the benefits will out way the costs.
Setting up a SQL Server Cluster requires using shared storage, provided by either a fibre channel or iSCSI SAN, or a software iSCSI target such as StarWind Software’s StarWind Enterprise Server. When using Windows 2003 or older as the OS to cluster on a shared SCSI array can be used, however that option is no longer available beginning with Windows 2008 as Windows 2008 no longer supports clustering using SCSI disks.
SQL Server Clustering provides some additional benefits beyond the hardware redundancy. Within SQL Server 2008 you get the additional benefit of rolling upgrades. This feature allows you to upgrade the SQL Server engine with a minimal amount of downtime, usually just a few seconds instead of the 15-30 minute outage which is required when patching older versions of SQL Server which have been installed in a cluster. A key concept to remember about SQL Server Clustering is that clustering does not provide additional resources for the SQL Server Service. Clustering is only a high availability solution and does not increase the available resources of your instance. There are third party solutions which can provide this functionally, however this functionally is beyond the scope of this paper.
While clustering does not require that the servers which you cluster to be matching hardware, using matched hardware makes the configuration easier. It also removes the requirement of configuring failback. This is because the SQL Server can be left running on either node of the cluster as each node has the same resources available. When using unmatched hardware you’ll need to configure auto failback so that the SQL Server fails back to the more powerful node of the cluster. If you don’t want to configure auto failback you’ll want to make sure that you manually fail the services back to the more powerful node after the system has come back online. Auto failback saves you from having to make this change manually; however it will restart the SQL Services when it automatically fails back.
When the SQL Service fails over from one node to another either do to a failure or some sort, or do to a manual service move from one node to another the move is not seamless. The migration of the SQL Service requires a normal start of the SQL Server service at which point the SQL Server goes though it’s normal startup procedure complete with transaction roll forward and rollback.
Each service that you cluster will be placed within its own application group (called resource groups in Windows 2003). When configuring your storage, each application group must have at least one shared hard drive assigned to it. The default network name will have the Quorum drive which is where the cluster will store its settings, and some log information. Most typically the quorum drive is given the drive letter Q. Because of this the Q drive will automatically be assigned as the quorum. If there is no Q drive, then the cluster wizard will select another drive to use. You can change the quorum drive later after the cluster configuration has been completed. The quorum drive typically only needs to be 1 Gig in size.
Software Requirements
In order to cluster SQL Server you have to meet some specific software requirements. The operating system must be Enterprise Edition or Data Center edition. When clustering SQL Server 2005 or SQL Server 2008, Windows 2003 or newer must be used.
Configuring the SQL Server for clustering starts with clustering two Windows 2003 or Windows 2008 Enterprise Edition or Datacenter Edition servers. In order to setup a two node cluster you can use SQL Server Standard or Enterprise Edition. In order to setup SQL Server on a three node or larger cluster you must use SQL Server Enterprise Edition. SQL Server 2005 supports being installed on a 4 node cluster, which SQL Server 2008 supports being installed on an 8 node cluster.
When setting up your shared storage, in order to ensure that you always have access to your network storage you should configure multiple paths to the storage. In a fibre channel SAN this is done by installing two or more HBAs into the server. In an iSCSI SAN this is done by installing two or more NICs into the server and configuring Windows to use them to access the storage. In order to use multiple paths from the server to the storage you’ll need some sort of multipathing software. Windows 2008 includes some native multipathing software which you can use. If you are using Windows 2003, you will need a third party multipathing software such as EMC’s PowerPath, FalconStor’sDynaPath, etc.
Network Design
A typical Windows cluster will have at least two physical networks. One is the public network which clients use to access the network resources of the cluster. The second is a private network, typically using a different IP subnet which the cluster uses as its heartbeat network. The heartbeat is used by the cluster to determine if the other nodes of the cluster are online or offline. In a two node cluster you can use a crossover cable between the servers, or a network switch. In a cluster larger than a two node cluster you have to use a network switch as each server needs access to each other server over this network.
Setting up clustering requires setting up multiple IP addresses per server, as well as additional network names. Setting up a basic Windows cluster requires 3 network names, two for the physical servers and one for the cluster as well as 5 IP addresses, two for the public IP addresses for the physical servers, two for the heartbeat IP addresses for the physical servers, and one for the cluster itself.
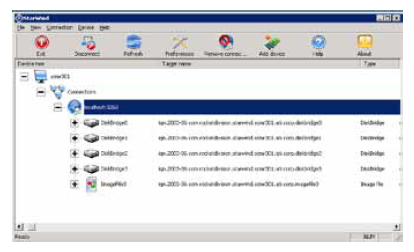
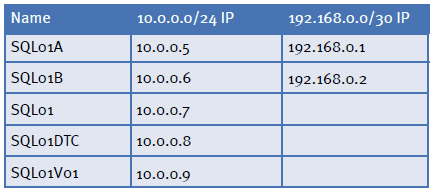
When setting up your cluster you’ll want to use care for your server names. Using sequential server names works fine for standalone servers, however when clustering you’ll find that this can get very confusing very quickly as you’ll end up with non-sequential names all being part of the same cluster. In the example shown below you’ll notice some specific names used when setting these machines up. The physical machines are named SQL01a and SQL01b. The cluster itself is named SQL01. Each instance of SQL Server has its own name and IP address with the first called SQL01V01, and the second called SQL01V02, etc.
If you will be using DTC on your cluster you’ll need an additional network name and IP Address for the cluster. For the DTC hostname we’ll be using SQL1DTC.
In our examples the LAN will be using the 10.0.0.0/24 network address space, and the heartbeat subnet will be using the 192.168.0.0/30. You can refer to the chart below to see how all 6 IPs and 4 network names are assigned. As you can see in the chart each network name gets its own IP address in the 10.0.0.0 subnet. The physical servers also get IP addresses on the 192.168.0.0 subnet.
When configuring the networking on the server prior to clustering the servers setup the NICs as you normally would with the 10.0.0.5, 10.0.0.6, 192.168.0.1 and 192.168.0.2 IP addresses. The other IP addresses will be configured through the cluster setup wizard, or the failover cluster administrator, or the SQL Server installer.
Clustering Windows
Each version on Microsoft Windows makes setting up Windows Clustering even easier. Windows 2008 is no exception. After installing Windows 2008 you need to install the failover cluster feature. This is done from the Server Administrator, by selecting the Add Feature link. Select the Failover Cluster item from the feature list and click next through the wizard.
If you wish to use MSDTC on your cluster from the Server Administrator select the Add Role link and select Application Server from the list and click next. On the next screen select Distributed Transactions which will select Incoming Remote Transactions, Outgoing Remote Transactions and WS-Atomic Transactions. You can select or unselect any of these items that you wish so that only the features which will be used will be installed.
After these steps have been performed on all the nodes in the cluster you can begin the process of configuring the cluster.
From the Administrative Tools folder select the Failover Cluster Manager. This will allow you to create a new cluster. This will run you through a wizard which prompts you for the nodes which will be in the cluster. The second screen will prompt you for the name and IP address which the cluster will respond on for management requests. In this case we’ll use SQL01 for the name and 10.0.0.7 as the IP Address.
The next screen confirms that cluster configuration, and the last creates the cluster with the configuration settings you have specified.
Clustering MSDTC
After setting up the basic Windows Cluster you can cluster MSDTC. To do this open Failover Cluster Administrator again and connect to the cluster. Right click on the Services and Applications menu and select Configure a Service or Application. Select Distributed Transaction Coordinator from the list and select next. Enter a network name and IP address which will be used to access MSDTC. The next screen will ask you which disk should be used by MS DTC to store its data. This disk only needs to be about 1 Gig in size.
Clustering SQL Server
In order to install SQL Server in a Cluster you must install a new instance. You cannot convert an existing standalone instance into a clustered instance.To install SQL Server in a cluster launch the SQL Installer from the SQL Server 2008 DVD via the SQL Server Installation Center. Instead of selecting the standalone installer, select the clustered installer. The bulk of the screens are the same between the normal installer and the clustered installer. Once you get past the disk space requirements screen, is where some new screens are added.
The first of the new screens is where you select or create the Cluster Resource Group that the service will be configured in. It is recommended that you name the resource group to match the network name which the SQL Server will respond to.
This will make it easier to identify which network name is hosting which SQL Service. The next screen allows you to select the disks which the SQL Server will host its data on. If you don’t configure the SQL Service to be dependent on the disks then SQL won’t allow you to put files on the disk.
The next screen allows you to configure the network name and IP Address that the service will listen on. This is a unique network name and IP address on your network. If you are using DHCP to assign IP Addresses to your servers, then you can select to use DHCP for the SQL Server instance as well. If you have static IP addresses for the nodes, then you must use a static IP address for the SQL Service.
The next screen is the Cluster Security Policy screen. This allows you to use service SIDs or a domain groups to control resource permissions. When using Windows 2008 as the operating system using service SIDs is recommended. When using Windows 2003 use of domain groups is required.
The remainder of the screens in the installer are the same as when running the standalone installer. After you have completed the SQL Installer the SQL Instance and any other services which are selected for installation will be installed on that node. In order to install SQL on the other node of the cluster you will need to run the installer on those nodes. This is not the same installer that was used on the first node, there is a separate installer for installing SQL on the other nodes in the cluster. This installer can be found by using the “Add node to a SQL Server failover cluster installation” option in the SQL Server Installation Center.
This installer is much like the normal cluster installer, just much shorter. It asks you which instance on the cluster you will be installing. After which the installer checks that all the needed patches are installed, and that the server is ready to have SQL Server installed on it. Once the SQL Server Service has been installed on all the nodes in the cluster you can manually fail the service back and forth between the nodes.
Conclusion
At this point your cluster is ready for use. You now have a high availability solution which is ready to keep your databases online 99.9% of the time, if not more.