StarWind Virtual SAN® Automating Management with SMI-S in System Center Virtual Machine Manager 2016
Download PDFIntroduction
With the increasing popularity of private cloud infrastructures, automation of storage and hypervisor management becomes even acuter.
To provide the utility for managing Hyper-V virtual machines, Microsoft has released System Center Virtual Machine Manager (SCVMM). This functionality has been initially introduced in SCVMM 2012 SP1 as well as the support of SMI-S standard. Now, the VMM console allows users creating, removing, marking, formatting, assigning, and connecting disks to the Hyper-V hosts. Originally, these tasks were performed via utilities provided by the storage array manufacturers with complicated management.
Storage Management Initiative – Specification (SMI-S) is a standard of disk storage management. SMI-S is based on the Common Information Model (CIM) open standard, Common Information Model (CIM), and the Web-Based Enterprise Management (WBEM) technology. SMI-S is certified as an ISO standard and is supported by many storage system vendors.
SMI-S is fully supported in Windows Server 2016 by the Storage Spaces functionality. Storage Spaces enables the use of SMI-S in PowerShell scripts for automation.
Disk array manufacturers also have to ensure SMI-S support by their products. They typically provide a so-called SMI-S provider or an «agent» that mediates the communication between an SMI-S client and a server storage array. An SMI-S client is connected to the SMI-S provider via CIM-XML protocol, while the SMI-S provider itself can use proprietary interfaces to manage the disk array.
Installing and Configuring StarWind SMI-S Agent
StarWind offers free SMI-S provider for storage management called StarWind SMI-S Agent.
1. To install the latest version of which is fully compatible with SMI-S provider, download the StarWind setup executable file from the website by following this link:
https://www.starwindsoftware.com/starwind-virtual-san#Hyper-V
2. Launch the downloaded setup file on the server where StarWind Virtual SAN or one of its components should be installed. The setup wizard will appear.
3. Read and accept the License Agreement. Click Next to continue.
4. Carefully read the information about new features and improvements. Red text indicates warnings for users who are updating existing software installations. Click Next to continue.
5. Click Browse to modify the installation path if necessary and Click Next to continue.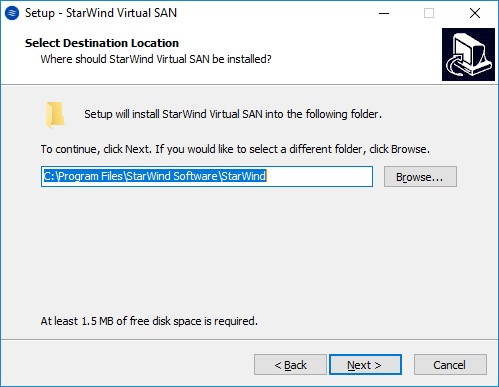 6. Select the required components for the minimum setup including SMI-S Agent as shown in the screenshot below, and click Next to continue.
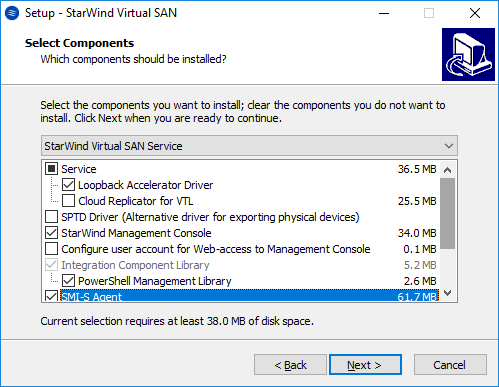 7. Specify Start Menu folder and click Next to continue.
8. Enable the checkbox Create a desktop icon if needed. Click Next to continue.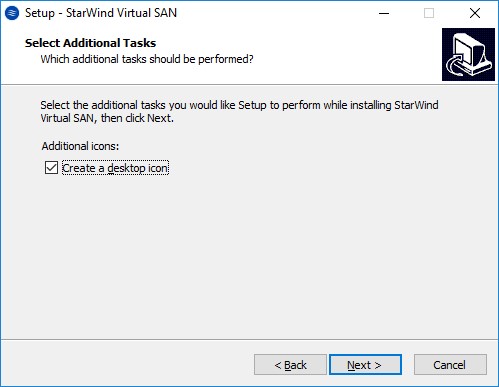 9. Check the components to install and click the Install button.
10. The installation wizard will ask you to configure the SMI-S Agent. This step can be skipped to complete the components installation. 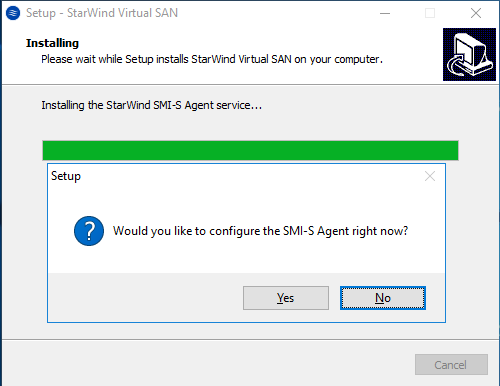 After StarWind SMI-S Agent is installed, it can be configured with StarWind SMI-S Configurator.
11. StarWind SMI-S Configurator can be launched from the Start menu. Alternatively, press Win + R, type StarWindSMISConfigurator in the Run window, and click OK.
12. The StarWind SMI-S Configurator window will appear.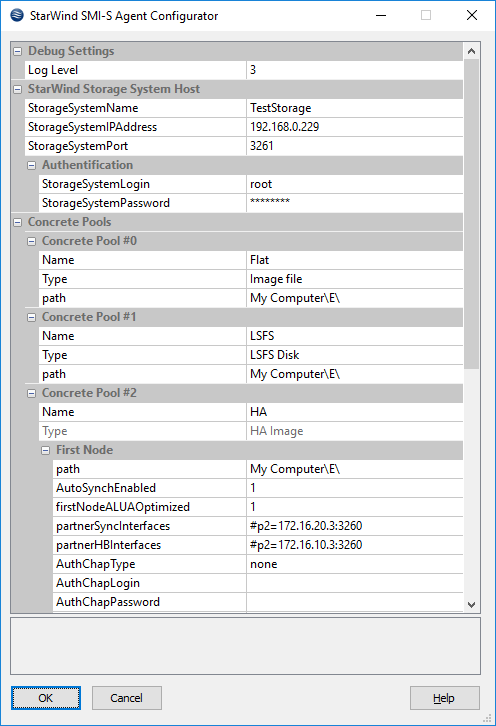 13. In the StorageSystemName text field, specify the name for a disk array, e.g. TestStorage.
14. Specify the address of the host running the StarWind service.
15. Leave the number in the StorageSystemPort field unchanged.
NOTE: StarWind service management Port (3261) and the Port 5988 which provides access to StarWind SMI-S Agent should be free.
16. In the path fields, specify correct paths to folders where StarWind disk device images will be stored.
NOTE: When fill in the path fields, use the same format as the one used for the creation of virtual devices in StarWind Management Console.
17. Click OK to apply the settings.
NOTE: By default, there is no password to access StarWind SMI-S Agent. To change these settings, modify the cimserver_planned.conf file located in the installation folder of StarWind SMI-S Agent. Add the following command line to the file:
|
1 |
enableAuthentication = true |
Save the file and restart the StarWind SMI-S Agent service. Then, add the following to the command line:
|
1 |
cimuser-a-u <username>-w <password> |
The <username> field should be filled in with the name of the existing account on the host that runs StarWind SMI-S Agent.
Connecting SMI-S provider to SCVMM 2016
To enable disk array management using VMM, connect the appropriate SMI-S provider.
1. Click the Add Resources button on the toolbar of the SCVMM console.
2. Select Storage Devices.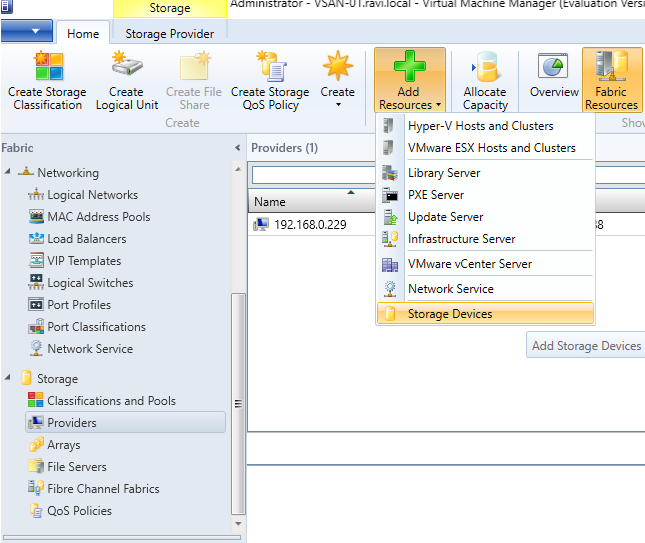 3. Specify the type of the storage provider. Select the SAN or NAS devices discovered and managed by a SMI-S provider radio button.
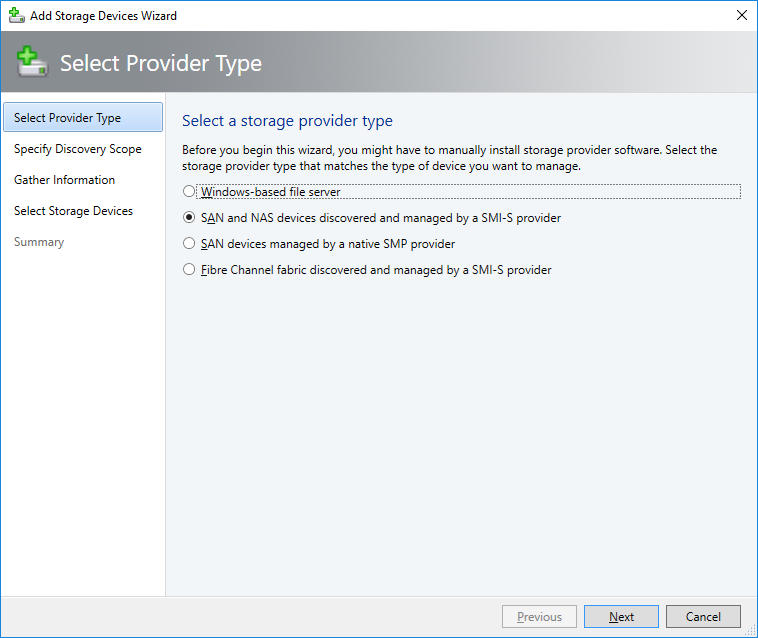 4. Select SMI-S CIMXML protocol and enter the address of the host where StarWind SMI-S Agent is running.
5. Specify the user name that will be used by VMM for authorization on StarWind SMI-S Agent. If there is no appropriate user, create it by clicking the Browse button.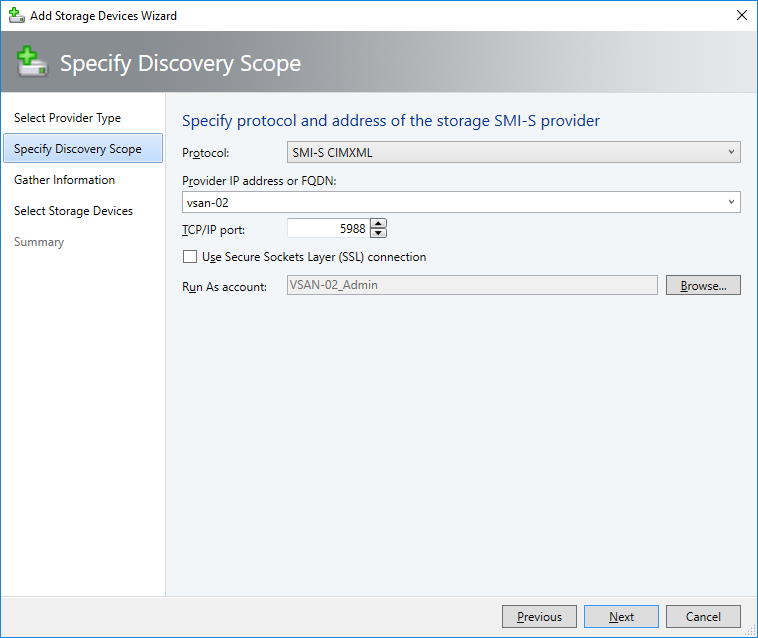 6. If the wizard succeeds in connecting to the provider, it will show all available disk arrays. The image below illustrates that the wizard has detected the StarWind storage device called TestStorage.
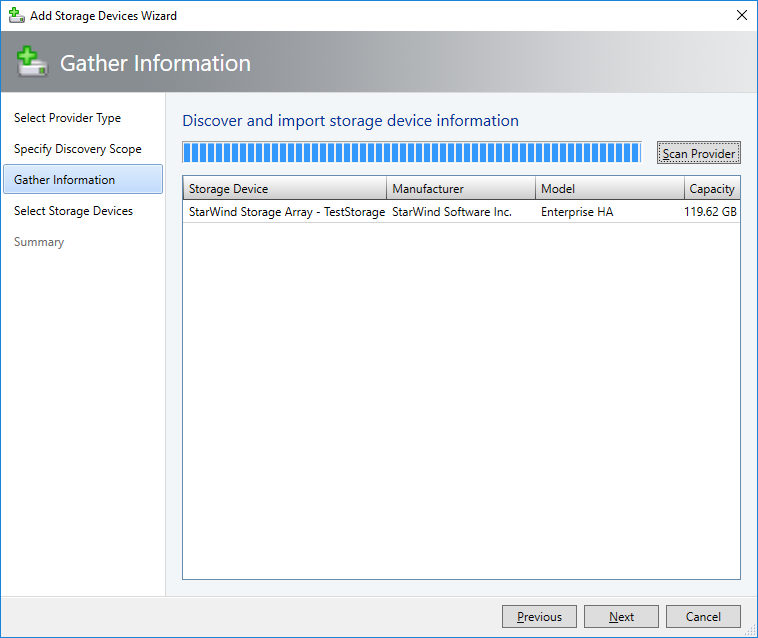 7. Click Next and select the pools to be assigned to VMM. Each selected pool has to be classified. If there are no classification options yet, click Create classification to carry out the required action.
 8. Summary displays the information regarding disk array, provider, and pools to be managed by VMM. Confirm the specified settings by clicking Finish.
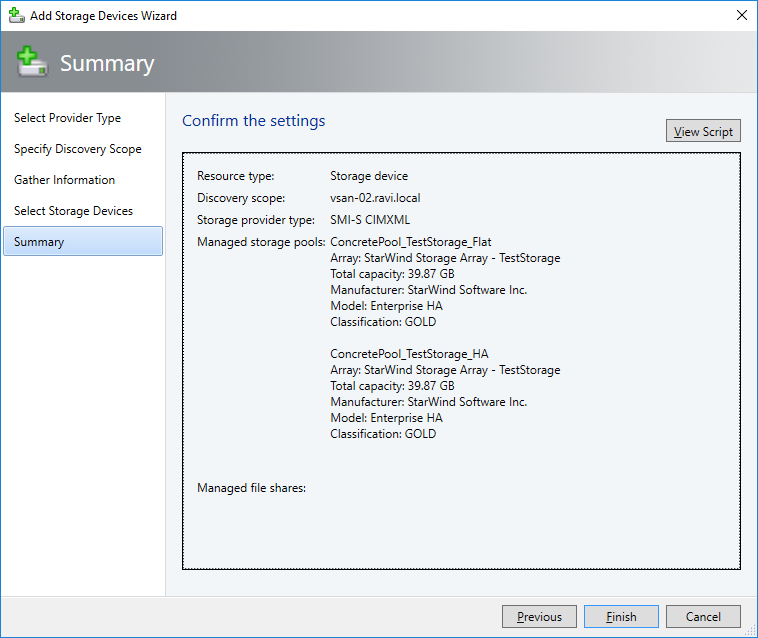
Creating a Logical Unit
1. To add a new logical unit, click Create Logical Unit on the toolbar.
2. In the Create Logical Unit dialog, select a storage pool, specify Name and Size of an LU, and click OK.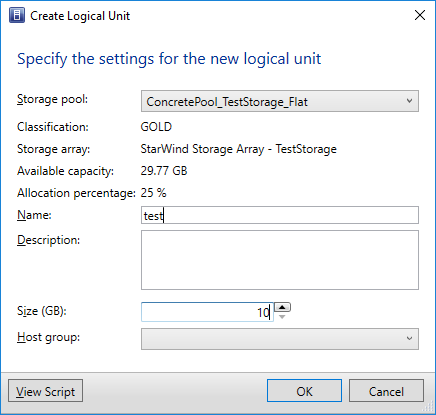 3. The newly created device appears in the list (view the Name column).
 NOTE: The new logical unit test1 is not assigned to any host, which is displayed by the value No in the Assigned field.
After this operation, StarWind Management Console displays the new device imagefile1.
The device is active and connected to the target. Note that the image file location is My Computer\E.
Allocating Storage Pools and Logical Units
SCVMM allows allocating storage pools and logical units to different Hyper-V hosts and host groups. To make a storage pool or logical unit available for a host or a host group, allocate them to a particular host or host group.
1. To allocate storage pools and logical units, click Allocate Capacity on the toolbar.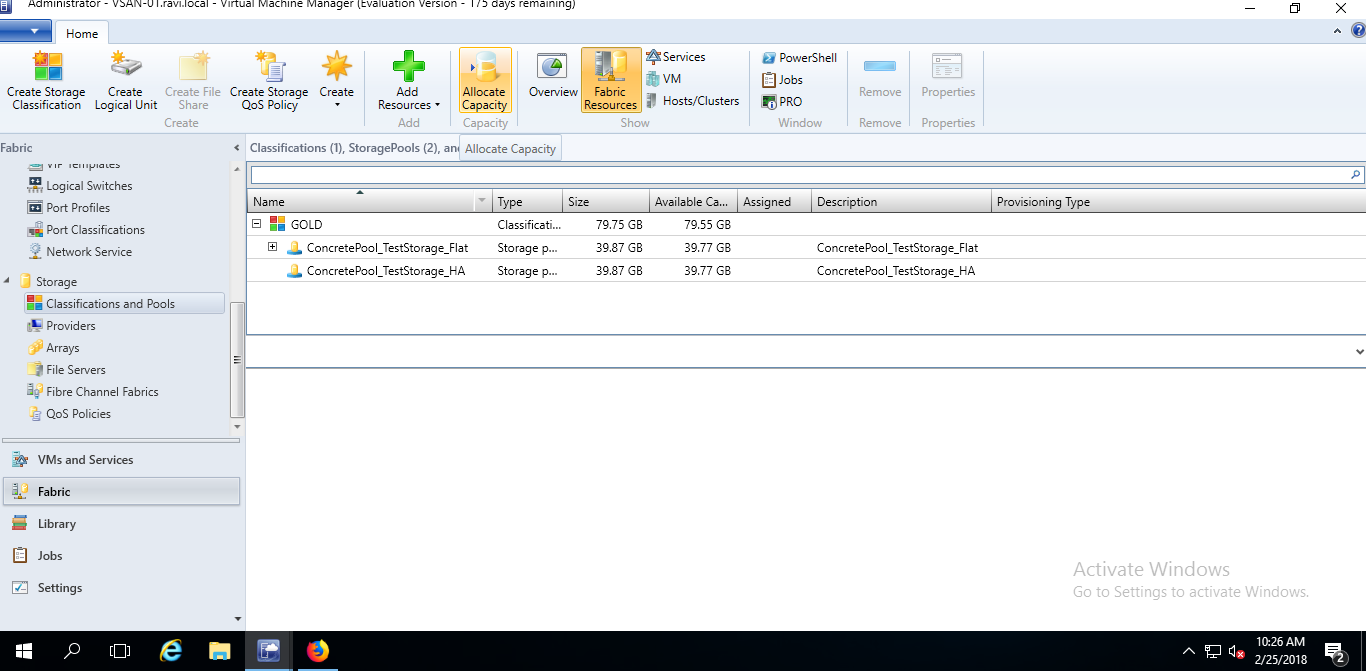 2. In the Allocate Storage Capacity dialog box, click on the Allocate Storage Pools and Allocate Logical Units buttons.
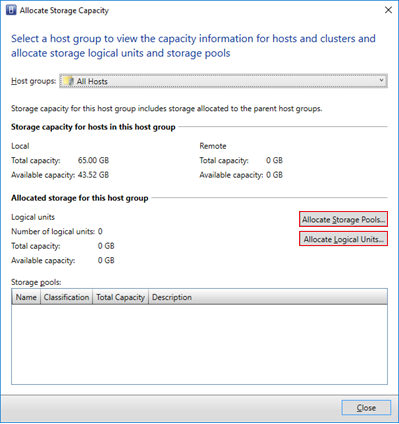 3. In the Allocate Storage Pools window, select the Display as available only storage arrays that are visible to any host in the host group checkbox to verify that storage pools are available on the network.
4. Select a storage pool and click the Add button.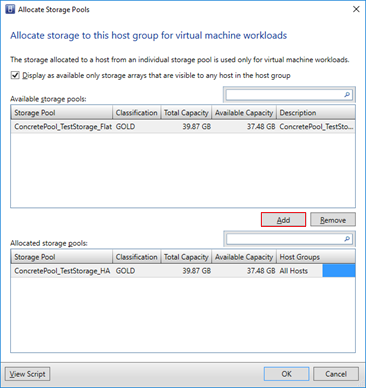 5. Repeat the steps 1-4 for every storage pool and click OK.
NOTE: In case the storage pools disappeared from the list after selecting this checkbox, refresh the information on a Hyper-V host and storage provider:
- To refresh information on a Hyper-V host, click Refresh on the shortcut menu of a respective host.
- To refresh information on a storage provider, click Rescan on the shortcut menu of SMI-S provider.
If storage pools aren’t displayed on the list, check the firewall settings, network paths, network zoning, etc. and make sure that the Hyper-V hosts from the group have access to the StarWind VSAN service.
6. Follow the same procedure to allocate the logical unit to the All Hosts group.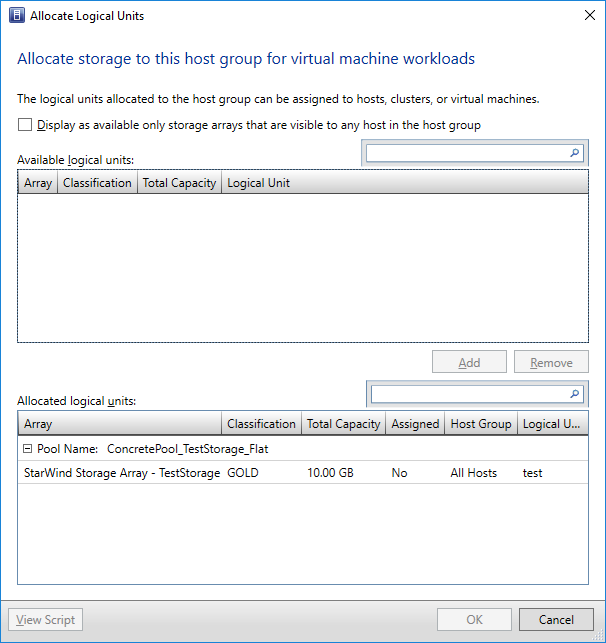
Connecting Logical Units to Hyper-V Hosts
1. To connect a logical unit to a Hyper-V host, choose a host and click Properties on the shortcut menu. 2. In the Properties window, click Storage on the left pane.
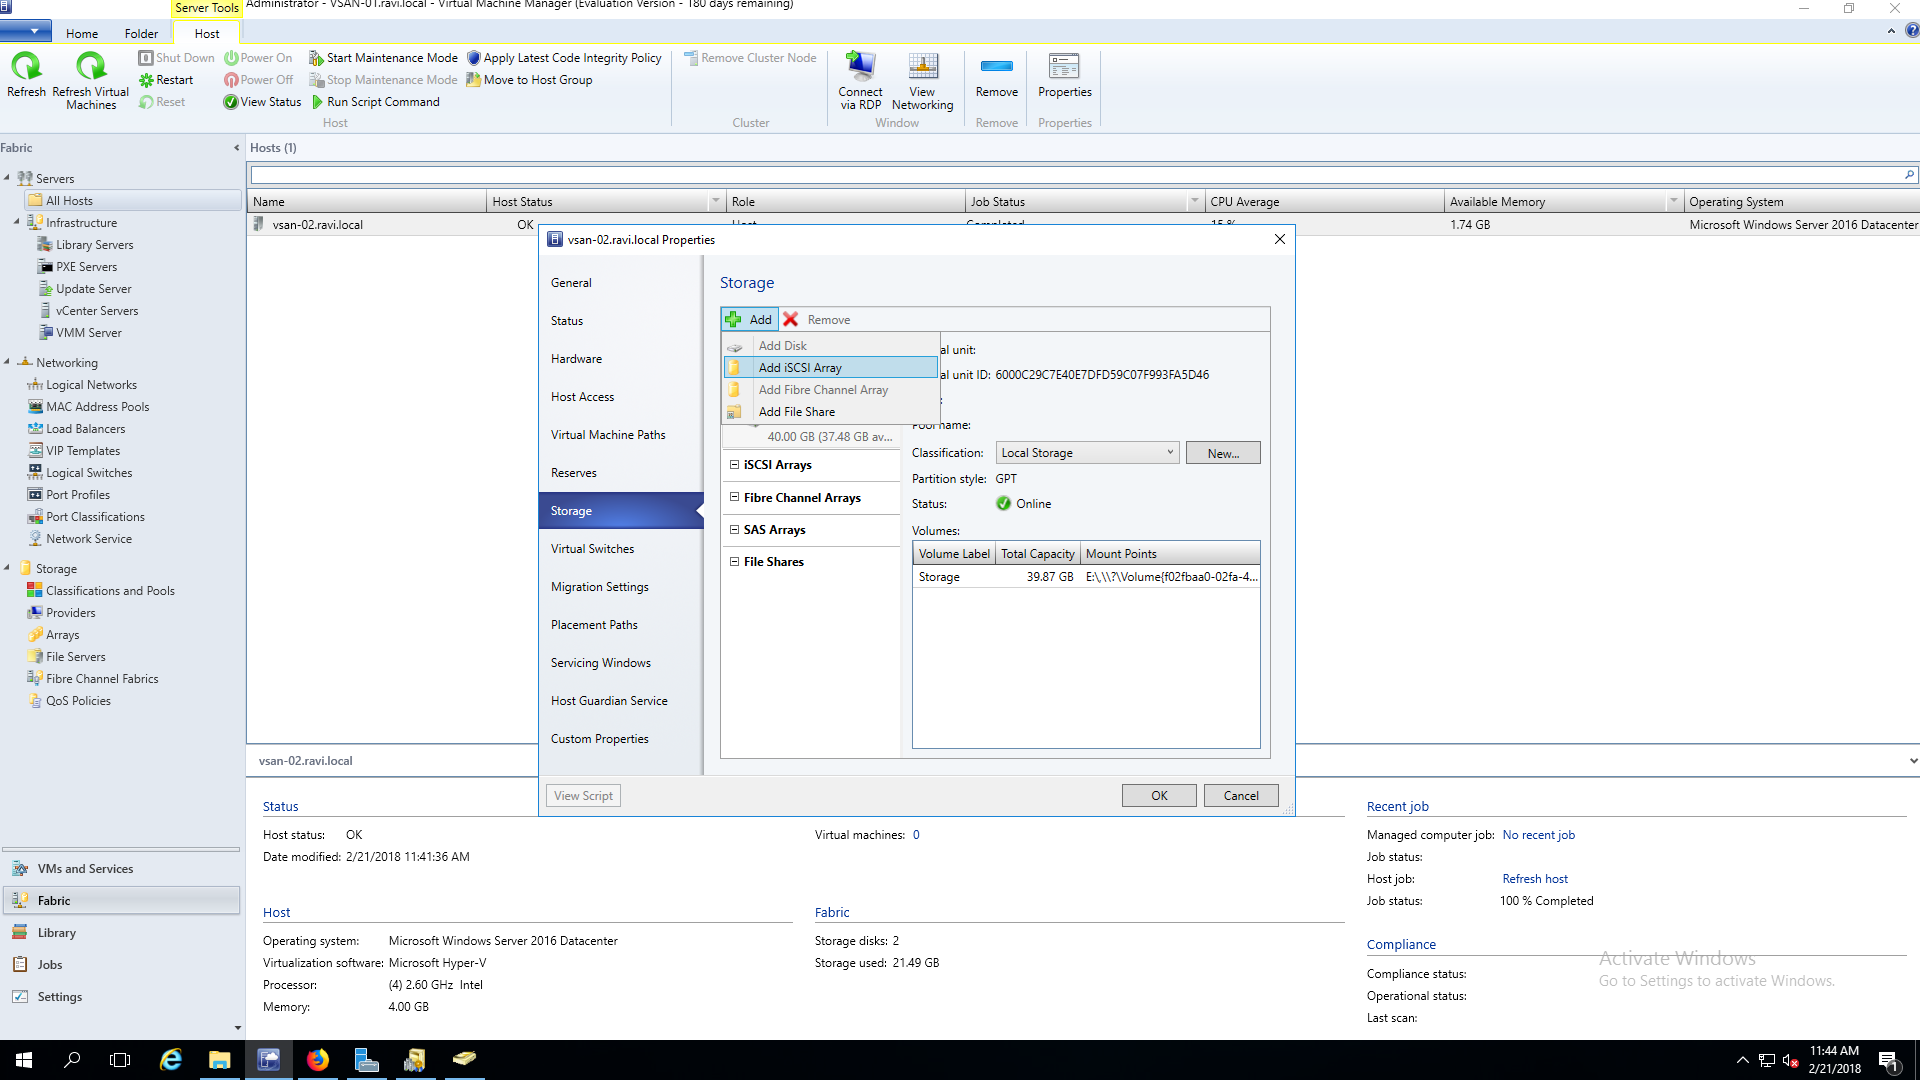 3. Click Add iSCSI Array to add a disk array.
4. In the Create New iSCSI Session dialog, select a disk array and click Create.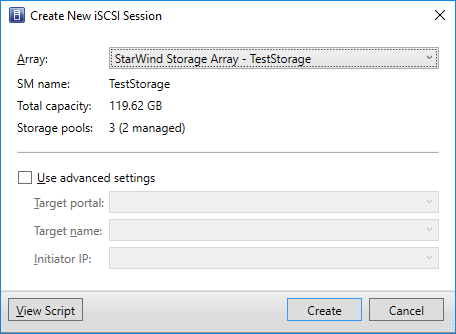 The new disk array appears on the Target portals list on the Discovery tab of an iSCSI Initiator Properties of the selected Hyper-V host.
5. Open Microsoft iSCSI Initiator on the Hyper-V host to check the target portals. In this case, 172.16.10.2 is an IP address of the host where StarWind VSAN is installed and running.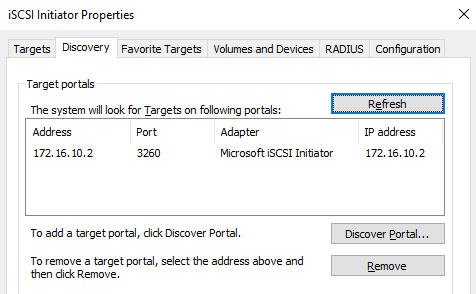 After the new array has been added, new disks can be based on it and the existing ones connected.
6. Click Add and then Add Disk to connect a new disk to the host.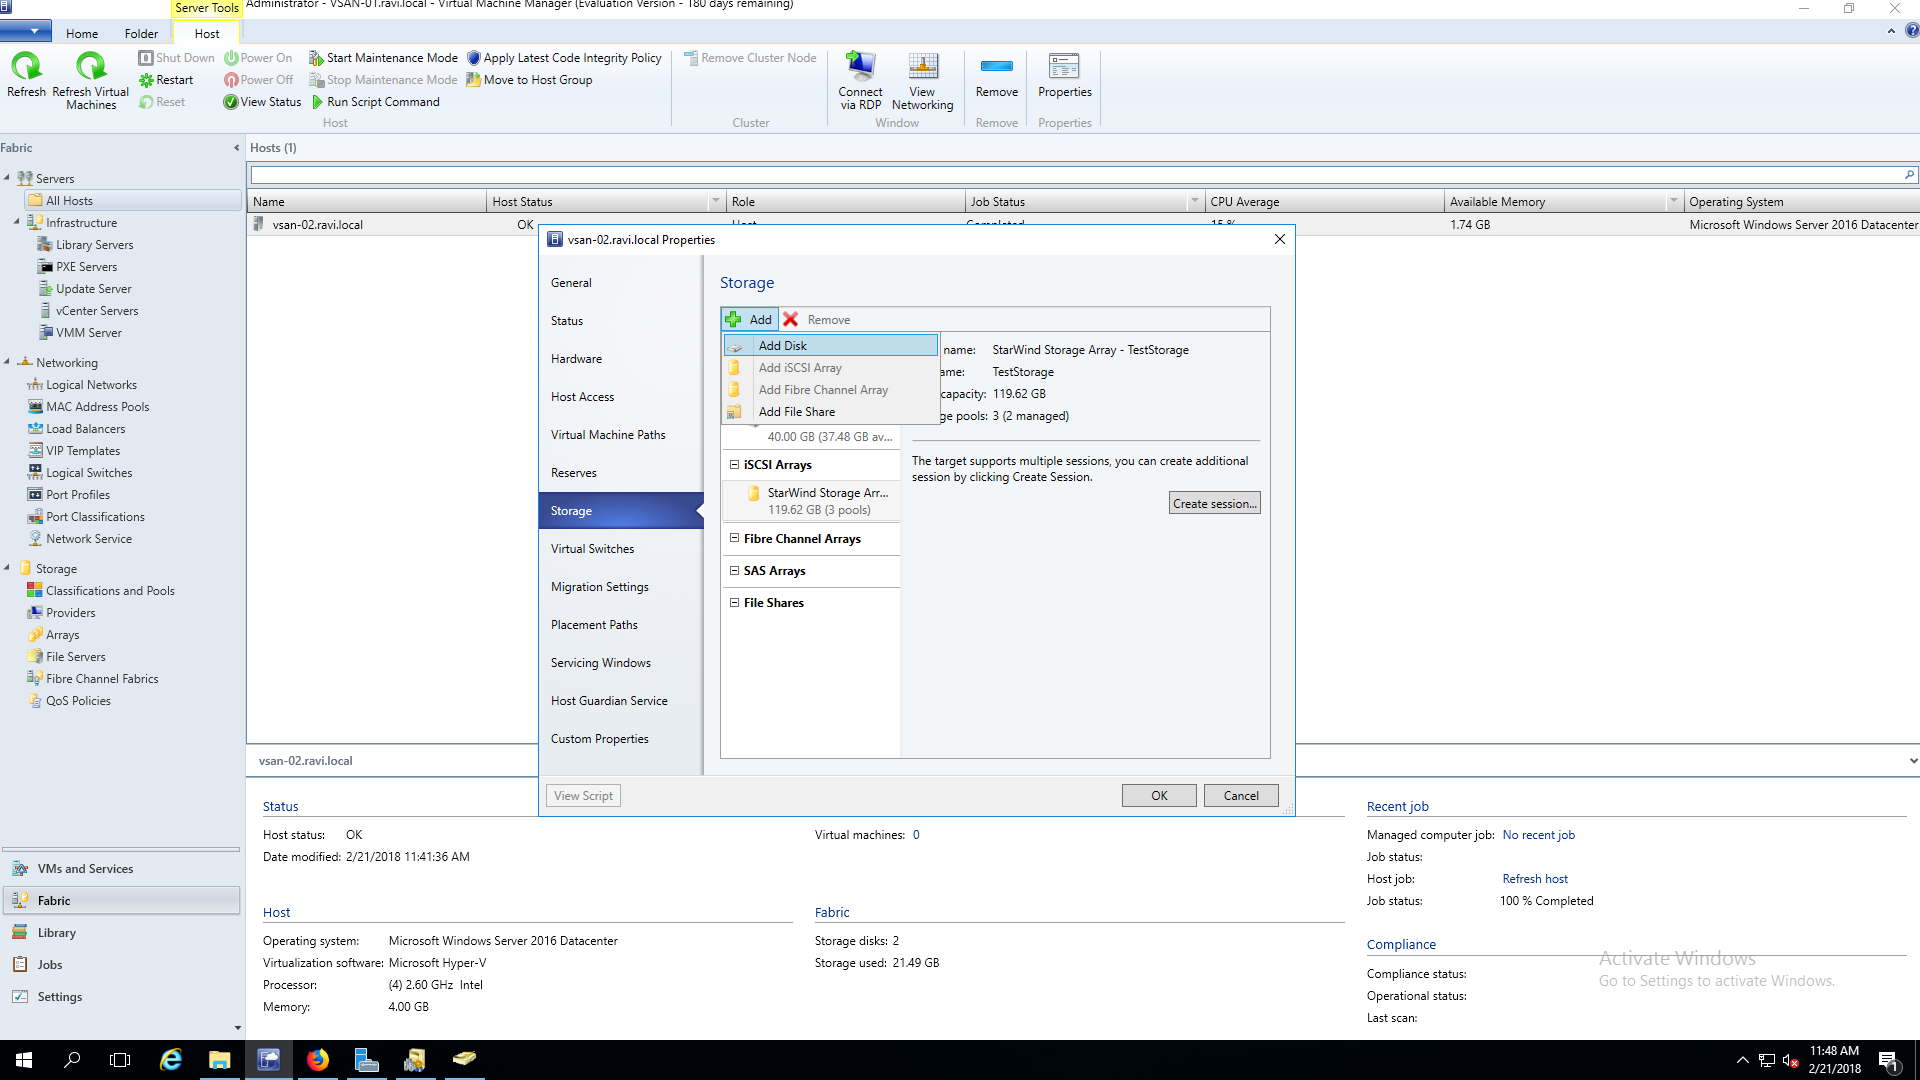 NOTE: Since the logical unit test1 has been allocated to the host group All hosts, it was automatically chosen from the list of available devices.
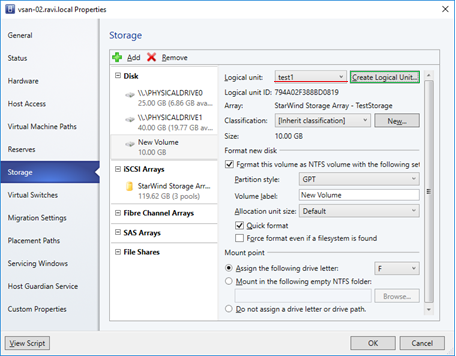 7. Click the Create Logical Unit button (green underlined) to create a new logical unit right from this window. As soon as the logical unit is selected, the system provides all information available for it. VMM suggests the disk initialization, its formatting to NTFS, and assigning a disk letter to make a logical unit available for VHD-files of VMs.
8. Click OK to connect a logical unit to a Hyper-V host.
9. The host has been connected to the iSCSI target iqn.2008-08.com.starwindsoftware:vsan-02.ravi.local-test1, and a new 10GB volume has been formatted to NTFS. 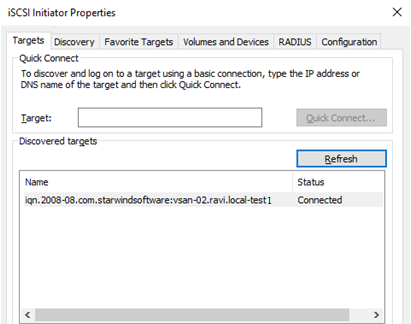

10. Right-click Classification and Pools of the SCVMM 2016 Console and to make sure that the details of a logical unit test1 have been updated. The property Assigned should display the value Yes.

NOTE: The same information is displayed on the Target List tab of StarWind Management Console.
11. The iSCSI Sessions section shows the initiator iqn.1991-05.com.microsoft:vsan-02.ravi.local as currently connected to the selected target. 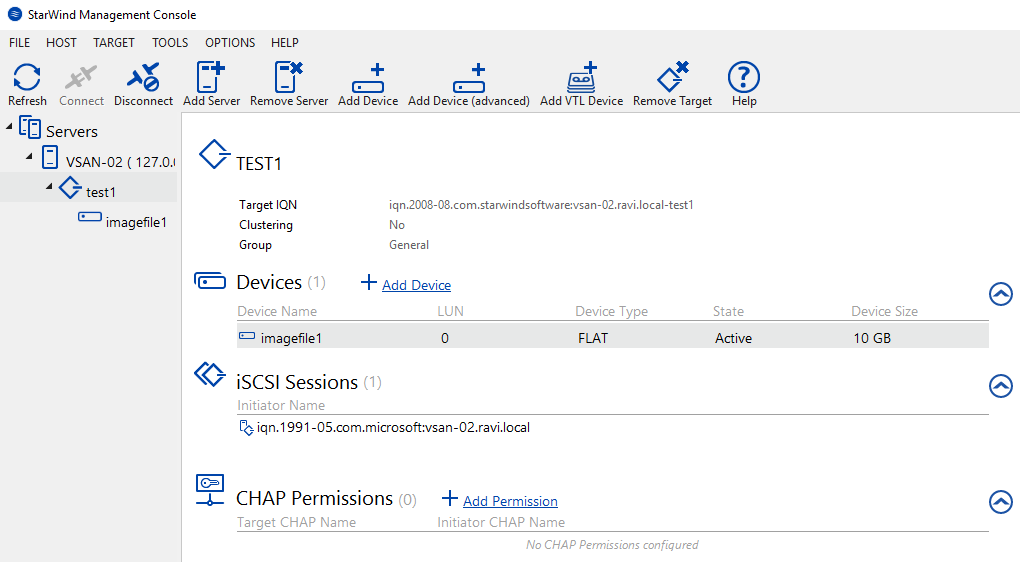 When a logical unit is allocated to a host, SMI-S provider also adds the access rule to the StarWind ACL service to permit the connection of the selected host to a target.
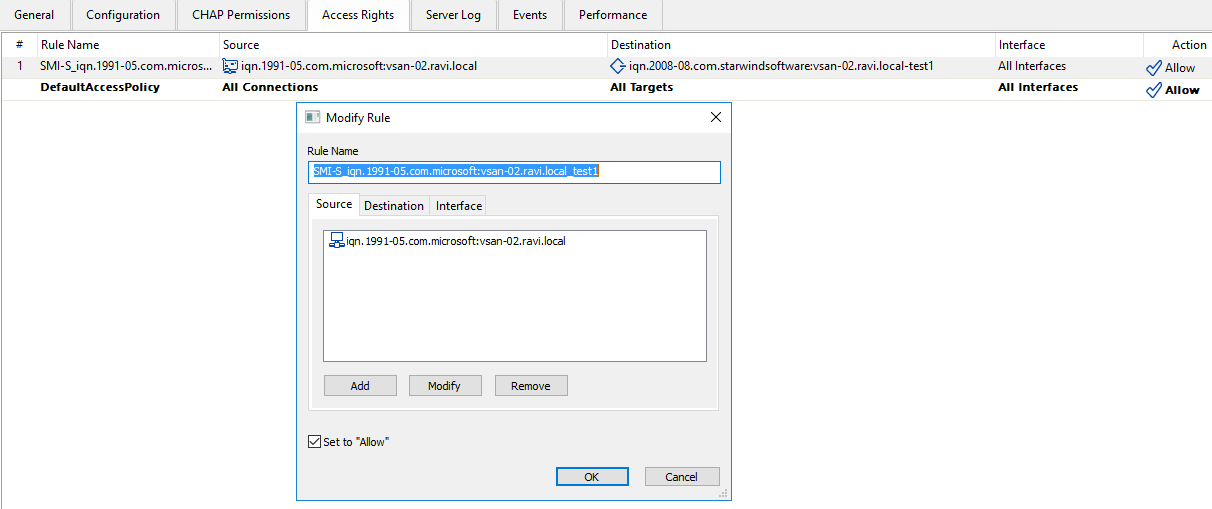 NOTE: Names of ACL rules created by SMI-S provider always include the prefix SMI-S. It is not recommended to change these rules or manually delete them from StarWind Management Console.
Disconnecting Logical Units from Hyper-V Hosts
1. To disconnect logical units, open Properties of a Hyper-V host and click Storage.
2. On the Storage pane, select a disk that needs to be removed and click the Remove button.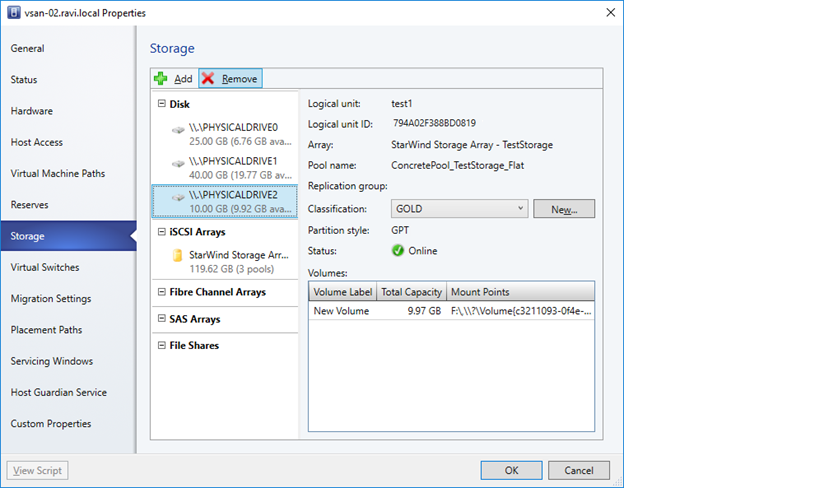 3. Click Yes in the VMM dialog to confirm the disconnection of the selected logical unit. The logical unit and its data remain untouched, so this device can be connected later.
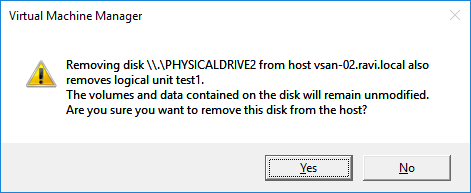
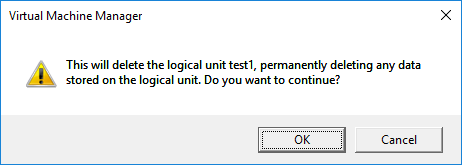
Deleting Logical Units
NOTE: In order to be deleted, a logical unit should be disconnected from all Hyper-V hosts. Make sure that the property Assigned has the value No.
1. To delete a logical unit, expand Storage, and right-click Classification and Pools of the SCVMM 2016 Console.
2. Select a logical unit that needs to be deleted and click Remove on the shortcut menu.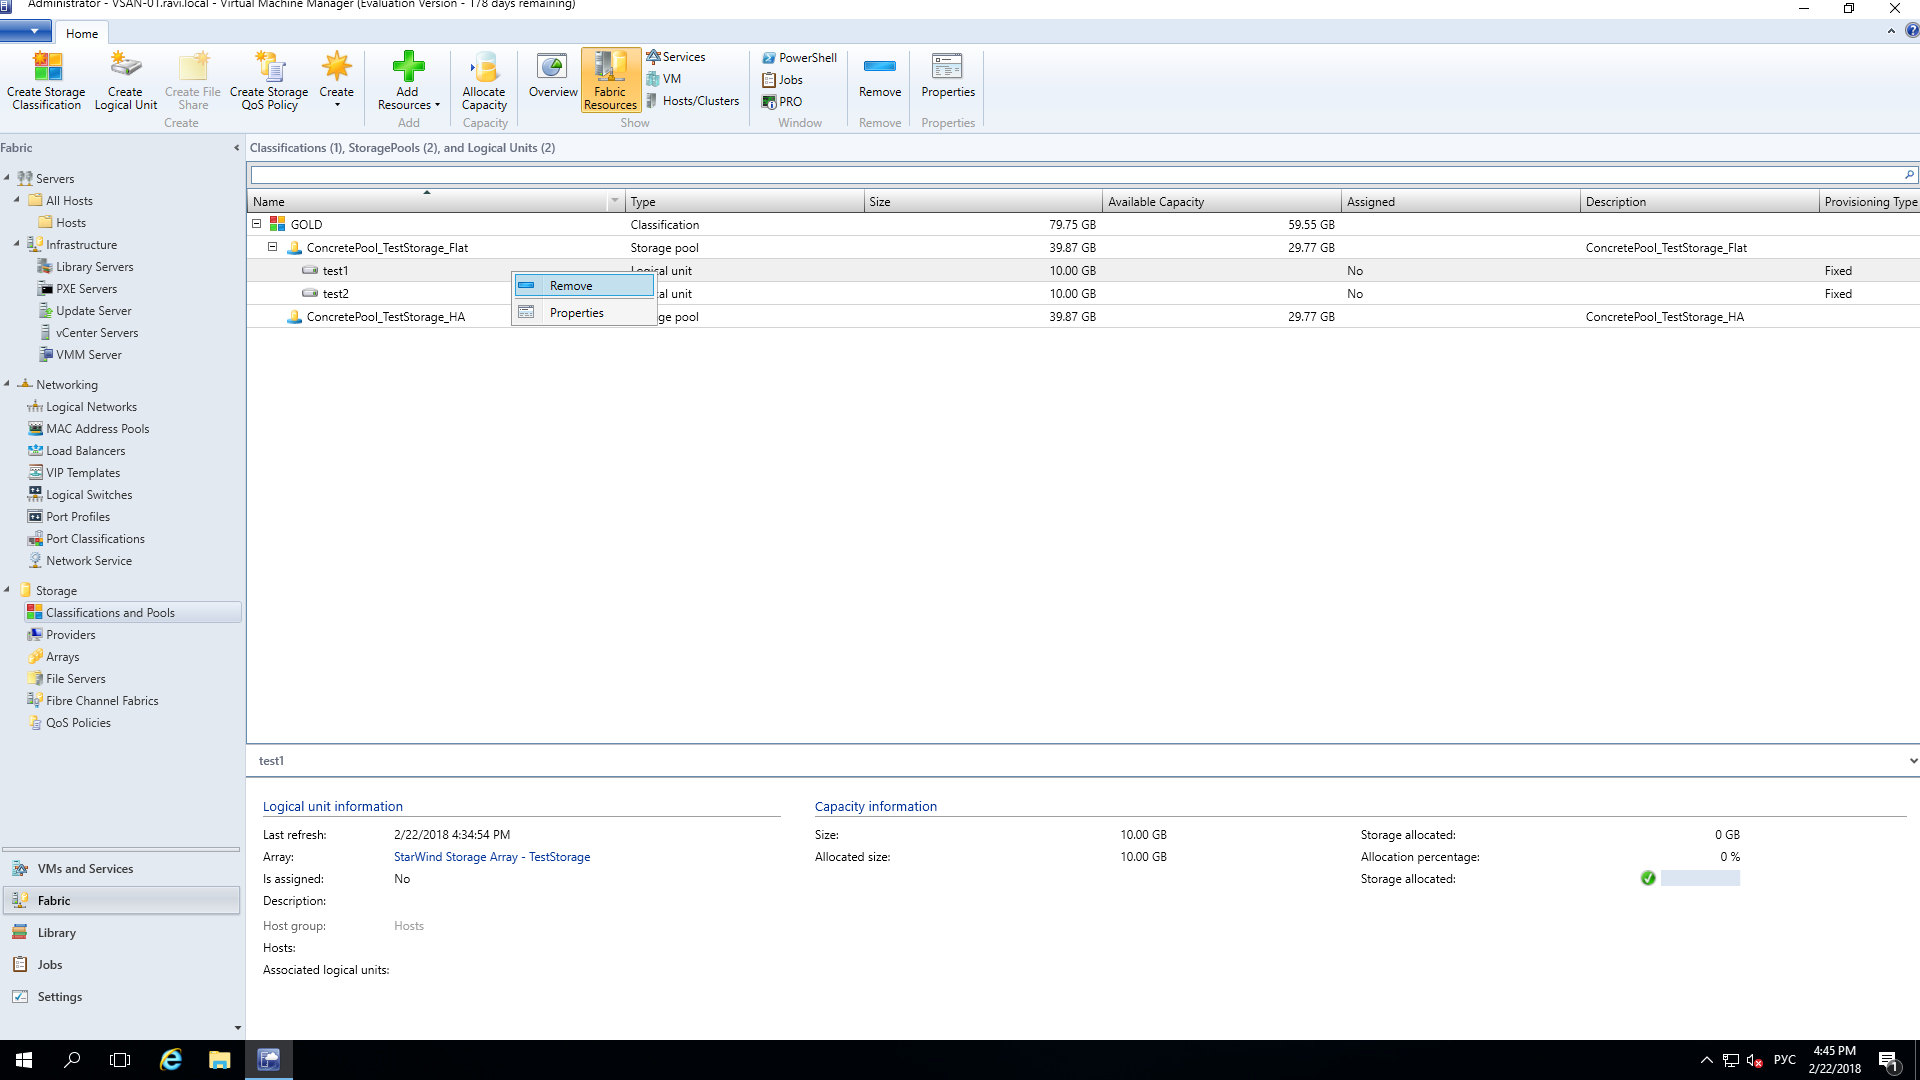 3. in the VMM dialog, click OK to confirm the deletion.