


The Auto Deploy is one of the underestimated vSphere features. I have seen many vSphere Designs where using Auto Deploy was outlined as overcomplicating and manual build of ESXi servers was preferred. That is pretty frustrating as we, as IT professionals, strive to automate as much as possible in our day to day work.
Configuring Auto Deploy is definitely not as simple as VSAN for instance, but using Auto Deploy really pays off when you manage hundreds and thousands of ESXi hosts.
Let’s start with the list of components that form the Auto Deploy solution.
| DNS Server | This is an essential component of nearly any infrastructure, so you most probably have it deployed already, but please note that you will need Reverse zone as well. That will help Auto Deploy server figure out the host names using their IP addresses. |
| DHCP Server | Apart from doing its regular job of distributing the IP configuration the DHCP server is also responsible for providing IP address of the TFTP server and the name of the iPXE boot loader |
| TFTP Server | Used for hosting iPXE boot loader and configuration files. |
| Auto Deploy Server | If you use vCSA you don’t even have to install it as Auto Deploy. It is already built in vCSA. For vCenter on Windows you will need to install Auto Deploy server separtely |
| Image Profile | This is just a collection of VIBs, which constitutes the ESXi installer. Most of the times you will use default Image Profile from VMware web site or vendor specific one. |
| PowerCLI | It will be your main tool to manage Auto Deploy rules and to customize Image Profiles. |
I am pretty sure you are familiar with the most of the components so it shouldn’t be a problem for you to understand the logic of the Auto Deploy. The configuration of each of the component will be covered in the end of this post.
Now let’s have a look at how Auto Deploy actually works:
- The host powers on and starts PXE boot sequence
- It receives IP configuration from the DHCP server along with the IP address of TFTP server and the name of iPXE file.
- The host downloads iPXE code and configuration from the TFTP server.
- The file downloaded from the TFTP server contains code that instructs the ESXi server to send a request to Auto Deploy server.
- The ESXi server creates a request and sends it to Auto Deploy server over HTTP. The request contains host specific information, e.g. Vendor name, IP address, MAC address, etc.
- When Auto Deploy server receives this request it does the following:
- Looks through Auto Deploy rules to find the one matching host specific information from the request.
- The rule is used to identify Image Profile, Host Profile and Location of the host in the
- This information is cached so that on consecutive boots Auto Deploy doesn’t need to parse deploy rules again
- The host boots using the Image and Host profile provided by Auto Deploy server
- Once the boot process is over the host is added to the vCenter where Auto Deploy server is registered.
Hopefully, all the logic of the Auto Deploy makes sense to you now and we can talk about Auto Deploy modes.
There are different modes of Auto Deploy:
| Stateless | Servers are network-booted from a central Auto Deploy server and need to have connection to Auto Deploy and vCenter. ESXi hosts don’t need any local storage |
| Stateless Caching | Servers are still network-booted from the Auto Deploy server, but the Image Profile and Host Profile are cached to the local disk. If any of Auto Deploy components go down or too busy during the boot storm the ESXi host can boot from the locally cached Image Profile and Host Profile. |
| Stateful Install | During the first boot the Image Profile is streamed from Auto Deploy server and installed on the local storage. At all consecutive boots the ESXi hosts uses local disk only and never talks to the Auto Deploy server again |
There are a couple of things you need to learn about working with Image Profile and Deploy Rules before we can proceed to the Auto Deploy Setup section.
Like I already mentioned Image Profile is just a collection of VIBs that are used to install ESXi server. Image Profiles are stored in Software Depots.
It can be either online depot or offline software bundle. The offline depot is simply a zip file which you can download from VMware web site.
The online depot for you is just an URL – https://hostupdate.vmware.com/software/VUM/PRODUCTION/main/vmw-depot-index.xml
Adding Software Depot is pretty simple, but keep in mind that Software Depot configuration is not persistent across PowerCLI sessions. If you re-open PowerCLI you will need to add software depot again.
|
1 |
Add-EsxSoftwareDepot -DepotUrl https://hostupdate.vmware.com/software/VUM/PRODUCTION/main/vmw-depot-index.xml |
Once the Software Depot is added you can check what image profiles it contains with the following command
|
1 |
Get-ESXImageProfile |
In most cases, the default image profiles you can see in the Software Depots can be used without any alterations.
Once you figured out the name of the image profile you will be using it is time to create your first Deploy Rule.
The Deploy Rule syntax looks following:
|
1 |
New-DeployRule -Name TestRule -Item ImageProfile, HostProfile,DefaultCluster -Pattern "vendor=VMware","ipv4=192.168.1.0 -192.168.2.225" |
Basically, the Deploy Rule uses three settings:
Name – that is pretty much self-explanatory.
Items can contain the following elements:
- Image Profile – it is the one you choose from the Software Depot
- Host Profile – Defines most of the configuration settings.
- vCenter Inventory Location: Datacenter, Folder, Cluster Btw, if you use the same name for Datacenter, Folder and/or Cluster the command will produce an error. That’s because there are no options n
A couple of notes on Items option:
- You cannot choose more than one location, that is, you cannot define in the Deploy Rule the Datacenter and Cluster for the ESXi hosts. So, if you have two Production clusters in different Datacenters your ESXi host may end up in the wrong Production Cluster.
- If Datacentre and Cluster have the same name you the New-Deploy rule will error out.
The following screenshot demonstrates the error when I tried to create a new Deploy Rule while having Datacentre and Cluster with identical name”AutoDeploy”. So obviously the rule couldn’t figure out what object to use as a location

So the general advice here would be to use unique naming for all objects in your infrastructure.
Patterns option specifies the host or group of hosts to which the rule applies. Choose one of the following:
- vendor
- model
- serial
- hostname
- domain
- ipv4
- mac
- asset
- oemstring
Here is an example of all Machine Attributes you can see when ESXi boots and download iPXE file from the TFTP server
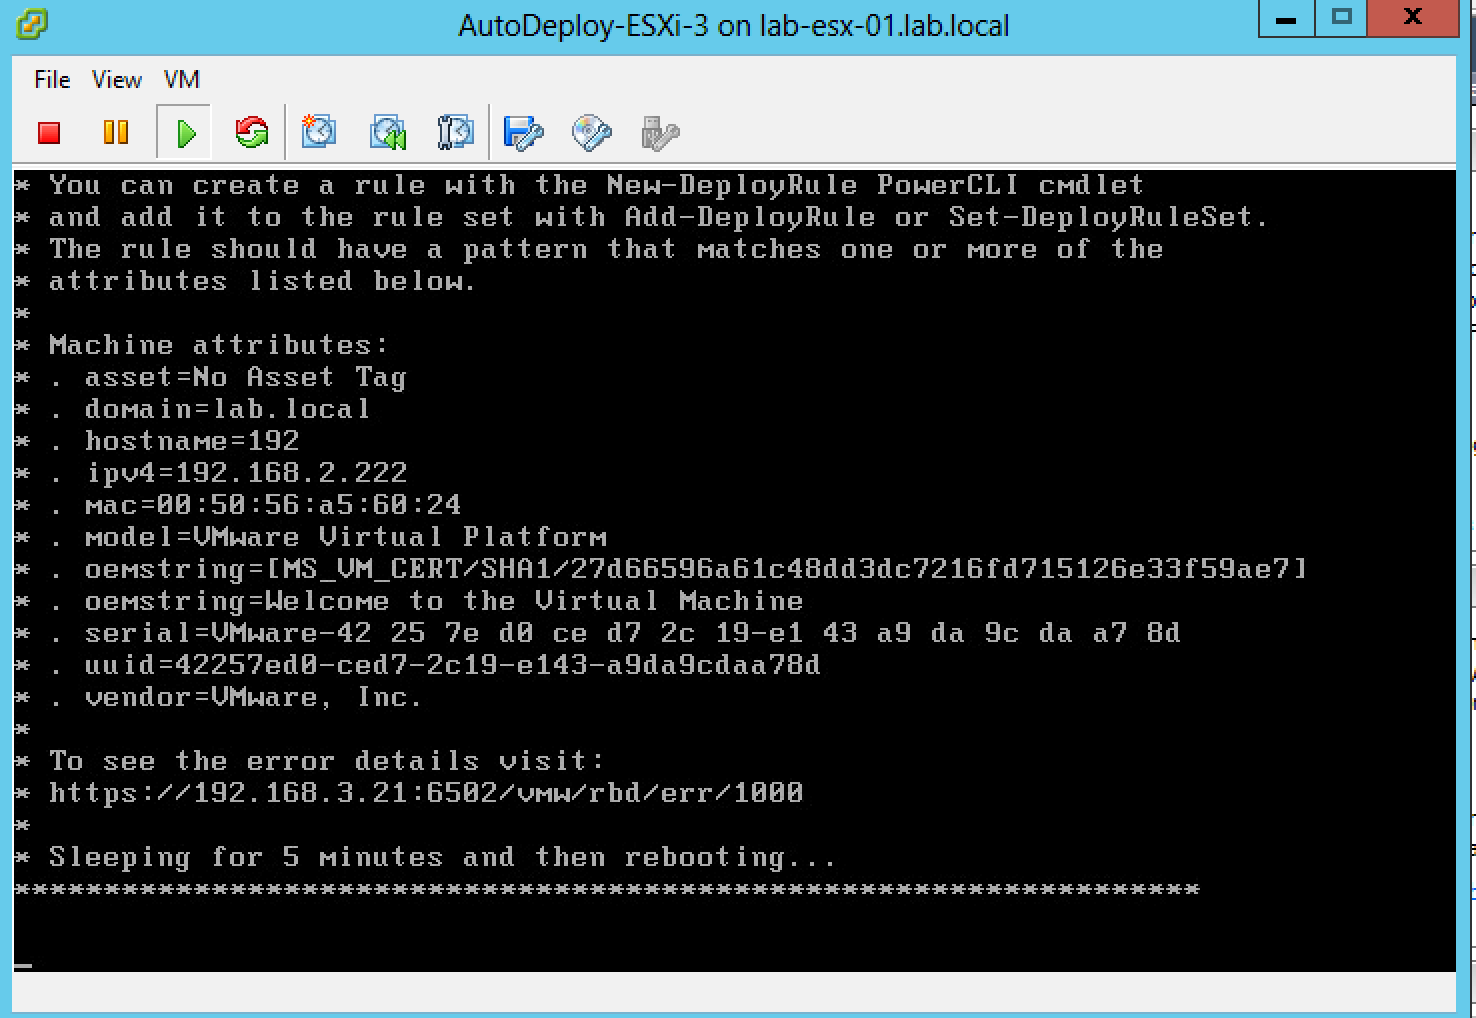
Note – You can see that the screen actually shows an Error. That’s because I network-booted one of the ESXi host without any Deploy Rules created on Auto Deploy server. That gave me time to take this screenshot
If you follow the link on the screen to see the error details you can see the following description:

Ok, you have created the rule, but it is still not active. To activate the rule, it has to be placed into working ruleset. If the deploy rule is not in the working ruleset it is not parsed when hosts send requests to Auto Deploy server
The rule activation is done with the following command:
|
1 |
Add-DeployRule -DeployRule TestRule |
You will most probably have more than one rule. For instance, you may have one Deploy Rule that is used for Management cluster for Stateful Install of the ESXi hosts. You don’t really want to network-boot the Management Cluster that will be hosting all elements of Auto Deploy infrastructure.
The second rule will be used for stateless boot of the Production Cluster.
So if there is more than one rule they are processed one by one and the first match is applied to the host. Run the following command to check the rules in the working ruleset
|
1 |
Get-DeployRuleSet |
One last important note about Auto Deploy server and its caching.
When the host boot for the first time Auto Deploy parses the rules in the working ruleset and the matching information of Image Profile, Host Profile and Location is saved in Auto Deploy cache. That helps to reduce load on the Auto Deploy server during the boot storms. But that gives us a little problem.
When the Deploy Rule is updated, let’s say you assigned a new Host Profile to the rule, the information in cache isn’t updated automatically. To fix that problem you have to use Test-DeployRuleSetCompliance command to get the difference between the current host’s attributes and the working ruleset. If there is a difference, then the host will be considered “out of compliance”. The issue is remediated with Repair-DeployRuleSetCompliance which actually updates the auto deploy cache with the correct information.
The easiest way to remediate this issue is by using the following command.
|
1 |
Get-VMHost TestESXiHost | Test-DeployRuleSetCompliance | Repair-DeployRuleSetCompliance |
If everything you read so far is clear and you digested all this info it is time to go through all the configuration steps of the Auto Deploy setup.
The short summary of the step is as following:
- Enable AutoDeploy
- Configure TFTP/DHCP/DNS
- Install PowerCLI
- Add Software Depot
- Create first deploy rule
- Boot and configure the first host
- Create a host profile based on the configuration of the first host
- Shutdown the first host and update the rule with the host profile
- Power on all hosts
Let’s start.
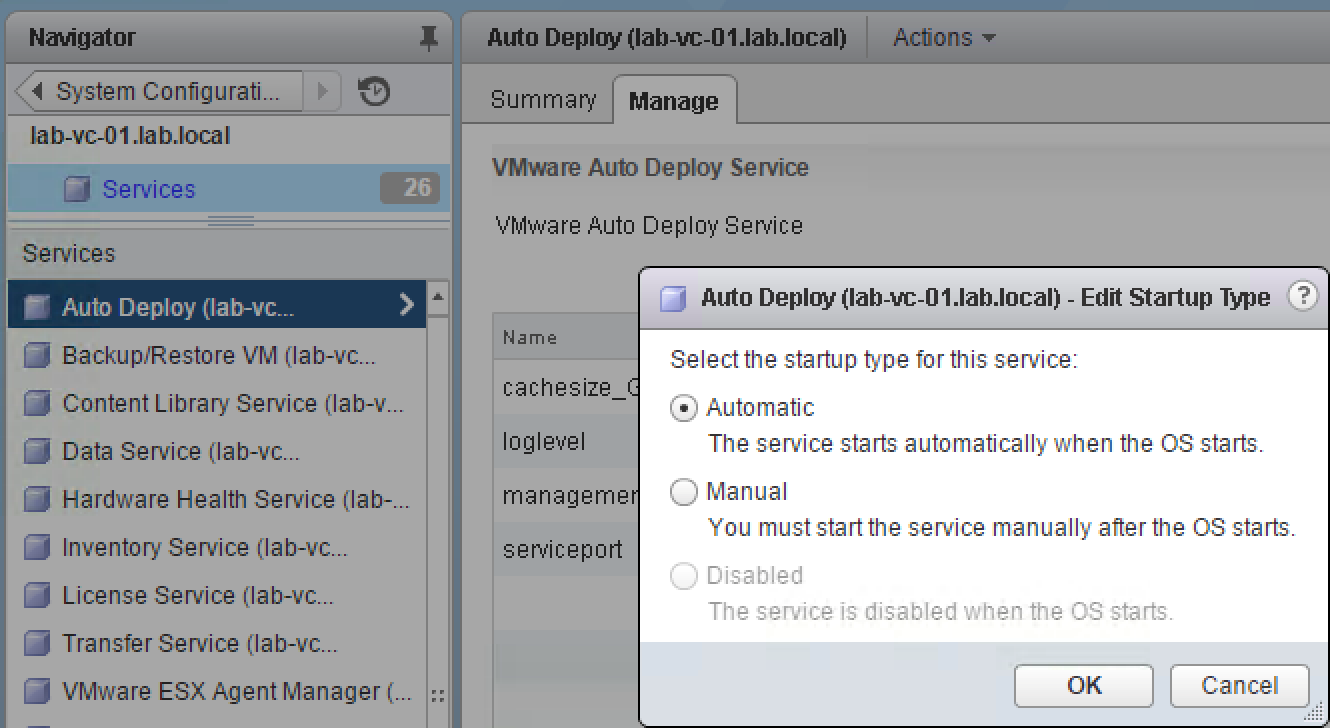
- Enabling AutoDeploy in vCSA is as simple as clicking one button.

Don’t forget to set Auto Deploy to Automatic startup mode
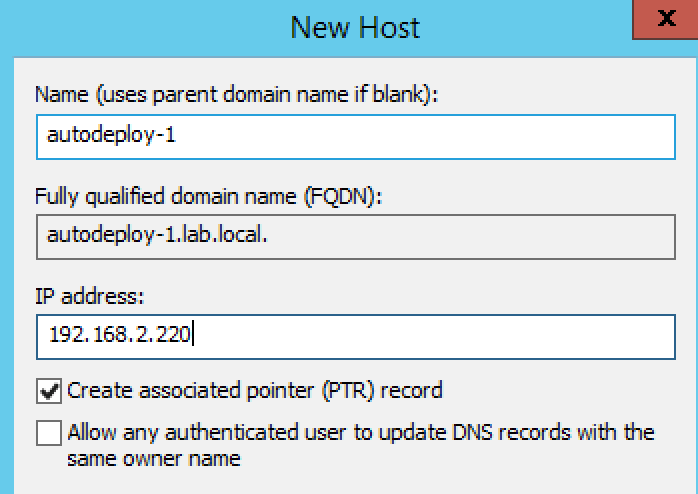
- DNS – you will need to preconfigure A and PTR records for every network-booted ESXi servers.
These records will be used when adding the ESXi host to the vCenter.
- You can use TFTP server of your choice. You will need to download set of iPXE files from the auto deploy server and copy them to TFTP server
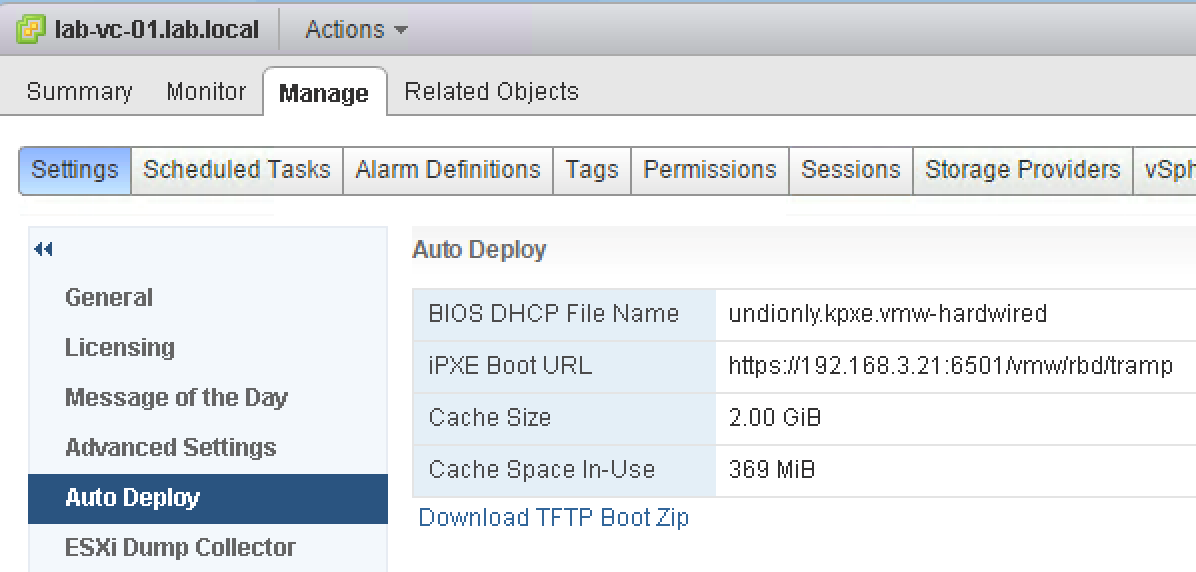
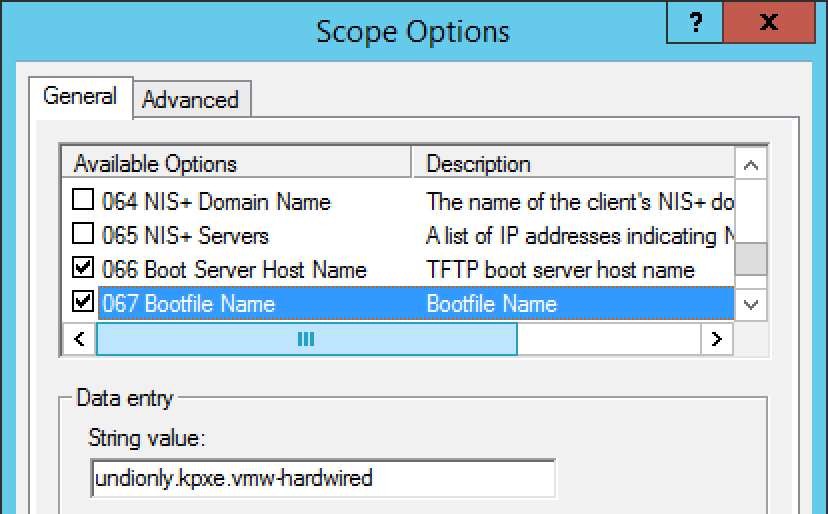
- Creating TFTP options in DHCP. The first one provides the ip address and the second option points to the iPXE boot file
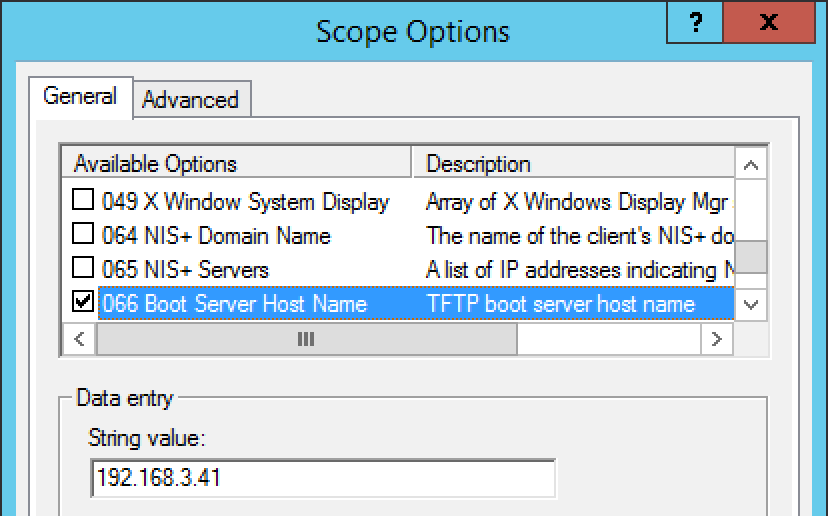
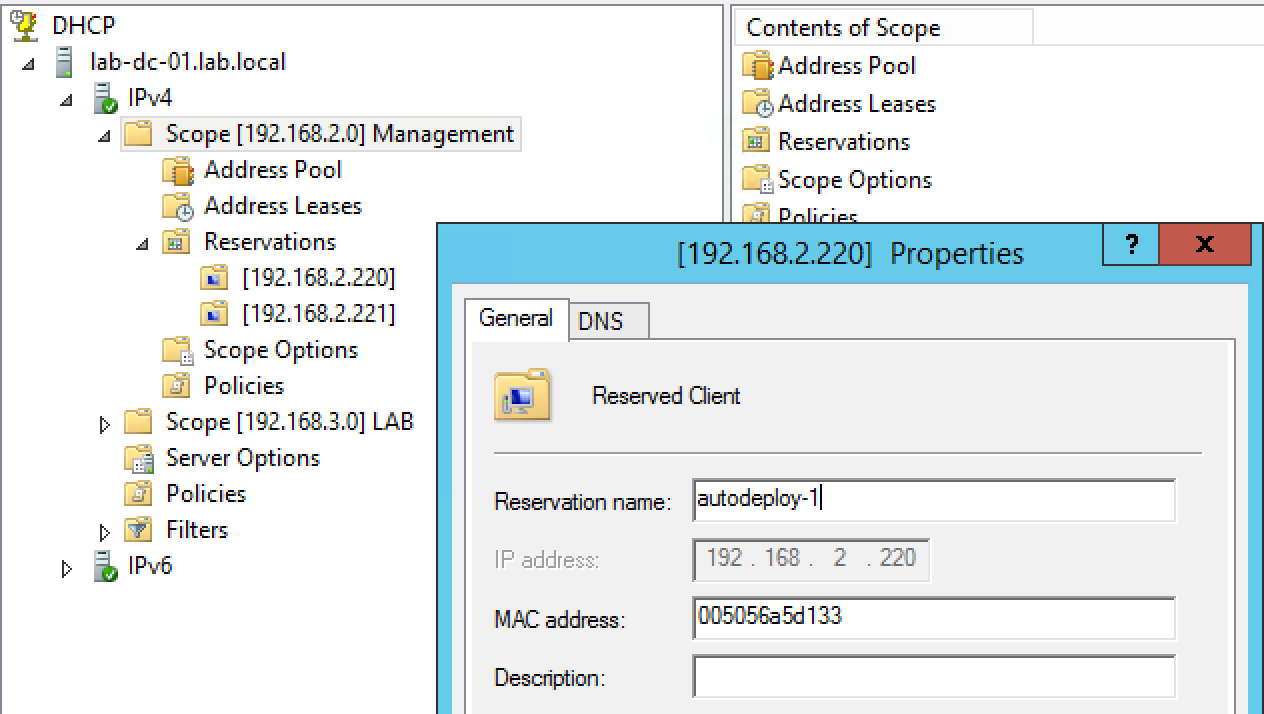
You don’t really want to rely on the random IP address provided by DHCP server to ESXi host.
Remember, the IP Address is used not only to assign the ESXi server name, but also as one of the matching criteria in the Deploy Rule. Getting the wrong IP address may result in wrong matching Deploy Rule, hence, wrong Image Profile, Host Profile, Location. Using DHCP reservations is an easiest way to ensure naming consistency
- Install PowerCLI. Ideally you would have a jump host for PowerCLI
- Add Software Depot
I used a locally saved zip file

Query the software depot for the list of Image Profiles/

Note the name of the image profile you will be using
- Create the first Deploy Rule

Remember, the rule should contain the minimum options – Image Profile and Location. It is used only to boot the first host that will be used to create a host profile.
Please note that my screenshot doesn’t show the uploading the VIBs sine I have done it before while testing Auto Deploy. Therefore, this Image Profile is already in Auto Deploy cache.
- Add the rule to the active working set

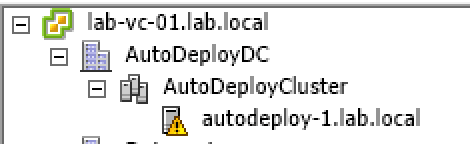
- Boot the host
You should see it in the location you used in the Deploy Rule
- Configure host’s settings: NTP, syslog, networking, storage, etc
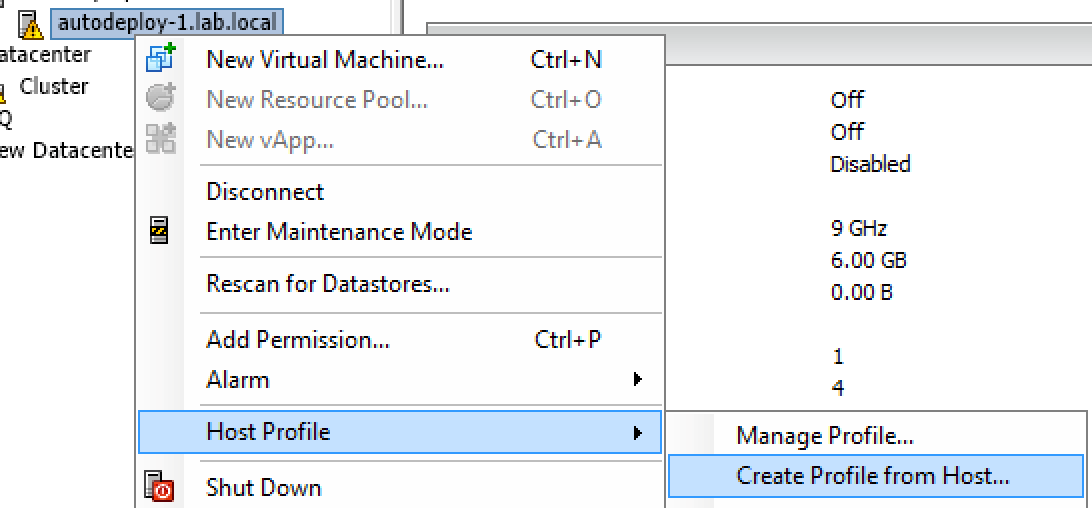
- Create the host profile using this server as a reference host.
- Once you are happy with the host profile shut down the server
- Update the rule with the Host Profile name and if need with pattern parameters

I find this commandlet’s name a bit confusing. Copy-DeployRule doesn’t actually creates a copy of the rule, but update the existing rule. -ReplaceItem and -ReplacePattern don’t always replace options, they can be used to add new options too. Like in my example where I add Host Profile to the rule and add the IP address range as a pattern.
-
- The Auto Deploy cache still contains the old deploy rule’s parameters for my first host, so I have to fix it with Test-DeployRuleSetCompliance | Repair-DeployRuleSetCompliance commands

- Power on all the ESXi hosts and enjoy the fully automated boot storm of hundreds of servers 🙂
- The Auto Deploy cache still contains the old deploy rule’s parameters for my first host, so I have to fix it with Test-DeployRuleSetCompliance | Repair-DeployRuleSetCompliance commands
There are few restrictions and considerations for Auto Deploy you have to be aware of:
-
-
- There is still no IPv6 support
- Enterprise Plus licensing only
- No application level High Availability
- Auto Deploy with vSphere Update Manager. You approach to upgrades and patching will heavily depend on the Auto Deploy Mode
- Host Profiles can be tricky. Not all settings can be configured in Host Profiles. For instance, scratch partition still has to be configured with PowerCLI or esxcli. You can grab a PowerCLI script that automate scratch partition configuration here. Some settings can have dependencies that are not documented. But still it is all doable.
-
All in all, there is no rocket science in Auto Deploy configuration, but there are many little things you have to carefully plan and thoroughly test in advance.
