

Introduction
As an admin, I often have to deal with the necessity to transfer large OVF and ISO files or even move virtual machines (VMs) between ESXi hosts that have poor network performance or disposed in different locations with no network connection whatsoever. If a case like this occurs, a USB flash drive or USB external drive is a way to go. More specifically, you can use a drive in two different ways (by the way, both authors have my most sincere regards and appreciation for presenting these methods in a most coherent and simultaneously simple way). The first one is to copy files from a USB device to a host directly through SSH session without changing drive format as the following article suggests. However, such an approach has some issues, the most tedious one being maximum file size limitations, which certainly limits its use for larger files. You cannot work with the Graphical user interface (GUI) as well. Instead, you gotta use SSH and dive deep into the host data storage system, so you can figure I am a much bigger fan of a second way: creating a VMFS datastore on a USB drive. You can connect it to ESXi hosts and transfer files from one to another (or just store a temporary copy on an external storage device).
As you’ve probably noticed, this approach implies connecting to host via SSH as well, but such datastore also allows using WebGui. That takes a load off your shoulders. Nevertheless, working with VMFS is like using any other technology. One mistake and it’s hit-or-miss. The author of the article on creating a datastore himself points out that carelessness will cost a lot. Even mastering partedUtil won’t save you from everything, so the only appropriate way to do this is to establish an algorithm. This article is dedicated to creating such a scenario. Now, I won’t be repeating the content of these articles; you don’t need me explaining it. What makes more sense, is getting more details on the order of actions you need to take to create a VMFS datastore on a USB drive.

You must have two ESXi hosts to run this script (source host and destination host). I, for one, have tested it on VMware vCenter Server 6.7 Update 1, but it should be working with earlier versions as well. Also, you’ll need a Windows 10 (Windows Server 2016) PC or VM with a network connection to ESXi hosts. In case an external network option is out of the table, a virtual network connecting a VM and ESXi host will do. However, don’t forget that for the latter scenario to work, you must have the Posh-SSH module manually installed, so look it up here. USB 2.0 or USB 3.0. is also on the list of necessary requirements.
NOTE: You cannot create a datastore on an 8 GB (or less) USB flash drive! Not sure why, but it’s no go.

The main trick to configure a USB device at the ESXi host level is stopping the Usbarbitrator service temporarily. Then you’ll just have to leave it to the ESXCLI command sequence listed up here. ESXCLI is the only option to create a VMFS datastore since it cannot be done with GUI. Naturally, since ESXCLI doesn’t support scenarios, here comes PowerShell, which is, basically, why you need to have the Posh-SSH module installed by now. You use SSH to connect to a remote server via the command line. In our case, you will execute ESXCLI commands to emulate an SHH host session successfully.
This script helps you to have all the necessary commands wholly automated with the following script parameters:
- NewDS – create a new USB datastore, stop the Usbarbitrator service and disable it permanently until restarting it through UnmountDS or until rebooting the host;
- UnmountDS – disconnect datastore from host, enable the Usbarbitrator service on the host;
- MountDS – mount existing datastore to ESXi host, disable the Usbarbitrator service on the host.
Now it’s time to dig into the details and command sequences.
NewDS
That parameter is a driving force of the whole script since it is responsible for creating a new datastore on a USB drive. As a USB drive, USB flash or USB HDD pocket will do just fine. Pay attention to details: this command sequence will disrupt the work of the Usbarbitrator service! If your ESXi host is installed on a USB drive, the further actions can disrupt its work! As I have already stated, carelessness can cost you a lot, so choose your USB drive wisely!
The PowerShell command sequence:
- ESXi host name parameter initialization.
|
1 |
$ESXi = '<ESXi Host Name or IP >' |
- Connection to ESXi host with a VM with virtualized ESXi host (password and login to connect to the ESXi host).
|
1 |
Connect-VIServer -Server $ESXi -ErrorAction Stop |
- Get the status of the TSM-SSH service (if the service is started, the exit status of the commands will be “True”; in this case, skip the next paragraph).
|
1 2 3 |
$SSH = Get-VMHostService -VMHost $ESXi | where{$_.Key -eq 'TSM-SSH'} Write-Host ($SSH).Running |
- Start the TSM-SSH service if it was disabled.
|
1 |
Get-VMHost -Name $ESXi |%{Start-VMHostService -HostService $SSH -Confirm:$false} |
- Start SSH host session (password and login to connect to the ESXi host).
|
1 |
$SSHSession = New-SSHSession -ComputerName $ESXi -ErrorAction Stop -AcceptKey:$true |
- Send an ESXCLI command to the ESXi host via SSH session to get the Usbarbitrator service status.
|
1 |
(Invoke-SSHCommand -SSHSession $SSHSession -Command '/etc/init.d/usbarbitrator status' -EnsureConnection).output |
- Send an ESXCLI command to the ESXi via SSH session to stop the Usbarbitrator service if it was enabled.
|
1 |
Invoke-SSHCommand -SSHSession $SSHSession -Command '/etc/init.d/usbarbitrator stop' -EnsureConnection |
- Send an ESXCLI command to the ESXi host via SSH session to update the list of devices attached.
|
1 |
Invoke-SSHCommand -SSHSession $SSHSession -Command 'esxcfg-rescan -A' -EnsureConnection |
- Send an ESXCLI command to the ESXi host via SSH session to scan the file system structure on devices attached to the host.
|
1 |
Invoke-SSHCommand -SSHSession $SSHSession -Command 'esxcli storage filesystem rescan' -EnsureConnection |
- Send an ESXCLI command to the ESXi host via SSH to get the list of available drives attached (need to choose the required drive).
|
1 |
(Invoke-SSHCommand -SSHSession $SSHSession -Command 'esxcfg-scsidevs -l' -EnsureConnection).output |
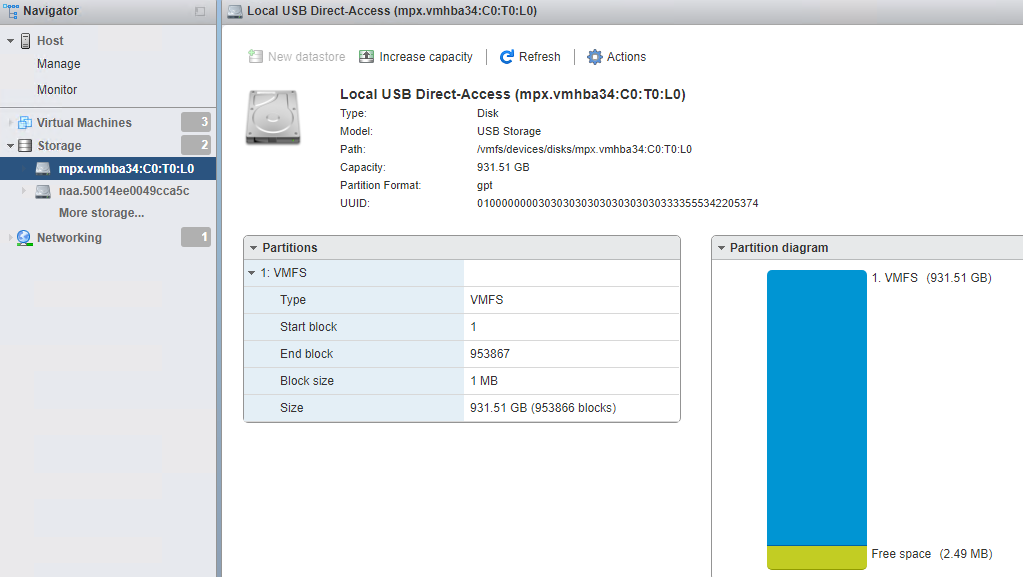
- USB datastore path parameter initialization ($DriveName). Choose path manually from the list you received with the previous command. In the name of the USB drive (Display Name line) should be “Local USB Direct-Access”.
|
1 |
$DriveName = '<Devfs Path>' |
- Send an ESXCLI command to the ESXi host via SSH session to install gpt for the USB drive structure.
|
1 |
Invoke-SSHCommand -SSHSession $SSHSession -Command ' partedUtil mklabel $DriveName gpt' -EnsureConnection |
- Send an ESXCLI command to the ESXi host via SSH session to find out the partition info.
|
1 |
Invoke-SSHCommand -SSHSession $SSHSession -Command 'partedUtil getptbl $DriveName' -EnsureConnection |
- ESXCLI write command parameter initialization.
|
1 |
$SSHCommand1 = 'eval expr $(partedUtil getptbl '+$DriveName+' | tail -1 | awk ''{print $1 " \\* " $2 " \\* " $3}'') - 1' |
- Send an ESXCLI command to the ESXi host via SSH session to determine the partition end sector ($EndSector).
|
1 |
$EndSector = (Invoke-SSHCommand -SSHSession $SSHSession -Command $SSHCommand1). output |
- ESXCLI write command parameter initialization.
|
1 |
$SSHCommand2 = 'partedUtil setptbl ' +$DriveName+' gpt "1 2048 '+$EndSector+' AA31E02A400F11DB9590000C2911D1B8 0"' |
- Send an ESXCLI command to the ESXi host via SSH session to create partition.
|
1 |
(Invoke-SSHCommand -SSHSession $SSHSession -Command $SSHCommand2 -EnsureConnection).output |
- Datastore name parameter initialization ($DSName). You can choose any other name if not ‘USB-Ds’.
|
1 |
$DSName = 'USB-Ds' |
- ESXCLI write command parameter initialization.
|
1 |
$SSHCommand3 = 'vmkfstools -C vmfs6 -S '+$DSName+' '+$DriveName+':1' |
- Send an ESXCLI command to the ESXi host via SSH session to create VMFS 6 datastore on the USB drive.
|
1 |
Invoke-SSHCommand -SSHSession $SSHSession -Command $SSHCommand3 -EnsureConnection |
- Disconnect from the ESXi host.
|
1 |
Disconnect-VIServer -Server $ESXi -Confirm:$false -Force |
- Remove SSH session from the ESXi host.
|
1 |
Remove-SSHSession -SSHSession $SSHSession -Verbose:$false |
- Remove ESXi host certificate from the trusted hosts list.
|
1 |
Remove-SSHTrustedHost -SSHHost $ESXi |
Now you have a new datastore on your host with name set in datastore name parameter ($DSName)!
You can invoke this command sequence with the Mode parameter (NewDS value).
To start the script, you need to save its listing – USB-DS.ps1.
USB-DS.ps1
|
1 2 3 4 5 6 7 8 9 10 11 12 13 14 15 16 17 18 19 20 21 22 23 24 25 26 27 28 29 30 31 32 33 34 35 36 37 38 39 40 41 42 43 44 45 46 47 48 49 50 51 52 53 54 55 56 57 58 59 60 61 62 63 64 65 66 67 68 69 70 71 72 73 74 75 76 77 78 79 80 81 82 83 84 85 86 87 88 89 90 91 92 93 94 95 96 97 98 99 100 101 102 103 104 105 106 107 108 109 110 111 112 113 114 115 116 117 118 119 120 121 122 123 124 125 126 127 128 129 130 131 132 133 134 135 136 137 138 139 140 141 142 143 144 145 146 147 148 149 150 151 152 153 154 155 156 157 158 159 160 161 162 163 164 165 166 167 168 169 170 171 172 173 174 175 176 177 178 179 180 181 182 183 184 185 186 187 188 189 190 191 192 193 194 195 196 197 198 199 200 201 202 203 204 205 206 207 208 209 210 211 212 213 214 215 216 217 218 219 220 221 222 223 224 225 226 227 228 229 230 231 232 233 234 235 236 237 238 239 240 241 242 243 244 245 246 247 248 249 250 251 252 253 254 255 256 257 258 259 260 261 262 263 264 265 266 267 268 269 270 271 272 273 274 275 276 277 278 279 280 281 282 283 284 285 286 287 288 289 290 291 292 293 294 295 296 297 298 299 300 301 302 303 304 305 306 307 308 309 310 311 312 313 314 315 316 317 318 319 320 321 322 323 324 325 326 327 328 329 330 331 332 333 334 335 336 337 338 339 340 341 342 343 344 345 346 347 348 349 350 351 352 353 354 355 356 357 358 359 360 361 362 363 364 365 366 367 368 369 370 371 372 373 374 375 376 377 378 379 380 381 382 383 384 385 386 387 388 389 390 391 392 393 394 395 396 397 398 399 400 401 402 403 404 405 406 407 408 409 410 411 412 413 414 415 416 417 418 419 420 421 422 423 424 425 426 427 428 429 430 431 432 433 434 435 436 437 438 439 440 441 442 443 444 445 446 447 448 449 450 451 452 453 454 455 456 457 458 459 460 461 462 463 464 465 466 467 468 469 470 471 472 473 474 475 476 477 478 479 480 481 482 483 484 485 486 487 488 489 490 491 492 493 494 495 496 497 498 499 500 501 502 503 504 505 506 507 508 509 510 511 512 513 514 515 516 517 518 519 520 521 522 523 524 525 526 527 528 529 530 531 532 533 534 535 536 537 538 539 540 541 542 543 544 545 546 547 548 549 550 551 552 553 554 555 556 557 558 559 560 561 562 563 564 565 566 567 568 569 570 571 572 573 574 575 576 577 578 579 580 581 582 583 584 585 586 587 588 589 590 591 592 593 594 595 596 597 598 599 600 601 602 603 604 605 606 607 608 609 610 611 612 613 614 615 616 617 618 619 620 621 622 623 624 625 626 627 628 629 630 631 632 633 634 635 636 637 638 639 640 641 642 643 644 645 646 647 648 649 650 651 652 653 654 655 656 657 658 659 660 661 662 663 664 665 666 667 668 669 670 671 672 673 674 675 676 677 678 679 680 681 682 683 684 685 686 687 688 689 690 691 692 693 694 695 696 697 698 699 700 701 702 703 704 705 706 707 708 709 710 711 712 713 714 715 716 717 718 719 720 721 722 723 724 725 726 727 728 729 730 731 732 733 734 735 |
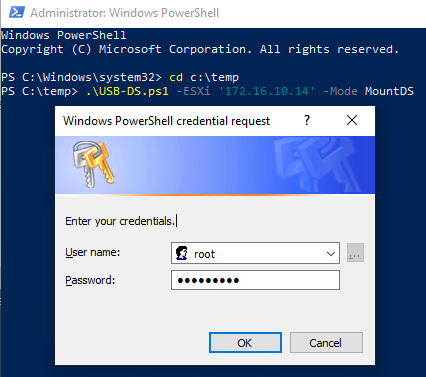
<# .SYNOPSIS A script to create and enable (disable) a VMFS datastore on a USB drive. .PARAMETER -ESXi ESXi Host Name or IP ('<ESXi Host Name or IP>') .PARAMETER -DSName Datastore Name ('<Datastore Name>') .PARAMETER -Mode Script mode ('<Mode>') .EXAMPLES PS> .\USB-DS.ps1 -ESXi '192.168.1.2' -DSName 'USB-VMFS-DS' -Mode NewDS PS> .\USB-DS.ps1 -ESXi '192.168.1.2' -Mode MountDS PS> .\USB-DS.ps1 -ESXi '192.168.1.2' -Mode UnmountDS #> # Parameter initialization. param ( [Parameter (Mandatory = $true)] [String] $ESXi, [Parameter (Mandatory = $false)] [String] $DSName, [Parameter (Mandatory = $true)] [ValidateSet("NewDS","MountDS","UnmountDS")] [String] $Mode ) # Check for the presence of Posh-SSH module. if ((Get-Module -Name Posh-SSH -ListAvailable -ErrorAction Continue) -eq $null) { # Install PoSH-SSH Module. Install-Module -Name Posh-SSH -Force -ErrorVariable Err if ("$Err" -eq "$null") { # Display the current state. Write-Host "Required script module (Posh-SSH) was not found and will be installed automatically!" -ForegroundColor Yellow } else { # Display the current state. Write-Host "Posh-SSH module cannot be installed automatically! In order to continue, download it from the repository and install manually following the instructions on the ""Manual Download"" at the following link: https://www.powershellgallery.com/packages/Posh-SSH/2.1!" -ForegroundColor Red # Pause. Pause # Exit the script. Exit } } # Script completion function. function Exit-script { # Parameter initialization. Param ([String]$State) # Initialization of a variable. $Err = $null # Disconnect the ESXi Host. Disconnect-VIServer -Server $ESXi -Verbose:$false -Confirm:$false -Force -ErrorVariable Err # Error check. if ("$Err" -eq "$null") { # Display the current state. Write-Host "Connection to $ESXi host is complete!" -ForegroundColor Green } else { # Display the current state. Write-Host "Connection to ESXi host isn't complete!" -ForegroundColor Red } # Disconnect SSH Session. Remove-SSHSession -SSHSession $SSHSession -Verbose:$false -ErrorVariable Err | Out-Null # Error check. if ("$Err" -eq "$null") { # Display the current state. Write-Host "SSH session with $ESXi host is stopped!" -ForegroundColor Green } else { # Display the current state. Write-Host "SSH session with $ESXi host isn't stopped!" -ForegroundColor Red } # Remove $ESXi Host from TrustedHost. Remove-SSHTrustedHost -SSHHost $ESXi -Verbose:$false # Check the message output flag. if ($State -eq 'e') { # Display the current state. Write-Host "The script completed successfully!" -ForegroundColor Green } else { # Display the current state. Write-Host "The script was interrupted!" -ForegroundColor Red } # Pause. Pause # Remove variables. Remove-Variable -Name * -Force -ErrorAction SilentlyContinue | Out-Null # Clear terminal. Clear-Host # Exit the script. Exit } # Confirmation function. function ConfirmSelected { # Receiving user parameters. $Choice = read-host "Attention! Formatting a USB drive ($USBDRIVE) will erase all its data! Do you agree to continue? (y/n)" # Switch Choice parameter value. Switch($Choice) { Y{NewDS} N{MainMenu} default{write-host -foregroundcolor red "Invalid Selection!" | sleep 3 | ConfirmSelected } } } # Menu output function. function MainMenu { # List of available USB devices. $USB = (Invoke-SSHCommand -SSHSession $SSHSession -Command 'esxcli --formatter=csv --format-param=fields="Display Name" storage core device list | grep "Local USB Direct-Access"' -EnsureConnection).Output # Number of available USB devices. $USBCounter=$USB.count # Check for the presence of available USB drives. if ($USB -match "Local USB Direct-Access") { # Creating data entry menu cycle. do { # Initialization of variables. $PointerCounter=0 $List=@() # Create the input cycle. do { # Output results. Write-Host "[$PointerCounter] - $(($USB[$($PointerCounter)]).TrimEnd(","))" -ForegroundColor Magenta # Initialization of variables. $Pointer=$null $Line=$null [string]$Line=$($USB[$($PointerCounter)]) $List+=$Pointer $PointerCounter++ } while ($PointerCounter -lt $USBCounter) # Message output. Write-Host "[q] - Quit!" -ForegroundColor Magenta # Receiving user parameters. $Pointer = Read-Host 'Enter the Number [x] of the required USB drive from the list! To quit the script, enter "q"' # Validation of the entered data. if ($Pointer -ge '0' -and $Pointer -clt $PointerCounter -and $Pointer -match '[\d]$' -and $Pointer -notmatch '[\D]$') { # Variable initialization. $USBDRIVE=((($USB)[$Pointer]).TrimEnd(' ,')) # Calling ConfirmSelected function. ConfirmSelected } else { # Validation of the entered data. if (($Pointer).Equals("Q") -or ($Pointer).Equals("q") ) { # Calling Exit-script function. Exit-script -Param 't' } else { write-host -ForegroundColor red "Invalid Selection!" | sleep 3 } } } while ( "$true" -eq "$true") } else { # Message output. Write-Warning "USB drive connected to host is not recognized! Please reconnect USB drive to $ESXi host!" # Terminate the script Exit-script -Param 't' } } # Function to create a new datastore. function NewDS { # Initialization of a variable. $DriveName = "/vmfs/devices/disks/"+((($USB)[$Pointer]).subString(25)).TrimEnd("),") # Initialization of a variable. $SSHCommand1 = 'partedUtil getptbl '+$DriveName # Send a command line to the ESXi host through an SSH session. write-host ($SSHOutput1 = (Invoke-SSHCommand -SSHSession $SSHSession -Command $SSHCommand1 -EnsureConnection).output) # Initialization of a variable. $SSHCommand1 = 'eval expr $(partedUtil getptbl '+$DriveName+' | tail -1 | awk ''{print $1 " \\* " $2 " \\* " $3}'') - 1' # Initialization of a variable. $EndSector = (Invoke-SSHCommand -SSHSession $SSHSession -Command $SSHCommand1 -EnsureConnection).output # Check for a USB drive detection error. if ($EndSector -eq '-1') { # Message output. Write-Host "Unexpected USB drive error! Reboot $ESXi host and try again!" -ForegroundColor Red # Calling Exit-script function. Exit-script -State 't' } # Initialization of a variable. $SSHCommand2 = 'partedUtil mklabel '+$DriveName+' gpt' # Send a command line to the ESXi host through an SSH session. Invoke-SSHCommand -SSHSession $SSHSession -Command $SSHCommand2 -EnsureConnection | Out-Null # Initialization of a variable. $SSHCommand3 = 'partedUtil setptbl '+$DriveName+' gpt '+'"1 2048 '+$EndSector+' AA31E02A400F11DB9590000C2911D1B8 0"' # Send a command line to the ESXi host through an SSH session and result output. write-host (Invoke-SSHCommand -SSHSession $SSHSession -Command $SSHCommand3).output # Check the need to change the name of a new datastore. if ($DSName -eq $null) { # Initialization of a variable. $DSName = "USB-VMFS-Datastore" } # Initialization of a variable. $SSHCommand4 = 'vmkfstools -C vmfs6 -S '+$DSName+' '+$DriveName+':1' # Send a command line to the ESXi host through an SSH session and result output. Write-Host (Invoke-SSHCommand -SSHSession $SSHSession -Command $SSHCommand4).output # Display the current state. Write-Host "Copy the necessary information to the newly created datastore. Don't forget to unmount datastore once you finish working with it! Run the script with the -Mode UnmountDS parameter to remove the USB drive!" -ForegroundColor Yellow # Calling Exit-script function. Exit-script -State 'e' } # Datastore disabling function. function UnmountDS { # Exception Handling. Try { # Send a command line to the ESXi host through an SSH session. Invoke-SSHCommand -SSHSession $SSHSession -Command '/etc/init.d/usbarbitrator start' -EnsureConnection -ErrorVariable Err| Out-Null } Catch { # Message output. Write-Host "Unable to start Usbarbitrator service on $ESXi host! Start service through ssh session on $ESXi host with a command: <'/etc/init.d/usbarbitrator start'>!" -ForegroundColor Red } Finally { # Error check. if ("$Err" -eq "$null") { # Message output. Write-Host "Usbarbitrator service on $ESXi is started! Reboot $ESXi host to restore access to USB devices from VM!" -ForegroundColor Yellow } } # Check for the need to disconnect the USB datastore from the host. if ($Mode -eq 'UnmountDS') { # Message output. Write-Host "Please, disconnect the USB datastore from $ESXi host, then press Enter to continue!" -ForegroundColor Yellow # Pause. pause } # Send a command line to the ESXi host through an SSH session. Invoke-SSHCommand -SSHSession $SSHSession -Command 'esxcfg-rescan -A' -EnsureConnection | Out-Null # Send a command line to the ESXi host through an SSH session. Invoke-SSHCommand -SSHSession $SSHSession -Command 'esxcli storage filesystem rescan' -EnsureConnection | Out-Null # Calling Exit-script function. Exit-script -State 'e' } # Datastore connection function. function MountDS { # Initialization of variables. $Cred = (Get-Credential -Credential $null) $User = $Cred.UserName $Password = $Cred.Password # Variable initialization. $Credential = New-Object System.Management.Automation.PSCredential -ArgumentList ($User,$Password) # Connect to the ESXi host. Connect-VIServer -Server $ESXi -Credential $Credential -ErrorAction Stop -ErrorVariable Err | Out-null # Error check. if ("$Err" -eq "$null") { # Message output. Write-Host "Connection to $ESXi host is established!" -ForegroundColor Green } else { # Message output. Write-Host "Connection to $ESXi host isn't established!" -ForegroundColor Red # Calling Exit-script function. Exit-script -Param 't' } # Check for the availability of TSM-SSH service on ESXi host. Get-VMHost -Name $ESXi | %{ # Initialization of a variable. $SSH = Get-VMHostService -VMHost $ESXi | where{$_.Key -eq 'TSM-SSH'} # Determine the status of SM-SSH service on ESXi host. if(!$SSH.Running){ # Start TSM-SSH service on ESXi host. Start-VMHostService -HostService $SSH -Confirm:$false | Out-Null } } # Starting a SSH session with ESXi host $SSHSession = New-SSHSession -ComputerName $ESXi -Credential $Credential -ErrorAction Stop -AcceptKey:$true -ErrorVariable Err # Error check. if ("$Err" -eq "$null") { # Message output. Write-Host "SSH session with $ESXi is established!" -ForegroundColor Green } else { # Message output. Write-Host "SSH session with $ESXi isn't established!" -ForegroundColor Red # Calling Exit-script function. Exit-script -Param 't' } # Get the status of Usbarbitrator service on ESXi host. $USBArb_Status = Invoke-SSHCommand -SSHSession $SSHSession -Command '/etc/init.d/usbarbitrator status' -EnsureConnection # Check for the status of Usbarbitrator service on ESXi host. if (($USBArb_Status).Output -eq 'usbarbitrator is running' -and $Mode -ne 'UnmountDS') { # Stop Usbarbitrator service on $ESXi host. Invoke-SSHCommand -SSHSession $SSHSession -Command '/etc/init.d/usbarbitrator stop' -EnsureConnection | Out-Null # Error check. if ("$Err" -eq "$null") { # Message output. Write-Host "Usbarbitrator service on $ESXi host has been stopped!"-ForegroundColor Green } } else { # Check Mode parameter value. if ($Mode -ne 'UnmountDS') { # Message output. Write-Host "Usbarbitrator service on $ESXi host has been stopped before!" -ForegroundColor Gray } } # Check for the need to connect the USB datastore to the host. if ($Mode -eq 'MountDS') { # Message output. Write-Host "Please, connect the USB datastore to $ESXi host, then press Enter to continue!" -ForegroundColor Yellow # Pause. pause } # Send a command line to the ESXi host through an SSH session. Invoke-SSHCommand -SSHSession $SSHSession -Command 'esxcfg-rescan -A' -EnsureConnection | Out-Null # Send a command line to the ESXi host through an SSH session. Invoke-SSHCommand -SSHSession $SSHSession -Command 'esxcli storage filesystem rescan' -EnsureConnection | Out-Null # Switch Mode parameter value. Switch($Mode) { NewDS{MainMenu} MountDS{Exit-script -State 'e'} UnmountDS{UnmountDS} } } # Calling MountDS function. MountDS |
Enter the host via WebGUI and make sure no existing datastore name matches the new USB datastore name.
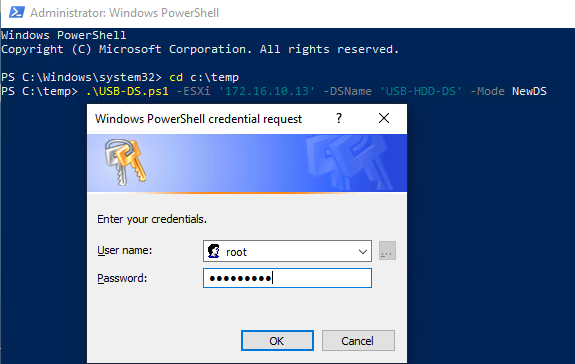
Start previously saved script with PowerShell as admin. Run the script from the directory, and enter the following command:
|
1 |
.\USB-DS.ps1 -ESXi '<ESXi Host Name or IP >' -DSName '<New Datastore Name>' -Mode NewDS |
Then you’ll have password and login screen to connect to the ESXi host; an account should have the administrative privileges on this host.
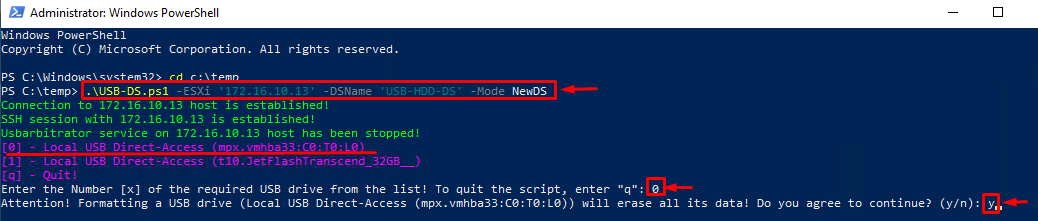
As you can see, in my case there are two USB drives available for creating a datastore. Choose one of the attached USB drives and confirm your choice. At this stage, you can still dismiss datastore creation just by choosing “q”! Be attentive! After selecting a USB drive, all data will be erased instantly!
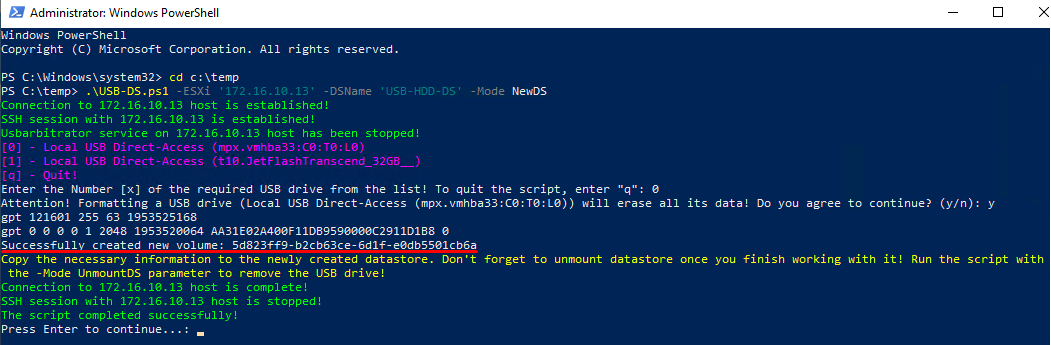
If all is performed correctly, you will receive a notification about new partition creation. After pressing Enter, the script work will be stopped, and the PowerShell console will be cleared.
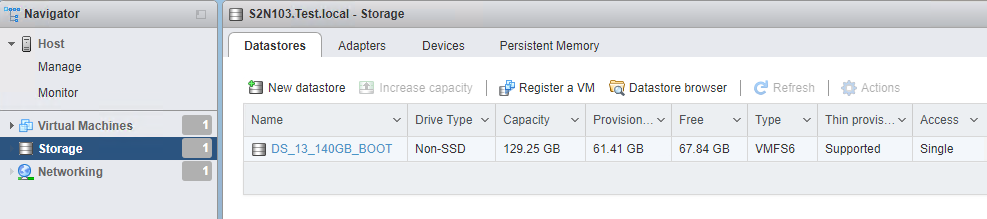
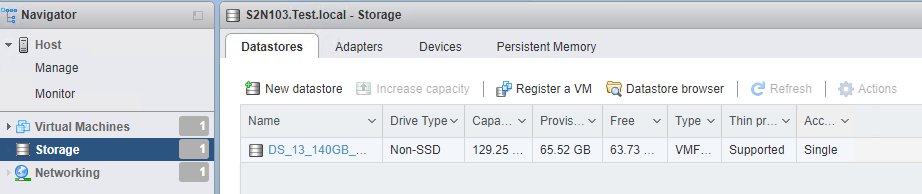
You can check the presence and start working with the new USB datastore with the help of WebGUI. You need to restart the page to check the presence of the new datastore.
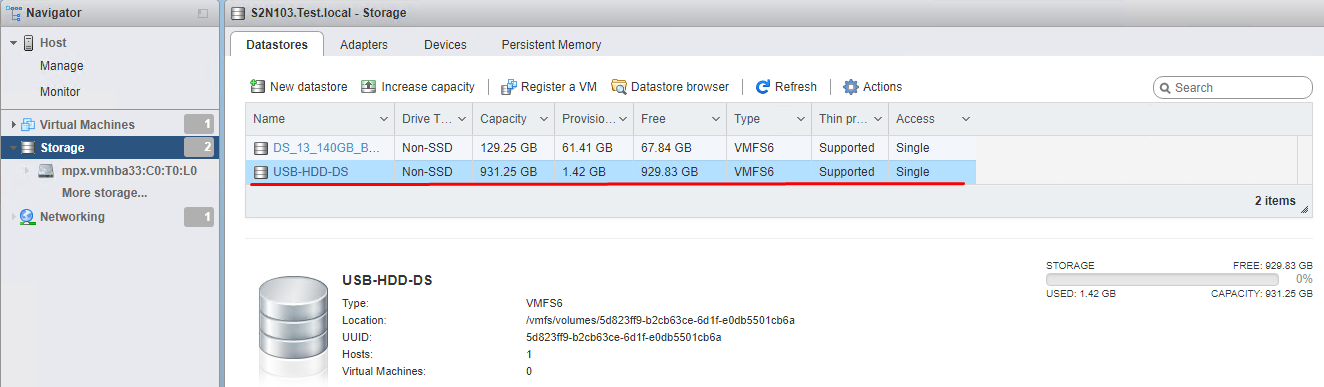
The new datastore is ready for work. After finishing the work, you’ll need the UnmountDS parameter, which will be explained further.
NOTE: Datastore will be available until you reboot the host.
UnmountDS
Before you get on with this parameter, please, make sure that you have finished all input and output operations in the datastore, unless you want to lose your data!
The PowerShell command sequence:
- ESXi host name parameter initialization.
|
1 |
$ESXi = '<ESXi Host Name or IP >' |
- Connection to ESXi host with a VM with virtualized ESXi host (password and login to connect to the ESXi host).
|
1 |
Connect-VIServer -Server $ESXi -ErrorAction Stop |
- Get the status of the TSM-SSH service (if the service is started, the exit status of the commands will be “True”; in this case, skip the next paragraph).
|
1 2 3 |
$SSH = Get-VMHostService -VMHost $ESXi | where{$_.Key -eq 'TSM-SSH'} Write-Host ($SSH).Running |
- Start the TSM-SSH service if it was disabled.
|
1 |
Get-VMHost -Name $ESXi |%{Start-VMHostService -HostService $SSH -Confirm:$false} |
- Start SSH host session (password and login to connect to the ESXi host).
|
1 |
$SSHSession = New-SSHSession -ComputerName $ESXi -ErrorAction Stop -AcceptKey:$true |
- Send an ESXCLI command to the ESXi host via SSH session to get the Usbarbitrator service status.
|
1 |
(Invoke-SSHCommand -SSHSession $SSHSession -Command '/etc/init.d/usbarbitrator status' -EnsureConnection).output |
- Send an ESXCLI command to the ESXi via SSH session to start the Usbarbitrator service if it was disabled.
|
1 |
Invoke-SSHCommand -SSHSession $SSHSession -Command '/etc/init.d/usbarbitrator start' -EnsureConnection |
- Disconnect from the ESXi host.
|
1 |
Disconnect-VIServer -Server $ESXi -Confirm:$false -Force |
- Remove SSH session from the ESXi host.
|
1 |
Remove-SSHSession -SSHSession $SSHSession -Verbose:$false |
- Remove ESXi host certificate from the trusted hosts list.
|
1 |
Remove-SSHTrustedHost -SSHHost $ESXi |
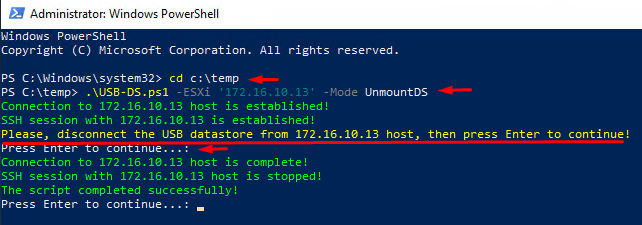
After completing this command sequence, all the USB drives attached to the host can be physically removed.
Start the script as admin, much like in the previous case. To start it, run the script from the directory, and enter the following command:
|
1 |
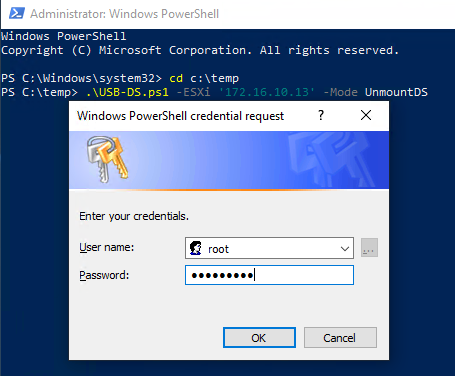
.\USB-DS.ps1 -ESXi '<ESXi Host Name or IP >' -Mode UnmountDS |
Unlike in the previous case, you don’t need to choose the datastore name. Then you’ll have password and login screen to connect to the ESXi host.
Remove the USB drive from the host. Reboot the host to regain access to the USB drives from the VM. If you don’t need the access right now, you can do it later.
You can check if everything is correct with the help of WebGUI. You need to restart the page to see the changes.
MountDS
This parameter is for stopping the Usbarbitrator service and updating the info about devices and their file systems. You can use this parameter on the source host to connect to the datastore after the reboot.
The PowerShell command sequence:
- ESXi host name parameter initialization.
|
1 |
$ESXi = '<ESXi Host Name or IP >' |
- Connection to ESXi host with a VM with virtualized ESXi host (password and login to connect to the ESXi host).
|
1 |
Connect-VIServer -Server $ESXi -ErrorAction Stop |
- Get the status of the TSM-SSH service (if the service is started, the exit status of the commands will be “True”; in this case, skip the next paragraph).
|
1 2 3 |
$SSH = Get-VMHostService -VMHost $ESXi | where{$_.Key -eq 'TSM-SSH'} Write-Host ($SSH).Running |
- Start the TSM-SSH service if it was disabled.
|
1 |
Get-VMHost -Name $ESXi |%{Start-VMHostService -HostService $SSH -Confirm:$false} |
- Start SSH host session (password and login to connect to the ESXi host).
|
1 |
$SSHSession = New-SSHSession -ComputerName $ESXi -ErrorAction Stop -AcceptKey:$true |
- Send an ESXCLI command to the ESXi host via SSH session to get the Usbarbitrator service status.
|
1 |
(Invoke-SSHCommand -SSHSession $SSHSession -Command '/etc/init.d/usbarbitrator status' -EnsureConnection).output |
- Send an ESXCLI command to the ESXi via SSH session to stop the Usbarbitrator service if it was enabled.
|
1 |
Invoke-SSHCommand -SSHSession $SSHSession -Command '/etc/init.d/usbarbitrator stop' -EnsureConnection |
- Disconnect from the ESXi host.
|
1 |
Disconnect-VIServer -Server $ESXi -Confirm:$false -Force |
- Remove SSH session from the ESXi host.
|
1 |
Remove-SSHSession -SSHSession $SSHSession -Verbose:$false |
- Remove ESXi host certificate from the trusted hosts list.
|
1 |
Remove-SSHTrustedHost -SSHHost $ESXi |
After completing this command sequence, all the USB drives attached to the host need to be physically reattached.
Don’t attach the USB drive before you start this script! Start the script as admin, much like in both previous cases. To do so, run the script from the directory, and enter the following command:
|
1 |
.\USB-DS.ps1 -ESXi '<ESXi Host Name or IP >' -Mode MountDS |
Like in the previous case, you don’t need to choose the datastore name. Then you’ll have password and login screen to connect to the ESXi host.
Connect the USB datastore and press Enter to continue.
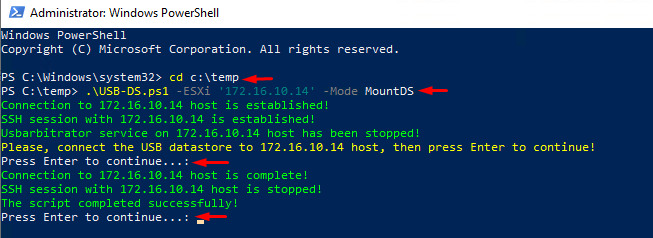
You can check the presence and start working with the new USB datastore with the help of WebGUI. You need to restart the page to check the presence of the new datastore. However, if you started the script with the datastore disabled before rebooting the host, you won’t be able to check its presence with WebGUI!

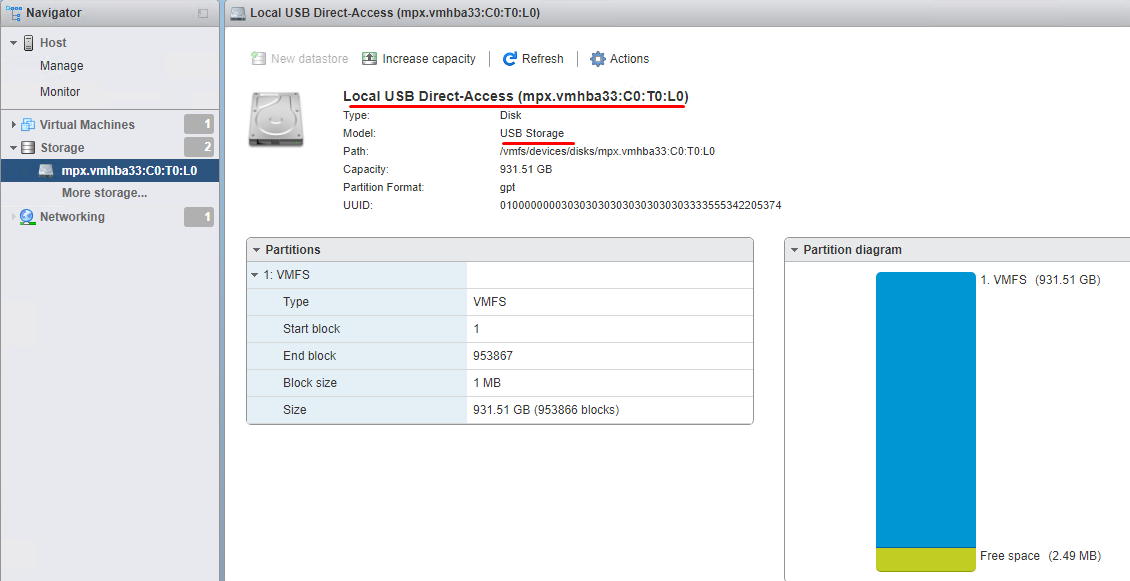
USB drive size and structure haven’t changed, it is ready for work.
After you finished working with the datastore, use the UnmountDS parameter to save your data. All active input and output operations in the datastore should be finished by now. After the complete end of using the datastore, you can restore the USB drive to its original state by standard means. This is it for now! I do hope that my work will help to get rid of the especially tedious processes.
