

While extending a VMDK file is a fairly easy task that can be performed right in Disk Manager, shrinking a virtual disk is a bit tricky. And, you need to be really careful because unless done properly, reducing virtual disk size may cause data loss! Sure, you can just use VMware Converter to make a VMDK smaller, but, for my money, it is always better to have a script at hand. In this article, I’ll discuss how to shrink virtual disks with 2 simple PowerShell scripts.
Let’s take a closer look at the whole process of shrinking VMDKs
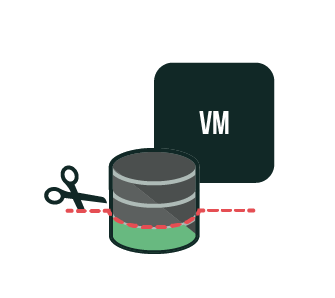
To understand better the whole magic behind reducing VMDK size, let’s discuss what a virtual disk is. *.vmdk file is just an abstraction existing between hardware and a VM. Neither VM nor physical datastore cares that much about what’s going on inside that entity, meaning that they exist in different layers. I think that the image below perfectly reflects the whole concept of virtual disks. To learn more about virtual disk types, check out my previous article that discusses each of them in detail.
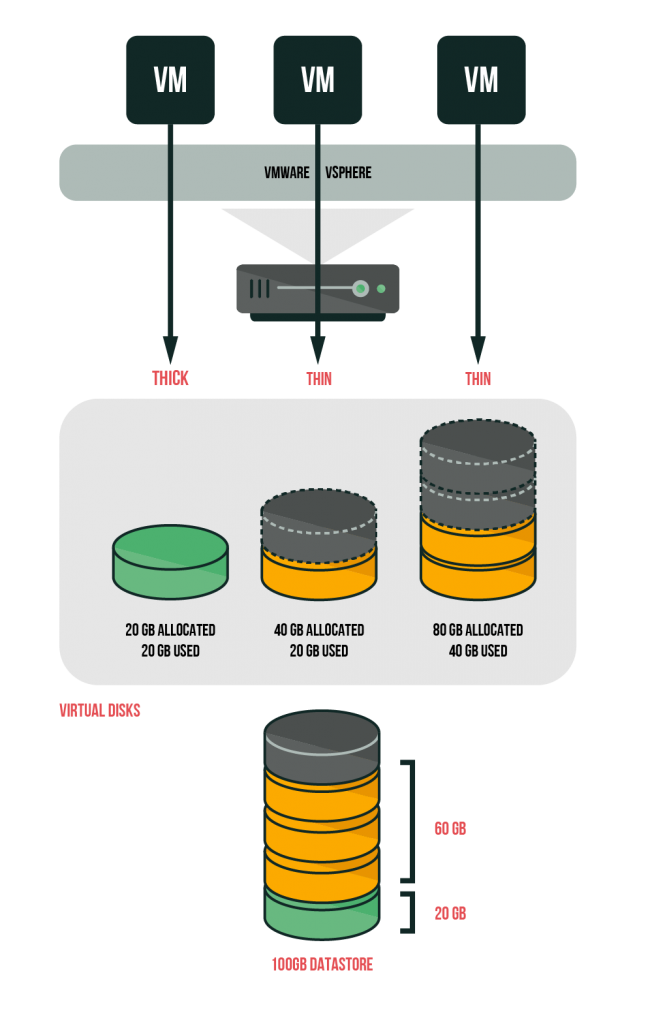
Let me explain now why one needs resizing virtual disks. Until you run out of the free space on the datastore or have to migrate a VM with a huge VMDK quickly, everything is just fine and you do not care how big a virtual disk is. At some point, to utilize the storage efficiently, one may naturally consider using a thin provisioned virtual device… but that thing bloats up at the end of the day, and the worst thing is that it doesn’t become any smaller even after you delete some data from it. And, that’s actually why you need to reduce VMDK size somehow.
What’s the catch with resizing a VMDK? By playing around with the disk size, you may corrupt the data as VM is not aware of those manipulations. Maybe, that’s why there’s no way to shrink the device in VM Disk Management.
To reduce VMDK size, it may be smart to resize the partition, separating the occupied disk volume from the free volume. Next, you need to “cut off” the free space to shrink VMDK such that no data will be lost. This being said, the process can be formally split into 2 subtasks:
- Resizing partition on the guest OS level.
- Shrinking the VMDK itself.
For each step, you need a PowerShell script. I discuss them later.
Now, as I’m getting closer to the main part, I’d like to mention requirements for shrinking the disk. You need your PowerShell version to be 5.11 or higher and PowerCLI version needs to be 11.0.0 or higher. You also need a VMware vCenter Server instance; otherwise, you won’t be able to run the commands. Additionally, you need an extra datastore on the ESXi host where your VM is running. Note that it should have enough space to be used as temporary storage for copying the resized VMDK. .
DISCLAIMER: If you mess things up that’s not my fault. The scripts I mentioned here worked for me, but none of them grants your data safety and VM stability if you do something wrong. So, always keep a copy of your disk before reducing its size as you can screw things up fairly easily.
Script one: How to resize the partition
Well, any script like that can be transformed into one that works on Linux. Today, though, I have a Windows VMs that’s why I present PowerShell scripts here. Now, I’d like to discuss some things about starting the script for resizing partitions.
1.The script is executed remotely so it can be run on several VMs simultaneously.
2. To run the script, use the following flags:
- VMIP – IP of the VM that has its VMDK disk shrunk.
- VMUser –VM administrator account.
3. Start the script as administrator on the local PowerShell instance.
Here’s the command to start the script:
|
1 |
PS> .\Resize-Partition.ps1 -VMIP "172.16.1.26" -VMUser "Administrator" |

Unless the VM is running, you’ll get the warning and script will be stopped. To restart the script, switch on the VM and start the script again.
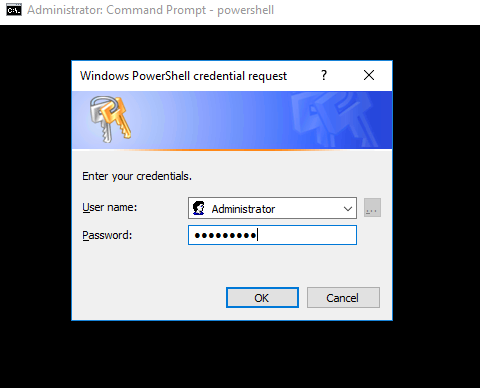
Next, enter the credentials and connect to the remote PowerShell session.
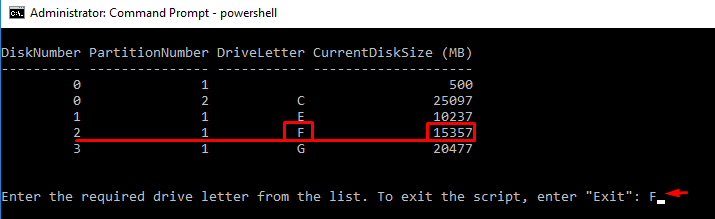
After authorizing, select the disk (F, in my case). You can exit the script by typing Exit.
Here’s the screenshot from the VM Disk Management. I strongly recommend closing Disk Management to avoid any errors during shrinking (that’s one of those annoying Windows bugs).
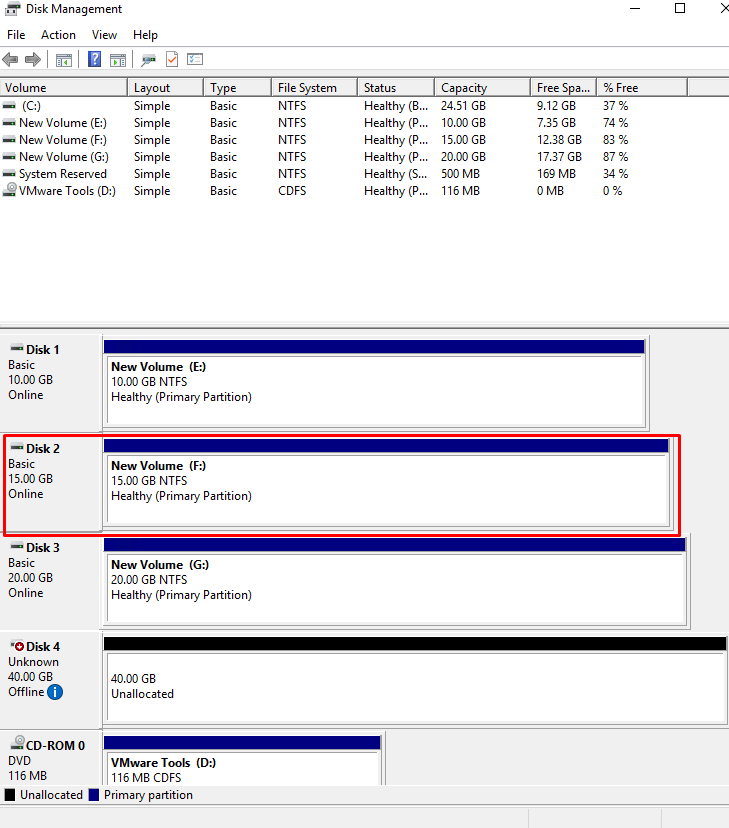
Next, see whether you have selected the right disk. Pay attention to the minimum and maximum partition size. Here, the partition size matches the maximum disk volume. Now, let’s shrink it! Enter the new partition size (4096 MB, let’s say).
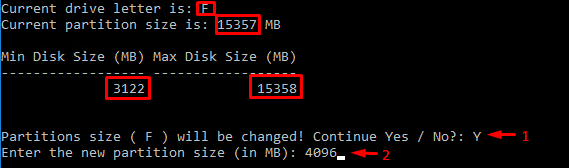
If the process has run smoothly, there will be an output saying that everything is fine. In the output, you can find the new partition size and recommendations for running the next script.

Jot down these numbers from the output. You will need them to shrink VMDK. Also, I strongly recommend adding some more space to the disk (512-1024 MB) to avoid any data loss due to errors that may occur while shrinking the disk.
Now, go to Disk Management and see whether the changes were applied. One more time, if you don’t close the Disk Management window before running the script, you will end up with an error. No worries, if you did encounter one, just close the Disk Management window and open it once again.
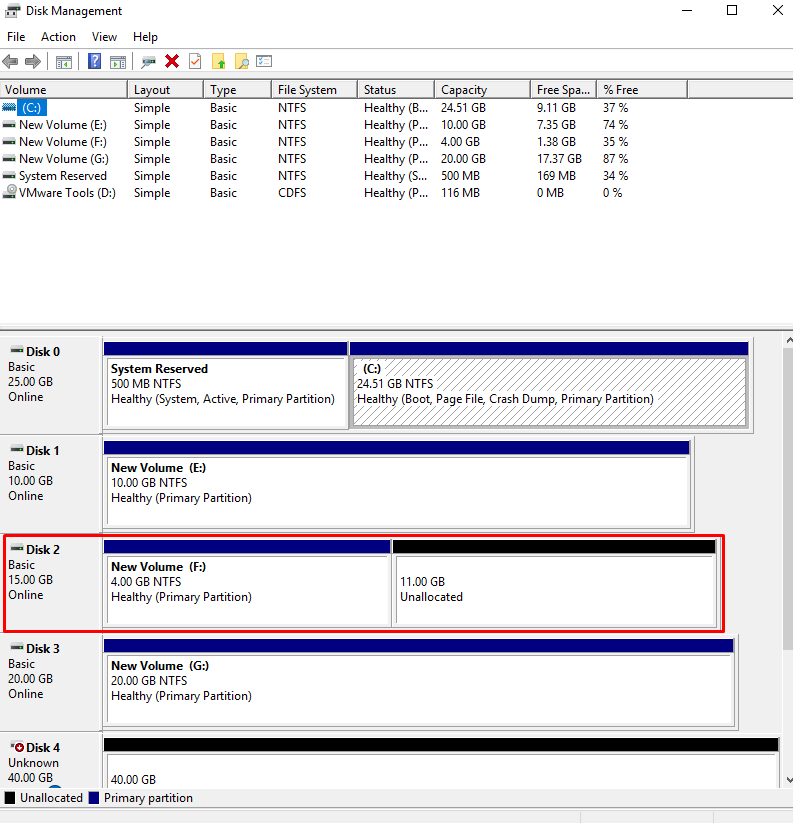
In this case, I freed 11GB on the disk by shrinking the partition and separating the volume taken by data from the free volume.
Below, you can find the script itself. To run it, copy the script on your PC and save it as Resize-Partition.ps1.
Resize-Partition.ps1
|
1 2 3 4 5 6 7 8 9 10 11 12 13 14 15 16 17 18 19 20 21 22 23 24 25 26 27 28 29 30 31 32 33 34 35 36 37 38 39 40 41 42 43 44 45 46 47 48 49 50 51 52 53 54 55 56 57 58 59 60 61 62 63 64 65 66 67 68 69 70 71 72 73 74 75 76 77 78 79 80 81 82 83 84 85 86 87 88 89 90 91 92 93 94 95 96 97 98 99 100 101 102 103 104 105 106 107 108 109 110 111 112 113 114 115 116 117 118 119 120 121 122 123 124 125 126 127 128 129 130 131 132 133 134 135 136 137 138 139 140 141 142 |
<# .SYNOPSIS The script for resizing the Windows partition. .PARAMETER -VMIP VM IP address ("10.0.0.2") .PARAMETER -VMUser VM admin username ("Administrator") .EXAMPLE PS> .\Resize-Partition.ps1 -VMIP "10.0.0.2" -VMUser "Administrator" #> param ( [Parameter (Mandatory = $true)] [String]$VMIP, [Parameter (Mandatory = $true)] [String]$VMUser ) ## Clear the console Clear-Host ## Add the VM IP address to the trusted list $CurValue = (get-item wsman:\localhost\Client\TrustedHosts -Force).value #Set-Item wsman:\localhost\client\trustedhosts "$CurValue,$VMIP" -Force Set-Item wsman:\localhost\client\trustedhosts "$VMIP,$CurValue " -Force ## Verify connectivity to the WinRM service on the VM try { ## Check if WinRM service is available on that VM. Test-WsMan $VMIP -ErrorAction Stop | Out-Null } catch { ## Information output Write-Warning "Attempt to connect to $VMIP server failed! Check if the VM $VMIP is turned on!" ## Clear the list of trusted hosts Set-Item wsman:\localhost\client\trustedhosts "$CurValue" -Force ## Remove variables Remove-Variable -Name * -Force -ErrorAction SilentlyContinue exit } ## Verify connectivity to the PSSession on the VM try { ## Creating a new PowerShell session on a remote computer $PSSession = New-PSSession -ComputerName $VMIP -Credential $VMUser -ErrorAction Stop } catch { ## Information output Write-Warning "Attempt create a new PowerShell session on a remote $VMIP server failed!" ## Clear the list of trusted hosts Set-Item wsman:\localhost\client\trustedhosts "$CurValue" -Force ## Remove variables Remove-Variable -Name * -Force -ErrorAction SilentlyContinue exit } ## Execution of commands in a remote PowerShell session Invoke-Command -Session $PSSession -ScriptBlock { ## Initializing Variables $LetMas=("C","D","E","F","G","H","I","J","K","L","M","N","O","P","Q","R","S","T","U","V","W","X","Y","Z","c","d","e","f","g","h","i","j","k","l","m","n","o","p","q","r","s","t","u","v","w","x","y","z") $Cycle=0 ## Create the input cycle while (($Cycle).Equals(0)) { ## Acquire information about disks Get-Partition | Format-Table -AutoSize DiskNumber,PartitionNumber,DriveLetter,@{Name="CurrentDiskSize (MB)"; Expression={[int]($_.Size/1MB)}} ## Assign the letter of the required disk from the user $DriveLetter = Read-Host 'Enter the required drive letter from the list. To exit the script, enter "Exit"' ## Validation of entered data if (($DriveLetter).Equals("Exit") -or ($DriveLetter).Equals("exit") ) { ## Clear the list of trusted hosts Set-Item wsman:\localhost\client\trustedhosts "$CurValue" -Force ## Pause before closing the console Write-Warning "You have successfully terminated the script!" | Pause | Clear-Host ## Exit the script Exit } elseif (($LetMas).Contains($DriveLetter) -and (Get-Partition -DriveLetter $DriveLetter).DriveLetter -notlike $null) { ## Get the current partition size. $PartSize = [int]((Get-Partition -DriveLetter $DriveLetter).size/1MB) ## Information output Write-Output "Current drive letter is: $DriveLetter" Write-Output "Current partition size is: $PartSize MB" ## Get information about the disk size. Get-PartitionSupportedSize -DriveLetter $DriveLetter -ErrorAction SilentlyContinue | Format-Table -AutoSize @{Name="Min Disk Size (MB)"; Expression={[int]($_.SizeMin/1MB)}},@{Name="Max Disk Size (MB)"; Expression={[int]($_.SizeMax/1MB)}} ## Get an answer from user. $UserAnsw = Read-Host 'Partitions size ('$DriveLetter' ) will be changed! Continue Yes / No?' } ## Handle user response if ( $UserAnsw -eq "Yes" -or $UserAnsw -eq "yes" -or $UserAnsw -eq "Y" -or $UserAnsw -eq "y" ) { $Cycle=1 break } } ## The cycle variable initialization $Cycle1=0 ## Partition Size Input Cycle while (($Cycle1).Equals(0)) { ## Get the letter of the required disk from user $NewSize = [Int](Read-Host 'Enter the new partition size (in MB)') ## Validation of the entered value if ($NewSize -match '[\d]$' -and $NewSize -notmatch '[\D]$') { $NewCurSize = (($NewSize)*([math]::pow(1024,2))) ## Change the volume of the selected partition. Resize-Partition -DriveLetter $DriveLetter -Size $NewCurSize -ErrorAction Continue ## Get and display information about disk size. Get-Partition -DriveLetter $DriveLetter | Format-Table -AutoSize DiskNumber,PartitionNumber,DriveLetter,@{Name="Current Disk Size (MB)"; Expression={[int]($_.Size/1MB)}} $DiskNumber=(Get-Partition -DriveLetter $DriveLetter).DiskNumber $DiskSize=([int]((Get-Partition -DriveLetter $DriveLetter).Size/1MB)) ## Output results Write-Output "Enter the parameters for the Resize-VMDK.ps1 script. Disk number - [$DiskNumber]. Current partition size - [$DiskSize MB]. It is highly recommended to add (512 MB - 1024 MB) of the volume to the new vmdk disk size in Resize-VMDK.ps1!" ## Exit Validation Cycle $Cycle1=1 break } } } ## Clear the list of trusted hosts Set-Item wsman:\localhost\client\trustedhosts "$CurValue" -Force ## Remove variables Remove-Variable -Name * -Force -ErrorAction SilentlyContinue |
Well, here’s how you resize partition. Now, let’s see how to shrink a VMDK itself!
Script two: How to shrink VMDK
Before I move any further, I’d like to recommend you to switch off the VM strongly. Be careful while entering script parameters as there’s a good risk of data loss.
Now, when the VM is turned off, it may be interesting to read more about how my shrinking script works.
How VMDK shrinking works in a nutshell
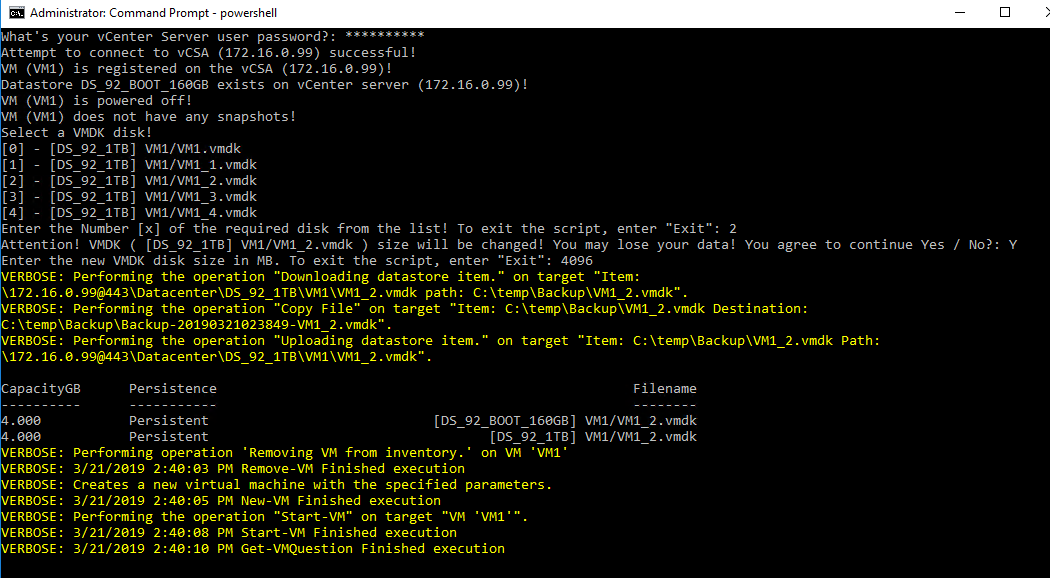
1. Copying the VMDK header file to the local directory (the path is picked automatically). Note that there’s always a backup in the Backup directory. It’s going to be called like Backup-yyyyMMddhhmmss-diskname.vmdk, so it’s fairly easy to find it. VMDK header file remains in the Backup folder, and it will be automatically replaced if you try shrinking the VMDK with the same name. The backup is done automatically before running the script. If the script has run smoothly, don’t forget to remove the file manually.
2. Changing the RW variable. This variable represents the disk size that can be derived using this formula: RW = Disk volume (GB)*1024*1024*1024/512. By altering RW value, you return the header file back to the source VM directory.
3. Moving the disk to the temporary datastore and back to the source VM directory. These operations allow the host to separate the fraction of disk volume occupied with data from the free volume using PowerCLI commands.
4. Re-registering the VM in the vCenter inventory have the changes applied.
How I run the script
Now, I’m going to tell you more about the operations that you need to do before running the script. You should start the script remotely from a PC. Here are the prerequisites for running it:
- You need a vCenter instance (i.e., ESXi host with a vCenter VM)
- One more datastore on the same ESXi host. You need it to keep the file temporarily during migration.
- The VM should have no snapshots
- The VM should be switched off
- There should be no changes in VM configuration since running the Resize-Partition.ps.1 script.
If you fail to meet any of those prerequisites, the script stops.
So, what is this script for? It allows shrinking a VMDK device such that data won’t be lost. The new size should lay between the partition size that you have entered before and the maximum volume of the initial VMDK. Although the script doesn’t limit the maximum volume, you need to keep in mind that you cannot set the infinitely large disk size. If the input value exceeds the maximum disk size, data on that disks will be corrupted. Anyway, since this article is about shrinking a VMDK file, pay attention rather to the minimum volume that you can set (i.e., minimum partition size).
Here are the parameters that you need to enter to run the script:
- vCSAIP – IP of vCenter Server instance that can be used to manage the guest ESXi host
- vCSAUser – vCenter Server account (Administrator@mydomain.local)
- VMName – How is the VM called in vCenter
- TmpDS – The name of the temporary datastore for copying the VMDK
Run the script as administrator using a local PowerShell instance. Here’s how starting the script looks like:
|
1 |
PS> .\Resize-VMDK.ps1 -vCSAIP "172.16.0.99" -vCSAUser "Administrator@vsphere.local" -VMName "VM1" -TmpDS "DS_92_BOOT_160GB" |

Enter vCenter Server user password once you start the script.

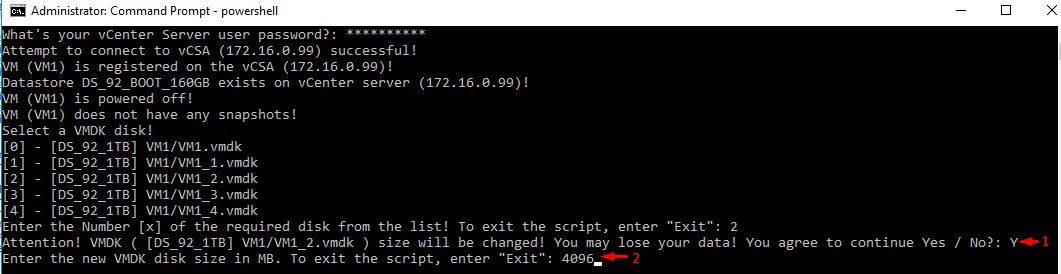
Next, the script checks whether all the prerequisites for its start are met. If everything is fine, you will be asked to select a VMDK disk.
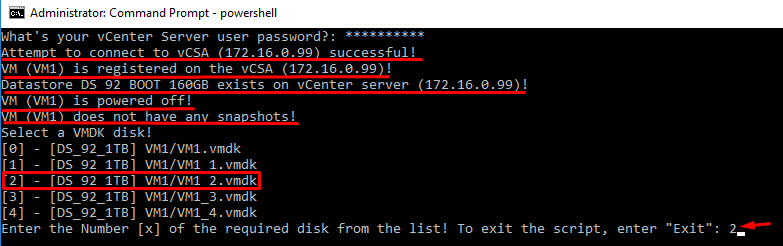
Confirm the disk selection and agree that you still want to run the script regardless of the risk of data loss. One more time, unless the new disk capacity exceeds the maximum allocated capacity, everything should be fine. This being said, type Y and enter the new VMDK volume. Anyway, if you do not want to continue, you can go back to disk selection by typing Exit.
If everything has run smoothly, here’s the output you’ll get.
Now, go to the VM Disk Management to see whether the changes have been applied.
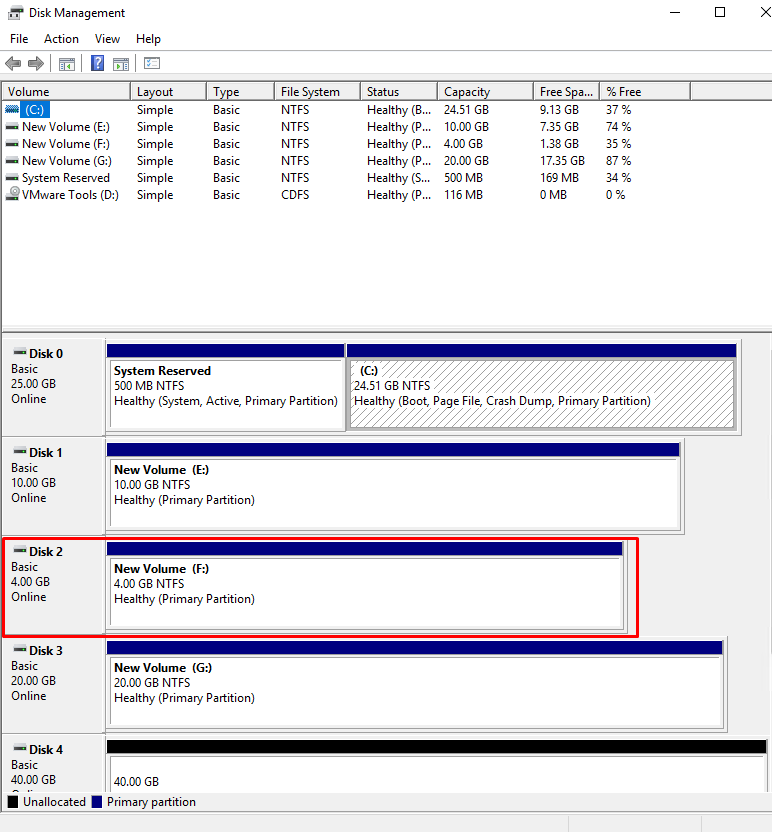
Well, that’s it! The disk became smaller and its content is absolutely OK. If you followed my recommendation and allocated some extra disk space while shrinking the VMDK file, you can expand the partition size later. Run Resize-Partition.ps1 one more time and set the maximum disk size for the desired partition value. Alternatively, you can just press Extend volume… in VM Disk Management and go through the wizard steps..
And, eventually, here comes the script itself.
Resize-VMDK.ps1
|
1 2 3 4 5 6 7 8 9 10 11 12 13 14 15 16 17 18 19 20 21 22 23 24 25 26 27 28 29 30 31 32 33 34 35 36 37 38 39 40 41 42 43 44 45 46 47 48 49 50 51 52 53 54 55 56 57 58 59 60 61 62 63 64 65 66 67 68 69 70 71 72 73 74 75 76 77 78 79 80 81 82 83 84 85 86 87 88 89 90 91 92 93 94 95 96 97 98 99 100 101 102 103 104 105 106 107 108 109 110 111 112 113 114 115 116 117 118 119 120 121 122 123 124 125 126 127 128 129 130 131 132 133 134 135 136 137 138 139 140 141 142 143 144 145 146 147 148 149 150 151 152 153 154 155 156 157 158 159 160 161 162 163 164 165 166 167 168 169 170 171 172 173 174 175 176 177 178 179 180 181 182 183 184 185 186 187 188 189 190 191 192 193 194 195 196 197 198 199 200 201 202 203 204 205 206 207 208 209 210 211 212 213 214 215 216 217 218 219 220 221 222 223 224 225 226 227 228 229 230 231 232 233 234 235 236 237 238 239 240 241 242 243 244 245 246 247 248 249 250 251 252 253 254 255 256 257 258 259 260 261 262 263 264 265 266 267 268 269 270 271 272 273 274 275 276 277 278 279 280 281 282 283 284 285 286 287 288 289 |
<# .SYNOPSIS The script for resizing VMDK disks in VMware vCenter Server Applience .PARAMETER -vCSAIP vCenter Server IP ("10.0.0.100") .PARAMETER -vCSAUser vCenter Server username ("Administrator@mydomain.local") .PARAMETER -VMName VM name (VM) .PARAMETER -TmpDS Temp datastore name (Datastore1) .EXAMPLE PS> .\Resize-VMDK.ps1 -vCSAIP "10.0.0.100" -vCSAUser "Administrator@vsphere.local" -VMName "VM" -TmpDSName "Datastore1" #> param ( [Parameter(Mandatory = $true)] [String]$vCSAIP, [Parameter(Mandatory = $true)] [String]$vCSAUser, [Parameter(Mandatory = $true)] [String]$VMName, [Parameter(Mandatory = $true)] [String]$TmpDS ) ## Import the module Import-Module VMware.PowerCLI ## Clear the console Clear-Host ## Enter vCSA user password $PwdResp = Read-host "What's your vCenter Server user password?" -AsSecureString $vCSAUserPwd = [Runtime.InteropServices.Marshal]::PtrToStringAuto([Runtime.InteropServices.Marshal]::SecureStringToBSTR($PwdResp)) ## Verify connectivity to the vCSA Try { ## Connect to the vCenter Server Connect-VIServer -Verbose:$true -Server $vCSAIP -User $vCSAUser -Password $vCSAUserPwd -ErrorAction Stop | Out-Null ## Output results Write-Output "Attempt to connect to vCSA ($vCSAIP) successful!" } Catch { ## Output results Write-Warning "Attempt to connect to vCSA $vCSAIP failed!" ## Exit the script exit } ## Check if the VM disk that you are going to resize is registered if ((Get-VM -Name $VMName) -like $VMName) { ## Output results Write-Host "VM ($VMName) is registered on the vCSA ($vCSAIP)!" } else { ## Output results Write-Warning "VM ($VMName) does not exist or is not registered on the vCSA ($vCSAIP)! Please register the VM ($VMName) and run the script again!" ## Pause the script pause Clear-Host ## Exit script exit } ## Check if the temporary datastore name is correct if ((Get-VMHost -Server $vCSAIP).StorageInfo.FileSystemVolumeInfo.Name -contains $TmpDS) { Write-Output "Datastore $TmpDS exists on vCenter server ($vCSAIP)!" } else { ## Output results Write-Warning "Datastore $TmpDS does not exist, is not available, or you entered a wrong name! Check that and restart the script!" ## Pause the script pause Clear-Host ## Exit script exit } ## Check whether the VM is running if((get-vm -name $VMName).PowerState -eq "PoweredOn" -or (get-vm -name $VMName).Guest.State -eq "Running") { ## Output results Write-Warning "Please stop the VM ($VMName) correctly before running the script, then restart the script!" ## Pause the script pause Clear-Host ## Exit script exit } else { ## Output results Write-Host "VM ($VMName) is powered off!" } ## Check if the VM has snapshots if((Get-Snapshot -VM $VMName).Name.Length -cgt "0") { Clear-Host ## Output results Write-Warning "The script is stopped since the VM ($VMName) has snapshots! Please start the script after removing all snapshots for this VM ($VMName)!" ## Pause the script pause Clear-Host exit } else { ## Output results Write-Host "VM ($VMName) does not have any snapshots!" } ## Get IP address of ESXi host $ESXiIP = (Get-VM -Name $VMName).VMHost.Name ## Get list and number of disks connected to the VM $VMDisks=get-vm $VMName -Server $vCSAIP |get-harddisk -Server $vCSAIP |select -expand filename ## Get the number of VM disks $VMDiskCount=$VMDisks.count ## Enabling multiple vmdk files selection for resizing $Counter=0 $Array=@() ## Single disk check if ($VMDiskCount -gt 1) { $Cycle1=0 ## Create the input cycle while (($Cycle1).Equals(0)) { Write-Output "Select a VMDK disk!" ## Create the input cycle do { ## Output results Write-Output "[$Counter] - $($VMDisks[$($Counter)])" $Choice=$null $Test=$null [string]$test=$($VMDisks[$($Counter)]) $Array+=$Choice $Counter++ } while ($Counter -lt $VMDiskCount) ## Cycle variable initialization $Cycle2=0 ## Partition Size Input Cycle while (($Cycle2).Equals(0)) { ## Output results $Choice = Read-Host 'Enter the Number [x] of the required disk from the list! To exit the script, enter "Exit"' # Validation of the entered data if (($Choice).Equals("Exit") -or ($Choice).Equals("exit") ) { ## Disconnect from vCSA Disconnect-VIServer -Verbose:$false -Confirm:$false -Server $vCSAIP | Out-Null ## Pause before closing the console Write-Warning "You have successfully terminated the script!" | Pause | Clear-Host ## Exit the script Exit } elseif ($Choice -match '[\d]' -and ($VMDisks[$Choice]) -notlike $null -and $Choice -notmatch '[\D]$' ) { $VMDK=$VMDisks[$Choice] ## Get the answer from the user $UserAnsw1 = Read-Host 'Attention! VMDK ('$VMDK' ) size will be changed! You may lose your data! You agree to continue Yes / No?' $Counter = $null ## Handle user response if ( $UserAnsw1 -notlike $null-and $UserAnsw1 -eq "Yes" -or $UserAnsw1 -eq "yes" -or $UserAnsw1 -eq "Y" -or $UserAnsw1 -eq "y" ) { $Cycle2=1 $Cycle1=1 break } } } } } else { ## The cycle variable initialization $Cycle3=0 ## Partition Size Input Cycle while (($Cycle3).Equals(0)) { $VMDK=$VMDisks ## Get an answer from the user $UserAnsw2 = Read-Host 'Attention! VMDK ('$VMDK' ) size will be changed! You may lose your data! You agree to continue Yes / No?' $Counter = $null ## Handle user response if ( $UserAnsw2 -notlike $null-and $UserAnsw2 -eq "Yes" -or $UserAnsw2 -eq "yes" -or $UserAnsw2 -eq "Y" -or $UserAnsw2 -eq "y" ) { $Cycle3="1" $Choice="0" break } else { ## Disconnect from vCSA Disconnect-VIServer -Verbose:$false -Confirm:$false -Server $vCSAIP | Out-Null ## Pause before closing the console Write-Warning "You have successfully terminated the script!" | Pause | Clear-Host ## Exit the script Exit } } } ## The cycle variable initialization $Cycle4=0 ## Partition Size Input Cycle while (($Cycle4).Equals(0)) { $NewVMDKSize = $null ## Get the letter of the required disk from user $NewVMDKSize = (Read-Host 'Enter the new VMDK disk size in MB. To exit the script, enter "Exit"') ## Validation of the entered value if (($NewVMDKSize).Equals("Exit") -or ($NewVMDKSize).Equals("exit") ) { ## Clear the list of trusted hosts Set-Item wsman:\localhost\client\trustedhosts "$CurValue" -Force ## Pause before closing the console Write-Warning "You have successfully terminated the script!" | Pause | Clear-Host ## Exit the script Exit } ## Validation of the entered value elseif ($NewVMDKSize -match '[\d]$' -and $NewVMDKSize -notmatch '[\D]$') { ## Convert the new disk size to RW variable $NewVMDKRW=(([Int]($NewVMDKSize)*([math]::pow(1024,2)) )/512) ## Exit Validation Cycle $Cycle4=1 break } } ## Assignment of variable values $TmpDir = ($MyInvocation.MyCommand.Path | Split-Path -Parent)+"\Backup\" $VMDsName=(($VMDK -split "\s+")[0]).trimend("]").trimstart("[") $VMDKFile=($VMDK -split " ")[1] $VMDKTmp=$VMDKFile.split("/")[1] $RW="RW" ## Creating a local temporary directory on PC Remove-PSDrive -Name PSDrv -erroraction silentlycontinue New-PSDrive -name PSDrv -location (get-datastore $VMDsName -Server $vCSAIP) -psprovider vimdatastore -root '/' |out-null ## Copy the VMDK file to the temporary directory copy-datastoreitem -item PSDrv:$VMDKFile -destination $TmpDir -Force -Confirm:$false -Verbose:$true ## Back up the VMDK file $Date=get-date -format yyyyMMddhhmmss Copy-Item $TmpDir/$VMDKTmp $TmpDir/"Backup-"$Date"-"$VMDKTmp -Force -Confirm:$false -Verbose:$true ## Find the Current size setting in VMDK file and replace it [string]$String=(get-content $TmpDir\$VMDKTmp -Raw) $StringArray=$String -split "\s+" $StringsNum=[array]::indexof($StringArray, $RW) ## Changing the variable values in a vmdk file $String.replace("$($StringArray[$StringsNum+1])", "$NewVMDKRW") | set-content $TmpDir\$VMDKTmp ## Copy the vmdk backup to the right place Copy-DatastoreItem -Item $TmpDir\$VMDKTmp -Destination PSDrv:$VMDKFile -Force -Confirm:$false -Verbose:$true ## Move VMDK to the temp datastore and back $CurrentDiskType = ((Get-HardDisk -VM $VMName -Server $vCSAIP)[$Choice]).StorageFormat (Get-HardDisk -VM $VMName -Server $vCSAIP)[$Choice] | Move-HardDisk -Server $vCSAIP -Datastore $TmpDS -StorageFormat $CurrentDiskType -Confirm:$false -RunAsync:$false (Get-HardDisk -VM $VMName -Server $vCSAIP)[$Choice] | Move-HardDisk -Server $vCSAIP -Datastore $VMDsName -StorageFormat $CurrentDiskType -Confirm:$false -RunAsync:$false ## Deregister the VM in the ESXi inventory Remove-VM -VM $VMName -Confirm:$false -Verbose:$true ## Register the VM in the ESXi inventory New-VM -Name $VMName -VMHost $ESXiIP -VMFilePath "[$VMDsName] $VMName/$VMName.vmx" -Confirm:$false -Verbose:$true | Out-Null ## Start the VM Start-VM -Verbose:$true -VM $VMName -ErrorAction SilentlyContinue |Out-Null Get-VMQuestion -Verbose:$true -VM $VMName | Set-VMQuestion -Option "I moved it" -Confirm:$false ## Disconnect from vCSA Disconnect-VIServer -Verbose:$false -Confirm:$false -Server $vCSAIP | Out-Null<strong>Conclusion</strong> |
Well, that’s how you shrink VMDKs! The way I discuss here is not a universal solution, so if there are any ideas on how to make those two scripts better, I am happy to discuss them in comments! Feel free to fine-tune the scripts for your daily needs. One more time: Be careful while playing around with disk volume as you may corrupt data fairly easy.
