

Introduction
Recently, I decided to automate some boring routine procedures related to setting up virtual networks in ESXi 6.5. That’s right, I’m talking about PowerCLI. This command-line tools allows automating all aspects of vSphere management, including network, storage, VM and so on and so forth. Sure, I had to dig into the details of orchestrating ESXi with PowerCLI. Yep, it took me some time but at the end of the day, the knowledge and experience I acquired paid back! Apparently, this case is not unique, so I decided to share my experience in today’s scribbling.
The setup used
For this small experiment I deployed a two-node VMware ESXi 6.5.0 (build 5969303) setup of the following configuration:
- Intel Core i7-2600 CPU, 3.40GHz;
- 12 GB RAM;
- 1 x 140GB HDD;
- 1 x 1TB HDD;
- 2 x 1 Gb/s LAN;
- 4 x 10 Gb/s LAN.
The server under Windows Server 2016 administration and with VMware.PowerCLI 10.0.0.7895300 deployed is used only for management.
The figure below addresses the configuration scheme of the setup:
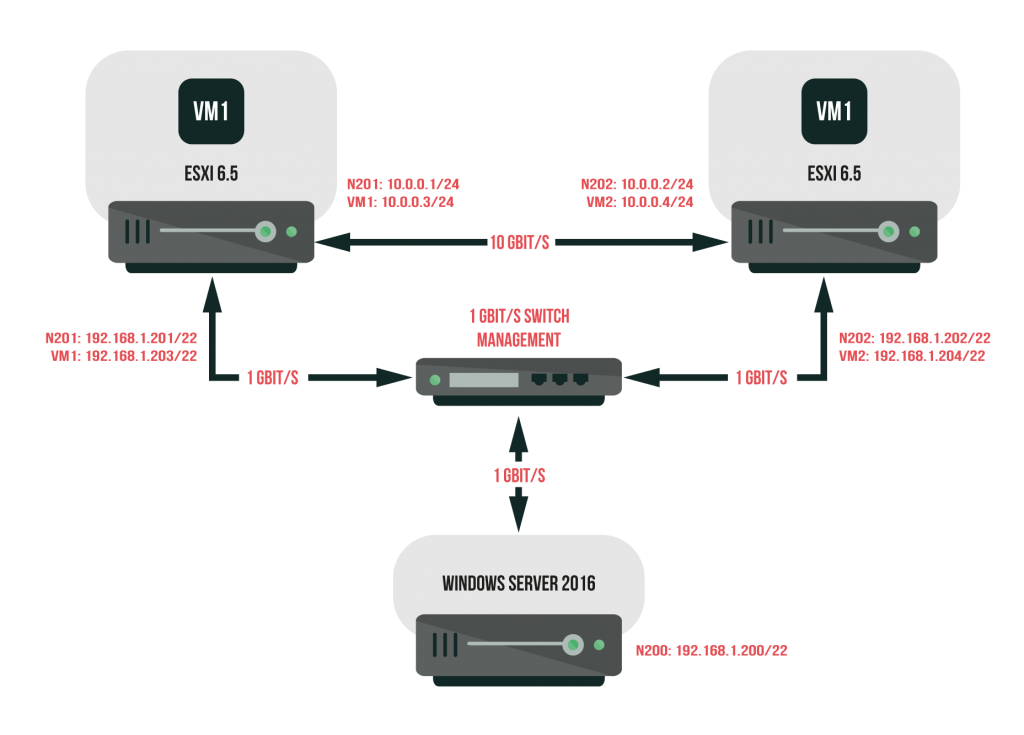
So, what I’m gonna do with that? Well, create a 10 Gbit/s virtual network (10.0.0.0/24).
Such network is usually used to build fault-tolerant clusters based on VMware solutions. To make it convenient, I’ll run the configuration with PowerCLI from the third physical node under Windows Server 2016 (N200) administration over 192.168.1.0/22 network. After that, I’ll check the result using two VMs (VM-01, VM-02), once again, under Windows Server 2016 orchestration, on nodes N201 and N202 correspondingly.
OK, let’s look how I’m gonna do that. Step-by-step.
- Connect to the ESXi hosts with PowerCLI
- Acquire the necessary information for network creation
- Create virtual switches
- Create port groups
- Create VMkernel NICs
- Connect the recently created network to the virtual machines on the hosts
- Check out whether the network works between the VMs
So, I have N201 and N202 servers, and both guys are absolutely identical. Therefore, to make long story short, I’ll describe the configuration only for N201 and certain differences relating to N202 node.
The important things and step sequence are highlighted in red. Find out more about the commands I mention here by the following link: https://code.vmware.com/doc/preview?id=5060#/doc/index-all_cmdlets.html.
Also remember, the steps I mention below, should be repeated on the second node (N202)
Now, let’s get the job done!
Reaching ESXi hosts with PowerCLI
First, let’s connect to the N201 host with PowerCLI. For this purpose, type host IP and specify server credentials.

Check that you’ve connected to the right server and go further.

Find out more about the network configuration
Now, acquire the necessary info about the network configuration with the following set of commands:
Get-VirtualSwitch
Get-VirtualPortGroup
Get-VMHostNetworkAdapter

Next, learn more about the network adapters. Execute the following commands for that purpose:
$esxcli = Get-Esxcli –V2|
$esxcli.network.nic.list.Invoke()
In particular, find out the name of the adapter corresponding to the physical connection between the servers. Here, you can see only two such devices. The first adapter is already utilized for management purposes and has exactly the same mac address as an adapter in the screenshot above. The second device is the network adapter I actually was looking for.

Creating Virtual Switches and port groups
According to the figure above, there already is a virtual switch, vSwitch0. There also are two virtual port groups. One is used as a VM Network, while another one is utilized as a Management Network. There are six physical network adapters. I’ve assigned one of them, vmnic0, to the VM kernel adapter (vmk0) connected to the switch (vSwitch0). The discussed configuration is created while setting up an ESXi host.
Further on, I’ll use the vmnic1000302 network adapter for building the direct physical uplink between virtual switches on the servers. As far you remember, I used 10Gb/s physical network adapters in the setup. Thus, I replaced the default 1Gb/s E1000E adapters with VMXNET3 ones since they support 10Gb/s speed. In order to streamline network adapters operation, I’ll also change the Mtu value for ports and VM kernel adapter to 9000.
Next, let’s create a virtual switch. For this purpose, run the following command:
new-virtualswitch -Name vSwitch1 -Nic vmnic1000302 -Mtu 9000
Type Get-VirtualSwitch to verify that everything is alright.

Establish the port group connected to the recently created switch with the following command:
New-VirtualPortGroup -VirtualSwitch vSwitch1 -Name ‘VM Network 2’.
Check whether everything is alright with Get-VirtualPortGroup command.

Creating VMkernel NICs
Now, let’s create a VM kernel adapter. Execute the following command for that purpose:
New-VMHostNetworkAdapter -VMhost 192.168.1.201 -virtualswitch vSwitch1 -portgroup ‘VMkernel 1’ -ip 10.0.0.1 -subnetmask 255.255.255.0 -Mtu 9000.
For configuring this adapter on the N202 server, deploy the same command but with the different host IP and adapter value:
New-VMHostNetworkAdapter -VMhost 192.168.1.202 -virtualswitch vSwitch1 -portgroup ‘VMkernel 1’ -ip 10.0.0.2 -subnetmask 255.255.255.0 -Mtu 9000.
Don’t forget to verify network adapter settings:
Get-VMHostNetworkAdapte.

Next, create some extra virtual network adapters for VMs:
New-NetworkAdapter -NetworkName ‘VM Network 2’ -StartConnected -WakeOnLan -Type VMXNET3 -VM ‘VM-01’.
For N201 server, align change the VM name:
New-NetworkAdapter -NetworkName ‘VM Network 2’ -StartConnected -WakeOnLan -Type VMXNET3 -VM ‘VM-02’.
Once done with it, do not forget to check everything. Execute:
Get-NetworkAdapter -VM VM-01
for N201 and
Get-NetworkAdapter -VM VM-02
for N202.

Connecting all that stuff
Now, install VMXNET3 network adapter drivers. For this purpose, VMware Tools need to be installed on VMs. Note that the network adapter won’t be available until you install the Tools. Also, do not forget to set up properly or disable the firewall before benchmarking the network with iperf3.exe and ping.exe utilities.
Connect to the VMs using ESXi Web Console on N201 and N202. Navigate to the VM console (on VM-01 and VM-02) and configure VMXNET3 network adapters for each VM. There will be an E1000E adapter, Intel(R) 82574L, dedicated to Management Network and created automatically. You do not need to set it up.

Now, we can proceed to the network adapter configuration. Check the Internet Protocol Version 4 (TCP/IPv4) checkbox and click Properties.

Type IP address and the subnet mask (VM-01-10.0.0.3/24, VM-02-10.0.0.4/24). Since our IPs are located in the same isolated subnetwork, leave other fields as they were set by default.

Press Ok and return to the Networking tab. Then, click Configure…

To make the network work faster, choose Jumbo 9000 as a Jumbo Packet value.

Benchmarking the network
Now that we’re done with both adapters’ configuration, let’s test the created network. For that matter, I used Ping utility available as a Windows Server 2016 default tool. Just check four used IP addresses (from 10.0.0.1 to 10.0.0.4). During the first test, all connections may experience up to 25% packets loss because there is no network route yet. During the following measurements, this problem goes away, and the network should show its best. The command to run is:
ping -f -l 8000 10.0.0.X.
Let’s check both VMs in order to be 100% sure that everything works as it should.

Next, let’s check out how fast the network is. For this purpose, I’ll use the iperf utility (v. 3.1.3 for Windows). It is available together with a configuration guide by the following link: https://iperf.fr/iperf-download.php. For tests, I used only two commands
iperf3.exe -s –portport 911
and
iperf3.exe -c 10.0.0.4 –port 911 -w 1024K.
The former launches the utility on VM-02 in the server mode, while the latter runs the utility on VM-01 as a client and benchmarks the connection between them via the 911 port.

In order to ensure that everything works fine, repeat the test vice versa. In other words, launch the utility in the server mode on VM-01, while running it as a client on VM-02:
iperf3.exe –s –portport 911
iperf3.exe -c 10.0.0.2 –port 911 -w 1024K
In the output, I get something close to the maximum possible connection speed in both measurements (10 Gb/s, in my case).
Well, that’s it!
Conclusion
Indeed, using PowerCLI for VMware ESXi management might seem a bit complicated, but, once you master it, the process will become really simple and convenient. Here, I’ve discussed how to quickly set up VMware ESXi virtual network with PowerCLI. Trying to keep thing as simple and as detailed as I could, I hope to provide you with a handy advice on using PowerCLI to make your daily routines simpler. Cheers!
