

Most every application we run in our datacenters today provides some sort of web-based interface. The push to move to HTML5, API driven GUIs is a good one – we can access things from anywhere, using any device or browser. The problem being we are also seeing a push for security, more specifically ensuring that all our web accessible interfaces are running through SSL and only accessed through https. With this we are seeing a lot of applications providing users the ability to generate self-signed certificates to get the job done. While this is ok, you may be thrown off and annoyed by the constant nagging from modern browsers such and Chrome, Firefox, and Edge – having to accept the self-signed cert bypassing some scary messages. To get around this administrators can go out and purchase a certificate from a trusted authority, however this could get pretty expensive if you start adding up all of the self-signed certificates within your environment. Another answer – the Microsoft Certificate Server.
Microsoft Certificate Server is just a role that we add to a server within our Active Directory environment. What it does is allows us to essentially turn that server into a trusted authority for our domain – meaning we can request and issue certificates from it, install them on our member servers, and we will no longer be nagged by warnings and messages. Instead, we can browse with the assurance that our environment is truly secure. So, with that, let’s dive in to how to get the Certificate Server installed, as well as how to request and install a certificate issued from it on one of our IIS instances.
Installing and Configuring the Microsoft Certificate Server
The first thing we need to do is to enable a few roles and features within the server manager on the box we wish to use as our certificate authority. The first being the Active Directory Certificate Services as shown below…

From here we will want to select a few role services that we want to install along with the Certificate Services. As for which ones to choose I normally go with the following

- Certificate Enrollment Policy Web Service – This allows our CA to dish out certificates to users and computers if they are non-domain joined, or if they are domain joined but don’t happen to be inside our network.
- Certificate Enrollment Web Service – This works with the Policy Web service to provide automatic enrollment for those users and computers.
- Certificate Authority Web Enrolment – this provides us with a web service in which our users can use to request and renew certificates. This is much easier than having to drop to the command line all the time.
The remaining two services, the Network Device Enrollment and Online Responder are optional – basically, the NDE allows us to issue certs to devices that may not have a network account such as a router or switch, while the online responder makes it possible to revoke certain issued certs.
Once the install completes go ahead and select AD CS from within our Service Manager dialog. We should notice a message along the top stating that there is still some configuration we need to do to get this up and running. Go ahead and click on the ‘more’ link in the top right hand.

From here, simply select ‘Configure Active Directory Certificate Services”

As we progress through the wizard we will get to a point where it askes which role services we would like to configure. Since most all the services depend on a Certificate Authority being present and configured let’s go ahead and just select that one for the time being. We will come back to configure the remainder of the services after.

As for the next screens let’s take a quick look at the options I most commonly use
Setup Type – We need to specify which type of CA we would like to install. Since I’m a member of domain here I am going to go ahead and chose Enterprise CA – this is probably the most common type of CA configured. Depending on your environment chose the proper type.
CA Type – Since this is the first CA getting introduced to my domain I am choosing Root CA here. If I was looking to add an additional CA to an existing authority I would chose Subordinate.
Private Key – Again, this is my first CA so I’m going to generate a new private key. If we had already generated a private key and didn’t wish to disturb the operation of existing certificates we could chose to Use an existing key.
Cryptography – Go ahead and leave the defaults here – ensuring we have the Microsoft Key Storage Provider (RSA) selected, along with a key length of 2048.
CA Name – give your CA a common name. For example, I used mwpreston-CA for mine.
Validity Period – Update this to whatever suits your needs. This is how long your issued certificates will be valid for. I normally use 10 years.
Certificate Database – Accept the default values for these, or if you’d rather have them placed somewhere else within the filesystem go ahead and input your paths.
Once you have went through the rest of the wizard for configuring your CA service you should be prompted to configure the remaining processes. Go ahead and select the remaining services (Certificate Authority for Web Enrollment, Certificate Enrollment web service, and Certificate Enrollment Policy Web Service) within the AD CS configuration dialog.

As far as the remaining configuration I normally accept all defaults except for when setting up the service account for CES. You could if you wanted to create a service account for this, ensuring that it is a member of the IIS_IUSRS group however I find that it’s much easier to simply utilizing the built in application pool identity (option shown below).

When asked about the Server Certificate simply select the certificate that was issued to our CA during its configuration (shown below).

At this point we have completed the Certificate Authority setup portion of this walkthrough – we can now dive into how to generate and request certificates through IIS.
Requesting and Generating Certificates
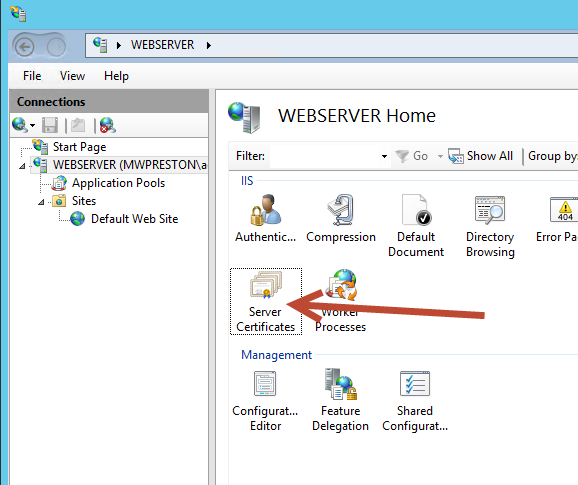 For our example we will be generating a Certificate Request from a simple server running IIS which currently is serving a website of https using only a self-signed certificate. The first step in getting our certificate is to generate the action CR. This is done through Server Certificates portion of the server within the IIS Manager. Once we are in the Server Certificates management simply click ‘Create Certificate Request…’ as shown below.

Simply fill out your certificate request as follows – paying attention to the common name as that will be the hostname that the web site/application will be listening on.

The rest of the wizard is straight forward, and the defaults can be accepted. Once completed you should be prompted to save a file, the certificate request, somewhere on your filesystem.
At this point we are ready to go and obtain our certificate from our newly installed certificate server. To do so, log into the servers web portal by visiting http://ip_of_cert_server/certsrv/ Once logged in simply select to ‘Request a certificate’, then, selecting ‘advanced certificate request’. At the next screen we need to open our certificate request which we have just saved and copy and paste in the information within it to our Saved Request box. Ensure that you also change the Certificate Template as shown below to Web Server as well. When ready, click ‘Submit’.

After clicking ‘Submit’ we can simply download our newly generated certificate by selecting ‘Download Certificate’.
From here it’s back into our IIS Manager to import our certificate. Select the server from the left pane, then ‘Server Certificates’ from the middle. On the Actions pane we should see the option to complete our certificate request. Within the ‘Complete Certificate Request’ dialog it’s as simple as browsing to our downloaded certificate (cer file), giving it a friendly name and clicking OK.

In order to affiliate the new certificate with our site we need to select our site from within IIS, click ‘Bindings’ from the Actions pane, then select our https binding, click ‘Edit’ and finally select our newly imported certificate from the list.

And there you have it! Give IIS a quick restart and go ahead and visit your site again! You should see the same site, only this time without any of the nagging security warnings! Generating certificates for all your software and infrastructure is always a good idea – you can ensure that your traffic is indeed encrypted as well as trusted by your internal certificate authority. Happy requesting!
