

Everybody knows how tedious it may be working with self-signed SSL certificates. That’s why it’s easier to add the Microsoft Certificate server role to your Active Directory. However, manual certificate enrollment is not so handy when there are dozens of users within one IT infrastructure, and if that’s the case, it won’t hurt to learn how to cut a corner or two!
Introduction
It isn’t news to anybody that practically all worthwhile applications are running web-based interfaces accessible only through SSL for security reasons. We got used to it a long time ago, especially since most apps provide a user with the ability to generate self-signed SSL certificates to work without interruptions.
However, whether it works or not, such an approach is still considered not wholly safe by most systems, so people often have to deal with the long and continuous chain of warnings every time they get to work.
Naturally, what is acceptable for some staying-at-home tinkerers or test environments is hardly the best option for people who have to soldier their way through multiple threatening notifications at work.
As purchasing certificates from a trusted authority every time you need one does not pay off in the long run, there’s another way of dealing with this problem, which is adding the Microsoft Certificate Server to your Active Directory. This Microsoft server software solution essentially provides you with a server that is considered a trusted SSL certificate authority in one particular domain, thus solving the problem.
Nevertheless, even though it does sound like a perfect solution, sometimes it isn’t just enough to get the job done. Yes, that may be the best choice for individual users indeed, but what if we are talking, say, an organization with dozens of employees?
Every enterprise naturally works with thousands and thousands of certificates as a part of daily routine. Trying to keep track of all of those eventually turns into a battle with no survivors. That’s why a lot of IT specialists tend to limit the range of certificate management since manual handling simply doesn’t pay off. Luckily, there’s another way to get around that problem, which is CA certificate auto-enrollment.
CA Certificate Auto-Enrollment: What’s it For?
All in all, this is an option available within Active Directory Certificate Services (ADCS), Microsoft certificate service option, enabled by Group Policy (GPO). This one allows users to enroll for certificates with no user intervention needed (well, in most cases, that is). Long story short, Microsoft certificate auto-enrollment automates the whole process and allows certificates to be automatically renewed and updated. It sounds like the option we are looking for, so let’s dig into details.
Basically, if you’re using Active Directory Certificate Services to manage certificates, the auto-enrollment is what you’re after. Microsoft Certificate Authority needs to be configured to support said auto-enrollment, although, without respective policy, users will have to go through with manual enrollment. The process, however, is multilayered, so you have to follow these steps carefully. First, we are going to configure the Server Certificate Template.
Configuring the Microsoft Certificate Server Certificate Template
A Microsoft Certificate Authority (CA) certificate template defines the policies and rules that CA uses when receiving a certificate request. Even though this solution may not yet be driven to perfection, admittedly, it makes the whole process of working with Windows certificate authority twice as simple. For the most part, you won’t even need some specific knowledge of certificates since there are pre-defined templates open for use as you go. In case you need certificates for non-trivial purposes, you’ll get there too with a little bit of research and determination. As soon as the templates are at hand, requesting and issuing certificates is a piece of cake.
To configure the Server Certificate Template, follow these steps:
1. In Server Manager, click Tools, and then click Certification Authority. The Certification Authority Microsoft Management Console (MMC) opens.

 - img")
2. In the MMC, double-click the CA name, right-click Certificate Templates, and then click Manage.

3. The Certificate Templates console opens. All of the certificate templates are displayed in the details pane.

4. In the details pane, click the RAS and IAS Server template.

5. Click the Action menu, and then click Duplicate Template. The template Properties dialog box opens.

6. Click the Security tab.

7. On the Security tab, in Group or user names, click RAS and IAS servers.

8. In Permissions for RAS and IAS servers, under Allow, ensure that Enroll is selected, and then select the Autoenroll check box. Click OK, and close the Certificate Templates MMC.

9. In the Certification Authority MMC, click Certificate Templates. On the Action menu, point to New, and then click Certificate Template to Issue. The Enable Certificate Templates dialog box opens.

10. In Enable Certificate Templates, click the name of the certificate template that you just configured, and then click OK. For example, if you did not change the default certificate template name, click Copy of RAS and IAS Server, and then click OK.

Configuring Certificate Auto-Enrollment within Active Directory Certificate Services (ADCS)
Now, we have just configured a server certificate template as we were using the Certificate Templates Microsoft Management Console snap-in on a Certificate Authority that is running ADCS. That means we finally get to the certificate auto-enrollment.
Let’s start with configuring server certificate auto-enrollment:
1. On the computer where AD DS is installed, open Windows PowerShell®, type mmc, and then press ENTER. The Microsoft Management Console opens.

2. On the File menu, click Add/Remove Snap-in. The Add or Remove Snap-ins dialog box opens.

3. In Available snap-ins, scroll down to and double-click Group Policy Management Editor. The Select Group Policy Object dialog box opens.

Important
Ensure that you select Group Policy Management Editor and not Group Policy Management. If you select Group Policy Management, your configuration using these instructions will fail and a server certificate will not be autoenrolled to your NPSs.
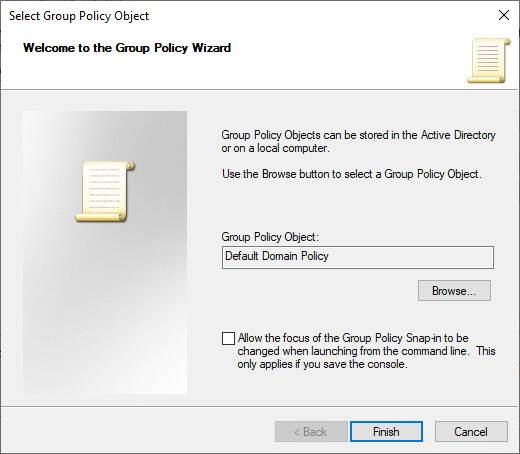
4. In Group Policy Object, click Browse. The Browse for a Group Policy Object dialog box opens.

5. In Domains, OUs, and linked Group Policy Objects, click Default Domain Policy, and then click OK.

6. Click Finish, and then click OK.

7. Double-click Default Domain Policy. In the console, expand the following path: Computer Configuration, Policies, Windows Settings, Security Settings, and then Public Key Policies.

8. Click Public Key Policies. In the details pane, double-click Certificate Services Client – Auto-Enrollment. The Properties dialog box opens.

9. Configure the following items, and then click OK:
- In Configuration Model, select Enabled.
- Select the Renew expired certificates, update pending certificates, and remove revoked certificates check box.
- Select the Update certificates that use certificate templates checkbox.

10. Click OK.
Auto-enrollment of user certificates enables you to have a quite straightforward path to certificate issuance for users and allows public key infrastructure apps. Eventually, the high cost of standard public infrastructure deployments drops down thanks to user auto-enrollment.
To configure user certificate auto-enrollment, follow these steps:
- On the computer where AD DS is installed, open Windows PowerShell®, type mmc, and then press ENTER. The Microsoft Management Console opens.

2. On the File menu, click Add/Remove Snap-in. The Add or Remove Snap-ins dialog box opens.

3. In Available snap-ins, scroll down to and double-click Group Policy Management Editor. The Select Group Policy Object dialog box opens.

Important:
Ensure that you select Group Policy Management Editor and not Group Policy Management. If you select Group Policy Management, your configuration using these instructions will fail and a server certificate will not be autoenrolled to your NPSs.
4. In Group Policy Object, click Browse. The Browse for a Group Policy Object dialog box opens.

5. In Domains, OUs, and linked Group Policy Objects, click Default Domain Policy, and then click OK.

6. Click Finish, and then click OK.
7. Double-click Default Domain Policy. In the console, expand the following path: User Configuration, Policies, Windows Settings, Security Settings.

8. Click Public Key Policies. In the details pane, double-click Certificate Services Client – Auto-Enrollment.

9. The Properties dialog box opens. Configure the following items, and then click OK:
- In Configuration Model, select Enabled.
- Select the Renew expired certificates, update pending certificates, and remove revoked certificates check box.
- Select the Update certificates that use certificate templates check box.

10. Click OK.
Microsoft Certificate Auto-Enrollment is Here: Have a Good Ride! In Conclusion
Well, then, let me congratulate you on successfully configuring certificate auto-enrollment! Now, you just have made your whole work process so much easier. It may not seem like that big of a deal yet, but once you’ve started, you are going to notice how much more smoothly things go now.
Enjoy good work, and don’t forget to keep tabs on your certificates with Windows Certificate Manager.
