

INTRODUCTION
In this post, I am going to take a closer look at the impact of read-only routing on SQL Server Availability Groups performance.
I measured SQL Server Availability Groups (AG) performance before (https://www.starwindsoftware.com/blog/hyper-v/can-sql-server-failover-cluster-instance-run-s2d-twice-fast-sql-server-availability-groups-storage-spaces-part-1-studying-ag-performance/). And, a guy from Reddit recommended enabling read-only routing to achieve higher performance (find more about this policy here: https://docs.microsoft.com/en-us/sql/database-engine/availability-groups/windows/configure-read-only-routing-for-an-availability-group-sql-server?view=sql-server-2017). Thanks for your comment, man! I highly appreciate your efforts. This article will shed light on how read-only routing affects SQL Server AG performance.
THE TOOLKIT USED

In this study, I used a two-node setup where both nodes, SRV153 and SRV154, had the same hardware configurations:
Dell PowerEdge R730, CPU 2x Intel Xeon E5-2697 v3 @ 2.60 GHz , RAM 128GB
Storage: 4x Intel SSD DC S3500 480GB
LAN: 1x Broadcom NetXtreme Gigabit Ethernet, 2x Mellanox ConnectX-4 100Gbit/s
OS: Windows Server 2016 Datacenter
Database Management System: Microsoft SQL Server 2016
Similarly to the setup used in my previous study (ADD HERE THE NEW LINK TO PART 1) , each host had four SSD-s. The thing is, S2D needs at least 4 drives in each host to be deployed (https://docs.microsoft.com/en-us/windows-server/storage/storage-spaces/storage-spaces-direct-hardware-requirements#minimum-number-of-drives-excludes-boot-drive). In the original article, I used the underlying storage like that, so I decided to use the same hardware for this study.
DEPLOYING SQL SERVER AVAILABILITY GROUPS IN A 2-NODE CLUSTER
Creating a virtual disk
Install Windows Server Failover Cluster. I assigned the quorum vote to a separate share witness.
Next, start the Storage Spaces installation wizard on SRV153/

Choose the node where you want to create a storage pool. You need to enter a storage pool name.

Select the disks that are to be included in the storage pool and press Next.

Review the pool settings and click Create.

Once the storage pool is created, check the Create a virtual disk when this wizard closes box and press Close.

Select the storage pool.

Specify the virtual disk name and hit Next.

Select Simple as the storage layout.

Specify the provisioning type afterwards. I used a fixed disk today.

Set the virtual disk size next.

Confirm virtual disk settings and click Create.

Once you are done with virtual disk creation, check the Create a volume when the wizard closes box and click Close.

Select the recently created virtual disk in the New Volume wizard.

Specify the volume size.

Assign the volume to a drive letter next.

Select file system settings and specify the volume label.

Eventually, confirm all the settings and press Create.

Once the wizard finishes, click Close. Then, go to Disk Management and check whether the new volume has been added.

Create just the same disk on SRV154 (I called it VD2 here).

Installing SQL Server AG
Once done with virtual disk creation, let’s start SQL Server AG installation. Install SQL Server 2016 on SRV153 first.

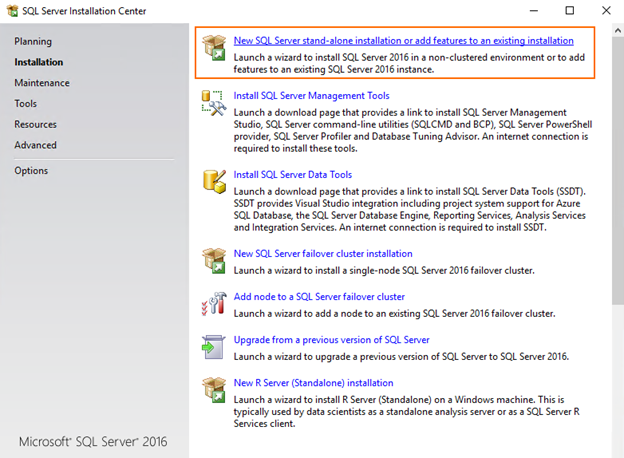
Select New SQL Server stand-alone installation or add features to an existing installation in SQL Server Installation Center.
Specify the SQL Server edition that you want to install. I use the Developer free edition for this study.

Look through the license terms, tick the checkbox saying that you accept it and press Next.

Select the Database Engine Services in the Instance Features and click Next again.


Specify the instance name.

Afterwards, enter the SQL Server credentials. It is a good idea to reuse the domain credentials in order to avoid any possible issues with creating Availability Groups.

Specify the authentication mode and administrators for Database Engine.

Enter the database directories afterward. In this study, the database is kept on the virtual disk D over Storage Spaces.

Specify TempDB settings next.

Verify the settings and hit Install.

After the wizard finishes, click Close.

In order to use AG, open SQL Server Configuration Manager, go to SQL Server (SQLAG) and enable AlwaysOn Availability Groups. Restart SQL Server afterwards.

That’s pretty much it for SQL Server AG installation. Now, repeat the whole process for SRV154.
Then, after you are done with deploying SQL Server AG on SRV154, install SQL Server Management Studio and connect all nodes to SQL Server (SQLAG).

Creating a test database
Here is how to create a new database.

Specify its name.

Back up this database next.


Creating an availability group
Specify the availability group name. Do not forget to enable Database Level Health Detection.

Select the database where you want to have this availability group created.

Next, at the Specify Replicas step, add the database replica. In this study, it resides on SRV154.


Go to the Listener tab now and set the IP and availability group listener DNS name. Use the 1433 port.

Select Automatic seeding as a data synchronization option.

Validate the settings and click Next.

Afterwards, verify the choices made in the New Availability Group wizard and press Finish to start availability group creation.

Close the wizard after it finishes.G

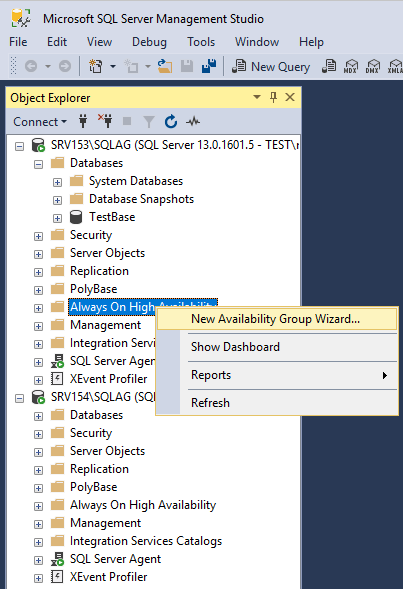
After availability group is created, you can find it in Microsoft SQL Server Management Studio.

TEST TIME!
Enabling read-only routing
Set up read-only routing first according to Microsoft’s (https://docs.microsoft.com/en-us/sql/database-engine/availability-groups/windows/configure-read-only-routing-for-an-availability-group-sql-server?view=sql-server-2017) and CodingSight’s (https://codingsight.com/read-only-routing-for-an-always-on/) recommendations.
Next, from the primary node, enable Read-intent only on the secondary replica.

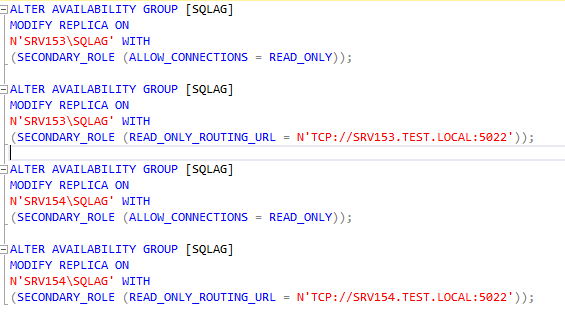
Now, create the query for read-only routing.

Add read-only routing list afterwards.
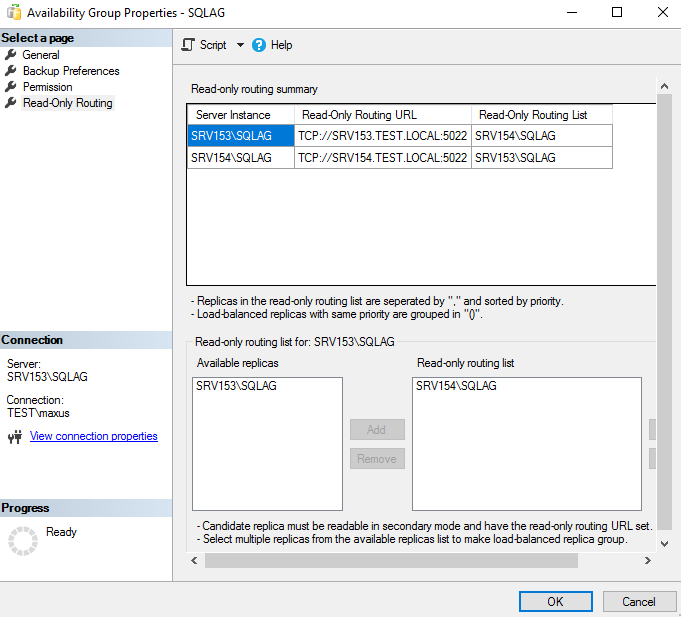
Here is how to check whether the read-only routing has been enabled.
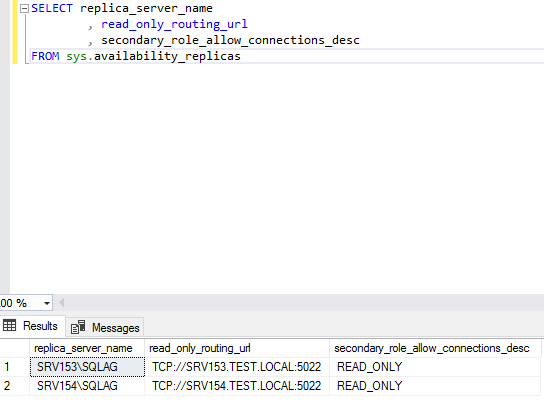
Here is how it looks like in SQL Management Studio when read-only routing is enabled.
Let’s finally jump to the tests!
HammerDB
First, it is necessary to populate the database with data. I used HammerDB (https://www.hammerdb.com/download.html) in this study.
Start HammerDB. Go to the Options menu and click Benchmark. Specify the testing parameters.

Next, in the Schema Build menu, set up HammerDB connections. You also need to specify the number of virtual users (number of threads).

Double-click Build to start populating the database.

After the database is filled with data, details about writing performance are saved to a file. Here is what writing performance was like today.

Once the database was populated, I reduced the amount of RAM available for SQL Server to prevent caching from altering the database performance.

I benchmarked database reading performance afterward. I judged on the reading performance based on the time that was needed to read 1M lines from dbo.customer. The result was the same as before – 19 seconds (https://www.starwindsoftware.com/blog/hyper-v/can-sql-server-failover-cluster-instance-run-on-s2d-twice-as-fast-as-sql-server-basic-availability-groups-on-storage-spaces-part-1-studying-AG-performance/).

Here are more details about SQL Server AG reading performance.

SQLQueryStress
Now, let’s see what reading performance was like when measured with SQLQueryStress (https://github.com/ErikEJ/SqlQueryStress). The interesting thing about SQLSqueryStress is that it allows playing around with the number of threads (number of virtual users = 1 ,2, 4, 8, 10, 12).
Start SQLQueryStress and click Database. Set up the connection and click Test Connection.

Specify the Number of Threads and Number of Iterations parameters. Click GO to start the test.

Here are the results measured with SQLQueryStress for different numbers of threads. See the difference in reading speed once read-only routing is enabled.
| Number of threads | SQL AG | SQL AG with Read-Only Routing | ||
|---|---|---|---|---|
| test run time, sec |
SSD, MB/s |
test run time, sec |
SSD, MB/s |
|
| 1 | 3.09 | 283 | 2.73 | 270 |
| 2 | 2.96 | 292 | 2.76 | 277 |
| 4 | 2.97 | 282 | 2.79 | 284 |
| 8 | 3.13 | 272 | 2.9 | 265 |
| 10 | 3.51 | 441 | 3.85 | 658 |
| 12 | 3.98 | 517 | 4.48 | 848 |
OLTP Workload (HammerDB again)
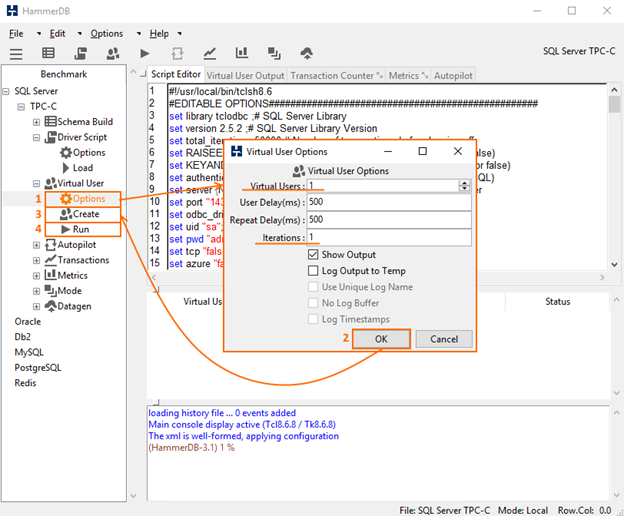
Run HammerDB again. Go to Options to set up HammerDB (i.e., enter connection parameters and number of transactions per virtual user. Click OK. Eventually, double-click Load to run the recently prepared script.

Go to the Virtual User menu and double-click Options. Specify the number of virtual users and hit OK. Double-click Create afterward to have the settings applied. To run the tests, double-click Run.
Now, let’s see how the number of virtual users impacts database performance.
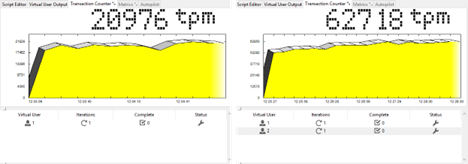
HammerDB. Performance for 1 and 2 virtual users

HammerDB. Performance for 4 and 8 virtual users

HammerDB. Performance for 10 and 12 virtual users
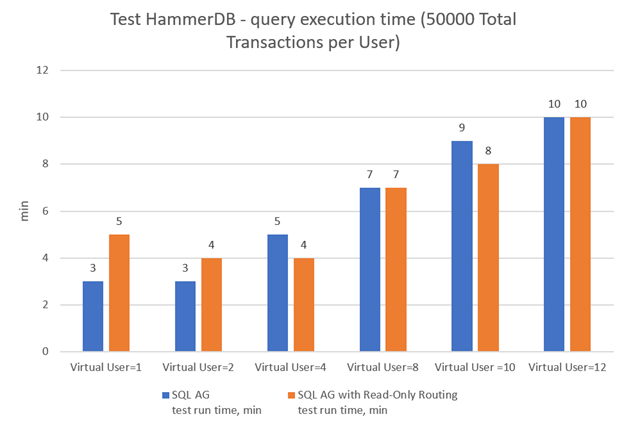
| Number of virtual users | SQL AG test run time, min |
SQL AG with Read-Only Routing test run time, min |
|---|---|---|
| 1 | 3 | 5 |
| 2 | 3 | 4 |
| 4 | 5 | 4 |
| 8 | 7 | 7 |
| 10 | 9 | 8 |
| 12 | 10 | 10 |
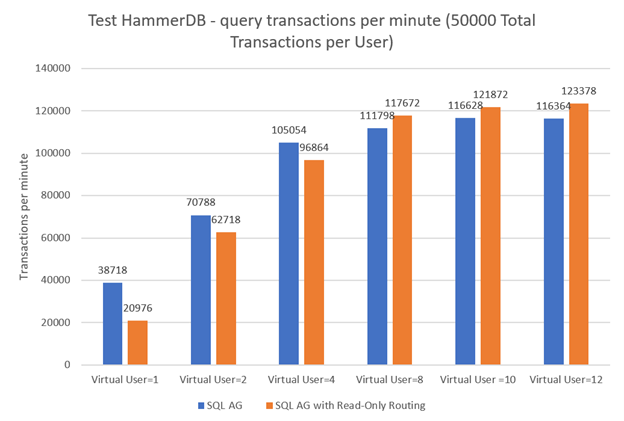
Now, let’s see how read-only routing affects database performance.
| Number of virtual users | SQL AG, Tpm |
SQL AG with Read-Only Routing, Tpm |
|---|---|---|
| 1 | 38718 | 20976 |
| 2 | 70788 | 62718 |
| 4 | 105054 | 96864 |
| 8 | 111798 | 117672 |
| 10 | 116628 | 121872 |
| 12 | 116364 | 123378 |
DISCUSSION
HammerDB still shows that reading 1M lines from dbo.customer takes 19 seconds even though read-only routing is enabled.
SQLQueryStress clearly shows that reading is done faster when read-only routing is enabled.
Now, let’s see how read-only routing impacts the performance for different numbers of virtual users. For 1, 2, and 4 virtual users, performance become lower after enabling the policy. It should also be noted that read-only routing made reading a bit slower (number of virtual users = 1 and 2). For larger numbers of virtual users (from 8 through 12) read-only routing made performance higher.
CONCLUSION
In general, you should better enable read-only routing. So, whenever it comes to high workloads, just make sure that you set this policy.
