As every admin knows way too well, administering an IT infrastructure is not an easy job. If you plan on performing everything manually, you’ll find yourself buried in tasks. That’s why command-line shells do exist and why today we’ll take a look on how to write a function in Windows PowerShell!
Introduction
The lion’s share of tasks regarding the maintenance of the local area networks is a routine that takes a lot of time if performed manually. Therefore, no wonder that solutions for automating the most typical administrative tasks to increase performance appeared almost instantly. The most common method to save your time and spare you from an unnecessary headache is the sequential execution of batch file commands and scripts in the command-line interface of the OS (operating system). Efforts to improve managing and administering Windows with the help of the command-line interface, however, did not result in adopting another’s scripting language or creating some super-utility, inherent to DOS. Instead, we got PowerShell, an entirely new and a lot more flexible command-line shell. Attention: Materials below are for educational and informational purposes only and may not correspond to your specific situation.
What is PowerShell?
PowerShell is a task automation framework from Microsoft that enables system administrators and experienced users to automate administrative tasks for managing processes and OSs. PowerShell consists of a command-line shell and associated scripting language built on the Microsoft .NET Framework. PowerShell provides commands for managing computers via the command line. With the use of PowerShell cmdlets, the access to the file system, registry, and certificate store remains as simple as it gets. PowerShell as well includes a parser that operates in expression mode and dynamically typed scripting language.
A cmdlet is a Microsoft PowerShell command that automates functions. When you start PowerShell, you’ll hardly notice any particular differences from the cmd.exe, except for maybe the background color (blue in PowerShell). The primary aspect that differentiates PowerShell from the previous command-line shells released by Microsoft is that it’s built on .NET Framework, and is entirely object-oriented. PowerShell’s structure employs various elements from different command-line shells. Some of them are familiar to those users who have experience in working with certain shells or programming frameworks. Reviewing some of these elements may help a lot to understand better how exactly PowerShell works.
Everybody knows that learning command names and parameters is taking too much time in most command-line interfaces. The problem is the small number of templates, so it turns out that memorizing is the only option available. The most troubling thing is that while mastering new commands, not always you’ll be able to apply what you already know because you must learn and memorize a lot of new names. As it usually goes, most command-line interfaces initially have a minimal set of tools in possession, which expands as you are using them. This problem is why there is no such thing as a standardized structure. The same thing goes for command names since each command is a separate tool by its own right. PowerShell, on the contrary, enables you with a more practical method to use command names. You can find more information here.
Formulating the Task
Occasionally, I face the necessity to get a list of computers from AD (Active Directory) with a short description of each machine, including computer name, IP address, and uptime. Naturally, you can just go to the Active Directory server and find all you need to know, but what if there was a much easier way? It seems unnecessarily redundant to go through all that when you can achieve the same result with one PowerShell command. With a simple Get-ADpcinfo command, you can find this list instantly and display it. How to do that and what problems you may have I can tell from my own experience.
Updating PowerShell
Let’s start from the beginning. I won’t take up much of your time explaining how to install and update PowerShell on Windows 8.1 or earlier versions because these operating systems are likely to be found only in a museum, if at all. Instead, let’s focus on the more relevant Windows 11 and Windows Server 2022, which are currently the two most popular versions of the Windows OS. Naturally, the latest version of PowerShell is included by default in both.
And yes, before working with PowerShell, it is highly recommended to update it. The simplest way to do so is by downloading the required version from the official site. First, install Net Framework 4.5 because it’s necessary for the installation of the WMF 5.0 (Windows Management Framework 5.0). Further, naturally, proceed with installing the required WMF. You can use this tab to pick an installer needed for your PowerShell.
| Windows | PS 3.0 | PS 4.0 | PS 5.0 | PS 5.1 |
| Windows 11 Windows Server 2022 |
– | – | – | installed |
| Windows 10 (see Note1) Windows Server 2016 |
– | – | – | installed |
| Windows 8.1 Windows Server 2012 R2 |
– | installed | not supported | WMF 5.1 |
| Windows 8 Windows Server 2012 |
installed | not supported | not supported | WMF 5.1 |
| Windows 7 SP1 Windows Server 2008 R2 SP1 |
not supported | not supported | not supported | WMF 5.1 |
*Windows 10 isn’t updating automatically via Windows Update, and it has PowerShell 5.0 installed by default. With automatic updates enabled, PowerShell updates from 5.0 to 5.1. (details are here).
Don’t forget to update the Help section for the current version of PowerShell as well with a cmdlet. Run PowerShell as administrator.
Update
update-help
Furthermore, to work with AD, you need to install Remote Server Administration Tools (RSAT) for Windows. For the usual OSs, you can just find RSAT on Microsoft site and download it from here. For the server Windows OSs, you’ll need to add AD components to RSAT.
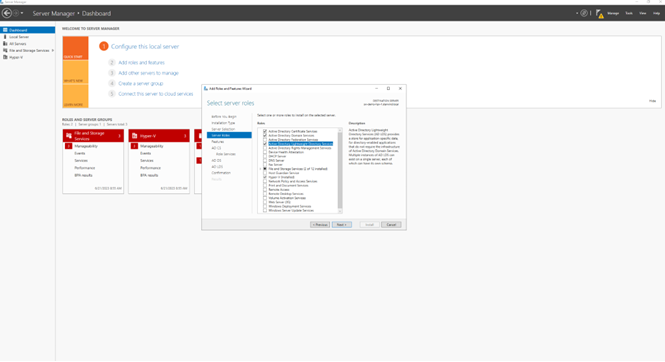
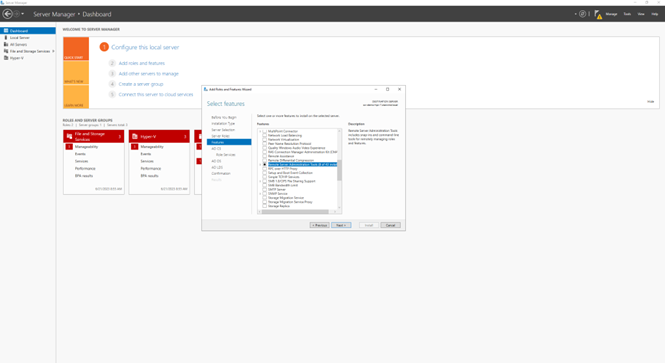
To import AD modules into PowerShell, use this command:
Import-Module <Name Module>Run PowerShell as administrator.
Import-Module
Import-Module ActiveDirectory
Now we have PowerShell all suited up to work with AD.
Writing a function
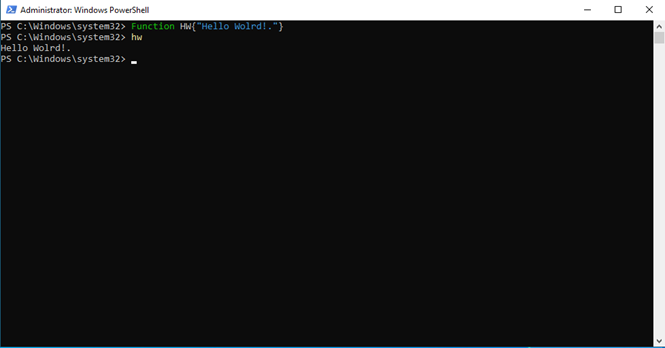
PowerShell functions are basically the blocks of code in its scripting language, named and stored in memory until the current session of command-line shell ends. Since PowerShell function isn’t defined by formal parameters, to set a function, you just have to type keyword “Function,” then set function name and list of expressions (body of the function, should be written in braces). Simple example: Hello World
|
1 |
Function HW{"Hello World!."} |
This function is named “HW,” its body – a line “Hello World!.”. Now, call this function from the command line: Call HW function
HW
Result: Hello World!
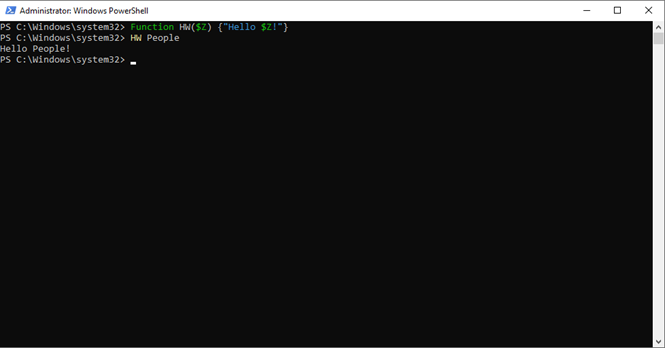
Functions, just as cmdlets, are working with variables (arguments). PowerShell arguments are not dependent on the registry so that function name can consist of pretty much any symbols, but if it contains symbols with more than one meaning, they should be written in braces. Each argument is marked by a dollar sign ($), which is followed by its name. For example, let’s define HW function with one formal argument: HW function working with argument
|
1 |
Function HW($Z) {"Hello $Z!"} |
Let’s call this function with declaring “People” argument: Call HW function
HW People
Result: Hello People!
In most programming languages, after you call the function, you are supposed to indicate braces after its name. In PowerShell, however, you can’t do that. Unlike the rest of the programming languages, PowerShell commands are actual commands (and NOT object methods), so you divide arguments with spaces and don’t use any additional symbols, such as braces or quotes. Let’s run the HW function in the following way, to see how it usually goes: Call HW function with declaring incorrect arguments:
|
1 |
HW ("lovely" "people") |
Result: At line:1 char:14 + hw (“lovely” “people”)
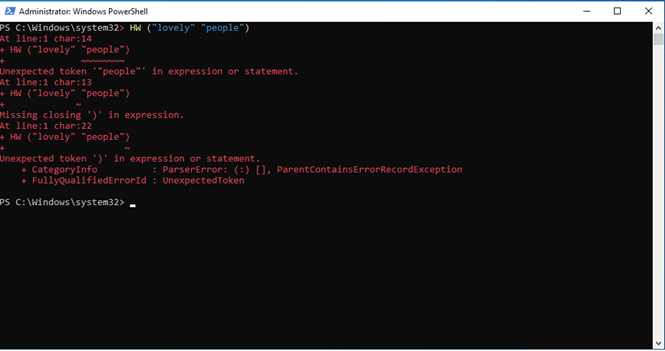
It seems that everything is clear. Now, let’s look at the function I wrote to solve my task. I divided it into several parts to comment on each stage of the process. The full listing will be submitted below. The start of the function named Get-ADPCInfo The listing of Get-ADPCInfo 1.1. function
|
1 |
function Get-ADPCInfo { |
I gave this function the name Get-ADPCInfo Description of the function parameters for additional information. The listing of Get-ADPCInfo 1.2. function
|
1 |
<# .SYNOPSIS Network computers info Get-ADPCInfo is an advanced Powershell function. It shows the Name, IP address, uptime of all enabled domain joined computers and Windows servers. .DESCRIPTION Uses IF for sorting, by operating time of computers and servers It is possible to specify the desired time for delay to reboot - $toolong. You can also sort by computer name or by installed operating system using Parametr -Name 'like' -Operatingsystem 'like' .PARAMETER Name - you can specify a selection by computer name .PARAMETER Operatingsystem - you can specify a selection by computer operating system .EXAMPLE Get-ADPCInfo .EXAMPLE Get-ADPCInfo -name Lab* .EXAMPLE Get-ADPCInfo -operatingsystem *serv* #> |
The description is presented in a particular way, as a built-in comment block so that you would be able to read it not only in the body of the script but via the standard Get-Help cmdlet as well. If we were to take a look at the cmdlet output, we would notice that the full description is divided into categories and sections, consisting of description, detailed description, parameters, examples, etc. The same thing goes for formatting descriptions in the code. My description template looks like this:
Take into account that the block of built-in description should be either at the beginning of the function (in the next line after the first opening brace) or the end of the function (before the last closing brace). You can find more details about Get-Help cmdlet and specific tags here.
Body of function
Let’s define parameters according to which we can make a selection with AD. The block param I’ll put in the place of the first executable module that PowerShell will see in my script. That’s why PowerShell will accept variables that I defined as the command-line commands. So, I defined two parameters in my script, which are computer name and local OS: The listing of Get-ADPCInfo 1.3. function. – block param
|
1 2 3 4 5 6 |
param ( [Parameter (Mandatory = $false)] [string] $Name = "*", [Parameter (Mandatory = $false)] [string] $operatingsystem = "*" ) |
Clear the workplace and define what the script does if there is an error. The listing of Get-ADPCInfo 1.4. – error processing
#Clear the workspace
clear
#What do functions do if there is an error
|
1 |
$ErrorActionPreference = "silentlycontinue" |
$ErrorActionPreference is an error processing cmdlet and defines how exactly PowerShell will take action if there is an error. For example, if I try to create an object that doesn’t exist, PowerShell will react with an error. Example: The example of an error
PS C:> New-Object foo PS C:\> New-Object foo New-Object : Cannot find type [foo]: verify that the assembly containing this type is loaded. At line:1 char:1 + New-Object foo
But if you use $ErrorActionPreference with the value SilentlyContinue, you will get the following result: The example of ErrorActionPreference at work
PS C:>$ErrorActionPreference = “silentlycontinue” PS C:> New-Object foo PS C:>
The $ErrorActionPreference parameter is set with the value to Continue by default, which means that you’ll get notified about an error, but the script (command) will try to continue anyway. In fact, you can set the $ErrorActionPreference to four variables: SilentlyContinue – continue despite the errors; Continue – doesn’t dismiss errors, if an error is not critical, send notification and continues; Stop – stop if there is any error; Inquire – prompts a request what should be done if there is an error. Importing Active Directory module and the information selection regarding the domain computers The listing of Get-ADPCInfo 1.5. function
# Loading the module AD so that it becomes available for use
Import-Module ActiveDirectory
$ADnfo = (Get-ADComputer -Filter { (ObjectClass -eq “Computer”) -and (Name -like $Name) -and (operatingsystem -like $operatingsystem) -and (Enabled -eq “True”) } -Properties * | Select -Expand Name IPv4Address)
#The number of days to designate computers working without interruption.
|
1 2 3 4 5 6 |
$days =4 #Get the work Write-Host "Computers that have worked for more than $days days will be flagged in " -NoNewline Write-Host "red" -ForegroundColor Red foreach ($PCnfo in $ADnfo) { $uptime=(get-date) – (gcim Win32_OperatingSystem -ComputerName $PCnfo).LastBootUpTime |
The PowerShell function has access to those arguments it is running with, even if while defining this function, you didn’t set formal parameters. All the arguments the function was started with are automatically stored in the $(name) variable. In other words, there is an array of function parameters set upon function start stored in the $(name) variable. In PowerShell, like in most of the programming languages, you can set the list of formal parameters in the function description, which values will be replaced with the values of actual arguments while executing the function. The listing of formal parameters should be set in braces after the function name. Let’s define, for example, the function Sum, to establish the sum of two arguments: The example of working with arguments
PS C:\> Function Sum ($Addend1, $Addend2) {$Addend1+$Addend1}
While calling the Subtract function, its formal parameters will be replaced with actual arguments, defined either according to its position in the command line or by its name. The example of the Sum function:
PS C:\> sum 8 -12 -4
When you are listing the arguments, you can use the names of formal parameters (order is not important). The example of the Sum function: rearrangement of arguments
PS C:\> sum -Addend1 8 -Addend2 -12 -4 PS C:\> sum -Addend2 -12 -Addend1 8 -4
Information’s output about the function of working. The listing of Get-ADPCInfo function 1.6. function’s output
“~~~~~~~~~~~~~~~~~~~~~~~~~~~~~~~~~~~~~~~~~~~~~~”
|
1 2 3 4 5 6 7 8 9 10 11 12 13 14 15 16 17 18 19 20 21 22 |
If ($uptime.Days -gt $days) { Write-Host $PCnfo -foregroundcolor Red -NoNewline Write-Host " Overdue for Reboot" -ForeGroundColor Cyan Write-host "IP Address: " -foregroundcolor Yellow -NoNewline Write-host $PCnfo.IPv4Address Write-host "UpTime: " -foregroundcolor Yellow -NoNewline Write-host $uptime.Days "Days " -NoNewline Write-host $uptime.Hours "Hours " -NoNewline Write-host $uptime.Minutes "Minutes " } else{ Write-Host $PCnfo -foregroundcolor Green Write-host "IP Address: " -foregroundcolor Yellow -NoNewline Write-host $PCnfo.IPv4Address Write-host "UpTime: " -foregroundcolor Yellow -NoNewline Write-host $uptime.Days "Days " -NoNewline Write-host $uptime.Hours "Hours " -NoNewline Write-host $uptime.Minutes "Minutes " } } } #end function |
The Write-host cmdlet customizes the command’s output. You can also set the color of the text with the ForegroundColo parameter. You can find more details up here. 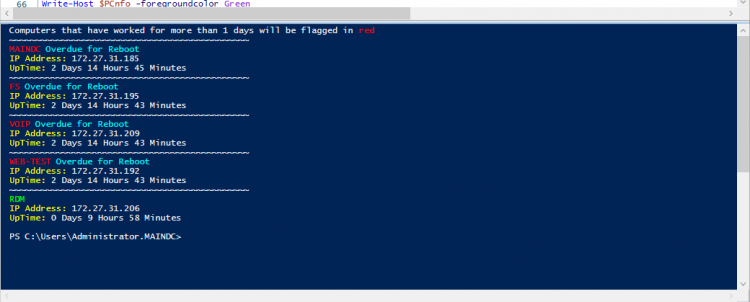 The listing of Get-ADPCInfo function
|
1 |
function Get-ADPCInfo { |
|
1 |
<# .SYNOPSIS Network computers info Get-ADPCInfo is an advanced Powershell function. It shows the Name, IP address, uptime of all enabled domain joined computers and Windows servers. .DESCRIPTION Uses IF for sorting, by operating time of computers and servers It is possible to specify the desired time for delay to reboot - $toolong. You can also sort by computer name or by installed operating system using Parametr -Name 'like' -Operatingsystem 'like' .PARAMETER Name - you can specify a selection by computer name .PARAMETER Operatingsystem - you can specify a selection by computer operating system .EXAMPLE Get-ADPCInfo .EXAMPLE Get-ADPCInfo -name Lab* .EXAMPLE Get-ADPCInfo -operatingsystem *serv* #> |
|
1 2 3 4 5 6 7 8 9 10 11 12 13 14 15 16 17 18 19 20 21 22 23 24 25 26 27 28 29 30 31 32 33 34 35 36 37 38 39 40 41 42 43 |
param ( [Parameter (Mandatory = $false)] [string] $Name = "*", [Parameter (Mandatory = $false)] [string] $Operatingsystem = "*" ) #Clear the workspace clear #What do functions do if there is an error $ErrorActionPreference = "silentlycontinue" #Loading the module AD so that it becomes available for use Import-Module ActiveDirectory $ADnfo = (Get-ADComputer -Filter { (ObjectClass -eq "Computer") -and (Name -like $Name) -and (operatingsystem -like $operatingsystem) -and (Enabled -eq "True") } -Properties * | Select -Expand Name IPv4Address) #The number of days to designate computers working without interruption. $days=4 #Get the work Write-Host "Computers that have worked for more than $days days will be flagged in " -NoNewline Write-Host "red" -ForegroundColor Red foreach ($PCnfo in $ADnfo) { $uptime=(get-date) – (gcim Win32_OperatingSystem -ComputerName $PCnfo).LastBootUpTime "~~~~~~~~~~~~~~~~~~~~~~~~~~~~~~~~~~~~~~~~~~~~~~" If ($uptime.Days -gt $days) { Write-Host $PCnfo -foregroundcolor Red -NoNewline Write-Host " Overdue for Reboot" -ForeGroundColor Cyan Write-host "IP Address: " -foregroundcolor Yellow -NoNewline Write-host $PCnfo.IPv4Address Write-host "UpTime: " -foregroundcolor Yellow -NoNewline Write-host $uptime.Days "Days " -NoNewline Write-host $uptime.Hours "Hours " -NoNewline Write-host $uptime.Minutes "Minutes " } else{ Write-Host $PCnfo -foregroundcolor Green Write-host "IP Address: " -foregroundcolor Yellow -NoNewline Write-host $PCnfo.IPv4Address Write-host "UpTime: " -foregroundcolor Yellow -NoNewline Write-host $uptime.Days "Days " -NoNewline Write-host $uptime.Hours "Hours " -NoNewline Write-host $uptime.Minutes "Minutes " } } } #end function |
Roughly speaking, each function can be divided into 3 parts. 1. Function description for help PowerShell «Get-Help». 2. The work of the function (defining variables, filters, arrays); 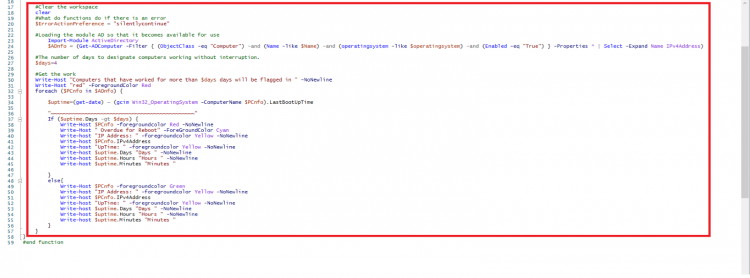 3. Function result’s output.
Saving the Script!
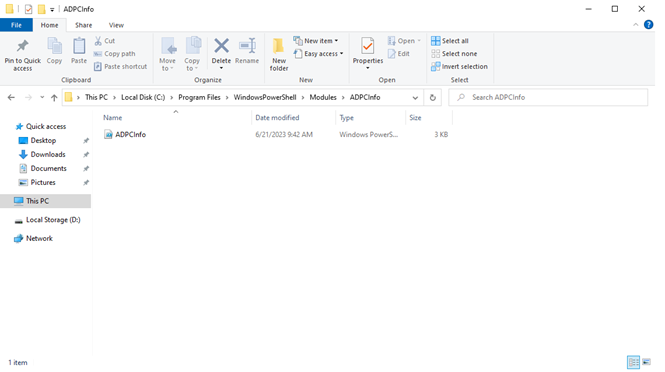
All the commands listed below you need to run in PowerShell as administrator. Now, we need to save this script so it would become available as a module. It would be best if you created a file directory with the script name in C:\Program Files\WindowsPowerShell\Modules. and save the script as PSM1.
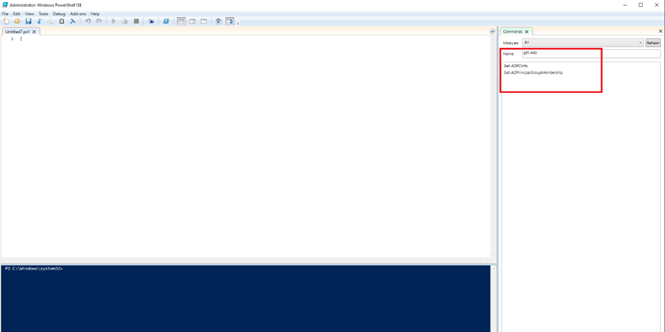
After that, this function will be available to you every time you run PowerShell.
 Importing module on another computer
If the module is introduced as a file directory, you’ll need to copy it to the computer so that you could import it into Windows PowerShell. Usually, modules are installed automatically. In Windows PowerShell, for example, there are several built-in modules. In Windows Server, you can use Add Features Wizard (Service Manager) to install selected features automatically. Lots of modules come along with the installation program that installs the module. To install the module, do the following: The current user needs to put the directory with the module to “Modules” in C:\Users\%UserName%\Documents\WindowsPowerShell\Modules. If there isn’t one, you should create it with the command in PowerShell: Creating a directory for the current user
new-item -type directory -path $home\Documents\WindowsPowerShell\Modules
All users will need to copy the directory with the module to “Modules” in C:\Program Files\WindowsPowerShell\Modules. To make sure that the PowerShell did recognize the copied module, in the Windows PowerShell command-line, write the following command: Getting the list of installed modules
get-module –listAvailable
To import the modules into the current session from their default location, use the following command format: import-module <name_module> Importing module
import-module ADPCInfo
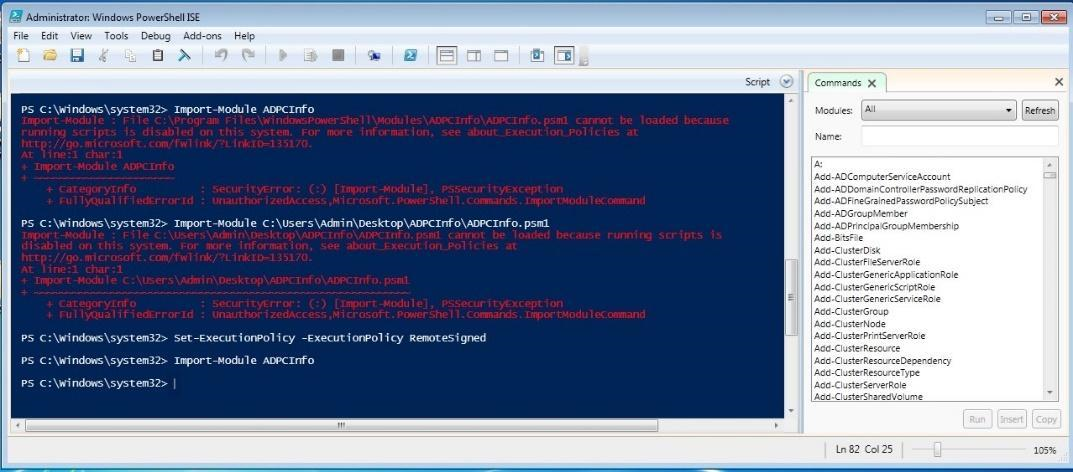
While importing the module, you can receive the notification from the PowerShell Security Policy. To solve this problem, you can set the PowerShell Execution Policy, which will allow executing scripts from the other sources (even the script created on the machine from the same network won’t work). Set the Execution Policy
Set-ExecutionPolicy -ExecutionPolicy RemoteSigned
Find more details here.
Conclusion
In this article, I tried to write one of the simplest functions and show you a part of the possibilities that PowerShell can offer! It’s neither perfect nor wholly self-sufficient but it’s working. And it’s useful. I hope that my advice and solution will help you!
This material has been prepared in collaboration with Vladyslav Savchenko Pre-sales Engineer at StarWind, and Viktor Kushnir, Technical Writer with almost 4 years of experience at StarWind.


