

We have already established in the first part that HCX supports the following types of data migrations:
- Cold migration – this one is used for the migration of powered off virtual machines via NFC
- Bulk Migration – this is actually built-in vSphere Replication
- vMotion – the very same vMotion you have been using in vSphere
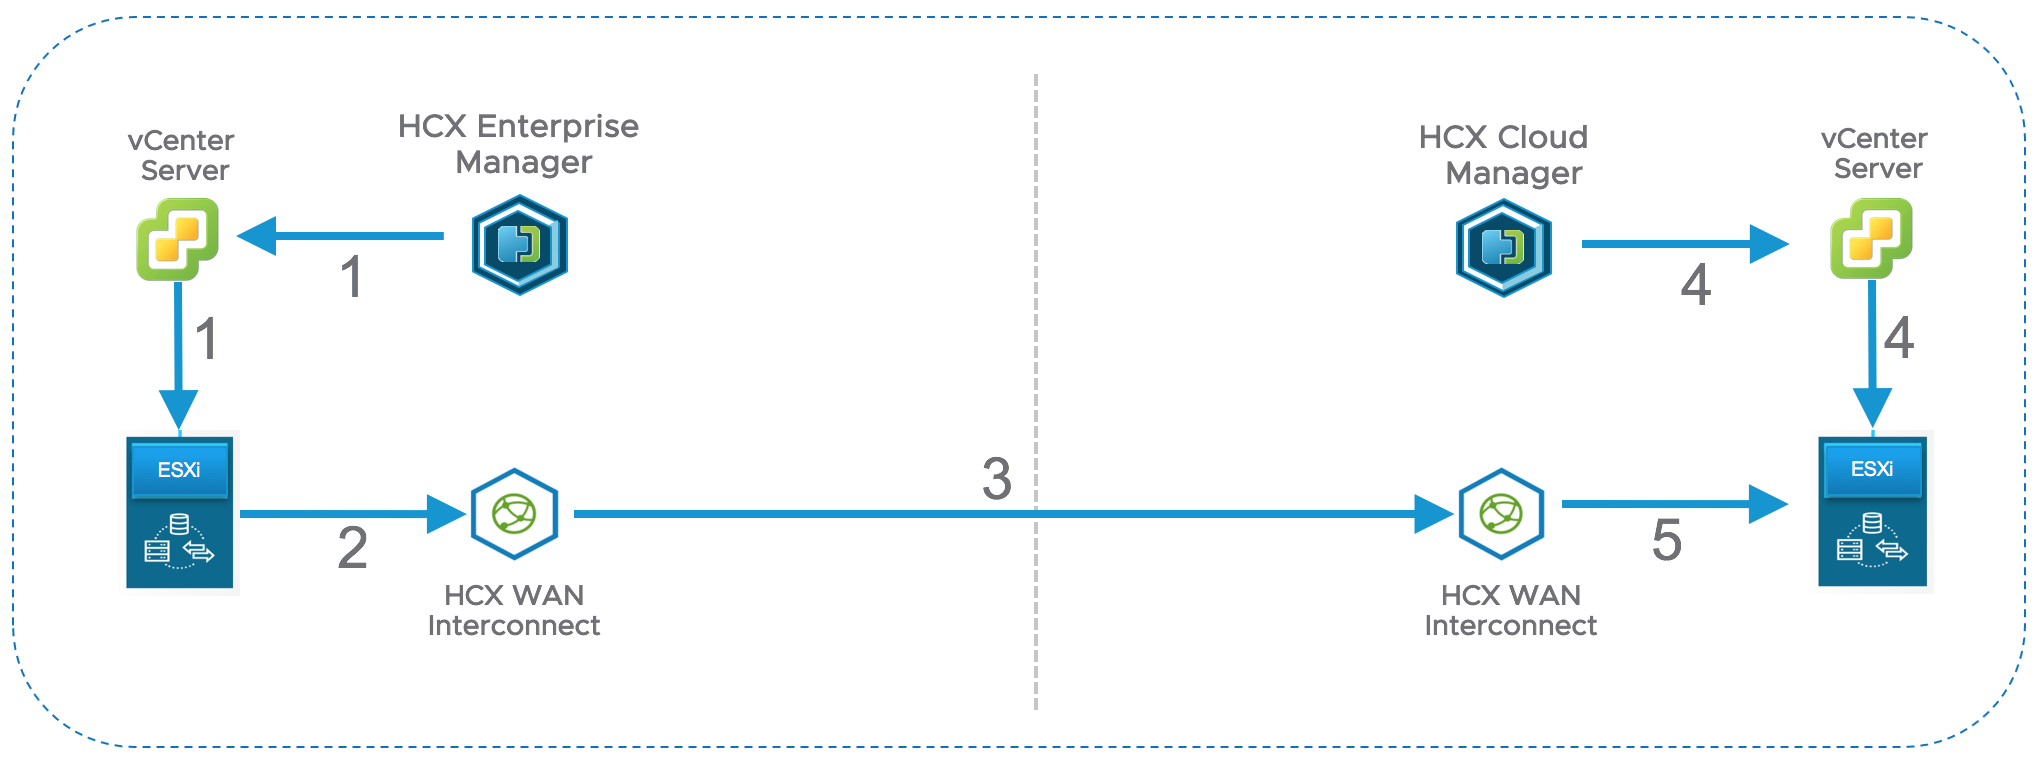
If you ever worked with vSphere, you definitely used at least one of those. However, in HCX they are used with Secure Proxy. All migration traffic is proxied via HCX WAN Interconnect appliance (WAN-IX). Deployed WAN-IX simulates new ESXi host under local vCenter. You can actually see it in the Web Client inventory. From the point of view of vCenter and other ESXi host the WAN-IX is just another regular host. Here is how Secure Proxy works:
- HCX Enterprise Manager initiates local vMotion migration task via vCenter Server
- The source ESXi host is instructed to send vMotion traffic to the fake ESXi host emulated by WAN-IX appliance.
- The source WAN-IX sends traffic to the destination WAN-IX
- HCX Cloud Manager creates vMotion tasks via destination vCenter server
- vMotion traffic is sent from local WAN Interconnect to the destination host
This technique provides the following significant benefits:
- There is no need to enable L3 vMotion to allow the vMotion traffic reach the destination site. Very often, companies use one large L2 subnet for vMotion traffic and that subnet is normally not even routable. To allow L3 vMotion traffic between sites without HCX you would need to update the routing network configuration first and then reconfigure all ESXi hosts in both sites to enable L3 vMotion. On top of that you will need to allow TCP/902 and TCP/8000 between all ESXi hosts. That’s a lot of changes for production environment. With HCX you will only need to allow TCP/443 between WAN Interconnect hosts for the migration traffic.
- Management IP addresses of vSphere environments don’t have to be unique in source and destination environments. That is because all migration traffic is proxied. From the ESXi servers’ perspective the migration traffic is always local, and they are not aware about ESXi hosts on the other side.
The Secure Proxy applies to all migration techniques.
The established IPSEC tunnel between WAN Interconnect appliances have the following functions:
- Secure, suite B AES 256 encryption-based connectivity which protects sensitive migration data
- Intelligent traffic engineering, and load balancing between public and private links ensures efficient usage of all available bandwidth
- Application aware traffic engineering and control. Fair distribution of traffic based on load.
- Jumbo Frames support via IPsec fragmentation
Network Stretching is amazing with HCX. Couple of clicks on the portgroup you want to stretch and HCX will automatically create a logical switch in the destination site and will bridge it with source portgroup. It is that simple.
Each Network Stretching appliance supports up to 4-6 Gbps per VLAN, but can be scaled up by additional appliances. It ought to be noted that network stretching is supported with vDS and N1Kv switches only.
Currently, there is no way to predict the migration performance due to so many factors this process depends on, e.g. network and storage performance, size of VMs, migration technique, deduplication and compression ratio, etc.
The migration task can include hundreds of VMs, however, when using vMotion only 2 vMotion tasks will run concurrently.
Now let’s quickly have a look at the HCX pre-requisites. The full list of requirements can be found in the official documentation, but I would like to show you a few diagrams to emphasize how simple the HCX requirements are.
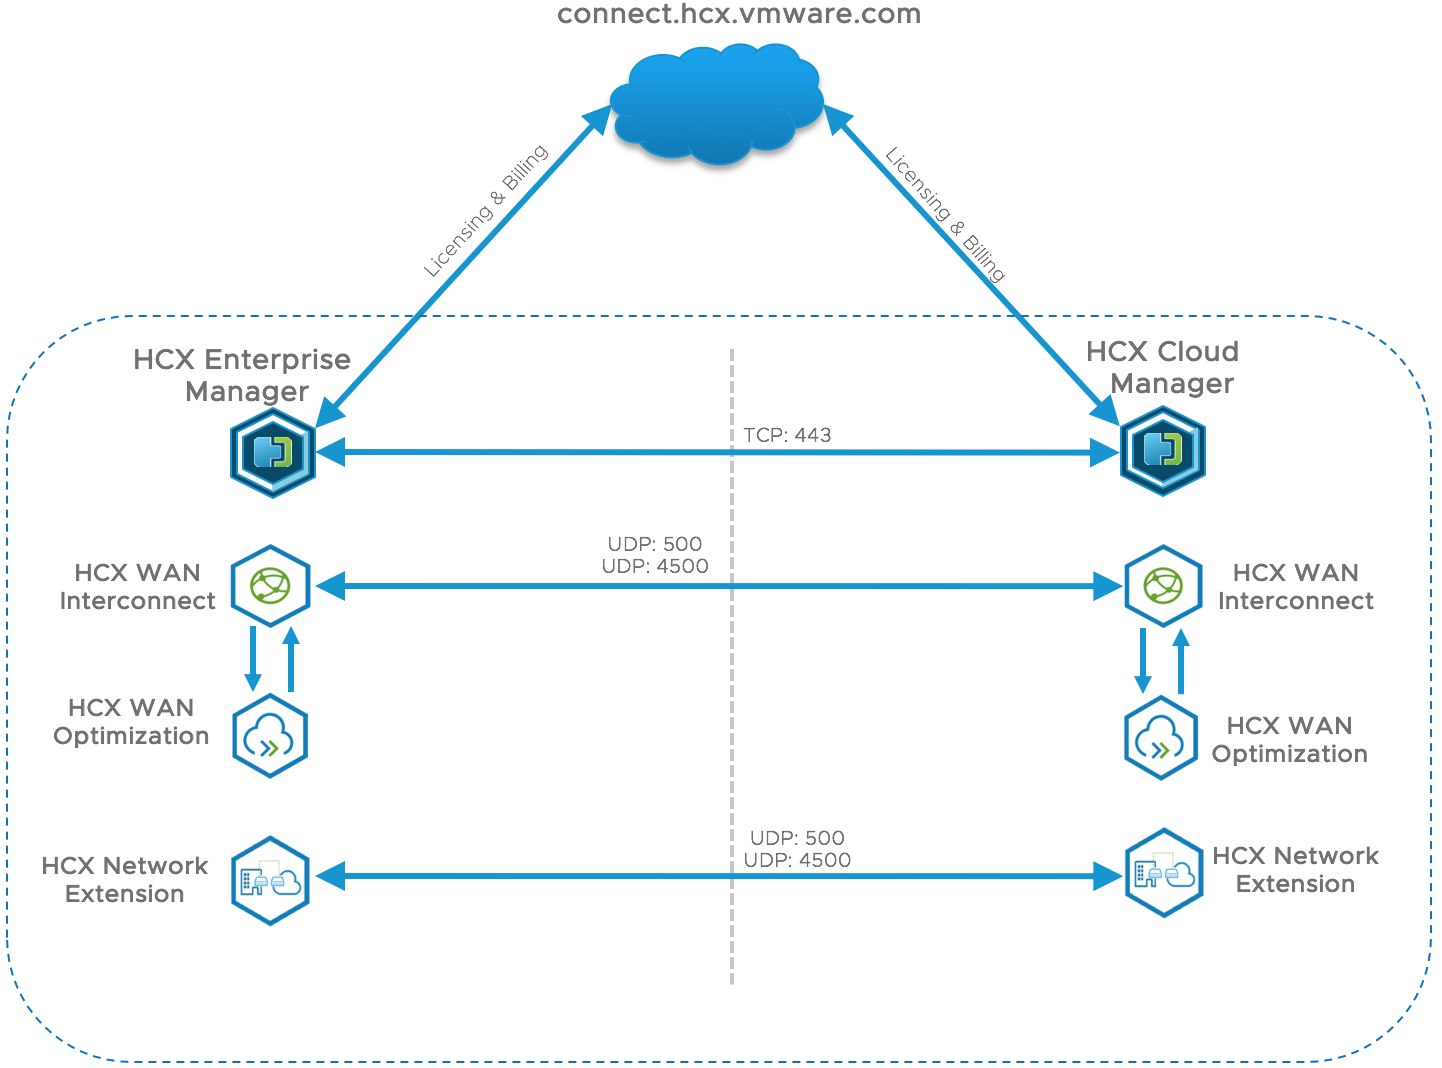
On the diagram above you can see the WAN traffic flows used by HCX:
- HTTPs traffic between HCX Managers is used to pair environments and to coordinate migration activities.
- HCX Communication to the cloud is required for product activation and will ensure that the latest updates are applied. It does not have to be a direct connection, so you can use proxy server.
- IPSEC tunnel between WAN Interconnect appliances carries all the migration traffic.
- IPSEC tunnel between Network Extension appliances creates bridged multi-gigabit network segments
LAN traffic flows are bit more complicated, but generally it is easier to get network ports open in firewalls for local traffic that doesn’t cross the borders of datacenter.

One last thing about requirements I would like to stress out – HCX is decoupled from vSphere version. Your source vSphere can be as old as version 5.1 and the destination site can run on vSphere 6.7. The requirements for identical versions can be a deal breaker for many migration solutions and that’s where HCX shines.
Once all the installation pre-requisites are completed it is time to proceed with deployment. For on-prem to on-prem topology HCX deployment always starts with destination environment.
- First, you have to deploy HCX Cloud Manager. This is a well-known OVA deployment process. The OVA wizard will prompt for a minimal amount of info to get the appliance going, e.g., IP address information.
- After successful deployment, the HCX Manager has to be activated and registered with local vCenter and NSX Manager servers. You may need to configure proxy server settings to enable activation
- Upon successful activation, HCX Cloud Manager will generate a URL to download OVA of HCX Enterprise Manager.
- During the configuration you will need resource pools, network portgroups and IP Address ranges for HCX WAN Interconnect and Network Stretching appliances in the destination site.
The actual appliances will be deployed later when deployment workflow is triggered from the HCX Enterprise at the source site.
- Next step requires pairing of HCX Managers. Since the HCX Web Client Plugin is installed on the source site only all further HCX operations will be run from there.
- Once managers are successfully paired proceed with the deployment of HCX appliances. The important thing to notice here is that you will only be deploying the appliances on the source site. The HCX will deploy the peering appliances on the destination site automatically for you based on the configuration created in previous steps.
- Only WAN Interconnect appliance is mandatory for installation. The deployment of WAN Optimization and Network Stretching appliances are optional
- If everything went well, you will see all appliances deployed and tunnels established.
Few words about monitoring of HCX. The HCX Web Client Plugin allows limited real-time monitoring capabilities, such as checking the state of appliances, tunnels and the migration jobs’ progress. However, there are no vCenter alerts available for HCX.
So, you best option would be vRealize Operations management package for HCX to ensure monitoring and in-depth analysis of the product behaviour.
Another thing that may cause some confusion. There are two offerings of the product on the market now. First one is the Hybrid Cloud Extension which is positioned for cloud onboarding. With HCX you only get to deploy and manage the source part of the HCX solution. The HCX Cloud components are looked after by cloud provider. The customer is billed monthly for each instance of HCX Enterprise Manager and for each migration event.
NSX Hybrid Connect is positioned for on-prem to on-prem topologies. The product is licensed as part of NSX Enterprise Plus suite. The license is required at destination site only and covers single source and single destination site. However, if you want to have more than one source site paired with destination site there is a monthly fee for each additional source HCX.
There is no mistaking the fact that HCX will be leading migration tool on the market, but it is not perfect yet and has its pros and cons:
Pros:
- Simple and quick deployment, minimal requirements
- It is decoupled from vSphere version. As long as you run vSphere 5.1 or newer you don’t need to upgrade vSphere. This saves months of upgrade efforts and minimizes all the risks associated with the upgrade process.
- Secured Migration over WAN, private lines and Internet with built-in high-throughput and enterprise grade encryption.
- Automated network stretching
- Allows to run infrastructure-led migrations with minimal involvement of the application teams
- RestAPI is available day 1
Cons:
- Not possible to customize migration workflows, e.g. additional steps like custom script cannot be inserted into the migration process like in SRM Recovery Plans.
- No application native HA. The solution relies on the vSphere HA only. It takes only 12 seconds for a failed HCX appliance to boot, but that may not meet business requirements of mission critical applications.
- PowerHCX module is in not available. Therefore, configuration of migration task is mostly a manual process.
- No traffic isolation on the source site. Migration and Management traffic are flowing through the same vNIC of WAN Interconnect appliance.
There are many HCX features that I didn’t have time to explore and test yet. There are more technical details to talk about for the features I have covered and there is so much more coming soon. Future is bright for NSX. Stay tuned.
