What is Microsoft Graph?
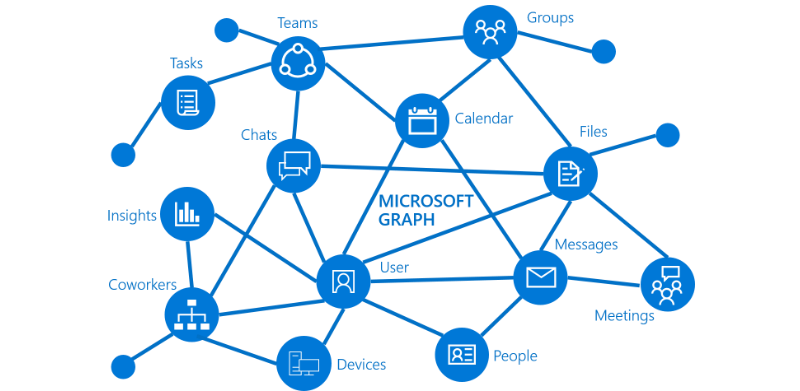
Microsoft Graph exposes REST APIs and client libraries to access data on the following Microsoft 365 services:
- Office 365 services: Delve, Excel, Microsoft Bookings, Microsoft Teams, OneDrive, OneNote, Outlook/Exchange, Planner, and SharePoint
- Enterprise Mobility and Security services: Advanced Threat Analytics, Advanced Threat Protection, Azure Active Directory, Identity Manager, and Intune
- Windows 10 services: activities, devices, notifications
- Dynamics 365 Business Central
What Is Microsoft Graph Explorer?
Microsoft Graph Explorer is a web-based tool that helps you build and test queries in order to interact with Microsoft resources. So, in this post, I will use it to manage data. You can access to Microsoft Graph Explorer from this link: https://developer.microsoft.com/en-us/graph/graph-explorer#

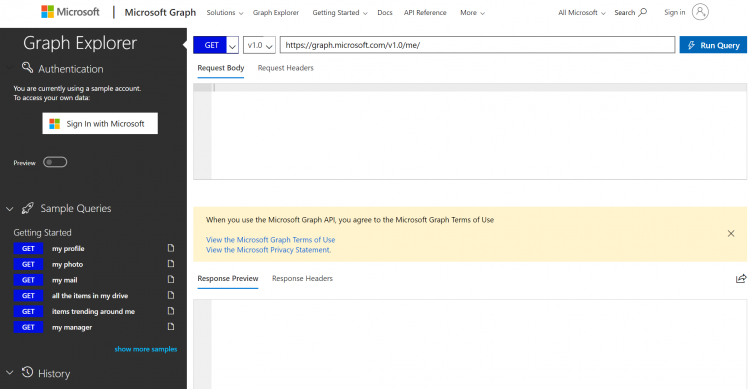
The first thing you need to do is to sign in with your account in order to access your own data. If you use Graph Explorer without your account, you will use the demo data. So click “Sign in with Microsoft”.

The following part allows you to interact with your Microsoft resources. It can be divided in three parts:

First, you can choose the action you want to perform:

- GET: Read data from a resource.
- POST: Create a new resource or perform an action.
- PUT: Replace a resource with a new one.
- PATCH: Update a resource with new values.
- DELETE: Remove a resource.
Next, you can select the API version you want to use:

- V1.0 : Includes generally APIs. You can use this version for all production apps.
- Beta : Includes APIs that are currently in preview. Microsoft recommends to not use beta APIs in production.
Then, there is the resource field which always starts with: https://graph.microsoft.com. This field allows you to insert the resource you want to manage. Below is the link that will be used:
- Graph link + API version + Resource link
For instance, the full resource link could be:
https://graph.microsoft.com/v1.0/me/drive/recent
The following textbox allows you to enter the new value to create or the date you want to update.

The following textbox will display data or error messages:

Let’s start by running the following query to display your information:
https://graph.microsoft.com/v1.0/me/

You can use sample queries on the left side by clicking “show more samples”, then turn on/turn off the sample categories you want to use:

Sometimes you can see the following error message:

This error means that you need specific permissions in order to use this query. Let’s see how to manage these permissions.
The first step is to check the documentation page https://docs.microsoft.com/en-us/graph to identify the permissions you have to allow. In my case, I want to read my OneNote notebooks:

The second step is to click “modify your permissions” in the error message in order to enable the permissions:

After applying the permissions, you need to log in again to refresh the permissions in Graph Explorer. Run the query to confirm that you can access your OneNote notebooks:

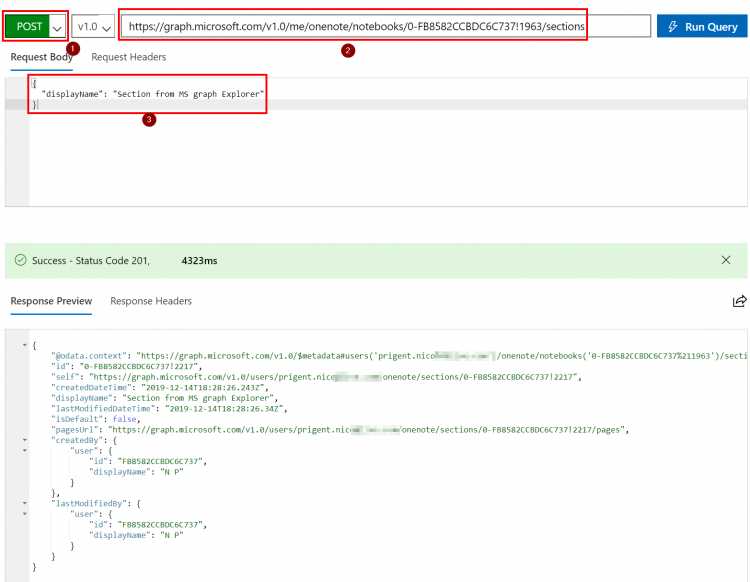
Copy the OneNote Notebook ID in order to create a new section:
- Select the POST action, because we want to create a resource
- Paste the following link: https://graph.microsoft.com/v1.0/me/onenote/notebooks/<ID>/sections and modify the ID
- Enter the name of the new section that will be created in the “Request Body” textbox.

Let’s check my OneNote and confirm that a new section named “Section from MS graph Explorer” is visible:

Conclusion
Thanks to the Graph API, we can very easily interact with the Microsoft resources. In this guide, I worked with OneNote, but a useful use case could be to interact with Microsoft Teams in order to create a new Teams/Channel, to add a member, and so on …
To finish, you can of course interact with the Graph API from your code as described on the following picture:


