

Introduction
Dell EMC introduced support for NVDIMM-N with their 14th generation of PowerEdge servers. NVDIMM-N is one of the variants of Persistent Memory (PMEM).
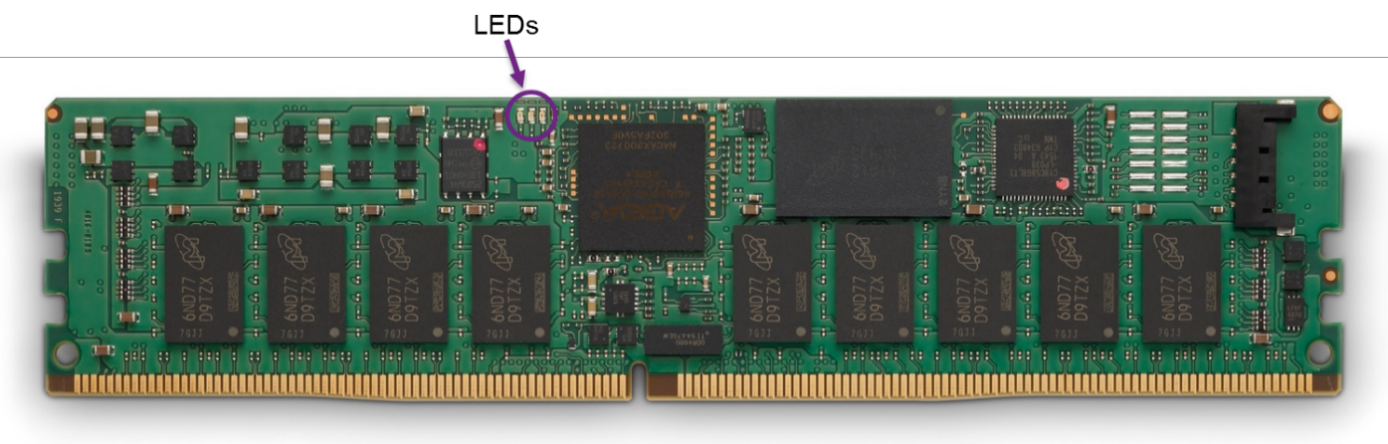
Microsoft also uses the term Storage Class Memory, not exactly the same as NVDIMM variants, but it is used in naming the bus driver on Windows. In essence, it is Non-Volatile DIMM (NVDIMM) which means it retains its data even when the system suffers unexpected power loss, a crash (BSOD) or a shutdown/restart., system crash etc. NVDIMM-N modules have a battery pack to help achieve this (like a storage controller) and has flash storage to persist the data.

An NVDIMM-N module sits in a standard CPU Memory slot. A lot closer to the CPU than any disk type has ever been. This way we get the benefits of memory (very high speed, very low latency) combined with the benefits of memory.
Hyper-V and NVDIMM-N
Both VMware and Microsoft are heavily investing in ever better storage performance. Both in the virtual disks as for their HCI storage offerings. VMware introduced support for NVDIMM-N from vSphere ESXi 6.7. Microsoft brings support for NVDIMM-N mainstream with Windows Server 2019 LTSC. With SAC build they can deliver features faster but for the use case of virtualization/HCI, LTSC is the branch we’re interested in. We can use NVDIMM-N with S2D or present it to VMs directly to be used with either DAX or block access depending on the need of your workloads.
As you know I tend to invest in cost-effective, high-value ways to let Hyper-V shine when it comes to performance and as such this capability is something I have to investigate. Just like most of you, I am a novice at this technology. So, we are going on an adventure.
The first step is configuring NVDIMM on the server
Before we can leverage the NVDIMM-N modules we need to configure them for that use case in the BIOS settings. We make sure we have updated the BIOS and all firmware to the latest and the greatest. The same goes for the drivers and Windows Server updates.
Boot into the BIOS and navigate to System Setup / System BIOS / Memory Settings / Persistent memory.

In that menu make sure your settings are as listed below.
- Persistent Memory has to be set to Non-Volatile DIMM, not Off. That makes sense.
- NVDIMM Read-Only has to be disabled.
- Persistent memory Scrubbing is set to auto.
- NVDIMM Factory Reset and Secure Erase All Dimms is disabled.
- NVDIMM Interleave is disabled or enabled. We’ll start with disabled.
- The Battery Status should read “Present-Ready”.

You back out and it will ask to save any changes. When the server has rebooted, we will find the NVDIMM-N modules in “Device Manager” under Memory devices. The number there depends on how many you have in your server. It speaks for itself that if you did not enable them in the BIOS no NVDIMM-N devices will be shown. These are the physical devices in your server memory slots.

What if my NVDIMM battery is dead or set as read-only (BIOS)?
Windows Server 2019 will still function and be able to read and write data. But when restarting, crashing or power loss the data is lost. If you want the OS to mark the NVDIMMs as read-only in these cases you need to create a registry DWORD value under HKLM\System\CurrentControlSet\Services\pmem called ReadOnlyOnPersistenceLoss with a value of 1.

How to use NVDIMM-N modules in Windows
In Windows Server 2019 we have support for label and namespace management. This basically means that clean NVDIMM-N modules are will not show up as usable disks by default. You have to create those. That’s why you don’t see the logical persistent memory disks until you configure them. Once you’ve done that you can bring them online, initialize them and format them. To get started with this we use PowerShell. Let’s look at that. We run Get-Command -Module PersistentMemory and list the available cmdlets.

An overview:
- Get-PmemDisk. This returns all or the specified logical persistent memory disks. It provides information on size, atomicity type, health status, and underlying physical devices. On a fresh install, you’ll find none as these have to be created by you. We’ll do that later.
- Get-PmemPhysicalDevice. This returns all or the specified physical persistent memory devices in your server (NVDIMMs). These are the physical memory devices you see in device manager
- Get-PmemUnusedRegion: Returns all PMEM regions available for provisioning a logical PEMEM disk. Note that when you have on interleaving all NVDIMMs are listed individually. When you use interleaving, the multiple NVDIMS per processor, combine into one or more usable regions
- Initialize-PmemPhysicalDevice. This resets the device. It will zeros out the labels and rebuild the Storage Class Memory (SCM) stack. This is the last resort kind thing when things have gone wrong and you want to start over. You will normally not use this often.
- New-PmemDisk. This cmdlet creates a new logical persistent disk out of a given unused region. It writes the labels to create the namespace then rebuilds the SCM stacks to expose the new logical device. One thing to note here is that we can select an atomicity type here: node (default) or BlockTranslationTable which protects against sector tearing by providing atomicity. Now MSFT seems to support this with both DAX as block-level use cases but this is a point of discussion in the industry. I’m hoping to see more guidance on this by MSFT when it makes sense and when not.
- Remove-PmemDisk. This removes a logical persistent memory disk. It also deletes the namespace’s labels and then rebuilds the SCM stacks to remove the logical device. The physical device is then available to create a new logical PMEM disk with.
Creating a logical PMEM disk
First, we list the physical memory devices with Get-PmemPhysicalDevice

We see six, which corresponds to the 6 we have in the host. This corresponds to what we saw in “Device Manager” for Memory Devices.
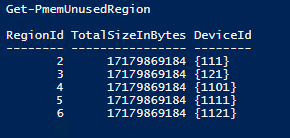
We then list the usable regions to create logical PMEM disks with via Get-PmemUnusedRegion

Again, we see six as we are not using interleaving, so each region contains 1 PMEM physical device, an NVDIMM-N module. We will use all of these to create 6 logical PMEM disks. But before we do so we run Get-PmemDisk to see there are none yet.
We now create just one using New-PmemDisk -RegionId 1 -AtomicityType None
Now let’s run Get-PmemUnusedRegion and Get-PmenDisk again. You see we have one less unused region than before …
… and we see one PMEM disk

We then create PMEM disk from the other 6 unused regions and voila we now have 6 disks at our disposal. Be patient this takes a while.

List all PMEM Disks

Note that once you have created a PMEM disk for all available physical devices you’ll have no more unused regions. Running Get-PmemUnusedRegion returns nothing at this point. As we have consumed all the available regions.
In “Device Manager” we see the Persistent memory disks. I did note that friendly naming doesn’t seem to be working properly, so I did not bother to use it.

These persistent memory disks are now available to the OS the bring online, initialize and format (as DAX) storage on which we can create Hyper-V .vhdpmem virtual disks. We’ll write about that later on.
Interleaving
Didier, I need more space than that miserly 16GB. Hold on, hold on, we’ll get you there. Within reason for now until we get larger NVDIMMs. Also, note you can split up a log file in SQL Server to help deal smaller disks.
Windows Server 2019 also brings us support for NVDIMM-N node interleaving. This has the ability to enhance performance. The big gain here is when interleaving is done for NVDIMM across channels. The gain in performance for interleaving within a channel is less significant.
To enable it you boot into the BIOS Setup and navigate to System Setup / System BIOS / Memory Settings / Persistent memory and change interleaving to enabled.

You’ll get a warning this will delete all data. No worries. We already deleted the logical PMEM disks on the host to make sure we don’t run into issues when the regions their layout changes. If anything worth saving was on there, you must have a backup somewhere, somehow you can restore.

When you save these changes and reboot, you’ll see that from the Memory Devices point of view nothing has changed, there are still six. But look at Get-PmemUnusedRegion and you’ll see 2 regions now each consisting of 3 physical PMEM devices.

Great more space when we create a logical PMEM disk out of those! That made my DBA’s a bit more enthusiastic and they now started envisioning larger log or temp DB LUNs for their SQL Server VMs.
So let’s create logical PMEM disks out of the unused regions. I’m using Block Translation table now for Atomicity type.
|
1 |
Get-pmemdisk | New-PmemDisk -AtomicityType BlockTranslationTable |

We run Get-PmemDisk

As you see we have 2 logical PMEM disks each consisting out of 3 physical NVDIMM-N modules thanks to interleaving.
In device manager, this looks as below. Note it states the persistent memory disks are interleaved.

A little warning. Interleaving is not offering protection against a failed NVDIMN-N module. So, if you lose 1 out of 3 the data is lost. There is no “mirroring” or “RAID” here. Just so you know. Now there are ways to protect against that when you leverage them for S2D or inside of a VM that that is beyond the scope of this article. By the way, this is the way to create bigger NVDIMM persistent logical disk for use with S2D as well. By having multiple of those, you can have redundancy, just like you would with multiple NVMe disks.
Some other interesting observations
Note that a physical NVDIMM-N device is managed by the nvdimm.sys driver.

The logical PMEM disks are managed by the partmgr.sys and the pmem.sys driver.

The creation of NVDIMM-N physical devices and the logical PMEM disks are managed by the scmbus.sys bus driver for storage class memory. Again, the naming aggravates some people as SCM is a specific type of persistent memory and not the same as the NVDIMM variants but for all practical purposes, we know what is it and where it is used.

Conclusion
Well, that was our introduction to PMEM/NVDIMM/Storage Class Memory with Windows Server 2019 & DELLEMC generation 14 hardware. In our next article, we’ll expose the logical PMEM disks to Hyper-V VMs so we can make virtualized SQL Servers shine.
